FCC ID : BEJLT560L APPENDIX F : USER’S MANUAL
ENGLISH T560 Flat Panel Monitor User Guide
Second Edition (June / 2002) Note : For important information, refer to the Monitor Safety and Warranty manual that comes with this monitor. This publication could contain technical inaccuracies or typographical errors. Changes are made periodically to the information herein; these changes will be made in later editions. IBM may make improvements and/or changes in the product(s) and/or program(s) at any time.
Setup............................................................................................................................2 Hardware Requirements ......................................................................................2 Desktop Use ........................................................................................................2 VESA Mount Use .................................................................................................2 Handling Instructions .................
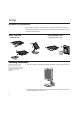
Setup Hardware Requirements This monitor requires a computer with a suitable on-board sub-system or Video Adapter card that can support XGA 1024 x 768, SVGA 800 x 600, or VGA 640 x 480 at 60Hz. Desk Top Use VESA Mount Use - REMOVE CLIP - Do Not Remove Clip Handling Instructions Do not support the monitor within the screen area. The Liquid Crystal Display is glass and can be damaged by rough handling or excessive pressure. 1. Lift the monitor by placing both hands under the lower part of the cover. 2.
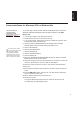
ENGLISH Monitor Installation Connecting your Monitor 1. Turn off your computer and all attached devices. 2. Connect the signal cable. The AC adapter and the analog signal cable are already connected to your monitor When connecting the analog signal cable (Figure A) Connect free end of the attached signal cable to the Dsub connector on the computer and tighten the screws.
Monitor Driver Installation Driver installation for Windows 95 or Windows 98 This section must be completed before continuing with the Windows95 or Windows98 Auto Setup on page 7. i On LCD monitors, unlike CRTs, a faster refresh rate does not improve display quality. IBM recommends using either 1024 x 768 at a refresh rate of 60Hz or 640 x 480 at a refresh rate of 60Hz. 3 To use the Plug and Play feature in Microsoft®Windows®95 or Windows 98, files should be loaded from the IBM Monitor CD. 1.
ENGLISH Driver Installation for Windows 2000 or Windows Me This section must be completed before continuing with the Windows2000 ,Windows Me Auto Setup on page 7. i On LCD monitors, unlike CRTs, a faster refresh rate does not improve display quality. IBM recommends using either 1024 x 768 at a refresh rate of 60Hz or 640 x 480 at a refresh rate of 60Hz. To use the Plug and Play feature in Microsoft Windows 2000 or Microsoft Windows Millennium Edition(Me) files should be loaded from the IBM Monitor CD.
Driver Installation for Windows XP This section must be completed before continuing with the Windows XP Auto Setup on page 7. i On LCD monitors, unlike CRTs, a faster refresh rate does not improve display quality. IBM recommends using either 1024 x 768 at a refresh rate of 60Hz or 640 x 480 at a refresh rate of 60Hz. 5 To use the Plug and Play feature in Microsoft Windows XP files should be loaded from the IBM Monitor CD. 1. Turn off the computer and all attached devices. 2.
ENGLISH Image Setup for analog input Auto Setup Before carrying out this section, it is very important that the correct monitor drivers have been installed.(See pages 3 and 5) For digital input, image setup is not required. i In order to optimise the displayed image a set-up utility is provided on the IBM Monitor CD. Operation of this utility is dependent on the operating system on your computer. You may choose to run AUTO SETUP for each operating system that you use.
Auto Setup for Windows 3.1, 95,Windows 98 or Windows 2000, Windows®Me, Windows XP or Windows NT i If the monitor is in standby mode (STANDBY ON), it may automatically turn off while you are waiting for it to warm up. 1. Turn on the monitor first; then the computer. If the message CHECK SIGNAL CABLE is displayed, or if nothing is displayed check: • that the video interface cable is not connected properly. • the correct video adapter card is not installed. 2.
ENGLISH Image Setup for DOS i If the monitor is in standby mode (STANDBY ON), it may automatically turn off while you are waiting for it to warm up. If this happens, switch off the monitor and switch it on again after a few seconds. 1. Turn on the monitor first; then the computer. i 2. 3. 4. 5. If you are using PC-DOS/V, change to U.S. mode by typing ‘CHEV US’ and pressing ENTER at the command prompt. You must use when you run DOS Auto Setup.
Manually adjusting the image settings i If the monitor is in standby mode (STANDBY ON), it might automatically turn off while you are waiting for it to warm up. Normally, you can complete the setup procedure using Image Setup, however, if your screen image is still distorted after you perform Image Setup or the setup CD does not run on your system, perform MANUAL SETUP. 1. Have your monitor turned on for about 15 minutes, until the monitor warms up. 2.
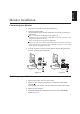
ENGLISH Ergonomic Considerations Workplace Preparation i This section gives advice on what you should consider before you set up your monitor. Height Position the monitor directly the top of the screen is slightly below your eye level when you sit at your workstation. Ergonomic It is recommended that in order to maintain an ergonomic and comfortable viewing position, the forward tilt angle of the monitor should not exceed 5 degree.
Adjusting the Monitor Position i With the IBM Flat Panel Monitor, you can adjust its position in various ways for maximum comfort. Tilt Range :-37°~145° You can tilt the screen backward and forward as shown below(Figure A). -37° +145° (Figure A) Height Range You can adjust height of the screen(Figure B). Maximum: 4.87 inch(123.8 mm) (Figure B) Landscape & Portrait This monitor offers the ability to rotate between landscape and portrait modes(Figure C).
ENGLISH VESA wall mounting (See page 19 for the details) Pivot Software Pivot software has been provided with your new monitor. This allows the image to be rotated through either 90˚, allowing the image to be viewed in landscape or portrait mode, see Figure C. Or rotated through 180˚, allowing a person opposite the user to view the image when tilted fully backwards in a landscape orientation, see Figure A.
Adjusting Your LCD Monitor User controls User control features Icon Monitor controls Switches the monitors on and off Display main OSD menu and selects highlighted menu item. and Moved the cursor to highlight icons or make adjustments. Exits from current OSD menu. i The image is already optimized for many display modes, however the user controls can be used to adjust the image to your liking. i The settings are saved after adjustment and when exiting the OSD and will be effective thereafter.
ENGLISH On-screen display (OSD) controls i The LCD monitor needs time to become thermally stable the first time you turn it on each day. Thus, to achieve more accurate adjustments for parameters, allow the LCD monitor to warm up (be On) for at least 15 minutes before making any screen adjustment. The settings adjustable with the user controls are viewed through the On Screen Display (OSD). Press the enter button [ ] to display the main OSD menu.
OSD Icon Description If manual is selected, the user will go to the manual adjustment screen. Sub-menu(s) Manual SETUP • Fine • Coarse IMAGE SET-UP CONT Select the Color Mode you find most comfortable and then fine tune the colors using the User Color Mode menu, if necessary. COLOR MODE COLOR Controls and Adjustments To adjust the focus of the display. This item allows you to remove any horizontal noise and clear or sharpen the image of characters.
ENGLISH OSD Icon RESET Description Sub-menu(S) Controls and Adjustments Reset should return all available functions • YES (apart from language which should not change unless adjusted via the • NO LANGUAGE menu) fo their factory presets. Moves the screen left and right . Is not availible with a digital input H-POSITION Moves the screen up and down.
Further Information Display modes i If your computer has previously been used with a CRT monitor and is currently configured to a display mode outside the range that the Flat Panel monitor can display, you may need to re-attach the CRT monitor temporarily until you have reconfigured the computer, preferably to 1024 x 768 at 60Hz. The display mode the monitor uses is controlled by the computer. Therefore, you should refer to your computer documentation for details on how to change display modes.
ENGLISH Power Management To benefit from power management, the monitor must be used in conjunction with a computer that implements the Video Electronics Standards Association (VESA) Display Power Management Signaling (DPMS) Standard. The power management feature is invoked when the computer recognizes that you have not used your mouse or keyboard for a user-definable period. There are several states as described in the table below.
VESA Wall Mounting Alternative mounting options for your IBM Flat Panel Monitor may be available from specialist suppliers. To attach the monitor to an arm or a surface of wall, please follow the instructions below: 1. Power off the monitor, and then disconnect the signal cable and the power cord from the monitor. (B) (A) (C) 2. Fold the monitor arm in the order of Figure (A), (B) and (C) as shown above. 3.
ENGLISH Troubleshooting If you have a problem setting up or using your monitor, you may be able to solve it yourself. Before calling your retailer or IBM, try the suggested actions that are appropriate to your problem. Problem Possible Cause Suggested Action Reference Connecting your Monitor section on page 3. Screen is blank and power indicator is off. No power to monitor. • Ensure that the electrical outlet and the monitor are both switched on.
Problem Possible Cause Screen is blank The monitor is not receving a and power video signal indicator is flashing green every 0.5 second Screen is blank and power indicator is flashing green every 0.5 or 1 second i For image problems, you may want to run AUTO SETUP again before consulting to this section. In most cases, AUTO SETUP can fix the problems. See Auto Setup for the computer on page 6 for details. Reference • Check that the signal cabel is firmly connected to the computer.
ENGLISH Further Help Machine Name – T560 Color Monitor Warranty Period – Three (3) Years See the IBM Statement of Limited Warranty included in this publication for IBM’s warranty terms and conditions. i If possible, stay by your computer. Your Technical Support Representative may wish to go through the problem with you during the call. The IBM Machine Warranty worldwide Web site at http://www-1.ibm.
Specifications DVI-D Connector (Digital) i The DVI - D(Digital Visual Interface - integrated) port supports digital signal inputs and also improves quality of the displayed image by eliminating poor video at the monitor source. Pin Signal(DVI-D) Pin Signal(DVI-D) 1. T. M. D. S. Data2- 16. Hot Plug Detect 2. T. M. D. S. Data2+ 17. T. M. D. S. Data0- 3. T. M. D. S. Data2/4 Shield 18. T. M. D. S. Data0+ 4. T. M. D. S. Data4- 19. T. M. D. S. Data0/5 Shield 5. T. M. D. S. Data4+ 20. T.
ENGLISH This color monitor (Type-model 6656-Hxx) uses a 15-inch TFT LCD. Full Up Position Folded Position W H Height: 17.158inch(435.8mm) Width: 14.379inch(365.2mm) Depth: 9.252inch(235mm) D D H Height: 3.406inch(86.5mm) Width: 14.379inch(365.2mm) Depth: 12.032inch(305.6mm) 7.7 kg (16.98 lbs) Weight Stand Range Tilt Range : Height Range : Rotate : -37° ~ 145° (Head) 4.87 inch(123.8 mm) 90˚ clockwise (L P) Image Viewable Image Size: Maximum Height: Maximum Width: Pixel Pitch: 15inch (381.
Display Mode Ranges Addressabillty Refresh Rate / Range ( + / - 3%) Horizontal Frequency / Range ( + / - 3%) 640 x 350 67.9 ~ 72.1 Hz 30.56 ~ 31.45 kHz 720 x 400 67.9 ~ 72.1 Hz 30.56 ~ 31.45 kHz 640 x 480 58.2 ~ 61.8 Hz 30.56 ~ 31.45 kHz 640 x 480 64.0 ~ 68.0 Hz 34.95 ~ 36.05 kHz 640 x 480 72.8 ~ 77.3 Hz 36.38 ~ 38.63 kHz 800 x 600 54.3 ~ 57.7 Hz 34.14 ~ 36.26 kHz 800 x 600 58.2 ~ 61.8 Hz 36.76 ~ 39.04 kHz 800 x 600 69.8 ~ 74.2 Hz 46.66 ~ 49.54 kHz 800 x 600 72.8 ~ 77.3 Hz 45.
Compliances This equipment has been tested and found to comply with the limits for a Class B digital device, pursuant to Part 15 of the FCC Rules. These limits are designed to provide reasonable protection against harmful interference in a residential installation. This equipment generates, uses, and can radiate radio frequency energy and, if not installed and used in accordance with the instructions, may cause harmful interference to radio communications.
IBM power cords for a specific country or region are usually available only in that country or region.
IBM power cord part number 13F9939 02K0545 36L8879 Used in these countries or regions Australia, Fiji, New Zealand, Papua New Guinea China Argentina, Paraguay, Uruguay Industry Canada Class B emission compliance statement This Class B digital apparatus complies with Canadian ICES-003. Cet appareil numérique de la classe B respecte toutes les exigences du Réglement sur le matériel brouilleur du Canada.
What does labeling involve? This product meets the requirements for the TCO’95 or TCO’99 scheme which provides for international and environmental labeling of personal computers.
Mercury** Mercury is sometimes found in batteries, relays and switches. The relevant TCO’99 requirement states that batteries may not contain any mercury. It also demands that mercury is not present in any of the electrical or electronics components associated with the labeled unit. There is however one exception. Mercury is, for the time being, permitted in the back light system of flat panel monitors as there today is no commercially available alternative.
MPRII This product complies with Swedish National Council for Metrology (MPR) standards issued in December 1999 (MPRII) for very low frequency (VLF) and Extremely low frequency (ELF) emissions. Electronic emission notices Hinweise Gemäß der Amtsblätter des BMPT Nm. 61Ú1991 und 6Ú1992 wird der Betreiber darauf aufmerksam gemächt, daß die von ihm mit diesem Gerät zusammengestellte Anlage auch den technischen Bestimmungen dieser Amtsblätter genügen muß.
IBM ne peut accepter aucune responsabilité pour le manquement aux exigences de protection résultant d’une modification non recommandée du produit, y compris l’installation de cartes autres que les cartes IBM. Ce produit a été testé et il satisfait les conditions de l’équipement informatique de Classe B en vertu de CISPR22 / Standard européen EN55024:1998.
Este producto ha sido probado y satisface los límites para Equipos Informáticos Clase B de conformidad con el Estándar CISPR22 y el Estándar Europeo EN55024:1998. Los límites para los equipos de Clase B se han establecido para entornos residenciales típicos a fin de proporcionar una protección razonable contra las interferencias con dispositivos de comunicación licenciados.
Deutsche EMV-Direktive (electromagnetische Verträglichkeit) Dieses Gerät ist berechtigt in Übereinstimmung mit dem deutschen EMVG vom 9.Nov.92 das EGKonformitätszeichen zu führen. Der Aussteller der Konformitätserklärung ist die IBM UK, Greenock. Dieses Gerät erfüllt die Bedingungen der EN 55022 Klasse B.