Test Report No.
User’s Guide M1717TM M1917TM Make sure to read the Important Precautions before using the product. Keep the User's Guide(CD) in an accessible place for furture reference. See the label attached on the product and quote this information to your dealer when you require service.
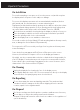
Important Precautions This unit has been engineered and manufactured to ensure your personal safety, however improper use may result in potential eletrical shock or fire hazards. In order to allow the proper operation of all safeguards incorporated in this display, observe the following basic rules for its installation, use, and servicing. On Safety Use only the power cord supplied with the unit.
Important Precautions On Installation Do not allow anything to rest upon or roll over the power cord, and do not place the display where the power cord is subject to damage. Do not use this display near water such as near a bathtub, washbowl, kitchen sink, laundry tub, in a wet basement, or near a swimming pool. Displays are provided with ventilation openings in the cabinet to allow the release of heat generated during operation.
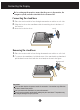
Connecting the Display Before setting up the monitor, ensure that the power to the monitor, the computer system, and other attached devices is turned off. Connecting the stand base 1. Place the monitor with its front facing downward on a cushion or soft cloth. 2. Align the hooks on the stand base with the matching slots in the base of the monitor. 3. Insert the hooks into slots. Hook Removing the stand base 1. Place the monitor with its front facing downward on a cushion or soft cloth. 2.
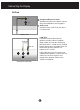
Connecting the Display Before setting up the monitor, ensure that the power to the monitor, the computer system, and other attached devices is turned off. Positioning your display 1. Adjust the position of the panel in various ways for maximum comfort. Tilt Range : -3˚~25˚ Swivel :345˚ Ergonomic It is recommended that in order to maintain an ergonomic and comfortable viewing position, the forward tilt angle of the monitor should not exceed 5 degrees.
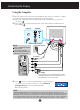
Connecting the Display Using the Computer 1. Place the monitor in a convenient, well-ventilated location near your computer. To adjust height of your monitor, unlock the stand lock on top of the stand. 2. Connect the signal cable. When attached, tighten the thumbscrews to secure the connection. 1 3. Connect the power cord into a proper power outlet that is easily accessible and close to the display. 2 Power Cord Signal Cable Varies according to model.
Connecting the Display Bottom PC AUDIO Headphone/Earphone Input Automatically mutes the speaker volume when the headphones are plugged in. Audio Input Connects to the *LINE OUT jack of the PC sound card. Speaker Out *Line Out *LINE OUT A terminal used to connect to the speaker including a built-in amplifier (Amp). Make sure that the connecting terminal of the PC sound card is checked before connecting. If the Audio Out of PC sound card has only Speaker Out, reduce the PC volume.
Control Panel Functions Front Panel Controls Control Function Power Button Use this button to turn the display on or off. Power Indicator This Indicator lights up green when the display operates normally(On Mode). If the display is in Sleep Mode (Energy Saving), this indicator color changes to amber. AUTO/SET Button Use this button to enter a selection in the On Screen Display.
Control Panel Functions Front Panel Controls Control Function VOL Buttons Buttons Use these buttons to decrease or increase the volume level. Use these buttons to select or adjust functions in the On Screen Display. Lightview hot key DAY This feature lets you easily select the best desired NIGHT image condition optimized to the environment (ambient illumination, image types etc). • DAY : Bright ambient illumination • NIGHT : Dark ambient illumination • TEXT : For text images (Word processing etc.
On Screen Display (OSD) Control Adjustment Screen Adjustment Making adjustments to the image size, position and operating parameters of the display is quick and easy with the On Screen Display Control system. A short example is given below to familiarize you with the use of the controls. The following section is an outline of the available adjustments and selections you can make using the OSD. NOTE Allow the display to stabilize for at least 30 minutes before making image adjustments.
On Screen Display(OSD) Selection and Adjustment The following table indicates all the On Screen Display control, adjustment, and setting menus.
On Screen Display(OSD) Selection and Adjustment You were introduced to the procedure of selecting and adjusting an item using the OSD system. Listed below are the icons, icon names, and icon descriptions of the all items shown on the Menu. Press the MENU Button, then the main menu of the OSD appears. Menu Name Icons Sub-menus NOTE OSD (On Screen Display) menu languages on the monitor may differ from the manual.
On Screen Display(OSD) Selection and Adjustment Main menu Sub menu Description PICTURE BRIGHTNESS To adjust the brightness of the screen. CONTRAST To adjust the contrast of the screen. GAMMA Set your own gamma value. : -50/0/50 On the monitor, high gamma values display whitish images and low gamma values display high contrast images. COLOR PRESET Select the screen color. • 6500K: Slightly reddish white. • 9300K: Slightly bluish white. RED Set your own red color levels.
On Screen Display(OSD) Selection and Adjustment Main menu Sub menu Description LANGUAGE To choose the language in which the control names are displayed. OSD POSITION To adjust position of the OSD window on the screen. WHITE BALANCE If the output of the video card is different the required specifications, the color level may deteriorate due to video signal distortion.
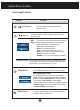
Troubleshooting Check the following before calling for service. No image appears Is the power cord of the display connected? Check and see if the power cord is connected properly to the power outlet. Is the power indicator light on? Touch the Power button. Is the power on and the power indicator blue or green? Adjust the brightness and the contrast. Is the power indicator amber? If the display is in power saving mode, try moving the mouse or pressing any key on the keyboard to bring up the screen.
Troubleshooting Display image is incorrect Display Position is incorrect. Press the AUTO/SET button to automatically adjust your display image to the ideal setting. If the results are unsatisfactory, adjust the image position using the H position and V position icon in the on screen display. Check Control Panel --> Display --> Settings and see if the frequency or the resolution were changed. If yes, readjust the video card to the recommend resolution.
Troubleshooting Have you installed the display driver? Have you installed the display driver? Be sure to install the display driver from the display driver CD (or diskette) that comes with your display. Or, you can also download the driver from our web site: http://www.lge.com. Do you see an "Unrecognized monitor, Plug&Play (VESA DDC) monitor found" message? Make sure to check if the video card supports Plug&Play function. Audio function No sound. Check if the audio cable is correctly connected.
Specifications Display Sync Input Video Input Resolution Plug&Play Audio Power Consumption Dimensions &Weight (with tilt stand) Tilt Range Power Input Environmental Conditions Tilt Stand Signal cable Power cord 17inch 17 inches (43.2cm) Flat Panel Active matrix-TFT LCD Anti-Glare coating 17 inches viewable 0.264 mm pixel pitch Horizontal Freq. Analog : 30 - 83kHz (Automatic) Digital : 30 - 71kHz (Automatic) Vertical Freq.
Specifications Display Sync Input Video Input Resolution Plug&Play Audio Power Consumption Dimensions &Weight (with tilt stand) Tilt Range Power Input Environmental Conditions Tilt Stand Signal cable Power cord 19inch 19 inches (48.18cm) Flat Panel Active matrix-TFT LCD Anti-Glare coating 19 inches viewable 0.294 mm pixel pitch Horizontal Freq. Analog : 30 - 83kHz (Automatic) Digital : 30 - 71kHz (Automatic) Vertical Freq.
Specifications Preset Modes (Resolution) Display Modes (Resolution) 1 2 3 4 5 6 7 8 9 10 11 *12 **13 VGA VGA VGA VESA VESA VESA MAC VESA VESA MAC VESA VESA VESA Horizontal Freq. (kHz) 31.469 31.468 31.469 37.500 37.879 46.875 49.725 48.363 60.023 68.681 61.805 63.981 79.976 640 x 350 720 x 400 640 x 480 640 x 480 800 x 600 800 x 600 832 x 624 1024 x 768 1024 x 768 1152 x 870 1152 x 900 1280 x 1024 1280 x 1024 Vertical Freq.
How to Install the Rack wall mounting This monitor meets VESA-compliant mounting interface pad specifications. 1. Separate the stand Cover using a screwdriver as shown in the picture. Stand Cover 2. Please the monitor on a piece of cloth or other soft surface with the front side facing downward. 3. Separate the stand base using a screwdriver as shown in the picture. 4. Install the VESA standrad wall mounting. VESA wall mounting Connected to another object (stand type and wall-mounted type.
Digitally yours
Regulatory information Regulatory information
Regulatory Information cont. respecte toutes les exigences du Règlement sur le matériel brouilleur du Canada. FCC Compliance Statement This equipment has been tested and found to comply within the limits of a Class B digital device pursuant to Part 15 of the FCC Rules. These limits are designed to provide reasonable protection against harmful interference in a residential installation. NOTICE The regulations are applied only to the products with the ID LABEL indicating specific requirements.
Regulatory Information cont. Why do we have environmentally labelled computers? In many countries, environmental labelling has become an established method for encouraging the adaptation of goods and services to the environment. The main problem as far as computers and other electronic equipment are concerned is that environmentally harmful substances are used both in the products and during their manufacture.
Regulatory Information cont. relevant bio-accumulative TCO’95 requirement permits the inclusion of lead, as no replacement has yet been developed. Monitor Disposal WARNING If you need to dispose of a monitor, ask a qualified service representative for the proper procedure. Improper disposal could result in personal injury from implosion. Cadmium is present in rechargeable batteries and in the color-generating layers of certain computer displays.
Regulatory Information cont. Approval requirements cover a wide range of issues: ecology, ergonomics, emission of electrical and magnetical fields, energy consumption and electrical safety. TCO’99 requires that plastic components weighing more than 25 grams shall not contain flame retardants with organically bound bromine or chlorine. Flame retardants are allowed in the printed wiring board laminates due to the lack of commercially available alternatives.
Regulatory Information cont. with displays in 1992 and is now requested by users and IT-manufacturers all over the world. TCO’03 (TCO’03 applied model only) For more information, please visit www.tcodevelopment.com English Congratulations! The display you have just purchased carries the TCO’03 Displays label. This means that your display is designed,manufactured and tested according to some of the strictest quality and environmental requirements in the world.
Regulatory Information cont. environnement plus propre' en 1994 et celle-ci est restée, depuis lors, un principe directeur de notre entreprise. Cette déclaration a servi de base à notre réflexion et nous a permis de prendre en compte à la fois les aspects économiques et sociaux de nos activités, tout en respectant l’environnement. Deutsch Informationen zur Erhaltung der Umwelt Im Jahr 1994 verkündete LGE die 'LG Declaration for a Cleaner Environment' (LG Erklärung für eine sauberere Umwelt).
Regulatory Information cont. Noi della LG, promuoviamo attività a favore della tutela dell'ambiente sviluppando appositamente i nostri prodotti per cogliere il concetto del rispetto dell’ambiente riducendo i materiali dannosi presenti nei nostri prodotti. Ad esempio nei nostri monitor non è presente il cadmio. Informazioni per il riciclaggio Il monitor può presentare componenti che potrebbero risultare eventualmente dannosi per l'ambiente.
Regulatory Information cont. monitor aan het einde van zijn levensduur wordt gerecycled. Informações relacionadas à reciclagem Este monitor pode conter peças que podem representar riscos ao ambiente. É importante que ele seja reciclado após o uso. LGE. verwerkt alle afvalmonitors via een milieuvriendelijke recyclingmethode. Hiervoor worden er momenteel wereldwijd verscheidene inname- en recyclingsystemen gehanteerd.
Regulatory Information cont. 또는 재활용되지만 환경 위해 물질과 중금속은 환경 친화적 방법으로 처리됩니다. 본사의 재활용 프로그램에 대한 자세한 정보는 각 지역의 LG 공급업체나 LG 기업 대표부에 문의하시기 바랍니다. KÓÔÓ‡ˆËˇ LGE Ô‡·‡Ú˚‚‡ÂÚ ‚Ò ·‡ÍÓ‚‡ÌÌ˚ ÏÓÌËÚÓ˚ Ò ÔÓÏÓ˘¸˛ ˝ÍÓÎӄ˘ÂÒÍË ÔËÂÏÎÂÏÓ„Ó ÏÂÚÓ‰‡ ÛÚËÎËÁ‡ˆËË ÓÚıÓ‰Ó‚. œÓ ‚ÒÂÏÛ ÏËÛ ‰ÂÈÒÚ‚Û˛Ú ÒËÒÚÂÏ˚ ÛÚËÎËÁ‡ˆËË ÓÚıÓ‰Ó‚ Ë ‚ÓÁ‚‡Ú‡ ËÒÔÓθÁÓ‚‡ÌÌÓÈ ÔÓ‰Û͈ËË.