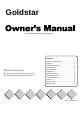
Goldstar Covering models MS-84MK Contents Electric Microwave Keep instructions for future reference. Be sure manual stays with microwave. Important Safety Information ....................................... 3 Installation..................................................................... 5 Other Helpful Information............................................. 6 Cooking Utensils........................................................... 8 Feature Diagram .................................................
Report No.: 02-LAE-M062 Date: March 13, 2002 FCC Part 18 (ISM) Certification APPENDIX F. Owner’s Manual with regard to FCC Instruction LG Electronics Inc.
Please take the time to complete the registration card and return promptly. If the registration card is missing, call Amana Consumer Affairs Department. When contacting Amana, provide product information from serial plate: Model Number Manufacturing (P) Number Serial Number (S/N) Purchase Date Dealer Name Dealer Address Dealer Phone For answers to questions or to locate an authorized servicer, call 1-800NAT-LSVC(1-800-628-5782) inside USA or 319-622-5511 outside USA.
IMPORTANT SAFETY INFORMATION w CAUTION To avoid risk of personal injury or property damage, observe the following: 7. Do not operate the oven empty. Either food or water should always be in the oven during operation to absorb microwave energy. 1. Be certain to place the front surface of the door three inches away or more from the countertop edge to avoid accidental tipping of the appliance in normal usage. 8. Do not use your microwave oven to dry newspapers or clothes. They can catch fire. 2.
IMPORTANT SAFETY INFORMATION Recognize this symbol as a SAFETY message w WARNING To reduce the risk of burns, electric shock, fire, injury to persons, or exposure to excessive microwave energy: 11. Do not store this appliance outdoors. Do not use this product near water - for example, near a kitchen sink, in a wet basement, or near a swimming pool, and the like. 12. Do not immerse cord or plug in water. 13. Keep cord away from heated surfaces. 14. Do not let cord hang over the edge of table or counter. 15.
Installation D. PLACEMENT OF THE OVEN w WARNING Your microwave oven can be placed easily in your kitchen, family room, or anywhere else in your home. Place the oven on a flat surface such as a kitchen countertop or a specially designed microwave oven cart. Do not place oven above a gas or electric range. Free air flow around the oven is important. To avoid risk of electrical shock or death, this oven must be earthed. w WARNING E.
Other Helpful Information GETTING THE BEST RESULTS FROM YOUR MICROWAVE OVEN SPECIAL TECHNIQUES IN MICROWAVE COOKING Keep an eye on things. The instructions in this book have been formulated with great care, but your success in preparing food depends, of course, on how much attention you pay to the food as it cooks. Always watch your food while it cooks.
Other Helpful Information Elevating: Thick or dense foods are often elevated so that microwaves can be absorbed by the underside and center of the foods. Piercing: Foods enclosed in a shell, skin, or membrane are likely to burst in the oven unless they are pierced prior to cooking. Such foods include both yolks and whites of eggs, clams and oysters, and many whole vegetables and fruits. Testing if cooked: Because foods cook so quickly in a microwave oven, it is necessary to test food frequently.
Cooking Utensils w CAUTION To avoid risk of personal injury or property damage, do not use stoneware, aluminum foil, metal utensils, or metal trimmed utensils in the oven. MICROWAVE-SAFE UTENSILS 4. Plastic storage containers: These can be used to hold foods that are to be quickly reheated. However, they should not be used to hold foods that will need considerable time in the oven as hot foods will eventually warp or melt plastic containers. 5.
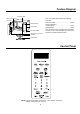
Feature Diagram Oven Front Plate Window Door Screen Door Seal Display Window Control Panel Door Open Button Safety Door Lock System Your oven will be packed with the following materials: Glass Turntable ...................................... 1 each Owner's Manual & Cooking Guide ........................................ 1 each Rotating Ring .......................................... 1 each This microwave oven is designed for household use only.
Operating Instructions SETTING CLOCK TIME COOK When your oven is plugged in for the first time or when power resumes after a power interruption, the numbers in the display reset to “:”. This function allows you to cook food for a desired amount of time. Because many foods need slower cooking (at less than HI-POWER), there are 10 power level settings in addition to HI-POWER. When cooking is complete, beeps will sound. The word END shows in the display window. Then the oven shuts itself off.
Operating Instructions MULTI-STAGE TIME COOK CHILD LOCK For Multi-Stage cooking, touch PROGRAM and repeat Time Cook steps 1-3 on previous page before touching the START pad. Auto Defrost can be programmed before the first stage to defrost first and then cook. This safety feature prevents unwanted oven operation. Once the child lock is set, no cooking can take place. The Child Lock feature is also useful when cleaning the control panel.
Operating Instructions CONTROL SET-UP CONTROL SET-UP provides five modes which make using your microwave oven quite handy. You can select SOUND ON/OFF, CLOCK ON/OFF, SCROLL SPEED, LBS/KG, and DEMO MODE. Example 1: To turn off Sound of beeper. Example 2: To select kg unit. 1. Touch CONTROL SET-UP. Five modes show in the display repeatedly. You can set them according to your intention. ➠ ➠ 1. Touch CONTROL SET-UP. Five modes show in the display continuously. You can set them according to your intention.
Operating Instructions MORE/LESS SENSOR COOK OPERATION INSTRUCTION By using the MORE or LESS keys, all of the AUTO COOK, TIME COOK, EASY COOK, SENSOR COOK programs can be adjusted to cook food for a longer or shorter time. Pressing MORE will add 10 seconds to the cooking time each time you press it. Pressing LESS will subtract 10 seconds of cooking time each time you press it. You must wait until heating begins to count down before adding or subtracting time.
Operating Instructions SENSOR COOK CHART Code Category Direction Amount 1 Potato Pierce each potato with a fork and place on the oven tray around the edge, at least one inch apart. 1 - 4 medium approx. 8 ounce each 2 Fresh Vegetable Prepare as desired, wash, and leave residual water on the vegetables. Place in an appropriately-sized microwave container, cover with plastic wrap and vent. 1 - 4 cups 3 Frozen Vegetable Remove from package, rinse off frost under running water.
Operating Instructions SENSOR REHEAT CHART SENSOR POPCORN SENSOR POPCORN lets you pop commercially packaged microwave popcorn (1.75-3.5 ounces). For best results, use a fresh bag of popcorn. Place only one bag of prepackaged microwave popcorn on the center of turntable. Code Category Amount 1 Dinner plate Place foods to be heated on dinner plate or similar dish. Cover with plastic wrap. 1-2 servings 2 Soup/ Sauce Place food to be heated in an appropriate size microwave container.
Operating Instructions AUTO COOK This feature allows to cook foods that you select by touching AUTO COOK pad. It has 6 foods categories. ➠ Example: To cook four slices of bacon 2. Touch number 1. Display scrolls the words BACON TOUCH 2 TO 6 SLICES. ➠ 1. Touch AUTO COOK. Display scrolls the words SELECT MENU 1 TO 6 -- SEE COOKING GUIDE BEHIND DOOR. 3. Touch number 4. The oven will start automatically. AUTO COOK CHART • First, touch AUTO COOK pad, then select food and amount.
Operating Instructions • For best results, remove fish, shellfish, meat, and poultry from its original closed paper or plastic package (wrapper). Otherwise, the wrap will hold steam and juice close to the foods, which can cause the outer surface of the foods to cook. • For best results, shape your ground meat into the form of a doughnut before freezing. When defrosting, scrape off thawed meat when the beep sounds and continue defrosting.
Fresh Vegetable Chart Amount Cook time at HIGH (minutes) 2 medium 4 medium 5-8 10-12 Asparagus, Fresh, spears 1 Ib. Beans, green & wax Vegetable Artichokes (8 oz. each) Instructions Standing Time Trim. Add 2 tsp. water and 2 tsp. lemon juice. Cover. Cook stem end up. 2-3 minutes 3-7 Wash and turn half of spears around. Add 1/2 cup water. Cover. 2-3 minutes 1 lb. 7-10 Add 1/2 cup water in 11/2 qt. casserole. Stir halfway through cooking. 2-3 minutes Beets, Fresh 1 Ib.
Cook using Sensor Cook Peel and Eat Shrimp, serves 2 1/2 cup dry white wine 2 cloves garlic, minced 2 tablespoons lemon juice 4 tablespoons butter 1 pound large shrimp in shells Place everything in a 2 quart microwave dish push to the edge of the dish, cover and cook on sensor or microwave on high power for about 5 minutes, stirring once or until the shrimp are pink. Peel the shrimp and serve with juices.
Cleaning w CAUTION To avoid risk of property damage, unplug the microwave oven or disconnect power at source by removing fuse or throwing circuit breaker. Before cleaning the oven, unplug the power supply cord of the oven. If impossible, open the oven door to prevent an accidental oven start. Part Description INSIDE OF THE OVEN Use a damp cloth to wipe out crumbs and spillovers. It is important to keep the area between door and cavity front clean to assure a tight seal.
Troubleshooting w WARNING To avoid risk of severe personal injury, electrical shock or death, do not remove outer case of at any time. Only an authorized servicer should remove outer case. BEFORE CALLING FOR SERVICE Check the following list to be sure a service call is really necessary. A quick reference of this manual as well as reviewing additional information on items to check may prevent an unneeded service call.
Full ONE Year Warranty Amana Appliances will repair or replace, including related labor and travel, any part (f.o.b. Amana Iowa) which proves defective as to workmanship or materials. Limited Warranty After one year from the date of original retail purchase, Amana will provide a free part, as listed below, to replace any part that fails due to a defect in materials or workmanship. The owner will be responsible for paying all other costs including labor, mileage, and transportation.