Colour Television OWNER'S MANUAL Please read this manual carefully before operating your set. Retain it for future reference. Record model number and serial number of the set. See the label attached on the back cover and quote this information to your dealer when you require service. Chassis : CP-079B/C P/No.
CONTENTS Important Precautions 3 Location and function of controls Remote control handset / Front panel 5 Basic operation On and Off / Programme selection Volume adjustment / Quick View / Mute function 7 On screen menus Menu selection 8 Setting up TV stations Auto programme tuning / Manual programme tuning Assigning a programme name / Fine tuning Programme edit / Deleting a programme / Copying a programme Moving a programme / Skipping a programme number Favourite programme (option) / Calling The Pro
Important Precautions This unit has been engineered and manufactured to assure your personal safety, however improper use may result in potential electrical shock or fire hazards. In order to allow the proper operation of all safeguards incorporated in this TV set, observe the following basic rules for its installation, use and servicing. Keep it in an accessible place for future reference. (TV operating voltage is : 110V ~ 240V AC) Make sure to insert the power plug completely.
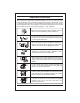
Important Precautions If you can smell a smoke or other odors or hear a strange sound unplug the power cord and contact the service center. If you continue to use, electric shock can occur. Do not place the product where it might be exposed to excessive heat, sunlight, rain or moisture. Do not attempt to open the product. There are dangerous High Voltages inside. Refer to Servicing through Qualified Personnel if the TV is not operating properly.
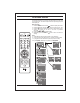
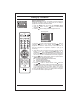
Location and function of controls 1 MUTE POWER TV/AV 9 10 MUSIC MOVIES NEWS SPORTS 18 EQ/* MM/* ARC 1 2 3 4 5 6 7 8 9 15 17 2 0 3 MENU 4 EYE/* PR 5 VOL OK VOL PR 6 Q-VIEW X-LIST 12 X-SORT TURBO SOUND/* XDP/* 16 PSM 7 13 SLEEP SSM/* 8 19 14 I/II* 11 All the functions can be controlled with the remote control handset. Some functions can also be adjusted with the buttons on the front panel of the set.
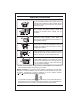
Location and function of controls FRONT PANEL / SIDE PANEL Shown below is a simplified representation of front or side panel, here shown may be somewhat different from your set. AV3 7 S VIDEO 9 OK/ 2 6 PR VIDEO L/MONO AUDIO R 10 5 1. MAIN POWER switches the set On or Off. 2. POWER/STANDBY INDICATOR illuminates brightly when the set is in standby mode. dims when the set is switched On. 3 4 PR ON/OFF VOL 3. MENU selects a menu.
Basic operation On and Off 1. Press the main power button at front side of set to switch On. 2. If the set is in standby mode, press the POWER, , TV/AV or NUMBER buttons on the remote control handset to switch it On fully. 3. Press the POWER button on the remote control handset. The set reverts to standby mode. 4. Press the main power button again to switch the set Off. Note : while the set is switched On and mains plug is disconnected, if mains plugged again then set will switch to standby or power On.
On screen menus The dialogue between you and your set takes place on screen with an operator menu. The buttons required for the operating steps are also displayed. MUTE MUSIC POWER MOVIES NEWS EQ/* MM/* TV/AV SPORTS ARC 1 2 3 4 5 6 7 8 9 0 MENU Menu selection 1. Press the MENU button and then button to display each menu. 2. Press the button and then button to select a menu item. 3. Press the button to display the sub menu or the pull-down menu.
Setting up TV stations Programme Up to 200 programmes can be stored by programme numbers (0 to199). Once you have preset the stations you will be able to use the or NUMBER buttons to scan the stations you programmed. Programmes can be tuned using automatic or manual modes. Note : In some models up to 100 TV stations can be stored. MUTE MUSIC POWER MOVIES TV/AV NEWS SPORTS MM/* ARC EQ/* 1 2 3 4 5 6 7 8 9 Auto programme tuning All channel that can be received are stored by this method.
Setting up TV stations Programme Manual programme tuning Manual programme offer you to manually tune and arrange the programme in whatever order you desire. Also you can assign a programme name with five characters to each. 1. Press the MENU button and select the Programme menu. 2. Press the button and then button to select Manual programme. 3. Press the button to display the Manual programme menu.
Setting up TV stations Programme MUTE MUSIC Assigning a programme name 1. Repeat the 'Manual programme tuning' steps 1 to 3. 2. Press the button to select Name. 3. Press the button on the Name pull-down menu. You can use a blank, +, -, the numeric 0 to 9 and the alphabet A to Z. With the button you can select in the opposite direction. 4. Select the next position by pressing the button and then take your choice of the second character, then press OK button. 5.
Setting up TV stations Programme edit This function enables you to delete or skip or copy the stored programmes. Also you can move some stations to other programme numbers. Programme G 1. Press the MENU button and then button to select the Programme menu. 2. Press the button and then button to select programme edit. 3. Press the button to display the Programme edit menu.
Setting up TV stations Favourite Prog. (option) This function lets you select your favourite programmes directly. 1. Press the MENU button and then button to select the Programme menu 2. Press the button and then button to select Favourite Prog. 3. Press the OK button to display the Favourite Prog. menu. Programme MUTE POWER MUSIC MOVIES NEWS SPORTS MM/* ARC EQ/* 1 2 3 4 5 6 7 8 9 0 MENU G TV/AV EYE/* PR 4. Press the button to select Favourite Prog. location. 5.
Picture adjustment XDP Demo (option) 1. 2. 3. 4. MUTE MUSIC POWER MOVIES TV/AV NEWS SPORTS MM/* ARC EQ/* 1 2 3 4 5 6 7 8 9 Press the MENU button and to select the picture menu. Press the to select XDP Demo. Screen splits for Demo. Press any button for XDP Demo exit. PSM (Picture Status Memory) 1. Press the PSM button on the remote to change for desired PSM setting. Note: PSM status change to user automatically when contrast, brightness, colour and sharpness set manually.
Picture adjustment Eye (option) In some models, the set will automatically adjust the picture according to the surrounding conditions. This will enable you to enjoy the most suitable picture according to the surroundings. Press the EYE/ button on remote to switch the eye function On or Off. MUTE MUSIC POWER MOVIES NEWS EQ/* MM/* TV/AV SPORTS ARC 1 2 3 4 5 6 7 8 9 When the eye function is On, the most suitable picture is automatically adjusted according to the surrounding.
Sound adjustment Sound Sound adjustment You can select your preferred sound setting: Flat, Music, Movie, User, Speech and you can also adjust the sound frequency of equalizers and balance. If you switch AVL (option) to On, the set automatically keeps on an equal volume level even if you change programmes. 1. Press the MENU button and then button to select the Sound menu 2. Press the button and then button to select the desired sound item; SSM, AVL, Balance. 3.
Sound adjustment XD / Turbo Sound (option) When this function is On, it will give surround effect as well as loudness will be increased. Repeatedly press the XD/Turbo sound/* button to switch On or Off.
Other functions Time --:-- MUTE MUSIC POWER MOVIES NEWS EQ/* MM/* TV/AV SPORTS ARC 1 2 3 4 5 6 7 8 9 0 MENU EYE/* PR VOL OK VOL PR Q-VIEW X-SORT TURBO SOUND/* PSM SLEEP I/II/* X-LIST XDP/* SSM/* Time functions The time uses 24 hrs. system and must be set to the correct time before operating the set. 1. Press MENU and to select time menu . 2. Press button to select time menu. 3. After selecting ‘Time Function’ press key to enter ‘Time’. 4. Set Time using and keys. 5.
Other functions Sleep timer MUTE POWER TV/AV You don't have to remember to switch the set Off before you go to sleep. The sleep timer automatically switches the set to standby after the preset time elapses. Press the SLEEP button to select the number of minutes. The display ---- will appear on the screen, followed by 10, 20, 30, 60, 90,120, 180 and 240. The timer begins to count down from the number of minutes selected. Note : a. To view the remaining sleep time, press the SLEEP button once. b.
Other functions Special MUTE MUSIC POWER MOVIES NEWS EQ/* MM/* TV/AV SPORTS ARC 1 2 3 4 5 6 7 8 9 0 MENU EYE/* PR VOL OK VOL PR Q-VIEW X-SORT TURBO SOUND/* PSM SLEEP I/II/* X-LIST XDP/* SSM/* On screen language selection (option) The menu can be displayed on the screen in desired language. First select your language. 1. Press the MENU button and then button to select the Special menu. 2. Press the button and then the button to select language in pull down menu. 3.
Connection of external equipment You can connect additional equipment, such as VCRs, camcorders etc. to your set. Here shown may be some what different from your set. OK INPUT OK VCR OK INPUT OK OK VCR Aerial socket 1. Connect the RF out socket of the VCR to the aerial socket on the back of the set. 2. Connect the aerial cable to the RF aerial in socket of the VCR. 3. Store the VCR channel on the programme number 0 using the ‘Manual programme tuning’ section. 4.
Connection of external equipment COMPONENT Component in sockets (option) 1. Connect the COMPONENT video output sockets (Y Cb Cr/ Y Pb Pr) of the COMPONENT to the COMPONENT INPUT sockets (Y Pb Pr) on the set. 2. Connect the audio cable from the COMPONENT to AUDIO IN socket of AV1. 3. Press the TV/AV button to select COMPONENT. 4. Press the PLAY button on the COMPONENT. The COMPONENT playback picture appears on the screen.
Troubleshooting check list Symptoms No picture, no sound Sound OK, poor picture Picture OK, poor sound Picture blurred Lines or streaks in picture Poor reception on some channels No colour Poor colour Remote control does not work Check following items and try to adjust these The mains plug-(plugged in and switched On) Is the TV switched On Try another channel (weak signal) Check aerial (plugged into TV?) Check aerial (broken lead?) Check aerial Check for local interference Adjust contrast Adjust brightness