Colour Television OWNER’S MANUAL BZ03 Please read this manual carefully before operating your set. Retain it for future reference. Record model number and serial number of the set. See the label attached on the back cover and quote this information to your dealer when you require service.
Installation Power Service This set operates on an AC mains supply, the voltage is as indicated on the label on the back cover. Never apply DC power to the set. In the event of thunderstorms or powercuts, please pull out the aerial and mains plugs. Press the POWER button on the front panel or side panel to turn off the TV when the TV set is not being used for a long time.It is recommended to remove the plug from the wall outlet(Power point).
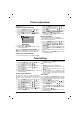
Location and function of controls type batteries. To load the batteries, turn the remote control handset over and open the battery compartment. Install batteries as indicated by the polarity symbols ( + and - ) marked inside the compartment. Remote control handset 2 3 1 Note : To avoid damage from possible battery leakage, remove the batteries if you do not plan to use the remote control handset for an extended period of time . 4 5 7 Front panel 6 4 3 7 5 6 1 2 1.
Basic operation On and off 1. Press the main power button to switch the set on. 2. If the set is in standby mode, press the POWER, D / E, TV/AV or NUMBER buttons on the remote control handset to switch it on fully. 3. Press the POWER button on the remote control handset. The set reverts to standby mode. 4. Press the main power button again to switch the set off.
Setting up TV stations Auto programme tuning All stations that can be received are stored by this method. It is recommended that you use auto programme during installation of this set. System Storage Normal Turbo { { { { BG I DK M (O} {OOKOMENU ) i BG : (Asia/New Zealand/M.East/Africa/ Australia) I : (Hong Kong/South Africa) DK : (East Europe/China/Africa/CIS) M : (USA/Korea/Philippines) (option) Option: In some models, you can only select Start. Note : a.
Picture adjustment Note: Picture menu options are not available for RGB input source. PSM (Picture Status Memory) 1. Press the MENU button and then D / E button to select the Picture menu . 2. Press the G button to select PSM. 3. Press the G button and then D / E button to select a picture setting on the PSM pull-down menu. PSM { PSM CSM { Contrast { Brightness{ { Colour Sharpness { reddish, greenish or bluish, as you prefer. 1. Press the MENU button and then D / E button to select the Picture menu. 2.
Troubleshooting check list Symptoms No picture, no sound Sound OK, poor picture Picture OK, poor sound Picture blurred Lines or streaks in picture Poor reception on some channels No colour Poor colour Remote control does not work Check these items and try to adjust these The mains plug-(plugged in and switched on) Is the TV switched on Try another channel (weak signal) Check aerial (plugged into TV?) Check aerial (broken lead?) Check aerial Check for local interference Adjust contrast Adjust brightness Adj
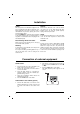
How to Install TV Legs Accessory:Legs 4EA(Front 2EA & Rear 2EA) 1. Lay the TV set down on a soft cloth as shown in the figure. 4. Lift up the legs of the TV set as shown in the figure. 2. Fully insert the two supporting legs marked with “FRONT” into the holes at the bottom of the front cabinet,and secure them as shown in the figure. 5.