User’s Guide Specification 1. Model Description MODEL SUFFIX 2. 담 당 관 리 자 GW Lee 01.30.12 HJ Shin JO Kim 01.30.12 01.30.12 Part No. MFL67409503 (1202-REV01) LG 22LS3500-ZA BRAND EU (PV) Product Name 19/22/26/32LS35** Printing Specification 1. Trim Size (Format) : 182mm x 257 mm 2. Printing Colors • Cover : 1 COLOR (BLACK) • Inside : 1 COLOR (BLACK) 3. Stock (Paper) • Cover : Coated paper , Snow White 150 g/㎡ • Inside : Uncoated paper , 백상지 60 g/㎡ 4. Printing Method : Off-set 5.
P/NO.
OWNER’S MANUAL LED LCD TV / LCD TV Please read this manual carefully before operating your set and retain it for future reference. LS35** LS34** CS46** P/NO : MFL67409503(1202-REV01) Printed in Korea www.lg.
A-2 TABLE OF CONTENTS TABLE OF CONTENTS A-3 SETTING UP THE TV A-3 A-5 A-6 Attaching the stand Tidying cables Not using the Desk-Type Stand COMMON LANGUAGE LIST English Deutsch Français Italiano Español Português Nederlands Ελληνικά LANGUAGE B-1 MAKING CONNECTIONS B-1 B-2 B-3 B-5 B-7 B-9 B-10 B-11 B-12 Antenna connection Satellite dish connection Adapter connection HDMI connection Component connection Composite connection USB connection CI module connection Euro Scart connection B-19 SPECIFICATIONS
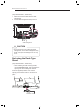
SETTING UP THE TV A-3 SETTING UP THE TV Attaching the stand Screw(Stand+Head) M4 x 14 Image shown may differ from your TV.
A-4 SETTING UP THE TV 26CS46** 32/42CS46**, 32/42LS34** 1 1 4EA 4EA M4 x 20 M4 x 20 Stand Body Stand Body Stand Base Stand Base 2 2 3 3 4EA 4EA M4 x 20 M4 x 20
SETTING UP THE TV A-5 CAUTION yy When attaching the stand to the TV set, place the screen facing down on a cushioned table or flat surface to protect the screen from scratches. yy Tighten the screws firmly to prevent the TV from tilting forward. Do not over tighten. Tidying cables Gather and bind the cables with the cable holder. (Only 19LS35**) NOTE yy Remove the stand before installing the TV on a wall mount by performing the stand attachment in reverse.
A-6 SETTING UP THE TV (Only 26/32/42CS46**, 32/42LS34**) 1 2 Gather and bind the cables with the cable management. Fix the cable management firmly to the TV. Cable Management CAUTION yy Do not move the TV by holding the cable management, as the cable management may break, and injure and damage to the TV may occur. Not using the Desk-Type Stand (Only 26/32/42CS46**, 32/42LS34**) • When installing the wall mounting bracket, use the Protection cover.
OWNER’S MANUAL LED LCD TV / LCD TV Please read this manual carefully before operating your set and retain it for future reference. www.lg.
2 TABLE OF CONTENTS ENGLISH ENG TABLE OF CONTENTS 3 LICENSES 3 OPEN SOURCE SOFTWARE NOTICE 4 SAFETY INSTRUCTIONS 10 INSTALLATION PROCEDURE 10 ASSEMBLING AND PREPARING 10 14 15 16 18 Unpacking Parts and buttons Lifting and moving the TV Mounting on a table Mounting on a wall 19 REMOTE CONTROL 20 USING THE USER GUIDE 21 MAINTENANCE 21 21 21 Cleaning your TV - Screen, frame, cabinet and stand - Power cord 21 TROUBLESHOOTING WARNING yy If you ignore the warning message, you may be serio
LICENSES / OPEN SOURCE SOFTWARE NOTICE 3 Supported licenses may differ by model. For more information about licenses, visit www.lg.com. Manufactured under license from Dolby Laboratories. “Dolby” and the double-D symbol are trademarks of Dolby Laboratories. HDMI, the HDMI logo and High-Definition Multimedia Interface are trademarks or registered trademarks of HDMI Licensing LLC. ABOUT DIVX VIDEO: DivX® is a digital video format created by DivX, LLC, a subsidiary of Rovi Corporation.
4 SAFETY INSTRUCTIONS ENGLISH ENG SAFETY INSTRUCTIONS Please read these safety precautions carefully before using the product.
SAFETY INSTRUCTIONS y Do not drop the product or let it fall over when connecting external devices. Otherwise, this may result in injury or damage to the product. Des icca nt y Keep the packing anti-moisture material or vinyl packing out of the reach of children. Anti-moisture material is harmful if swallowed. If swallowed by mistake, force the patient to vomit and visit the nearest hospital. Additionally, vinyl packing can cause suffocation. Keep it out of the reach of children.
6 SAFETY INSTRUCTIONS ENGLISH ENG Do not disassemble, repair or modify the product at your own discretion. yy Fire or electric shock accident can occur. Contact the service center for check, calibration or repair. If any of the following occur, unplug the product immediately and contact your local yy service centre.
SAFETY INSTRUCTIONS Install the product where no radio wave occurs. yy There should be enough distance between an outside antenna and power lines to yy keep the former from touching the latter even when the antenna falls. This may cause an electric shock. Do not install the product on places such as unstable shelves or inclined surfaces. yy Also avoid places where there is vibration or where the product cannot be fully supported.
8 SAFETY INSTRUCTIONS ENGLISH ENG Do not turn the product On/Off by plugging-in or unplugging the power plug to the yy wall outlet. (Do not use the power plug for switch.) It may cause mechanical failure or could give an electric shock. Please follow the installation instructions below to prevent the product from yy overheating. --The distance between the product and the wall should be more than 10 cm. --Do not install the product in a place with no ventilation (e.g., on a bookshelf or in a cupboard).
SAFETY INSTRUCTIONS Contact the service center once a year to clean the internal parts of the product. yy Accumulated dust can cause mechanical failure. Refer all servicing to qualified service personnel. Servicing is required when the yy apparatus has been damaged in any way, such as power supply cord or plug is damaged, liquid has been spilled or objects have fallen into the apparatus, the apparatus has been exposed to rain or moisture, does not operate normally, or has been dropped.
10 INSTALLATION PROCEDURE / ASSEMBLING AND PREPARING ENGLISH ENG NOTE yy Image shown may differ from your TV. yy Your TV’s OSD (On Screen Display) may differ slightly from that shown in this manual. yy The available menus and options may differ from the input source or product model that you are using. y y New features may be added to this TV in the future. yy The TV can be placed in standby mode in order to reduce the power consumption.
ASSEMBLING AND PREPARING ENGLISH ENG or Remote control and batteries (AAA) (See p. 19) Owner’s manual Cable holder (Depending on model) (See p. A-5) Polishing cloth (Depending on model) Use this to remove dust from the cabinet. Adapter (Only 19/22/26LS35**) (See p. B-3) Stand Screw 2EA, P4 x 20 (Only 19/22LS35**) (See p. A-3) Stand Screw 2EA, M4 x 14 (Only 26LS35**) (See p. A-3) Stand Screw 4EA, P4 x 16 4EA, M4 x 14 (Only 32LS35**) (See p.
12 ASSEMBLING AND PREPARING ENGLISH ENG Stand Body / Stand Base (Only 19/22/26LS35**) (See p. A-3) Stand Body / Stand Base (Only 32LS35**) (See p. A-3) Stand Body / Stand Base (Only 26CS46**) (See p. A-4) Stand Body / Stand Base (Only 32/42CS46**, 32/42LS34**) (See p.
ASSEMBLING AND PREPARING 13 yy Antenna Isolator Installation Guide -- Use this to install TV in a place where there is a voltage difference between TV Set and GND of antenna signal. »» If there is a voltage difference between TV Set and GND of antenna signal, the antenna contact might be heated and excessive heat might cause an accident. -- You can improve the safety when watching TV by efficiently removing power voltage from TV antenna. It is recommended to mount the isolator to the wall.
14 ASSEMBLING AND PREPARING ENGLISH ENG Parts and buttons Screen Remote control and intelligent1 sensors Power indicator Speakers OK SETTINGS Touch Button INPUT Touch buttons2 Description Scrolls through the saved programmes. H Adjusts the volume level. H OK ꔉ Selects the highlighted menu option or confirms an input. SETTINGS Accesses the main menu, or saves your input and exits the menus. INPUT Changes the input source. /I Turns the power on or off.
ASSEMBLING AND PREPARING When moving or lifting the TV, read the following to prevent the TV from being scratched or damaged and for safe transportation regardless of its type and size. yy When transporting a large TV, there should be at least 2 people. yy When transporting the TV by hand, hold the TV as shown in the following illustration. CAUTION yy Avoid touching the screen at all times, as this may result in damage to the screen.
16 ASSEMBLING AND PREPARING ENGLISH ENG Mounting on a table 1 Lift and tilt the TV into its upright position on a table. -- Leave a 10 cm (minimum) space from the wall for proper ventilation. Securing the TV to a table (Only 32LS35**, 26/32/42CS46**, 32/42LS34**) Fix the TV to a table to prevent from tilting forward, damage, and potential injury. To secure the TV to a table, insert and tighten the supplied screw on the rear of the stand.
ASSEMBLING AND PREPARING (This feature is not available for all models.) Using the Kensington security system (Depending on model) The Kensington security system connector is located at the rear of the TV. For more information of installation and using, refer to the manual provided with the Kensington security system or visit http://www.kensington.com. Connect the Kensington security system cable between the TV and a table.
18 ASSEMBLING AND PREPARING ENGLISH ENG Mounting on a wall Attach an optional wall mount bracket at the rear of the TV carefully and install the wall mount bracket on a solid wall perpendicular to the floor. When you attach the TV to other building materials, please contact qualified personnel. LG recommends that wall mounting be performed by a qualified professional installer. 10 cm 10 cm 10 cm 10 cm Make sure to use screws and wall mount bracket that meet the VESA standard.
REMOTE CONTROL 19 The descriptions in this manual are based on the buttons on the remote control. Please read this manual carefully and use the TV correctly. To replace batteries, open the battery cover, replace batteries (1.5 V AAA) matching the and ends to the label inside the compartment, and close the battery cover. To remove the batteries, perform the installation actions in reverse. CAUTION yy Do not mix old and new batteries, as this may damage the remote control.
20 USING THE USER GUIDE ENGLISH ENG USING THE USER GUIDE User Guide allows you to more easily access the detailed TV information. Press SETTINGS to access the main menus. Press the RED button to access the Customer Support menus. Press the Navigation buttons to scroll to User Guide and press OK.
MAINTENANCE / TROUBLESHOOTING 21 Cleaning your TV Clean your TV regularly to keep the best performance and to extend the product lifespan. CAUTION yy Make sure to turn the power off and disconnect the power cord and all other cables first. yy When the TV is left unattended and unused for a long time, disconnect the power cord from the wall outlet to prevent possible damage from lightning or power surges.
BENUTZERHANDBUCH LED-LCD-TV / LCD-TV Bitte lesen Sie dieses Handbuch aufmerksam durch, bevor Sie Ihr Gerät zum ersten Mal verwenden, und bewahren Sie es zur späteren Verwendung auf. www.lg.
2 INHALTSVERZEICHNIS INHALTSVERZEICHNIS DEUTSCH DEU 3 LIZENZEN 3 ANMERKUNG ZU OPEN SOURCESOFTWARE 4 SICHERHEITSHINWEISE 10 INSTALLATIONSVERFAHREN 10 MONTAGE UND VORBEREITUNG 10 13 14 15 17 Auspacken Teile und Tasten Anheben und Bewegen des TV-Gerätes Montage auf einem Tisch Wandmontage 18 FERNBEDIENUNG 19 DAS BENUTZERHANDBUCH VERWENDEN 20 WARTUNG 20 20 20 Reinigung des TV-Gerätes - Bildschirm, Rahmen, Gehäuse und Standfuß - Gehäuse und Standfuß 20 FEHLERBEHEBUNG WARNUNG yy Bei Nicht
LIZENZEN / ANMERKUNG ZU OPEN-SOURCE-SOFTWARE 3 LIZENZEN Die unterstützten Lizenzen sind von Modell zu Modell verschieden. Weitere Informationen zu den Lizenzen erhalten Sie unter www.lg.com. HDMI, das HDMI Logo und High-Definition Multimedia Interface sind Markenzeichen oder eingetragene Markenzeichen von HDMI Licensing LLC. ÜBER DIVX-VIDEO: DivX® ist ein digitales Videoformat der Firma DivX, LLC, einem Tochterunternehmen der Rovi Corporation.
4 SICHERHEITSHINWEISE SICHERHEITSHINWEISE Bevor Sie das Produkt zum ersten Mal verwenden, lesen Sie diese Sicherheitshinweise bitte aufmerksam durch. DEUTSCH DEU WARNUNG y Stellen Sie das TV-Gerät mit Fernsteuerung nicht in folgenden Umgebungen auf: - Unter direkter Sonneneinstrahlung - In Bereichen mit hoher Luftfeuchtigkeit, wie z. B. einem Badezimmer - In der Nähe von Hitzequellen, wie z. B.
SICHERHEITSHINWEISE 5 y Schließen Sie nicht zu viele Elektrogeräte an einer einzelnen Steckdose an. Andernfalls kann es aufgrund von Überhitzung zu Bränden kommen. Des icca nt y Bewahren Sie das Trockengranulat und die Vinyl-Verpackung außerhalb der Reichweite von Kindern auf. Trockengranulat ist bei Verschlucken gesundheitsschädlich. Falls es verschluckt wurde, Erbrechen herbeiführen und die Person ins nächste Krankenhaus bringen. Außerdem besteht Erstickungsgefahr durch die Vinyl-Verpackung.
6 SICHERHEITSHINWEISE DEUTSCH DEU Sie dürfen das Gerät nicht eigenmächtig auseinanderbauen, reparieren oder veryy ändern. Es besteht Stromschlag- und Brandgefahr. Wenden Sie sich zur Überprüfung, Kalibrierung oder Reparatur an den Kundendienst. Ziehen Sie in jedem der folgenden Fälle sofort den Netzstecker, und setzen Sie yy sich mit Ihrem Kundendienst vor Ort in Verbindung.
SICHERHEITSHINWEISE 7 VORSICHT Stellen Sie das Gerät nicht in der Nähe von Funkwellen auf. yy Wenn Sie das TV-Gerät an der Wand montieren, befestigen Sie eine VESA-Standardwandhalterung yy (optional) an der Rückseite des Gerätes. Wenn Sie das TV-Gerät mit der optionalen Wandhalterung montieren möchten, befestigen Sie diese sorgfältig, um ein Herunterfallen zu vermeiden. Verwenden Sie nur vom Hersteller empfohlenes Zubehör.
8 SICHERHEITSHINWEISE DEUTSCH DEU Schalten Sie das Gerät niemals ein oder aus, indem Sie den Stecker aus der yy Steckdose ziehen. (Verwenden Sie das Stromkabel nicht als Ein- und Aus-Schalter.) Ein mechanischer Defekt oder Stromschlag können die Folge sein. Folgen Sie den unten stehenden Installationsanweisungen, um ein Überhitzen des yy Gerätes zu verhindern. --Der Abstand des Gerätes zur Wand sollte mindestens 10 cm betragen. --Montieren Sie das Gerät nur an Orten mit ausreichender Belüftung (d. h.
SICHERHEITSHINWEISE 9 Das Gerät ist schwer und sollte stets mit zwei Personen bewegt oder ausgepackt yy werden. Andernfalls kann es zu Verletzungen kommen. Wenden Sie sich bei Problemen an einen qualifizierten Kundendienstmitarbeiter. yy Bitte setzen Sie sich mit dem Kundendienst in Verbindung, wenn das Gerät in irgendeiner Weise beschädigt wurde, z. B.
10 INSTALLATIONSVERFAHREN / MONTAGE UND VORBEREITUNG HINWEIS DEUTSCH DEU yy Ihr TV-Gerät kann von der Abbildung möglicherweise leicht abweichen. yy Das OSD-Menü (am Bildschirm angezeigtes Menü) Ihres TV-Gerätes kann sich leicht von dem in diesem Handbuch unterscheiden. yy Die verfügbaren Menüs und Optionen können sich je nach verwendeter Eingangsquelle bzw. je nach Modell unterscheiden. yy Künftig können diesem TV-Gerät neue Funktionen hinzugefügt werden.
MONTAGE UND VORBEREITUNG 11 Benutzerhandbuch Kabelhalter (Abhängig vom Modell) (Siehe S. A-5) Reinigungstuch (Abhängig vom Modell) Verwenden Sie dieses, um das Gehäuse zu entstauben. Netzgerät (Nur 19/22/26LS35**) (Siehe S. B-3) Schrauben für Standfuß 2 Stk., P4 x 20 (Nur 19/22LS35**) (Siehe S. A-3) Schrauben für Standfuß 2 Stk., M4 x 14 (Nur 26LS35**) (Siehe S. A-3) Schrauben für Standfuß 4 Stk., P4 x 16 4 Stk., M4 x 14 (Nur 32LS35**) (Siehe S. A-3) Schrauben für Standfuß 8 Stk.
12 MONTAGE UND VORBEREITUNG DEUTSCH DEU Standkörper / Ständerplatte (Nur 19/22/26LS35**) (Siehe S. A-3) Standkörper / Ständerplatte (Nur 32LS35**) (Siehe S. A-3) Standkörper / Ständerplatte (Nur 26CS46**) (Siehe S. A-4) Standkörper / Ständerplatte (Nur 32/42CS46**, 32/42LS34**) (Siehe S.
MONTAGE UND VORBEREITUNG 13 Teile und Tasten DEUTSCH DEU Bildschirm Fernbedienung und intelligente Sensoren1 Betriebsanzeige Lautsprecher OK Drucktasten SETTINGS INPUT Drucktasten2 Beschreibung Navigiert durch die gespeicherten Programme. H Regelt die Lautstärke. H OK Wählt die markierte Menüoption aus oder bestätigt eine Eingabe. SETTINGS Öffnet und schließt das Hauptmenü und speichert Ihre Eingaben. INPUT Ändert die Eingangsquelle. /I 1 2 Schaltet den Strom ein und aus.
14 MONTAGE UND VORBEREITUNG Anheben und Bewegen des TV-Gerätes DEUTSCH DEU Lesen Sie folgende Hinweise, bevor Sie das TVGerät bewegen oder anheben, um Kratzer oder Beschädigungen am TV-Gerät zu verhindern und um einen reibungslosen Transport unabhängig von Typ und Größe zu gewährleisten. yy Große TV-Geräte sollten stets von mindestens 2 Personen transportiert werden. yy Wenn das TV-Gerät von Hand transportiert wird, halten Sie es wie in der folgenden Abbildung gezeigt.
MONTAGE UND VORBEREITUNG Montage auf einem Tisch 1 Befestigen des TV-Gerätes an einem Tisch (Nur 32LS35**, 26/32/42CS46**, 32/42LS34**) Befestigen Sie das TV-Gerät an einem Tisch, um ein Kippen nach vorne, Beschädigungen und Verletzungsgefahr zu verhindern. Um das TV-Gerät an einem Tisch zu montieren, führen Sie die mitgelieferte Schraube an der Rückseite des Standfußes ein, und ziehen Sie sie fest. 10 cm 10 cm 2 m 10 c 10 cm Schließen Sie das Stromkabel an eine Steckdose an.
16 MONTAGE UND VORBEREITUNG Befestigen des TV-Gerätes an einer Wand (Diese Funktion steht nicht bei allen Modellen zur Verfügung.) Verwendung des Kensington-Sicherheitssystems (Abhängig vom Modell) DEUTSCH DEU Der Anschluss des Kensington-Sicherheitssystems befindet sich an der Rückseite des TV-Gerätes. Weitere Informationen zur Installation und Verwendung finden Sie im Handbuch, das im Lieferumfang des Kensington-Sicherheitssystems enthalten ist, oder auf der Website unter .
MONTAGE UND VORBEREITUNG Wandmontage 10 cm 10 cm 10 cm 10 cm Verwenden Sie unbedingt Schrauben und Wandhalterungen, die der VESANorm entsprechen. Die Standardmaße der Wandmontagesätze können der folgenden Tabelle entnommen werden.
18 FERNBEDIENUNG FERNBEDIENUNG DEUTSCH DEU Die Beschreibungen in diesem Handbuch beziehen sich auf die Tasten der Fernbedienung. Lesen Sie dieses Handbuch bitte aufmerksam durch, und verwenden Sie das TVGerät bestimmungsgemäß. Um die Batterien zu wechseln, öffnen Sie das Batteriefach, wechseln Sie die Batterien (1,5 V, AAA), legen Sie die - und -Enden entsprechend der Kennzeichnung im Fach ein, und schließen Sie das Batteriefach. Gehen Sie zum Herausnehmen der Batterien in umgekehrter Reihenfolge vor.
DAS BENUTZERHANDBUCH VERWENDEN 19 DAS BENUTZERHANDBUCH VERWENDEN Im Benutzerhandbuch erhalten Sie auf einfache Weise detaillierte Informationen zum TV-Gerät. Öffnen Sie die Hauptmenüs mit der Taste SETTINGS. Drücken Sie die ROTE Taste, um zu den Kundendienst-Menüs zu gelangen. Drücken Sie die Navigationstasten, um zu Benutzerhandbuch zu gelangen, und drücken Sie OK.
20 WARTUNG / FEHLERBEHEBUNG WARTUNG Reinigung des TV-Gerätes Reinigen Sie Ihr TV-Gerät regelmäßig für eine optimale Leistung und eine verlängerte Produktlebensdauer. DEUTSCH DEU VORSICHT yy Achten Sie darauf, zuvor das Gerät auszuschalten und trennen Sie das Netzkabel sowie alle anderen Kabel vom Gerät bzw. der Steckdose.
MANUEL D'UTILISATION TÉLÉVISEUR LCD À LED / TÉLÉVISEUR LCD Veuillez lire attentivement ce manuel avant de mettre en service votre produit et conservez-le afin de pouvoir vous y référer ultérieurement. www.lg.
2 TABLE DES MATIÈRES TABLE DES MATIÈRES FRANÇAIS FRA 3 LICENCES 3 INFORMATIONS SUR LES LOGICIELS LIBRES 4 CONSIGNES DE SÉCURITÉ 10 PROCÉDURE D'INSTALLATION 10 ASSEMBLAGE ET PRÉPARATION 10 13 14 15 17 Déballage Pièces et boutons Soulever et déplacer la TV Installation sur une table Fixation du support mural 18 TÉLÉCOMMANDE 19 UTILISATION DU GUIDE DE L'UTILISATEUR 20 MAINTENANCE 20 20 20 Nettoyage de votre TV - Écran, cadre, boîtier et support - Cordon d’alimentation 20 DÉPANNAGE AVE
LICENCES / INFORMATIONS SUR LES LOGICIELS LIBRES 3 LICENCES Les licences prises en charge peuvent varier d'un modèle à l'autre. Pour plus d'informations sur les licences, consultez le site www.lg.com. Fabriqué sous licence de Dolby Laboratories. « Dolby » et le symbole double-D sont des marques commerciales de Dolby Laboratories. À PROPOS DES VIDÉOS DIVX : DIVX® est un format de vidéo numérique créé par DivX, LLC, filiale de Rovi Corporation.
4 CONSIGNES DE SÉCURITÉ CONSIGNES DE SÉCURITÉ Veuillez lire attentivement ces consignes de sécurité avant d'utiliser le produit.
CONSIGNES DE SÉCURITÉ 5 y Ne branchez pas trop d'appareils électriques sur une seule multiprise murale Le non-respect de cette consigne peut provoquer un incendie résultant d'une surchauffe. icca nt y Respectez les règles de sécurité lors de la mise au rebut des batteries pour éviter qu'un enfant ne les avale. En cas d'ingestion, consultez immédiatement un médecin.
6 CONSIGNES DE SÉCURITÉ FRANÇAIS FRA Ne démontez pas le produit, ne le réparez pas et n'y apportez aucune modification. yy Vous risqueriez de provoquer une électrocution ou un incendie. Contactez le centre de services pour les vérifications, les calibrages et les réparations. Si vous êtes confronté à l'une des situations suivantes, débranchez immédiatement yy le produit et contactez votre centre de services local.
CONSIGNES DE SÉCURITÉ 7 ATTENTION Installez le produit à l'écart des ondes radio. yy La distance entre une antenne extérieure et les lignes d'alimentation doit être yy suffisante pour éviter tout contact physique en cas de chute de l'antenne. Le non-respect de cette consigne peut provoquer une électrocution. Si vous essayez de monter le produit sur un mur, fixez une interface de montage VESA standard yy (pièces en option) à l'arrière du produit.
8 CONSIGNES DE SÉCURITÉ FRANÇAIS FRA Ne mettez pas le produit sous/hors tension en branchant et en débranchant le yy cordon d'alimentation de la prise. (N'utilisez pas le cordon d'alimentation en tant qu'interrupteur.) Vous risqueriez de provoquer une panne mécanique ou une électrocution. Veuillez suivre les instructions d'installation ci-après pour empêcher une surchauffe yy du produit. --La distance entre le produit et le mur doit être d'au moins 10 cm.
CONSIGNES DE SÉCURITÉ 9 Vous devez être deux pour déplacer ou déballer le produit car ce dernier est lourd. yy Le non-respect de cette consigne peut entraîner des blessures. Contactez le centre de services une fois par an pour nettoyer les composants yy internes du produit. Une accumulation de poussière peut provoquer des pannes mécaniques. L'écran haute technologie se caractérise par une résolution de deux millions à yy six millions de pixels.
10 PROCÉDURE D'INSTALLATION / ASSEMBLAGE ET PRÉPARATION REMARQUE FRANÇAIS FRA yy L’image ci-dessous peut être différente de celle affichée sur votre téléviseur. yy L'affichage à l'écran de votre TV peut différer légèrement de celui qui est présenté dans ce manuel. yy Les menus et options disponibles peuvent être différents selon la source d'entrée ou le modèle de produit utilisé. yy De nouvelles fonctionnalités pourront être ajoutées ultérieurement à ce téléviseur.
ASSEMBLAGE ET PRÉPARATION 11 Télécommande et piles (AAA) (voir p. 18) Manuel d’utilisation Chiffon de nettoyage (selon le modèle) Utilisez-le pour enlever la poussière du boîtier. Adaptateur (uniquement 19/22/26LS35**) (voir p. B-3) Vis du support 2EA, P4 x 20 (uniquement 19/22LS35**) (voir p. A-3) Vis du support 2EA, M4 x 14 (uniquement 26LS35**) (voir p. A-3) Vis du support 4EA, P4 x 16 4EA, M4 x 14 (uniquement 32LS35**) (voir p.
12 ASSEMBLAGE ET PRÉPARATION Corps du support / Base du support (uniquement 19/22/26LS35**) (voir p. A-3) FRANÇAIS FRA Corps du support / Base du support (uniquement 32LS35**) (voir p. A-3) Corps du support / Base du support (uniquement 26CS46**) (voir p. A-4) Corps du support / Base du support (uniquement 32/42CS46**, 32/42LS34**) (voir p.
ASSEMBLAGE ET PRÉPARATION 13 Pièces et boutons écrans Voyant d’alimentation Haut-parleurs OK Boutons tactiles SETTINGS INPUT Boutons tactiles2 Description Permet de parcourir les chaînes enregistrées. H Permet de régler le niveau du volume. H OK ꔉ SETTINGS INPUT /I 1 2 Permet de sélectionner l'option du menu en surbrillance ou de confirmer une entrée. Permet d'accéder au menu principal ou bien d'enregistrer votre entrée et de quitter les menus. Permet de changer la source d'entrée.
14 ASSEMBLAGE ET PRÉPARATION Soulever et déplacer la TV Lisez les consignes suivantes afin d'éviter de rayer ou d'endommager la TV en la déplaçant, en la soulevant ou en la transportant, quels que soient le type et les dimensions de l'appareil. yy Si votre téléviseur est volumineux, faites-vous aider par une autre personne. yy Lorsque vous transportez la TV, tenez-la comme indiqué sur l'illustration suivante.
ASSEMBLAGE ET PRÉPARATION Installation sur une table 1 Soulevez et positionnez la TV à la verticale sur une table. -- Laissez au moins 10 cm entre le mur et le moniteur pour assurer une bonne ventilation. 15 Fixation fiable de la TV sur une table (uniquement 32LS35**, 26/32/42CS46**, 32/42LS34**) Fixez la TV sur une table pour l'empêcher de s'incliner vers l'avant, de s'endommager et de provoquer potentiellement des blessures.
16 ASSEMBLAGE ET PRÉPARATION Fixation fiable de la TV au mur (Cette option n'est pas disponible sur tous les modèles.) Utilisation du système de sécurité Kensington (selon le modèle) Le connecteur du système de sécurité Kensington est situé à l’arrière du téléviseur. Pour plus d’informations sur l’installation et l’utilisation, reportez-vous au manuel fourni avec le système de sécurité Kensington ou consultez le site http:// www.kensington.com.
ASSEMBLAGE ET PRÉPARATION Fixation du support mural Prenez les précautions nécessaires pour fixer le support mural en option à l'arrière de la TV. Installez-le sur un mur solide perpendiculaire au sol. Contactez du personnel qualifié pour fixer la TV sur d'autres matériaux de construction. Pour l'installation murale, LG recommande l'intervention de professionnels qualifiés. 10 cm 10 cm 10 cm Veillez à utiliser des vis et un support mural conformes aux normes VESA.
18 TÉLÉCOMMANDE TÉLÉCOMMANDE FRANÇAIS FRA Les descriptions contenues dans ce manuel font référence aux touches de la télécommande. Veuillez lire attentivement ce manuel et utiliser correctement la TV. Pour changer les piles, ouvrez le couvercle et remplacez-les (modèle : 1,5 V AAA). Faites correspondre les pôles et avec les signes sur l'étiquette placée à l'intérieur du compartiment, puis refermez le couvercle. Pour retirer les piles, faites l'inverse de la procédure l'installation.
UTILISATION DU GUIDE DE L'UTILISATEUR 19 UTILISATION DU GUIDE DE L'UTILISATEUR Le guide de l'utilisateur vous permet d'accéder plus facilement aux informations complètes sur la TV. 2 3 Guide de l’utilisateur 1 Paramètre de CHAÎNE Paramètre d’IMAGE et de SON OPTION SON CONFIG HORLOGE VERROU OPTION SOURCE MES MÉDIAS 2 Zoom avant Fermer SETTINGS OPTION Langue Vous pouvez sélectionner la langue du menu affiché à l’écran et celle de la diffusion audio numérique.
20 MAINTENANCE / DÉPANNAGE MAINTENANCE Nettoyage de votre TV Nettoyez régulièrement votre TV pour conserver des performances optimales et pour allonger la durée de vie du produit. FRANÇAIS FRA ATTENTION yy Avant toute chose, veillez à couper l’alimentation et à débrancher le cordon d’alimentation et tous les autres câbles.
MANUALE DELL'UTENTE TV LCD LED / TV LCD Leggere attentamente il presente manuale prima di utilizzare l'apparecchio e conservarlo come riferimento futuro. www.lg.
2 INDICE INDICE ITALIANO ITA 3 LICENZE 3 AVVISO PER IL SOFTWARE OPEN SOURCE 4 ISTRUZIONI DI SICUREZZA 10 PROCEDURA DI INSTALLAZIONE 10 MONTAGGIO E PREPARAZIONE 10 14 15 16 18 Disimballaggio Componenti e pulsanti Sollevamento e spostamento del TV Montaggio su un tavolo Montaggio a parete 19 TELECOMANDO 20 UTILIZZO DELLA GUIDA UTENTE 21 MANUTENZIONE 21 21 21 Pulizia del televisore - Schermo, cornice, telaio e supporto - Cavo di alimentazione 21 RISOLUZIONE DEI PROBLEMI 22 SPECIFICHE
LICENZE / AVVISO PER IL SOFTWARE OPEN SOURCE 3 LICENZE Le licenze supportate possono variare da un modello all'altro. Per ulteriori informazioni sulle licenze, visitare il sito www.lg.com. Prodotto su licenza di Dolby Laboratories. "Dolby" e il simbolo a doppia D sono marchi di Dolby Laboratories. HDMI, il logo HDMI e High-Definition Multimedia Interface sono marchi commerciali o marchi registrati di HDMI Licensing LLC.
4 ISTRUZIONI DI SICUREZZA ISTRUZIONI DI SICUREZZA Leggere attentamente queste istruzioni di sicurezza prima di utilizzare il prodotto.
ISTRUZIONI DI SICUREZZA 5 y Non collegare troppi dispositivi elettrici a una singola presa multipla. Ciò potrebbe comportare il rischio di incendi dovuti a surriscaldamento. y Attenzione a non far cadere il prodotto quando si collegano dispositivi esterni. Ciò potrebbe causare lesioni alle persone o danni al prodotto. Des icca nt y Tenere il materiale anti-umidità o vinilico dell'imballaggio fuori dalla portata dei bambini. Il materiale antiumidità è nocivo, se ingerito.
6 ISTRUZIONI DI SICUREZZA ITALIANO ITA Non disassemblare, riparare o modificare il prodotto a propria discrezione. yy Vi è il rischio di provocare incendi o scosse elettriche. Rivolgersi al centro di assistenza per effettuare il controllo, la taratura o le riparazioni del caso. Se si verifica una delle seguenti circostanze, scollegare immediatamente il yy prodotto dall'alimentazione e contattare il centro di assistenza di zona.
ISTRUZIONI DI SICUREZZA 7 ATTENZIONE Installare il prodotto in un luogo privo di onde radio. yy Tra un'antenna esterna e le linee elettriche deve esserci una distanza sufficiente a yy impedire che la prima tocchi le seconde anche in caso di caduta dell'antenna per evitare il rischio di scosse elettriche. Se si intende montare il prodotto su una parete, collegare l'interfaccia di montaggio VESA standard yy (parti opzionali) al retro del prodotto.
8 ISTRUZIONI DI SICUREZZA Evitare di spegnere il prodotto scollegando il cavo dalla presa a muro. (Non usare yy la spina come interruttore.) Potrebbero verificarsi errori meccanici o scosse elettriche. ITALIANO ITA Seguire le istruzioni di installazione riportate di seguito per evitare il yy surriscaldamento del prodotto. --Collocare il prodotto a una distanza minima di 10 cm dalla parete.
ISTRUZIONI DI SICUREZZA 9 A causa del peso dell'apparecchio, si raccomanda di spostarlo o rimuoverlo dal yy suo imballaggio in due persone. In caso contrario, si possono subire lesioni. Contattare il centro servizi una volta l'anno per pulire le parti interne del prodotto. yy La polvere accumulata può causare danni meccanici. Il pannello è un prodotto ad alta tecnologia con risoluzione da due a sei milioni yy di pixel.
10 PROCEDURA DI INSTALLAZIONE / MONTAGGIO E PREPARAZIONE NOTA yy Il televisore raffigurato nell'immagine può essere diverso da quello in uso. yy Il menu OSD (On Screen Display) del TV potrebbe risultare leggermente diverso da quello mostrato in questo manuale. yy I menu e le opzioni disponibili possono essere diversi a seconda della sorgente in ingresso o del modello del prodotto utilizzati. yy In futuro possono essere aggiunte nuove funzioni al televisore.
MONTAGGIO E PREPARAZIONE Manuale dell’utente Supporto per cavi (in base al modello) (Vedere pag. A-5) Panno per la pulizia (in base al modello) Utilizzare questo panno per rimuovere la polvere dal telaio. Adattatore (Solo 19/22/26LS35**) (Vedere pag. B-3) Viti del supporto 2EA, P4 x 20 (Solo 19/22LS35**) (Vedere pag. A-3) Viti del supporto 2EA, M4 x 14 (Solo 26LS35**) (Vedere pag. A-3) Viti del supporto 4EA, P4 x 16 4EA, M4 x 14 (Solo 32LS35**) (Vedere pag.
12 MONTAGGIO E PREPARAZIONE Corpo del supporto / Base del supporto (Solo 19/22/26LS35**) (Vedere pag. A-3) Corpo del supporto / Base del supporto (Solo 32LS35**) (Vedere pag. A-3) ITALIANO ITA Corpo del supporto / Base del supporto (Solo 26CS46**) (Vedere pag. A-4) Corpo del supporto / Base del supporto (Solo 32/42CS46**, 32/42LS34**) (Vedere pag.
MONTAGGIO E PREPARAZIONE 13 NOTA yy Guida all’installazione dell’isolatore di antenna -- Utilizzare l’isolatore per installare la TV in un luogo in cui è presente una differenza di tensione tra il set della TV e il GND di segnale dell’antenna. »» Se tale differenza di tensione è presente, il contatto dell’antenna potrebbe scaldarsi e l’eccessivo calore potrebbe causare incidenti.
14 MONTAGGIO E PREPARAZIONE Componenti e pulsanti Schermo Telecomando e sensori intelligenti1 ITALIANO ITA Indicatore di alimentazione Altoparlanti OK Pulsanti a sfioramento SETTINGS INPUT Pulsanti a sfioramento2 Descrizione Consente di scorrere tra i programmi salvati. H Consente di regolare il livello del volume. H OK Consente di selezionare l'opzione di menu evidenziata o confermare un'opzione.
MONTAGGIO E PREPARAZIONE Sollevamento e spostamento del TV Prima di sollevare o spostare il televisore, leggere le seguenti indicazioni per evitare di graffiare o danneggiare l'apparecchio e per un trasporto sicuro a prescindere dal tipo e dalle dimensioni. 15 yy Per trasportare un televisore di grandi dimensioni occorrono 2 o 3 persone. yy Durante il trasporto, tenere il televisore come mostrato nell'illustrazione di seguito.
16 MONTAGGIO E PREPARAZIONE Montaggio su un tavolo 1 Sollevare ed inclinare il televisore in posizione verticale su un tavolo. -- Lasciare uno spazio (minimo) di 10 cm dalla parete per assicurare una ventilazione adeguata. Fissaggio della TV al tavolo (Solo 32LS35**, 26/32/42CS46**, 32/42LS34**) Fissare il televisore al tavolo per evitare cadute, danni ed eventuali lesioni. Per fissare la TV al tavolo, inserire e fissare le viti in dotazione sul retro del supporto.
MONTAGGIO E PREPARAZIONE Fissaggio della TV alla parete (Funzione non disponibile su tutti i modelli.) 17 Utilizzo del sistema di sicurezza Kensington (in base al modello) Il connettore del sistema di sicurezza Kensington è situato sul retro del televisore. Per ulteriori informazioni sull’installazione e l’utilizzo, consultare il manuale fornito in dotazione con il sistema di sicurezza Kensington o visitare il sito . Collegare il cavo del sistema di sicurezza Kensington tra il televisore ed un tavolo.
18 MONTAGGIO E PREPARAZIONE Montaggio a parete Montare attentamente la staffa per il montaggio a parete opzionale sul retro del televisore e fissare la staffa su una parete solida perpendicolare al pavimento. Per fissare il televisore su altri materiali da costruzione, contattare il personale qualificato. LG consiglia di far eseguire il montaggio a parete da un installatore qualificato esperto.
TELECOMANDO 19 TELECOMANDO Le descrizioni nel presente manuale si basano sui pulsanti del telecomando. Leggere attentamente il presente manuale e utilizzare correttamente il televisore. Per sostituire le batterie, aprire il coperchio del vano batterie, inserire le batterie (AAA da 1,5 V) rispettando le polarità e come indicato dall'etichetta all'interno del vano e chiudere il coperchio. Per rimuovere le batterie, eseguire la procedura di installazione all'inverso.
20 UTILIZZO DELLA GUIDA UTENTE UTILIZZO DELLA GUIDA UTENTE La guida utente consente di accedere più facilmente a informazioni dettagliate sul televisore. Premere SETTINGS per accedere ai menu principali. Premere il pulsante ROSSO per accedere ai menu Assistenza clienti. Premere i pulsanti di navigazione per scorrere fino a Manuale dell’utente, quindi premere OK. 1 2 3 Manuale dell’utente 1 Impostazione CONFIG.
MANUTENZIONE / RISOLUZIONE DEI PROBLEMI 21 MANUTENZIONE Pulizia del televisore Pulire regolarmente il televisore per mantenerne le prestazioni ottimali e per estenderne la durata nel tempo. ATTENZIONE yy Innanzitutto, accertarsi di spegnere e di scollegare il cavo di alimentazione e tutti gli altri cavi.
22 SPECIFICHE TECNICHE SPECIFICHE TECNICHE Le specifiche del prodotto precedentemente indicate possono subire modifiche senza preavviso in seguito all’aggiornamento delle funzioni del prodotto. MODELLI ITALIANO ITA 19LS35** 22LS35** 26LS35** 19LS3500-ZA 19LS350S-ZA 19LS350T-ZA 22LS3500-ZA 22LS350S-ZA 22LS350T-ZA 22LS3510-ZB 22LS3590-ZC 26LS3500-ZA 26LS350S-ZA 26LS350T-ZA 26LS3510-ZB 26LS3590-ZC 26LS359S-ZC 26LS359T-ZC 523,0 x 376,0 x 140.
SPECIFICHE TECNICHE Dimensione modulo CI (L x A x P) 23 100,0 mm x 55,0 mm x 5,0 mm Temperatura di funzionamento Da 0 °C a 40 °C Condizioni Umidità operativa Inferiore all'80% ambientali Temperatura di stoccaggio Da -20 °C a 60 °C Umidità di stoccaggio Inferiore all’85% TV digitale2 TV digitale TV digitale TV analogica Sistema televisivo DVB-T DVB-C DVB-S/S2 DVB-T/T2 DVB-C DVB-T DVB-C SECAM L/L’3 , PAL/SECAM B/G/D/K Copertura programma VHF, UHF C-Band, Ku-Band VHF, UHF Numero massimo
5HDU 6LGH + 3 287 6,) +'0, 70'6 70'6 '3 '0 + 3 / 5 73 71 53 51 63',) 6& B5 * % 6& B&9%6B,1 )(B 9287 / 5 5*% + 9 &9%6 < 3E 3U / 5 78B&9%6 ,) 86% (7+(51(7 63',) ͷΆͽͽ͑΄ʹͲ΅ 3& '9, $XGL ,Q 5*% 3& &RPSRQHQW $9 &20021 +'0, '9, $79 6, ; WDO 0 ; 'LDJUDPPL D EORFFKL 6 /5 7 & /* $ ,& , 6 ͺ ͽͶ͵ΐ ͼͶΊͣ ͼͶΊ͢ ,& %XIIHU 7& /&; )7 $XGLR $03 67$ %: &21752/ ,5 /(' 62)7 728&+ 7$&7 6:,7&+ )(B76B'$7$> @ 76B'$7$> @ 3&0B$> @ 3&0B'$
5HDU 6LGH + 3 287 6,) +'0, 70'6 70'6 '3 '0 + 3 / 5 73 71 53 51 63',) 6& B5 * % 6& B&9%6B,1 )(B 9287 / 5 5*% + 9 &9%6 < 3E 3U / 5 78B&9%6 )(B76> @ 6<1& 9$/,' &/.
5HDU 6LGH + 3 287 6,) +'0, 70'6 70'6 '3 '0 + 3 / 5 73 71 53 51 63',) 6& B5 * % 6& B&9%6B,1 )(B 9287 / 5 5*% + 9 &9%6 < 3E 3U / 5 78B&9%6 )(B76> @ 6<1& 9$/,' &/.
MANUAL DE USUARIO TV LCD LED / TV LCD Antes de utilizar el equipo, lea este manual con atención y consérvelo para consultarlo cuando lo necesite. www.lg.
2 CONTENIDO CONTENIDO ESPAÑOL ESP 3 LICENCIAS 3 AVISO DE SOFTWARE DE CÓDIGO ABIERTO 4 INSTRUCCIONES DE SEGURIDAD 10 PROCEDIMIENTO DE INSTALACIÓN 10 MONTAJE Y PREPARACIÓN 10 13 14 15 17 Desembalaje Piezas y botones Elevación y desplazamiento de la TV Montaje en una mesa Montaje en una pared 18 MANDO A DISTANCIA 19 USO DE LA GUÍA DEL USUARIO 20 MANTENIMIENTO 20 20 20 Limpieza de la TV - Pantalla, marco, carcasa y soporte - Cable de alimentación 20 SOLUCIÓN DE PROBLEMAS ADVERTENCIA yy
LICENCIAS / AVISO DE SOFTWARE DE CÓDIGO ABIERTO 3 LICENCIAS Las licencias admitidas pueden diferir según el modelo. Para obtener más información acerca de las licencias, visite www.lg.com. Fabricado bajo licencia de Dolby Laboratories. "Dolby" y el símbolo de la doble D son marcas comerciales de Dolby Laboratories. HDMI, el logotipo HDMI y High-Definition Multimedia Interface son marcas comerciales o marcas registradas de HDMI Licensing LLC.
4 INSTRUCCIONES DE SEGURIDAD INSTRUCCIONES DE SEGURIDAD Lea detenidamente estas instrucciones de seguridad antes de utilizar el producto.
INSTRUCCIONES DE SEGURIDAD 5 y No enchufe demasiados dispositivos eléctricos a una misma toma de alimentación eléctrica múltiple. De lo contrario, podría producirse un incendio por exceso de calentamiento. y No golpee ni deje caer el producto cuando lo conecta a dispositivos externos. De lo contrario, podrían producirse lesiones personales o daños en el producto. Des icca nt y Mantenga el embalaje de vinilo o de material aislante lejos del alcance de los niños.
6 INSTRUCCIONES DE SEGURIDAD No desmonte, repare ni modifique el producto según su criterio. yy Puede causar un incendio o una descarga eléctrica. Póngase en contacto con el centro de atención al cliente para cualquier comprobación, calibración o reparación. Si ocurre algo de lo indicado a continuación, desenchufe inmediatamente el yy producto y póngase en contacto con su centro de servicio local.
INSTRUCCIONES DE SEGURIDAD 7 PRECAUCIÓN Instale el producto en un lugar alejado de ondas de radio. yy Entre la antena exterior y las líneas de alimentación debe dejarse una distancia yy suficiente como para evitar que se entren en contacto, incluso en caso de caída de la antena. Podría producirse una descarga eléctrica. No instale el producto en lugares como un estante poco estable o una superficie yy inclinada.
8 INSTRUCCIONES DE SEGURIDAD No encienda ni apague el producto enchufando y desenchufando la clavija a la yy toma de pared. (No utilice la clavija para como un interruptor). Puede provocar un fallo mecánico o una descarga eléctrica. Siga las instrucciones de instalación que se indican a continuación para evitar que yy el producto se sobrecaliente. --La distancia entre el producto y la pared ha de ser de al menos 10 cm. --No instale el producto en un lugar sin ventilación (p. ej.
INSTRUCCIONES DE SEGURIDAD 9 Dado el elevado peso del producto, muévalo o desembálelo siempre con la ayuda yy de alguien. De lo contrario, se pueden producir daños personales. Póngase en contacto con el centro de atención al cliente para limpiar las piezas yy internas del producto una vez al año. El polvo acumulado podría producir un fallo mecánico. Solicite cualquier reparación necesaria al personal cualificado.
10 PROCEDIMIENTO DE INSTALACIÓN / MONTAJE Y PREPARACIÓN NOTA yy La imagen que se muestra puede diferir de la de su TV. yy Es posible que el menú en pantalla (OSD) de la TV no coincida exactamente con el de las imágenes incluidas en este manual. yy Los menús y las opciones disponibles pueden diferir según la fuente de entrada o modelo de producto que emplee. yy Puede que en el futuro se incorporen nuevas funciones a esta TV. yy La TV puede ponerse en modo de espera para reducir el consumo de energía.
MONTAJE Y PREPARACIÓN 11 Manual de usuario Organizador de cables (En función del modelo) (Consulte la página. A-5) Paño para limpieza (En función del modelo) Utilícelo para limpiar el polvo de la carcasa. Adaptador (Solo 19/22/26LS35**) (Consulte la páginas. B-3) Tornillos del soporte 2EA, P4 x 20 (Solo 19/22LS35**) (Consulte la páginas. A-3) Tornillos del soporte 2EA, M4 x 14 (Solo 26LS35**) (Consulte la páginas.
12 MONTAJE Y PREPARACIÓN Cuerpo del soporte / base del soporte (Solo 19/22/26LS35**) (Consulte la página. A-3) Cuerpo del soporte / base del soporte (Solo 32LS35**) (Consulte la página. A-3) ESPAÑOL ESP Cuerpo del soporte / base del soporte (Solo 26CS46**) (Consulte la página. A-4) Cuerpo del soporte / base del soporte (Solo 32/42CS46**, 32/42LS34**) (Consulte la página.
MONTAJE Y PREPARACIÓN 13 Piezas y botones Screen Mando a distancia y sensores inteligentes1 Indicador de encendido OK SETTINGS INPUT Botones táctiles2 Botones táctiles Descripción Permiten desplazarse por los programas almacenados. H Permiten ajustar el nivel de volumen. H OK Permite seleccionar la opción resaltada del menú o confirmar una entrada. SETTINGS Permite acceder al menú principal o guardar la información introducida y salir de los menús. Permite cambiar la fuente de entrada.
14 MONTAJE Y PREPARACIÓN Elevación y desplazamiento de la TV Antes de levantar o mover la TV, lea la información siguiente para evitar arañar o dañar la TV y transportarla de manera segura, independientemente del tipo y tamaño de que se trate. yy Para transportar una TV grande, se necesitan como mínimo dos personas. yy Cuando transporte la TV con las manos, sujétela como se muestra en la ilustración siguiente. PRECAUCIÓN yy Procure en todo momento no tocar la pantalla, ya que podría dañarla.
MONTAJE Y PREPARACIÓN Montaje en una mesa 1 Levante la TV e inclínela hasta la posición vertical sobre una mesa. -- Deje un espacio de 10 cm (como mínimo) con respecto a la pared para permitir una ventilación adecuada. 15 Cómo fijar la TV a una mesa (Solo 32LS35**, 26/32/42CS46**, 32/42LS34**) Fije la TV a la mesa para evitar que se incline hacia delante, que se dañe o que pueda infringir lesiones personales.
16 MONTAJE Y PREPARACIÓN Cómo fijar la TV a una pared (Esta función no está disponible en todos los modelos). Uso del sistema de seguridad Kensington (En función del modelo) El conector del sistema de seguridad Kensington se encuentra en la parte posterior de la TV. Para obtener más información sobre la instalación y el uso, consulte el manual que se incluye con el sistema de seguridad Kensington, o visite . Utilice el cable del sistema de seguridad Kensington para conectar la TV a una mesa.
MONTAJE Y PREPARACIÓN Montaje en una pared Monte un soporte de montaje en pared opcional en la parte posterior de la TV con cuidado e instale el soporte de montaje en una pared robusta y perpendicular con respecto al suelo. Si desea fijar la TV sobre otros materiales del edificio, póngase en contacto con personal cualificado. LG recomienda que un profesional cualificado instale el soporte de pared.
18 MANDO A DISTANCIA MANDO A DISTANCIA Las descripciones que aparecen en este manual se basan en los botones del mando a distancia. Lea este manual con detenimiento y utilice la TV correctamente. Para cambiar las pilas, abra la tapa del compartimento, sustitúyalas (AAA de 1,5 V) haciendo coincidir los polos y con las indicaciones de la etiqueta del interior del compartimento, y vuelva a colocar la tapa. Para quitar las pilas, realice el proceso de instalación en orden inverso.
USO DE LA GUÍA DEL USUARIO 19 USO DE LA GUÍA DEL USUARIO La Guía del usuario permite acceder más fácilmente a información detallada del TV. Pulse SETTINGS para acceder a los menús principales. Pulse el botón ROJO para acceder a los menús de Asistencia al cliente. Pulse los botones de navegación para desplazarse hasta Guía del Usuario y pulse OK.
20 MANTENIMIENTO / SOLUCIÓN DE PROBLEMAS MANTENIMIENTO Limpieza de la TV Limpie la TV con regularidad para mantener el mejor rendimiento y prolongar la vida del producto. PRECAUCIÓN yy En primer lugar, apague el aparato y desconecte el cable de alimentación y el resto de cables. yy Si no va usar la TV durante un periodo prolongado, desconecte el cable de alimentación de la toma de pared para evitar posibles daños por rayos o subidas de corriente.
MANUAL DE INSTRUÇÕES TV LCD LED / TV LCD Leia este manual com atenção antes de utilizar o dispositivo e guarde-o para futura referência. www.lg.
2 ÍNDICE ÍNDICE PORTUGUÊS PT 3 LICENÇAS 3 NOTAS SOBRE SOFTWARE DE CÓDIGO ABERTO 4 INSTRUÇÕES DE SEGURANÇA 10 PROCEDIMENTO DE INSTALAÇÃO 10 MONTAGEM E PREPARAÇÃO 10 13 14 15 17 Desembalar Peças e botões Levantar e deslocar a TV Montar numa mesa Montagem numa mesa 18 CONTROLO REMOTO 19 COMO UTILIZAR O GUIA DO UTILIZADOR 20 MANUTENÇÃO 20 20 20 Limpar a TV - Ecrã, estrutura, caixa e suporte - Cabo de alimentação 20 RESOLUÇÃO DE PROBLEMAS AVISO yy Se ignorar a mensagem de aviso, poderá
LICENÇAS /NOTAS SOBRE SOFTWARE DE CÓDIGO ABERTO 3 LICENÇAS As licenças suportadas podem ser diferentes consoante o modelo. Para mais informações sobre as licenças, visite www.lg.com. Fabricado sob licença da Dolby Laboratories. “Dolby”, bem como o símbolo D duplo, são marcas comerciais da Dolby Laboratories. HDMI, o logótipo HDMI e High-Definition Multimedia Interface são marcas comerciais ou marcas registadas da HDMI Licensing LLC.
4 INSTRUÇÕES DE SEGURANÇA INSTRUÇÕES DE SEGURANÇA Leia atentamente estas precauções de segurança antes de utilizar o produto. AVISO y Não coloque a TV nem o controlo remoto nos seguintes ambientes: - Um local exposto à luz directa do sol - Um local com humidade elevada, como p. ex. uma casa de banho - Próximo de fontes de calor como p. ex.
INSTRUÇÕES DE SEGURANÇA 5 y Não ligue demasiados aparelhos eléctricos num único bloco de tomadas eléctricas. Caso contrário, isto poderá provocar um incêndio devido ao sobreaquecimento. y Não deixe cair o produto nem deixe que este caia acidentalmente ao ligar aparelhos externos. Caso contrário, poderá provocar ferimentos ou danos do produto. Des icca nt y Mantenha o material dissecador da embalagem ou a película de vinil fora do alcance das crianças. O material dissecador é nocivo se for ingerido.
6 INSTRUÇÕES DE SEGURANÇA Não desmontar, reparar ou modificar o produto sem ajuda de um especialista. yy Se o fizer, poderá dar origem a incêndios ou choques eléctricos. Contacte o centro de assistência para qualquer verificação, calibração ou reparação. Se ocorrer uma das seguintes situações, desligue o produto imediatamente da yy tomada e entre em contacto com o seu serviço de assistência local.
INSTRUÇÕES DE SEGURANÇA 7 ATENÇÃO Instale o produto num local que não esteja exposto a ondas de rádio. yy Deve garantir uma distância satisfatória entre uma antena exterior e as linhas elécyy tricas para evitar que a antena toque nestas, mesmo se cair. Isto pode provocar um choque eléctrico. Não instale o produto em locais como p. ex. prateleiras instáveis ou superfícies inyy clinadas. Deve evitar também locais sujeitos a vibração ou sem suporte suficiente.
8 INSTRUÇÕES DE SEGURANÇA Não ligue/desligue o produto retirando/colocando a ficha da tomada. (Não utilize a yy ficha eléctrica como interruptor.) Isto poderá provocar danos mecânicos ou choques eléctricos. Siga as seguintes instruções de instalação para evitar o sobreaquecimento do yy produto. --A distância entre o produto e a parede deve ser superior a 10 cm. --Não instale o produto num local sem ventilação (p. ex. numa prateleira ou num armário).
INSTRUÇÕES DE SEGURANÇA 9 Ao desembalar ou mudar o produto de sítio, deve trabalhar em conjunto com outra yy pessoa porque o produto é pesado. Caso contrário, poderá provocar ferimentos. Contacte o centro de assistência uma vez por ano para limpar os componentes yy internos do projector. O pó acumulado pode provocar avarias mecânicas. Para reparações, contacte a assistência técnica qualificada.
10 PROCEDIMENTO DE INSTALAÇÃO/MONTAGEM E PREPARAÇÃO NOTA yy A imagem indicada pode diferir da sua TV. yy A OSD (On Screen Display - Visualização no ecrã) da sua TV pode ser um pouco diferente da apresentada neste manual. yy Os menus e opções disponíveis podem ser diferentes da fonte de entrada ou do modelo de produto que está a utilizar. yy Poderão ser adicionadas novas funcionalidades a esta TV no futuro. yy A TV pode ser colocada em modo de espera para reduzir o consumo eléctrico.
MONTAGEM E PREPARAÇÃO Manual de instruções Suporte do cabo (Dependendo do modelo) (Consulte a p. A-5) Pano de limpeza (Dependendo do modelo) Utilize este pano para remover o pó da caixa. Transformador (Apenas 19/22/26LS35**) (Consulte a p. B-3) Parafusos do suporte 2 de cada, P4 x 20 (Apenas 19/22LS35**) (Consulte a p. A-3) Parafusos do suporte 2 de cada, M4 x 14 (Apenas 26LS35**) (Consulte a p. A-3) Parafusos do suporte 4 de cada, P4 x 16 4 de cada, M4 x 14 (Apenas 32LS35**) (Consulte a p.
12 MONTAGEM E PREPARAÇÃO Corpo do suporte/base do suporte (Apenas 19/22/26LS35**) (Consulte a p. A-3) Corpo do suporte/base do suporte (Apenas 32LS35**) (Consulte a p. A-3) Corpo do suporte/base do suporte (Apenas 26CS46**) (Consulte a p. A-4) PORTUGUÊS PT Corpo do suporte/base do suporte (Apenas 32/42CS46**, 32/42LS34**) (Consulte a p.
MONTAGEM E PREPARAÇÃO 13 Peças e botões Imagem Controlo remoto e sensores inteligentes1 Indicador de potência Colunas Botões de toque SETTINGS INPUT Botões de toque2 Descrição Percorre os programas gravados. H Ajusta o nível de volume. H OK ꔉ SETTINGS INPUT /I 1 2 Selecciona a opção de menu que está realçada ou confirma uma introdução. Acede ao menu inicial ou guarda o que o utilizador introduziu e sai dos menus. Altera a fonte de entrada. Liga e desliga a alimentação.
14 MONTAGEM E PREPARAÇÃO Levantar e deslocar a TV Quando deslocar ou levantar a TV, leia as seguintes instruções para impedir que esta fique riscada ou danificada e para garantir um transporte seguro independentemente do seu tipo ou tamanho. yy Uma TV de grandes dimensões deve ser transportada, no mínimo, por 2 pessoas. yy Quando transportar a TV à mão, segure-a conforme mostrado na seguinte ilustração. ATENÇÃO yy Evite sempre tocar no ecrã, uma vez que pode causar danos no ecrã.
MONTAGEM E PREPARAÇÃO Montar numa mesa 1 Levante e incline a TV até esta ficar na posição vertical na mesa. -- Deixe um espaço livre de 10 cm (no mínimo) em relação à parede para uma ventilação adequada. 15 Fixar a TV numa mesa (Apenas 32LS35**, 26/32/42CS46**, 32/42LS34**) Fixe a TV numa mesa para impedir inclinações para a frente, danos e eventuais ferimentos. Para fixar a TV numa mesa, introduza e aperte o parafuso fornecido na parte de trás do suporte.
16 MONTAGEM E PREPARAÇÃO Fixar a TV numa parede (Esta função não está disponível para todos os modelos.) Utilizar o sistema de segurança “Kensington” (Dependendo do modelo) O conector do sistema de segurança Kensington está localizado na parte posterior da TV. Para mais informações sobre a sua instalação e utilização, consulte o manual fornecido com o sistema de segurança Kensington ou visite http://www. kensington.com. Ligue o cabo do sistema de segurança Kensington entre a TV e uma mesa.
MONTAGEM E PREPARAÇÃO Montagem numa mesa Fixe cuidadosamente um suporte de montagem na parede opcional na parte de trás da TV e monte o suporte numa parede sólida perpendicular ao chão. Quando montar a TV noutros materiais de construção, consulte pessoal qualificado. A LG recomenda que a montagem na parede seja executada por um profissional qualificado.
18 CONTROLO REMOTO CONTROLO REMOTO As descrições deste manual baseiam-se nos botões do controlo remoto. Leia cuidadosamente este manual e utilize correctamente a TV. Para substituir as pilhas, abra a tampa do compartimento das pilhas, substitua as pilhas (1,5 V AAA) fazendo corresponder as extremidades e com a etiqueta no interior do compartimento e feche a tampa do compartimento das baterias. Para remover as pilhas, execute as acções de instalação pela ordem inversa.
COMO UTILIZAR O GUIA DO UTILIZADOR 19 COMO UTILIZAR O GUIA DO UTILIZADOR O Guia do Utilizador permite um acesso mais fácil às informações detalhadas da TV. 1 Prima SETTINGS para aceder aos menus Guia do Utilizador 1 OPÇÃO > Para definir o idioma principais. SETTINGS OPÇÃO Idioma 2 Prima o botão VERMELHO para aceder ao É possível seleccionar o idioma do menu apresentado no ecrã e da transmissão de som digital. • Idioma do menu : Selecciona um idioma para o texto do ecrã. menu Apoio ao cliente.
20 MANUTENÇÃO/RESOLUÇÃO DE PROBLEMAS MANUTENÇÃO Limpar a TV Limpe regularmente a TV para manter o melhor desempenho e prolongar a vida útil do aparelho. ATENÇÃO yy Não se esqueça de primeiro desligar a alimentação, e desligar o cabo de alimentação da tomada eléctrica e todos os outros cabos.
GEBRUIKERSHANDLEIDING LED LCD-TV / LCD-TV Lees deze handleiding zorgvuldig door voordat u het apparaat bedient en bewaar de handleiding op een veilige plek zodat u deze in de toekomst kunt raadplegen. www.lg.
2 INHOUDSOPGAVE INHOUDSOPGAVE NEDERLANDS DUT 3 LICENTIES 3 VERKLARING OVER OPEN SOURCESOFTWARE 4 VEILIGHEIDSINSTRUCTIES 10 INSTALLATIEPROCEDURE 10 MONTEREN EN VOORBEREIDEN 10 13 14 15 17 Uitpakken Onderdelen en knoppen De TV optillen en verplaatsen Op een tafelblad plaatsen Aan een muur monteren 18 AFSTANDSBEDIENING 19 DE GEBRUIKSAANWIJZING GEBRUIKEN 20 ONDERHOUD 20 20 20 De TV schoonmaken - Scherm, frame, behuizing en standaard - Netsnoer 20 PROBLEMEN OPLOSSEN WAARSCHUWING yy Als
LICENTIES/VERKLARING OVER OPEN SOURCE-SOFTWARE 3 LICENTIES Ondersteunde licenties kunnen per model verschillen. Ga voor meer informatie over de licenties naar www. lg.com. Geproduceerd onder licentie van Dolby Laboratories. "Dolby" en het symbool met de dubbele D zijn handelsmerken van Dolby Laboratories. HDMI, het HDMI-logo en High-Definition Multimedia Interface zijn handelsmerken of geregistreerde handelsmerken van HDMI Licensing LLC.
4 VEILIGHEIDSINSTRUCTIES VEILIGHEIDSINSTRUCTIES Lees deze veiligheidsmaatregelen zorgvuldig door voordat u het product gebruikt.
VEILIGHEIDSINSTRUCTIES 5 y Sluit niet te veel elektrische apparaten op één meervoudige contactdoos aan. Dit kan leiden tot brand als gevolg van oververhitting. y Laat het product niet vallen of omkantelen wanneer u externe apparaten aansluit. Hierdoor kunt u zich bezeren of het product beschadigen. Des icca nt y Houd het antivochtverpakkingsmateriaal en de vinyl verpakking buiten het bereik van kinderen. Antivochtmateriaal is schadelijk bij inslikken.
6 VEILIGHEIDSINSTRUCTIES Breng geen veranderingen aan in het product en demonteer of repareer het niet. yy Dit kan leiden tot brand of elektrische schokken. Neem contact op met de klantenservice als u het product wilt laten controleren, kalibreren of repareren. Trek in de volgende gevallen de stekker uit het stopcontact en neem direct contact yy op met de dichtstbijzijnde klantenservice. --Er is hard tegen het product gestoten. --Het product is beschadigd.
VEILIGHEIDSINSTRUCTIES 7 ATTENTIE Installeer het product uit de buurt van apparaten die werken met radiogolven. yy Er moet genoeg ruimte tussen een buitenantenne en elektrische leidingen zijn om yy te voorkomen dat de antenne, zelfs wanneer deze komt te vallen, in aanraking komt met de leidingen. Dit kan een elektrische schok veroorzaken. Installeer het product niet op of schuine oppervlakken of instabiele plekken zoals yy een wankele plank.
8 VEILIGHEIDSINSTRUCTIES Schakel het product niet in of uit door de stroomstekker in het stopcontact te yy steken of eruit te verwijderen. (Gebruik het netsnoer niet als aan/uit-schakelaar.) Dit kan mechanische storing of een elektrische schok veroorzaken. Volg de onderstaande installatie-instructies om te voorkomen dat het product yy oververhit raakt. --De afstand tussen het product en de muur dient minstens 10 cm te bedragen.
VEILIGHEIDSINSTRUCTIES 9 Het product is zwaar. Probeer dus nooit om het alleen te verplaatsen of uit te yy pakken. Doe dit samen met iemand anders. Anders kunt u zich bezeren. Neem eenmaal per jaar contact op met een servicecentrum om de interne yy onderdelen van het product te laten reinigen. Opeengehoopt stof kan mechanische storingen veroorzaken. Laat al het onderhoud verrichten door erkend onderhoudspersoneel.
10 INSTALLATIEPROCEDURE/MONTEREN EN VOORBEREIDEN OPMERKING yy Uw TV kan afwijken van de getoonde afbeelding. yy De OSD (schermweergave) van uw TV kan enigszins afwijken van de afbeeldingen in deze handleiding. yy De beschikbare menu's en opties kunnen per gebruikte invoerbron en per model verschillen. yy Mogelijk wordt deze TV in de toekomst voorzien van nieuwe functies. yy De TV kan in stand-bymodus worden geplaatst om het stroomverbruik te verminderen.
MONTEREN EN VOORBEREIDEN 11 Gebruikershandleiding Kabelhouder (afhankelijk van het model) (Zie pag. A-5) Reinigingsdoekje (afhankelijk van het model) Hiermee kunt u de behuizing afstoffen. DC-adapter (Alleen 19/22/26LS35**) (Zie pag. B-3) Schroeven van standaard 2EA, P4 x 20 (Alleen 19/22LS35**) (Zie pag. A-3) Schroeven van standaard 2EA, M4 x 14 (Alleen 26LS35**) (Zie pag. A-3) Schroeven van standaard 4EA, P4 x 16 4EA, M4 x 14 (Alleen 32LS35**) (Zie pag.
12 MONTEREN EN VOORBEREIDEN Standaard/basis van standaard (Alleen 19/22/26LS35**) (Zie pag. A-3) Standaard/basis van standaard (Alleen 32LS35**) (Zie pag. A-3) Standaard/basis van standaard (Alleen 26CS46**) (Zie pag. A-4) Standaard/basis van standaard (Alleen 32/42CS46**, 32/42LS34**) (Zie pag.
MONTEREN EN VOORBEREIDEN 13 Onderdelen en knoppen Scherm Afstandsbediening en intelligente sensors1 Stroomindicator Luidsprekers OK INPUT Aanraakknoppen2 Beschrijving Hiermee worden de opgeslagen programma's doorlopen. H Hiermee regelt u het volumeniveau. H OK ꔉ SETTINGS INPUT /I Hiermee wordt de gemarkeerde menuoptie gekozen, of een invoer bevestigd. Hiermee wordt het hoofdmenu opgeroepen, of de invoer opgeslagen en de menu's gesloten. Hiermee wordt de invoerbron veranderd.
14 MONTEREN EN VOORBEREIDEN De TV optillen en verplaatsen Lees het onderstaande als u de TV wilt optillen of verplaatsen om te voorkomen dat de TV gekrast of beschadigd raakt, en als u de TV veilig wilt vervoeren, ongeacht het type en afmeting. yy Voor het vervoeren van een grote TV zijn ten minste 2 mensen nodig. yy Wanneer de TV met de hand wordt vervoerd, houdt u de TV vast zoals aangegeven in de onderstaande afbeelding.
MONTEREN EN VOORBEREIDEN Op een tafelblad plaatsen 1 Til de TV op, kantel deze rechtop en zet de TV op het tafelblad. -- Laat een ruimte vrij van (minimaal) 10 cm vanaf de muur voor een goede ventilatie. 15 De TV aan een tafel bevestigen (Alleen 32LS35**, 26/32/42CS46**, 32/42LS34**) Bevestig de TV aan een tafel om te voorkomen dat deze voorover valt en beschadigd raakt of letsel veroorzaakt.
16 MONTEREN EN VOORBEREIDEN De TV aan een muur bevestigen (Deze functie is niet op alle modellen beschikbaar.) Het Kensington-veiligheidssysteem gebruiken (afhankelijk van het model) Uw TV kan afwijken van de getoonde afbeelding. De aansluiting voor het Kensingtonveiligheidssysteem bevindt zich aan de achterkant van de TV. Voor meer informatie over de installatie en het gebruik hiervan raadpleegt u de handleiding die werd geleverd bij het Kensingtonveiligheidssysteem of gaat u naar http://www. kensington.
MONTEREN EN VOORBEREIDEN Aan een muur monteren Bevestig voorzichtig een optionele muurbevestigingssteun op de achterkant van de TV en monteer de muurbevestigingssteun aan een massieve muur die loodrecht op de vloer staat. Als u de TV monteert op andere bouwmaterialen, vraagt u advies aan vakmensen. LG raadt aan dat de muurbevestiging uitgevoerd wordt door een erkende professionele installateur. 10 cm 10 cm 10 cm 10 cm Gebruik schroeven en een muurbevestigingssteun die voldoen aan de VESA-norm.
18 AFSTANDSBEDIENING AFSTANDSBEDIENING De beschrijvingen in deze handleiding gaan uit van de toetsen op de afstandsbediening. Lees deze handleiding aandachtig door en bedien de TV op de juiste wijze. Om de batterijen te vervangen, opent u het klepje van het batterijvak, vervangt u de batterijen (1,5 V AAA-formaat) waarbij u let op de juiste richting van de - en -polen op de sticker in het batterijvak, en sluit u het klepje van het batterijvak.
DE GEBRUIKSAANWIJZING GEBRUIKEN 19 DE GEBRUIKSAANWIJZING GEBRUIKEN Met de gebruiksaanwijzing kunt u de uitgebreide TV-informatie gemakkelijker oproepen. Druk op SETTINGS voor toegang tot de hoofdmenu’s. Druk op de RODE knop voor toegang tot de klantenservice-menu’s. Druk op de navigatieknoppen om naar Gebruiksaanwijzing te bladeren en druk op OK.
20 ONDERHOUD/PROBLEMEN OPLOSSEN ONDERHOUD De TV schoonmaken Voor de beste prestaties en een langere levensduur moet u de TV regelmatig schoonmaken. ATTENTIE yy Zorg dat u eerst de power knop uitzet, haal de stroomstekker uit het stopcontact en maak de alle kabels los. yy Indien de TV voor een langere tijd niet gebruikt wordt, haal de stroomstekker uit het stopcontact om mogelijk schade door onweer of stroompieken te voorkomen.
ΕΓΧΕΙΡΙΔΙΟ ΧΡΗΣΤΗ ΤΗΛΕΟΡΑΣΗ LED LCD / ΤΗΛΕΟΡΑΣΗ LCD Πριν θέσετε σε λειτουργία τη συσκευή, διαβάστε προσεκτικά το παρόν εγχειρίδιο και φυλάξτε το σε ασφαλές μέρος για μελλοντική αναφορά. www.lg.
2 ΠΙΝΑΚΑΣ ΠΕΡΙΕΧΟΜΕΝΩΝ ΠΙΝΑΚΑΣ ΠΕΡΙΕΧΟΜΕΝΩΝ 3 ΆΔΕΙΕΣ ΧΡΉΣΗΣ ΕΛΛΗΝΙΚΑ ELL 3 ΣΗΜΕΙΩΣΗ ΓΙΑ ΤΟ ΛΟΓΙΣΜΙΚΟ ΑΝΟΙΧΤΟΥ ΚΩΔΙΚΑ 4 ΟΔΗΓΊΕΣ ΣΧΕΤΙΚΆ ΜΕ ΤΗΝ ΑΣΦΆΛΕΙΑ 10 ΔΙΑΔΙΚΑΣΊΑ ΕΓΚΑΤΆΣΤΑΣΗΣ 10 ΣΥΝΑΡΜΟΛΟΓΗΣΗ ΚΑΙ ΠΡΟΕΤΟΙΜΑΣΙΑ 10 13 14 15 17 Αφαίρεση συσκευασίας Εξαρτήματα και κουμπιά Ανύψωση και μετακίνηση της τηλεόρασης Επιτραπέζια τοποθέτηση Επιτοίχια τοποθέτηση 18 ΤΗΛΕΧΕΙΡΙΣΤΗΡΙΟ 19 ΧΡΉΣΗ ΤΟΥ ΟΔΗΓΟΎ ΧΡΉΣΗΣ 20 ΣΥΝΤΗΡΗΣΗ 20 20 20 Καθαρισμός της τηλεόρασης - Οθόνη, πλαίσιο, έπιπλο και βάση - Καλώδιο
ΑΔΕΙΕΣ ΧΡΗΣΗΣ / ΣΗΜΕΙΩΣΗ ΓΙΑ ΤΟ ΛΟΓΙΣΜΙΚΟ ΑΝΟΙΧΤΟΥ ΚΩΔΙΚΑ 3 ΆΔΕΙΕΣ ΧΡΉΣΗΣ Οι υποστηριζόμενες άδειες χρήσης ενδέχεται να διαφέρουν, ανάλογα με το μοντέλο. Για περισσότερες πληροφορίες σχετικά με τις άδειες χρήσης, επισκεφθείτε τη διεύθυνση www.lg.com. Κατασκευάστηκε με την άδεια της Dolby Laboratories. Η ονομασία "Dolby" και το σύμβολο διπλού "D" είναι εμπορικά σήματα της Dolby Laboratories.
4 ΟΔΗΓΙΕΣ ΣΧΕΤΙΚΑ ΜΕ ΤΗΝ ΑΣΦΑΛΕΙΑ ΟΔΗΓΙΕΣ ΣΧΕΤΙΚΑ ΜΕ ΤΗΝ ΑΣΦΑΛΕΙΑ Προτού χρησιμοποιήσετε τη συσκευή, διαβάστε προσεκτικά τις οδηγίες σχετικά με την ασφάλεια.
ΟΔΗΓΙΕΣ ΣΧΕΤΙΚΑ ΜΕ ΤΗΝ ΑΣΦΑΛΕΙΑ 5 y Μην συνδέετε μεγάλο αριθμό ηλεκτρικών συσκευών σε ένα πολύπριζο. Υπάρχει κίνδυνος πρόκλησης πυρκαγιάς λόγω υπερθέρμανσης. y Προσέξτε να μην ρίξετε κάτω το προϊόν και μην το αφήσετε να πέσει κατά τη σύνδεση εξωτερικών συσκευών. Σε μια τέτοια περίπτωση, υπάρχει κίνδυνος τραυματισμού ή πρόκλησης ζημιάς στο προϊόν. Des icca nt y Μην αφήνετε το αφυγραντικό μέσο ή τα πλαστικά υλικά συσκευασίας σε μέρη όπου έχουν πρόσβαση παιδιά.
6 ΟΔΗΓΙΕΣ ΣΧΕΤΙΚΑ ΜΕ ΤΗΝ ΑΣΦΑΛΕΙΑ Μην αποσυναρμολογήσετε, μην επισκευάσετε και μην τροποποιήσετε το προϊόν με yy δική σας πρωτοβουλία. Υπάρχει κίνδυνος πυρκαγιάς ή ηλεκτροπληξίας. Για τον έλεγχο, τη βαθμονόμηση ή την επισκευή της οθόνης, επικοινωνήστε με το κέντρο τεχνικής εξυπηρέτησης. Σε περίπτωση που συμβεί κάτι από τα παρακάτω, αποσυνδέστε αμέσως το προϊόν yy από την πρίζα και επικοινωνήστε με το τοπικό κέντρο τεχνικής εξυπηρέτησης.
ΟΔΗΓΙΕΣ ΣΧΕΤΙΚΑ ΜΕ ΤΗΝ ΑΣΦΑΛΕΙΑ 7 ΠΡΟΣΟΧΗ Μην τοποθετείτε το προϊόν σε μέρη με παρεμβολές ραδιοκυμάτων. yy Θα πρέπει να αφήσετε αρκετή απόσταση μεταξύ της εξωτερικής κεραίας και των yy γραμμών ηλεκτροδότησης, ώστε η κεραία να μην έρθει σε επαφή με τις γραμμές ακόμη και σε περίπτωση που πέσει. Υπάρχει κίνδυνος ηλεκτροπληξίας. Μην τοποθετείτε το προϊόν σε μέρη όπως ασταθή ράφια ή κεκλιμένες επιφάνειες.
8 ΟΔΗΓΙΕΣ ΣΧΕΤΙΚΑ ΜΕ ΤΗΝ ΑΣΦΑΛΕΙΑ Μην ενεργοποιείτε/απενεργοποιείτε το προϊόν συνδέοντας ή αποσυνδέοντας το φις yy του καλωδίου από την πρίζα. (Μην χρησιμοποιείτε το φις ρεύματος ως διακόπτη.) Υπάρχει κίνδυνος πρόκλησης μηχανικής βλάβης ή ηλεκτροπληξίας. Να τηρείτε τις παρακάτω οδηγίες εξαερισμού, για να αποτρέψετε την υπερθέρμανyy ση του προϊόντος. --Η απόσταση μεταξύ του προϊόντος και του τοίχου θα πρέπει να είναι μεγαλύτερη από 10 εκ. --Μην τοποθετείτε το προϊόν σε μέρος χωρίς εξαερισμό (π.χ.
ΟΔΗΓΙΕΣ ΣΧΕΤΙΚΑ ΜΕ ΤΗΝ ΑΣΦΑΛΕΙΑ 9 Κατά τη μεταφορά ή την αφαίρεση του προϊόντος από τη συσκευασία του, ζητήστε yy τη βοήθεια δεύτερου ατόμου, γιατί το προϊόν είναι βαρύ. Διαφορετικά, υπάρχει κίνδυνος τραυματισμού. Για τον καθαρισμό του εσωτερικού του προϊόντος, επικοινωνείτε με το κέντρο τεχνιyy κής εξυπηρέτησης μία φορά το χρόνο. Η συσσωρευμένη σκόνη μπορεί να προκαλέσει μηχανική βλάβη. Για τις απαραίτητες εργασίες, απευθυνθείτε σε εξειδικευμένο προσωπικό.
10 ΔΙΑΔΙΚΑΣΙΑ ΕΓΚΑΤΑΣΤΑΣΗΣ / ΣΥΝΑΡΜΟΛΟΓΗΣΗ ΚΑΙ ΠΡΟΕΤΟΙΜΑΣΙΑ ΣΗΜΕΙΩΣΗ yy Η εικόνα μπορεί να διαφέρει από την τηλεόρασή σας. yy Οι ενδείξεις OSD (On Screen Display) στην οθόνη της τηλεόρασής σας ενδέχεται να διαφέρουν ελαφρώς από αυτές που εμφανίζονται σε αυτό το εγχειρίδιο. yy Τα διαθέσιμα μενού και οι επιλογές ενδέχεται να διαφέρουν, ανάλογα με την πηγή εισόδου ή το μοντέλο προϊόντος που χρησιμοποιείτε. yy Στο μέλλον, ενδέχεται να προστεθούν νέες λειτουργίες σε αυτή την τηλεόραση.
ΣΥΝΑΡΜΟΛΟΓΗΣΗ ΚΑΙ ΠΡΟΕΤΟΙΜΑΣΙΑ 11 Εγχειρίδιο χρήστη Κλιπ συγκράτησης καλωδίων (Ανάλογα με το μοντέλο) (Ανατρέξτε στη σελ. A-5) Πανί καθαρισμού (Ανάλογα με το μοντέλο) Χρησιμοποιήστε το, για να απομακρύνετε τη σκόνη από το έπιπλο. Τροφοδοτικό DC (Μόνο για τα μοντέλα 19/22/26LS35**) (Ανατρέξτε στη σελ. B-3) Βίδες βάσης 2EA, P4 x 20 (Μόνο για τα μοντέλα 19/22LS35**) (Ανατρέξτε στη σελίδα A-3) Βίδες βάσης 2EA, M4 x 14 (Μόνο για τα μοντέλα 26LS35**) (Ανατρέξτε στη σελ.
12 ΣΥΝΑΡΜΟΛΟΓΗΣΗ ΚΑΙ ΠΡΟΕΤΟΙΜΑΣΙΑ Σώμα βάσης/Βάση στήριξης (Μόνο στα μοντέλα 19/22/26LS35**) (Ανατρέξτε στη A-3) Σώμα βάσης/Βάση στήριξης (Μόνο στα μοντέλα 32LS35**) (Ανατρέξτε στη A-3) Σώμα βάσης/Βάση στήριξης (Μόνο στα μοντέλα 26CS46**) (Ανατρέξτε στη A-4) Σώμα βάσης/Βάση στήριξης (Μόνο στα μοντέλα 32/42CS46**, 32/42LS34**) (Ανατρέξτε στη A-4) ΕΛΛΗΝΙΚΑ ELL
ΣΥΝΑΡΜΟΛΟΓΗΣΗ ΚΑΙ ΠΡΟΕΤΟΙΜΑΣΙΑ 13 Εξαρτήματα και κουμπιά Οθόνη Τηλεχειριστήριο και έξυπνοι αισθητήρες1 Δείκτης τροφοδοσίας Ηχεία OK Κουμπιά αφής SETTINGS INPUT Κουμπιά αφής2 Περιγραφή Ρύθμιση του επιπέδου έντασης του ήχου. H OK ꔉ SETTINGS INPUT /I 1 2 Ενεργοποίηση της επιλογής μενού που έχει επισημανθεί ή επιβεβαίωση μιας καταχώρησης. Πρόσβαση στο κύριο μενού ή αποθήκευση των επιλογών σας και έξοδος από τα μενού. Αλλαγή της πηγής εισόδου. Ενεργοποίηση ή απενεργοποίηση της τηλεόρασης.
14 ΣΥΝΑΡΜΟΛΟΓΗΣΗ ΚΑΙ ΠΡΟΕΤΟΙΜΑΣΙΑ Ανύψωση και μετακίνηση της τηλεόρασης Πριν από τη μετακίνηση ή την ανύψωση της τηλεόρασης, διαβάστε τις ακόλουθες οδηγίες για την αποφυγή πρόκλησης γρατσουνιών ή βλάβης στην τηλεόραση και για την ασφαλή μεταφορά της, ανεξαρτήτως τύπου και μεγέθους συσκευής. yy Για τη μεταφορά μεγάλων τηλεοράσεων, απαιτούνται τουλάχιστον 2 άτομα. yy Αν μεταφέρετε την τηλεόραση με τα χέρια, κρατήστε τη όπως φαίνεται στην παρακάτω εικόνα.
ΣΥΝΑΡΜΟΛΟΓΗΣΗ ΚΑΙ ΠΡΟΕΤΟΙΜΑΣΙΑ Επιτραπέζια τοποθέτηση 1 Σηκώστε και τοποθετήστε την τηλεόραση σε κατακόρυφη θέση επάνω σε ένα τραπέζι. -- Αφήστε απόσταση (τουλάχιστον) 10 εκ. από τον τοίχο για επαρκή εξαερισμό. 15 Στερέωση της τηλεόρασης σε τραπέζι (Μόνο για τα μοντέλα 32LS35**, 26/32/42CS46**, 32/42LS34**) Στερεώστε την τηλεόραση σε ένα τραπέζι. Έτσι η τηλεόραση δεν θα γείρει προς τα εμπρός, δεν θα πάθει ζημιά και δεν θα προκαλέσει τραυματισμό.
16 ΣΥΝΑΡΜΟΛΟΓΗΣΗ ΚΑΙ ΠΡΟΕΤΟΙΜΑΣΙΑ Στερέωση της τηλεόρασης σε τοίχο (Η λειτουργία αυτή δεν είναι διαθέσιμη σε όλα τα μοντέλα). Χρήση του συστήματος ασφαλείας Kensington (Ανάλογα με το μοντέλο) Η εικόνα μπορεί να διαφέρει από την τηλεόρασή σας. Η υποδοχή του συστήματος ασφαλείας Kensington βρίσκεται στο πίσω μέρος της τηλεόρασης.
ΣΥΝΑΡΜΟΛΟΓΗΣΗ ΚΑΙ ΠΡΟΕΤΟΙΜΑΣΙΑ Επιτοίχια τοποθέτηση Συνδέστε προσεκτικά μια προαιρετική επιτοίχια βάση στήριξης στο πίσω μέρος της τηλεόρασης και τοποθετήστε την επιτοίχια βάση στήριξης σε έναν στερεό τοίχο κάθετα προς το δάπεδο. Αν θέλετε να τοποθετήσετε την τηλεόραση σε άλλα δομικά υλικά, απευθυνθείτε σε εξειδικευμένο προσωπικό. Η LG συνιστά την πραγματοποίηση της επιτοίχιας τοποθέτησης από εξειδικευμένο επαγγελματία. 10 εκ. 10 εκ. 10 εκ. 10 εκ.
18 ΤΗΛΕΧΕΙΡΙΣΤΗΡΙΟ ΤΗΛΕΧΕΙΡΙΣΤΗΡΙΟ Οι περιγραφές σε αυτό το εγχειρίδιο βασίζονται στα κουμπιά του τηλεχειριστηρίου. Διαβάστε προσεκτικά αυτό το εγχειρίδιο και χρησιμοποιήστε σωστά την τηλεόραση. Για να αντικαταστήσετε τις μπαταρίες, ανοίξτε το κάλυμμα της μπαταρίας, αντικαταστήστε τις μπαταρίες (1,5 V AAA) αντιστοιχώντας τα άκρα  και  με την ετικέτα στο εσωτερικό της θήκης και κλείστε το κάλυμμα της μπαταρίας. Για να αφαιρέσετε τις μπαταρίες, εκτελέστε τα βήματα τοποθέτησης με την αντίθετη σειρά.
ΧΡΗΣΗ ΤΟΥ ΟΔΗΓΟΥ ΧΡΗΣΗΣ 19 ΧΡΗΣΗ ΤΟΥ ΟΔΗΓΟΥ ΧΡΗΣΗΣ Ο Οδηγός χρήσης σάς επιτρέπει να αποκτήσετε εύκολη πρόσβαση στις λεπτομερείς πληροφορίες της τηλεόρασης. Πατήστε SETTINGS για να μεταβείτε στα κύρια μενού. Πατήστε το ΚΟΚΚΙΝΟ κουμπί για να αποκτήσετε πρόσβαση στα μενού Υποστήριξης πελατών. Πατήστε τα κουμπιά πλοήγησης για να μεταβείτε στον Οδηγό χρήσης και πατήστε OK.
20 ΣΥΝΤΗΡΗΣΗ / ΑΝΤΙΜΕΤΩΠΙΣΗ ΠΡΟΒΛΗΜΑΤΩΝ ΣΥΝΤΗΡΗΣΗ Καθαρισμός της τηλεόρασης Καθαρίζετε τακτικά την τηλεόραση για τη διατήρηση της βέλτιστης απόδοσης και την επέκταση της διάρκειας ζωής του προϊόντος. ΠΡΟΣΟΧΗ yy Βεβαιωθείτε ότι έχετε απενεργοποιήσει την τηλεόραση και έχετε αποσυνδέσει το καλώδιο τροφοδοσίας και όλα τα άλλα καλώδια.
MAKING CONNECTIONS B-1 MAKING CONNECTIONS yy This section on MAKING CONNECTIONS mainly uses diagrams for the LS35** models. Antenna connection ANTENNA/ CABLE IN Français Connectez la TV à une prise d’antenne murale avec un câble RF (75 Ω). REMARQUE yy Utilisez un séparateur de signaux pour utiliser plus de deux téléviseurs. yy Si la qualité d’image est mauvaise, installez correctement un amplificateur de signaux pour l’améliorer.
B-2 MAKING CONNECTIONS Português Ligue a TV a uma tomada de antena de parede com um cabo RF (75 Ω). Satellite dish connection (Only satellite models) NOTA yy Utilize um separador de sinal se quiser utilizar mais de 2 TVs. yy Se a qualidade de imagem for fraca, instale um amplificador de sinal para melhorar a ANTENNA/ qualidade de imagem. CABLE IN yy Se a qualidade de imagem for fraca mesmo que tenha uma antena ligada, tente orientar a antena para a direcção correcta.
MAKING CONNECTIONS B-3 Ελληνικά Συνδέστε την τηλεόραση σε μια δορυφορική κεραία, μέσω μιας δορυφορικής υποδοχής με δορυφορικό καλώδιο (75 Ω). Adapter connection (Only 19/22/26LS35**) DC IN DC Adapter English 1 2 3 Connect the antenna cable to the antenna input port on the TV. Connect the DC adapter plug to the power input jack on the TV. Connect the power cord to the DC adapter first, then plug the power cord into the wall power outlet.
B-4 MAKING CONNECTIONS Français 1 2 3 Connectez le câble d’antenne au port d’entrée de l’antenne du téléviseur. Branchez l’adaptateur CC sur la prise d’alimentation du téléviseur. Connectez d’abord le câble d’alimentation à l’adaptateur CC, puis branchez le câble d’alimentation sur une prise murale. Português 1 2 3 ATTENTION CUIDADO yy Assurez-vous de connecter le téléviseur à l’adaptateur CC avant de brancher la prise d’alimentation du téléviseur sur la prise murale.
MAKING CONNECTIONS B-5 HDMI connection Deutsch Überträgt digitale Video- und Audiosignale von einem externen Gerät an das TV-Gerät. Verbinden Sie das externe Gerät, wie in der folgenden Abbildung gezeigt, mithilfe des HDMI-Kabels mit dem TV-Gerät. Wählen Sie zum Anschließen einen beliebigen HDMI-Eingang. Es ist egal, welchen HDMIEingang Sie wählen.
B-6 MAKING CONNECTIONS Italiano Il segnale digitale audio e video viene trasmesso da un dispositivo esterno al televisore. Collegare il dispositivo esterno e il televisore mediante il cavo HDMI come mostrato nell’illustrazione di seguito. Scegliere una porta di ingresso HDMI per il collegamento. La scelta della porta è libera. NOTA yy Si consiglia di utilizzare il televisore con il collegamento HDMI per ottenere la migliore qualità delle immagini.
MAKING CONNECTIONS B-7 Ελληνικά Μεταδίδει τα ψηφιακά σήματα εικόνας και ήχου από μια εξωτερική συσκευή στην τηλεόραση. Συνδέστε την εξωτερική συσκευή και την τηλεόραση με το καλώδιο HDMI, όπως φαίνεται στην παρακάτω εικόνα. Επιλέξτε οποιαδήποτε θύρα εισόδου HDMI για τη σύνδεση. Δεν έχει σημασία ποια θύρα θα χρησιμοποιήσετε.
B-8 MAKING CONNECTIONS Deutsch Überträgt analoge Video- und Audiosignale von einem externen Gerät an das TV-Gerät. Verbinden Sie das externe Gerät, wie in der folgenden Abbildung gezeigt, mithilfe eines KomponentenKabels mit dem TV-Gerät. HINWEIS yy Wenn Kabel falsch angeschlossen werden, kann dies dazu führen, dass ein Bild in Schwarz-Weiß oder in verzerrten Farben erscheint. Français Permet de transmettre les signaux audio et vidéo analogiques d’un périphérique externe vers la TV.
MAKING CONNECTIONS B-9 Composite connection Français Permet de transmettre les signaux audio et vidéo analogiques d’un périphérique externe vers la TV. Connectez le périphérique externe et la TV avec le câble composite comme indiqué sur l’illustration suivante. Italiano AV IN 2 L/MONO AUDIO R VIDEO Y Il segnale audio e video analogico viene trasmesso da un dispositivo esterno al televisore.
B-10MAKING CONNECTIONS USB connection USB IN Español Conecte un dispositivo de almacenamiento USB, como una memoria flash USB, un disco duro externo o un lector de tarjetas de memoria, al TV y acceda al menú Mis medios para manejar diversos archivos multimedia.
MAKING CONNECTIONSB-11 CI module connection Français Affichez les services cryptés (payants) en mode TV numérique. Cette fonction n’est pas disponible dans tous les pays. REMARQUE yy Vérifiez si le module CI est inséré dans le bon sens dans la fente de la carte PCMCIA. Si le module est mal inséré, la TV pourrait subir des dommages ainsi que la fente de la carte PCMCIA. Italiano Consente la visione dei servizi codificati (a pagamento) in modalità TV digitale.
B-12MAKING CONNECTIONS Nederlands Bekijk gescrambelde services (betaalservices) in de digitale TV-modus. Deze functie is niet in alle landen beschikbaar. Euro Scart connection OPMERKING yy Controleer of de CI-module in de juiste richting is geplaatst in de PCMCIAkaartsleuf. Indien de module niet goed is geplaatst, kan dit schade veroorzaken aan de TV en de PCMCIA-kaartsleuf. AV IN 1 (RGB) Ελληνικά Παρακολουθήστε κρυπτογραφημένες (συνδρομητικές) υπηρεσίες στη λειτουργία ψηφιακής τηλεόρασης.
MAKING CONNECTIONSB-13 Deutsch Italiano Ausgangstyp Aktueller Eingangsmodus Digital-TV AV1 (TV-Ausgang1) Digital-TV Analog-TV, AV Modalità di ingresso corrente TV digitale Analog-TV HDMI Component TV digitale TV analogica HDMI TV-Ausgang: Ausgang für analoge und digitale Fernsehsignale. 1 Uscita TV: uscite segnali TV analogica o TV digitale. HINWEIS NOTA yy Das Euro-Scart-Kabel muss signaltechnisch abgeschirmt sein. yy I cavi Euro Scart devono essere schermati.
B-14MAKING CONNECTIONS Português Tipo de saída Modo de entrada actual TV Digital Ελληνικά AV1 (Saída TV1) TV Digital TV Analógica HDMI 1 Saída TV: Sinais de Saída de TV Analógica ou Digital. yy Qualquer cabo Euro scart utilizado terá de ser blindado. Digitale TV AV1 (TV Uit1) Digitale TV Analoge TV, AV Component Analoge TV HDMI 1 Component AV1 (Έξοδος TV1) Ψηφιακή τηλεόραση Αναλογική τηλεόραση HDMI TV Out : Έξοδοι αναλογικού σήματος τηλεόρασης ή ψηφιακού σήματος τηλεόρασης.
MAKING CONNECTIONSB-15 English Connect various external devices to the TV and switch input modes to select an external device. For more information of external device’s connection, refer to the manual provided with each device. Available external devices are: HD receivers, DVD players, VCRs, audio systems, USB storage devices, PC, gaming devices, and other external devices. NOTE yy The external device connection may differ from the model.
B-16MAKING CONNECTIONS Français Connectez divers périphériques externes à la TV et changez de mode de source d’entrée pour sélectionner un périphérique externe. Pour en savoir plus sur le raccordement d’un périphérique externe, reportez-vous au manuel fourni avec ce dernier. Les périphériques externes disponibles sont les suivants : récepteurs HD, lecteurs DVD, VCR, systèmes audio, périphériques de stockage USB, PC, consoles de jeu et autres périphériques externes.
MAKING CONNECTIONSB-17 Español Puede conectar varios dispositivos externos al TV y cambiar entre los modos de entrada para seleccionar un dispositivo externo. Para obtener más información sobre la conexión de dispositivos externos, consulte el manual que se incluye con cada dispositivo. Los dispositivos externos disponibles son: receptores HD, reproductores de DVD, vídeos, sistemas de audio, dispositivos de almacenamiento USB, PC, consolas de juegos, etc.
B-18MAKING CONNECTIONS Nederlands U kunt diverse externe apparaten aansluiten op de TV en de invoerbron wijzigen om het externe apparaat te kiezen. Zie voor meer informatie over het aansluiten van externe apparaten de handleiding die bij elk extern apparaat is geleverd. De mogelijke externe apparaten zijn: HDontvangers, DVD-spelers, videorecorders, audiosystemen, USB-opslagapparaten, PC’s, game-apparaten en andere externe apparaten.
SPECIFICATIONSB-19 SPECIFICATIONS Product specifications may be changed without prior notice due to upgrade of product functions. For the power supply and power consumption, refer to the label attached to the product. MODELS 19LS35** 22LS35** 26LS35** 19LS3500-ZA 19LS350S-ZA 19LS350T-ZA 22LS3500-ZA 22LS350S-ZA 22LS350T-ZA 22LS3510-ZB 22LS3590-ZC 26LS3500-ZA 26LS350S-ZA 26LS350T-ZA 26LS3510-ZB 26LS3590-ZC 26LS359S-ZC 26LS359T-ZC 523.0 x 376.0 x 140.0 627.0 x 442.0 x 162.0 451.0 x 334.0 x 140.
B-20SPECIFICATIONS CI Module Size(W x H x D) 100.0 mm x 55.0 mm x 5.
SPECIFICATIONSB-21 Component port connecting information Component ports on the TV Y PB PR Video output ports on DVD player Y PB PR Y B-Y R-Y Y Cb Cr Y Pb Pr Signal 480i/576i 480p/576p 720p/1080i 1080p Component O O O O (50 Hz / 60 Hz only) HDMI-PC supported mode Resolution Horizontal Frequency (kHz) Vertical Frequency (Hz) 640x350 720x400 31.468 31.469 70.09 70.08 640x480 800x600 1024x768 1152x864 1360x768 1280x1024 1920x1080 31.469 37.879 48.363 54.348 47.712 63.981 67.50 59.
Please contact LG First. If you have any inquiries or comments, please contact LG customer information centre. Customer Information Centre Country Country Service 0 810 144 131 800 187 40 32 15 200255 Record the model number and serial number of the TV. Refer to the label on the back cover and quote this information to your dealer when requiring any service.