LCD TV OWNER’S MANUAL MODEL: 20HIZ20 20LS1R* Please read Information Manual included together before reading this manual and operating your set. Retain it for future reference. Record model number and serial number of the set. See the label attached on the back cover and quote this information to your dealer when you require service.
Contents 2 Installation 3 Location and function of controls Remote control handset Battery installation / Front / Rear 7 Basic operation On and off On-Screen Menu Language/Country Selection 11 On screen menus Menu selection / Programme selection Volume adjustment 12 Setting up TV stations Auto programme tuning Manual programme tuning Programme edit / Favourite programme Calling the programme table 13 Picture adjustment PSM (Picture Status Memory) Picture adjustment CSM (Colour Status Memory) XD
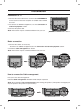
ENGLISH Installation Stand Installation 1. Assemble parts of stand body with cover base of the stand. Insert stand body into a cover base until clicking sound. 2. Carefully place the product screen side down on a cushioned surface that will protect product and screen from damage. 3. Place the product stand on the product as shown. Note: Here shown may be somewhat different from your set. stand body cover base Detaching stand 1. 2. 3. 4. 5.
Installation Connection of TV 1. Connect the aerial cable to the socket marked ANTENNA IN on the back. For the best reception an outdoor aerial should be used. 2. To connect an additional equipment, see the Connection of external equipment section. 3. Connect the power cord. ( ) Note: Here shown may be somewhat different from your set. Basic connection 1. Connect the cables as necessary. To connect an additional equipment,see the Connection of external equipment section. 2.
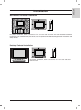
ENGLISH Installation Wall Mount: Horizontal installation 4 inches 4 inches 4 inches 4 inches R R 4 inches For proper ventilation, allow a clearance of 4" on each side and from the wall. Detailed installation instructions are available from your dealer, see the optional Tilt Wall Mounting Bracket Installation and Setup Guide. Desktop Pedestal Installation 4 inches 4 inches 4 inches 4 inches R For proper ventilation, allow a clearance of 4" on each side and from the wall.
Installation Positioning your display Adjust the position of the panel in various ways for maximum comfort. • Tilt range 12~10 0 3 Location Position your set so that no bright light or sunlight falls directly onto the screen. Care should be taken not to expose the set to any unnecessary vibration, moisture, dust or heat. Also ensure that the set is placed in a position to allow a free flow of air. Do not cover the ventilation openings on the back cover.
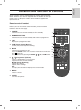
ENGLISH Location and function of controls All the functions can be controlled with the remote control handset. Some functions can also be adjusted with the buttons on the top panel of the set. Only the remote control handset supplied will operate this set. Remote control handset Before you use the remote control handset, please install the batteries. See the next page. POWER 1. POWER switches the set on from standby or off to standby. 1 2.
Location and function of controls 9. TV returns to the TV mode. switches the set on from standby. 10. INPUT selects the remote operating mode. switches the set on from standby. 11. Q.VIEW returns to the previously viewed programme. Press the Q.VIEW button to view the last programme you were watching. 9 POWER TV INPUT 10 12. SSM (Sound Status Memory) recalls your preferred sound setting. 13. TELETEXT BUTTONS These buttons are used for teletext. For further details, see the ‘Teletext’ section.
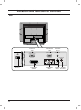
ENGLISH Location and function of controls Front Top panel /I INPUT MENU 1 2 3 OK 4 VOL PR 5 6 9 7 8 E / D (Programme Down/Up) selects a programme or a menu item. switches the set on from standby. 1. ON/OFF (r / I) switches the set on from standby or off to standby. 6. 2. INPUT selects the remote operating mode. switches the set on from standby. 7. REMOTE CONTROL SENSOR 3. MENU selects a menu. 4. OK accepts your selection or displays the current mode. 5. 8.
Location and function of controls Rear RS-232C IN JACK RS-232C IN (CONTROL & SERVICE) FOR SERVICE JACK SERVICE ONLY ANTENNA INPUT ANTENNA IN AC-IN SPEAKER OUT (MONO) VIDEO AV 1 AC INPUT 10 EURO SCART SOCKET S-VIDEO AV IN 2 AUDIO/VIDEO INPUT S-VIDEO SPEAKER INPUT OUT INPUT
ENGLISH Basic operation On and off 1. Press the POWER, D / E, TV, INPUT or NUMBER buttons to switch it on fully. 2. Press the POWER button. The set reverts to standby mode. 3. Pull out mains plugs to switch the set off. Note : If, while the set is switched on, the mains plug is disconnected the set will switch to standby or power on when the mains plug is replaced in the mains power socket.
On screen menus Menu selection 7 8 9 LIST 0 Q.VIEW PSM MUTE SSM TEXT PR OK VOL VOL NU I/II ME PR SL EE 1. Press the MENU button and then D / E button to display each menu. 2. Press the G button and then D / E button to select a menu item. 3. Change the setting of an item in the sub or pull-down menu with F / G button. You can move to the higher level menu by pressing the OK button and to move to the lower level menu by pressing the MENU button. Note : a.
ENGLISH Setting up TV stations Up to 100 TV stations can be stored by programme numbers (0 to 99). Once you have preset the stations, you will be able to use the D / E or NUMBER buttons to scan the stations you have programmed. Stations can be tuned using automatic or manual modes. Station Auto programme Manual programme Programme edit Favourite programme Auto programme tuning All stations that can be received are stored by this method.
Setting up TV stations Manual programme tuning Station Auto programme Manual programme Programme edit Favourite programme DE Manual programme lets you manually tune and arrange the stations in whatever order you desire. Also you can assign a station name with five characters to each programme number. 1. Press the MENU button and then D / E button to select the Station menu. 2. Press the G button and then D / E button to select Manual programme. 3.
ENGLISH Setting up TV stations Assigning a station name 1. Repeat the ‘Manual programme tuning’ steps 1 to 2. 2. Press the G button and then D / E button to select Name. 3. Press the G button and then use the D / E. You can use a blank, +, -, the number 0 to 9 and the alphabet A to Z. It can be saved 5 digits for name. With the F button you can select in the opposite direction. 4. Select the position by pressing the F / G button and then make your choice of the second character, and so on. 5.
Setting up TV stations Programme edit Station Auto programme Manual programme Programme edit Favourite programme DE FG This function enables you to delete or skip the stored programmes. Also you can move some stations to other programme numbers or insert a blank station data into the selected programme number. 1. Press the MENU button and then D / E button to select the Station menu. 2. Press the G button and then D / E button to select Programme edit. 3.
ENGLISH Setting up TV stations Favourite programme Station Auto programme Manual programme Programme edit Favourite programme This function lets you select your favourite programmes directly. 1. Press the MENU button and then D / E button to select the Station menu. 2. Press the G button and then programme.
Picture adjustment PSM (Picture Status Memory) Picture PSM CSM XD Reset DE 1. Press the MENU button and then D / E button to select the Picture menu. 2. Press the G button and then D / E button to select PSM. 3. Press the G button and then D / E button to select a picture setting on the PSM menu. 4. Press the OK button. OK MENU FG Picture PSM CSM XD Reset POWER 1 TV INPUT 2 3 DE FG Dynamic Standard Mild Game User G OK MENU 5.
ENGLISH Picture adjustment CSM (Colour Status Memory) Picture PSM CSM XD Reset Selecting a factory setting colour set. 1. Press the MENU button and then D / E button to select the Picture menu. 2. Press the G button and then D / E button to select CSM. DE FG Picture DE FG G Cool Normal Warm User OK MENU POWER 3. Press the G button and then D / E button to select a color setting on the CSM menu: Cool, Normal, Warm or User (Red, Green, Blue). 4. Press the OK button. 5.
Picture adjustment Picture XD function PSM CSM XD Reset XD is LG electronic's unique picture improving technology to display a real HD source through an advanced digital signal processing algorithm. DE FG 1. Press the MENU button and then D / E button to select the Picture menu. 2. Press the G button and then D / E button to select XD. 3. Press the G button and then D / E button to select Auto or OK MENU Manual. Picture PSM CSM XD Reset POWER TV INPUT 1 2 3 4 5 6 7 8 9 LIST 0 Q.
ENGLISH Picture adjustment Reset Picture PSM CSM XD Reset Returns to the default settings PSM, CSM, XD, Cinema at the factory. 1. Press the MENU button and then D / E button to select the Picture menu. 2. Press the G button and then D / E button to select Reset. 3. Press the G button to initialize the adjusted value. DE FG OK MENU Picture PSM CSM XD Reset DE FG G To set POWER TV INPUT 1 2 3 4 5 6 7 8 9 LIST 0 Q.VIEW OK MENU 4.
Sound adjustment SSM (Sound Status Memory) Sound SSM AVL Balance You can select your preferred sound setting; Flat, Music, Movie or Sports and you can also adjust the sound frequency of the equalizer. 1. Press the MENU button and then D / E button to select the Sound menu. 0 Sound DE FG SSM AVL Balance OK MENU DE POWER TV INPUT 1 2 3 4 5 6 7 8 9 LIST 0 Q.VIEW FG G 0 Flat Music Movie Sports User OK MENU 2. Press the G button and then D / E button to select SSM. 3.
ENGLISH Sound adjustment Stereo/Dual reception When a programme is selected, the sound information for the station appears after the programme number and station name disappear. On Screen Display MONO STEREO DUAL I Mono sound selection In stereo reception if the stereo signal is weak, you can switch to mono by pressing the I/II button twice. In mono reception the depth of sound is improved. To switch back to stereo, press the I/II button twice again.
TIME Menu Clock Time Clock Off time On time Auto sleep DE FG You must set the time correctly before using on/off time function. 1. Press the MENU button and then D / E button to select the Time menu. 2. Press the G button and then D / E button to select Clock. OK MENU Time Clock Off time On time Auto sleep DE POWER TV INPUT 1 2 3 4 5 6 7 8 9 LIST MUTE TEXT OK VOL VOL NU I/II ME PR * P HOLD SIZE MIX i M Time TIME REVEAL INDEX MODE UPDATE ? 1.
ENGLISH TIME Menu Auto sleep Time Clock Off time On time Auto sleep If you select On on the Auto sleep menu, the set will automatically switch itself to standby mode approximately ten minutes after a TV station stops broadcasting. 1. Press the MENU button and then D / E button to select the Time menu. 2. Press the G button and then D / E button to select Auto sleep. 3. Press the G button and then D / E button to select On or Off.
Other functions Child lock Special Language Country Child lock XD Demo DE FG The TV can be set so that the remote control handset is needed to control it. This feature can be used to prevent unauthorized viewing. 1. Press the MENU button and then D / E button to select the Special menu. 2. Press the G button and then D / E button to select Child lock. 3. Press the G button and then D / E button to select On or Off on the Child lock menu.
ENGLISH Other functions XD Demo Special Language Country Child lock XD Demo Use it to see the difference between XD Demo on and XD Demo off. 1. Press the MENU button and then D / E button to select the Special menu. 2. Press the G button and then D / E button to select XD Demo. 3. Press the G button to begin XD Demo. DE FG OK MENU Special Language Country Child lock XD Demo G To start POWER DE FG TV INPUT 1 2 3 4 5 6 7 8 9 LIST 0 Q.VIEW OK MENU 4.
Other functions TV, AV and PC modes Press the INPUT button and then D / E button to select desired mode. Inputs can be set for TV, AV mode. AV mode is used when a video cassette recorder (VCR), or other equipment is connected to the set. Note : When a VCR is connected via the aerial socket the set is used in TV mode. See the ‘Connection of external equipment’ section. Input POWER TV INPUT 1 2 3 4 5 6 7 8 9 LIST 0 Q.
ENGLISH Teletext - This feature is not available in all countries. Teletext (or TOP text) is an optional function, therefore only a set with the teletext system can receive the teletext broadcast. Teletext is a free service broadcast by most TV stations which gives upto-the-minute information on news, weather, television programmes, share prices and many other topics. The teletext decoder of this TV can support the SIMPLE, TOP and FASTEXT systems.
Teletext TOP text The user guide displays four fields-red, green, yellow and blue at the bottom of the screen. The yellow field denotes the next group and the blue field indicates the next block. Block / group / page selection 1. With the blue button you can progress from block to block. 2. Use the yellow button to proceed to the next group with automatic overflow to the next block. 3. With the green button you can proceed to the next existing page with automatic overflow to the next group.
ENGLISH Connection of external equipment You can connect additional equipment, such as VCRs, camcorders etc. to your set. Examples are shown below. Note: Here shown may be somewhat different from your set. Aerial socket ANTENNA IN 1. Connect the RF out socket of the VCR to the aerial socket of the set. 2. Connect the aerial cable to the RF aerial in socket of the VCR. 3. Store the VCR channel on a desired programme number using the ‘Manual programme tuning’ section. 4.
Connection of external equipment S-Video/Audio in sockets (S-Video) When connecting an S-VIDEO VCR to the S-VIDEO socket, the picture quality will be further improved. VIDEO S-VIDEO AV IN 2 1. Connect the S-Video socket of the VCR to the S-VIDEO socket of the set. 2. Connect the audio cable from the S-VIDEO VCR to the AUDIO sockets of the set. 3. Press the INPUT button to select AV 2. 4. Press the PLAY button on the VCR. The VCR playback picture appears on the screen.
ENGLISH External Control Device Setup ; RS-232C Connect the RS-232C input jack to an external control device (such as a computer or an A/V RGBcontrol IN (PC/DTV) system) and control the TV’s functions externally. Connect the serial port of the control device to the RS-232C jack on the TV back panel.RS-232C connection cables are not supplied with the TV.
External Control Device Setup ; RS-232C Set ID - Use this function to specify a monitor ID number. - Refer to ‘Real Data Mapping 1’. See page 38. - Set ID Setup is located in service menu. (ADJ => MENU => Set ID Setup) Installation Menu V2.0 LG Hotel Mode Setup TV Link-Loader Password Change Set ID Setup Clock Setup Configuration Setup G G DE G Set ID Lock Set ID G NO 1 G G MCU Version MENU Set ID Setup G DE FG OK MENU 2.
ENGLISH External Control Device Setup ; RS-232C 0 5 . Volume Control (Command2:f) 0 1 . Power (Command2:a) To control Power On/Off of the TV. Transmission [k][a][ ][Set ID][ ][Data][Cr] Data 0 : Power Off Data 1 : Power On Acknowledgement [a][ ][Set ID][ ][OK][Data][x] To show Power On/Off. To adjust volume. You can also adjust volume with the volume buttons on remote control. Transmission [k][f][ ][Set ID][ ][Data][Cr] Data Min : 0 ~ Max : 64 Refer to ‘Real data mapping 1 ’. See page 6.
External Control Device Setup ; RS-232C 10. Sharpness (Command2:k) 15. Balance (Command2:t) To adjust the screen sharpness. You can also adjust sharpness in the PICTURE menu. Transmission [k][k][ ][Set ID][ ][Data][Cr] Transmission [k][t][ ][Set ID][ ][Data][Cr] Data Min: 0 ~ Max: 64 Data Min: 0 ~ Max: 64 Refer to ‘Real data mapping 1’. See page 6. Refer to ‘Real data mapping 1’. See page 6. Acknowledgement [k][ ][Set ID][ ][OK][Data][x] 11.
ENGLISH External Control Device Setup ; RS-232C 20. Abnormal State (Command2:z) 24 . Orbiter Pixel Setting (Command1:j, Command2:s) To recognize an abnormal state. To adjust pixel number in orbiter function. This feature is not available for all models. This feature is not available for all models.
External Control Device Setup ; RS-232C 27. Key (Command1:m, Command2:c) 29. Input select (Command1:x, Command2:y) To send IR remote key code. To adjust input source for sub picture in PIP mode Transmission [m][c][ ][Set ID][ ][Data][Cr] Transmission [x][y][ ][Set ID][ ][Data][Cr] Data: Structure Data: Key code - Refer to page 9 Acknowledgement [c][ ][Set ID][ ][OK][Data][x] MSB 0 28.
ENGLISH IR CODES Remote Control IR Codes ■ Output waveform Single pulse, modulated with 37.917KHz signal at 455KHz Tc Carrier frequency FCAR = 1/TC = fOSC/12 Duty ratio = T1/TC = 1/3 T1 ■ Configuration of frame 1st frame Lead code Low custom code High custom code Data code Data code C0 C1 C2 C3 C4 C5 C6 C7 D0 D1 D2 D3 D4 D5 D6 D7 D0 D1 D2 D3 D4 D5 D6 D7 Repeat frame Repeat code ■ Tf Lead code 9 ms 4.5 ms ■ Repeat code 0.55 ms 9 ms ■ 2.25 ms Bit description Bit ”0” Bit ”1” 0.
REMOTE CONTROL IR CODES Code (Hexa) Function Note Code (Hexa) Function Note 0F TV R/C Button 71 GREEN R/C Button 0B INPUT R/C Button 63 YELLOW R/C Button 08 POWER R/C Button (Power On/Off) 61 BLUE R/C Button C4 POWER ON Discrete IR Code (Only Power On) 02 VOL + R/C Button C5 POWER OFF Discrete IR Code (Only Power OFF) 03 VOL - R/C Button 0E SLEEP R/C Button 00 PR + R/C Button 20 TEXT R/C Button 01 PR - R/C Button 0A I/II R/C Button 09 MUTE R/C Button 43
ENGLISH Troubleshooting Checklist The operation does not work normally. The remote control doesn’t work • Check to see if there is any object between the product and the remote control causing obstruction. • Are batteries installed with correct polarity (+ to +, - to -)? • Correct remote operating mode set: TV, VCR etc.? • Install new batteries. Power is suddenly turned off • Is the sleep timer set? • Check the power control settings.
Troubleshooting Checklist The audio function does not work. Picture OK & No sound No output from one of the speakers Unusual sound from inside the product • Press the VOL (or Volume) button. • Sound muted? Press MUTE button. • Try another channel. The problem may be with the broadcast. • Are the audio cables installed properly? • Adjust Balance in menu option.
ENGLISH Product Specifications Power Requirement/ Power Consumption 20LS1R* : AC100-240V~ 50/60Hz 1.0A / 60W Dimensions (Width x Depth x Height) 20LS1R* : 573.2mm x 189.7mm x 435.5mm 22.6inches x 7.5inches x 17.1inches Weight (Net) 20LS1R* : 6.9kg (15.
Installation menu Installation Guide MODEL: 20HIZ20 20LS1R*
Contents Location and function of controls 3~4 Installation Menu Introduction LG Hotel Mode setup 2 5 6~10 TVLink-Loader 11 Password Change 12 Set ID Setup 12 Clock Setup 13 Configuration setup 14 External Speaker Interface 14
ENGLISH Location and function of controls Front Top panel /I INPUT MENU 1 2 3 OK 4 VOL PR 5 6 7 8 E / D (Programme Down/Up) selects a programme or a menu item. switches the set on from standby. 1. ON/OFF (r / I) switches the set on from standby or off to standby. 6. 2. INPUT selects the remote operating mode. switches the set on from standby. 7. REMOTE CONTROL SENSOR 3. MENU selects a menu. 8. POWER/STANDBY INDICATOR illuminates red in standby mode.
Location and function of controls Rear RS-232C IN JACK RS-232C IN (CONTROL & SERVICE) FOR SERVICE JACK SERVICE ONLY ANTENNA INPUT ANTENNA IN AC-IN SPEAKER OUT (MONO) VIDEO AV 1 AC INPUT 4 EURO SCART SOCKET S-VIDEO AV IN 2 AUDIO/VIDEO INPUT S-VIDEO SPEAKER INPUT OUT INPUT
ENGLISH Installation Menu Introduction The abundant functions for Hotel TV linked with software installation can be projected on OSD as ‘Installation Menu’. The wide range of hotel features can be performed simply on additional window to enhance the LG hotel TV’s easy installation and convenient operation for Hotelier and System Integrators. Installation Menu V2.
Installation Menu LG Hotel Mode setup LG Hotel Mode V2.0 Installation Menu V2.0 LG Hotel Mode Setup TV Link-Loader Password Change Set ID Setup Clock Setup Configuration Setup MCU Version MENU DE G G G G G G G 2.02 OK Hotel Mode Operation Power On Status Station Menu Display Program Change Input Source Change Menu Display OSD Display LG IR Operation Local Key Operaion Max Volume Power On Default Program Volume AV Setting Radio Video Blank Start PR. No. No. of PR.
ENGLISH Installation Menu LG Hotel Mode setup (3) Station Menu Display - Decide to enter 'Station Menu Display' or not in the 'Main Menu' by setting 'Station Menu Display' as Yes(Enter Possible) or No(Enter Impossible) on the "LG Hotel Mode setup" OSD. (4) Program Change - Decide to change channel or not by setting 'Program Change' as Yes(Change Possible) or No(Change Impossible) when present source is TV. - When 'Program Change' is set to No(Change Impossible), Program Key, Numeral Key, List Key, Q.
Installation Menu (8) LG IR Operation - Decide whether work the LG remote control or not. - Set to Yes(Work) or No(Do Not Work). - When ‘LG IR Operation’ is set to NO(Not Work), all keys don’t work. - Although set to No, it can work in Service mode. - Although set to No, Menu key action to enter the ‘Installation Menu’ and key action to enter Password are available. - When ‘LG IR Operation’ is set to Yes(Work), all keys are available.
ENGLISH Installation Menu LG Hotel Mode setup - If both 'Program' and 'On Time' is set, but just the value is different, then 'Program' value has priority. (11-2) Volume - Set OFF(Do Not Work)or the volume level to adjust designated volume level or last memorized volume level when the TV turns on. - The next value for the max volume is OFF.And next it will be changed to 0. - If both 'Volume'data and 'On Time'is set,but just the value is different,then 'Volume'has priority.
Installation Menu Initial Configuration and Configuration Detail Item Hotel Mode Operation Power On Status Station Menu Program Change Input Source Change Menu Display OSD Display LG IR Operation Local Key Operation Max Volume Power On Default Program Volume A/V Setting Radio Video Blank Start PR. No. No. of PR. 10 Active De-active No No No No No No No No Yes Yes Yes Yes Yes Yes Yes Yes 0~100 No Off Off No No Yes 0 ~ (Max PR.
ENGLISH Installation Menu TVLink-Loader You can adjust TVLink-Loader menu by only TVLink Loader which is to be purchased additionally. - TV sets for each single hotel rooms, providing ‘TVLink-Loader’ does maximise installers convenience. By copying all programming settings, picture setting, sound setting and installation menu setting. from a set as default and conveying into additional sets, which ensures uniformity between sets and significantly reduces unnecessary installation time via RS232.
Installation Menu Password Change - To ensure more security, Password can be changed by installers’ own design. Installation Menu V2.0 LG Hotel Mode Setup TV Link-Loader Password Change Set ID Setup Clock Setup Configuration Setup G G G G G MCU Version MENU DE G Change Password G - - - - 2.02 OK 1 Use the D / 2 Enter four digit password. 3 Input the password again for confirmation. E button to select the Password Change and then press the G button. Set ID Setup Installation Menu V2.
ENGLISH Installation Menu Clock Setup - To elaborate indoor condition in hotel rooms. The indicating luminous LED Clock helps guests to figure out time without turning on TV. Moreover, the level of luminance of LED Clock is adjustable according to each circumstances. Clock Setup Installation Menu V2.0 LG Hotel Mode Setup TV Link-Loader Password Change Set ID Setup Clock Setup Configuration Setup G G G G Clock Display Dimming Standby Dimming PowerOn Pr.
Installation Menu Configuration setup Installation Menu V2.0 LG Hotel Mode Setup TV Link-Loader Password Change Set ID Setup Clock Setup Configuration Setup DE G DC Power Outlet RGB Overlay in RF Remote Jack Pack On Timer Operation G G G G YES YES YES ONE G DE MCU Version MENU Configuration Setup G F G OK MENU 2.02 OK (1) DC Power Outlet - It is a mode to decide whether to output DC or not for power supply to IB Box in Installation Menu.
ENGLISH Installation Menu (2) RGB Overlay In RF - It is a mode to select whether to display RGB Data together on RF image or not. When ‘RGB Overlay In RF’ is set to ‘Yes’, Overlay Mode get to ‘Enable’ and you can see RGB Data signal as well as general RF Image. (3) Remote Jack Pack - It is a mode to set whether to use RJP( Remote Jack Pack) or not. When ‘Remote Jack Pack’ is set to ‘Yes’, the function to convert or separate Image and Sound automatically according to RJP Control signal is activated.