LCD TV OWNER’S MANUAL MODELS: 15LC1R * 20LC1R * Internet Home Page : http://www.lge.com http://www.lg.ca ENERGYSATR is a set of power-saving guidelines issued by the U.S. Environmental Protection Agency(EPA). As an ENERGY STAR Partner LGE U. S. A.,Inc. has determined that this product meets the ENERGY STAR guidelines for energy efficiency. Please read this manual carefully before operating your set. Retain it for future reference. Record model number and serial number of the set.
Warning Warning CAUTION RISK OF ELECTRIC SHOCK DO NOT OPEN WARNING: TO REDUCE THE RISK OF ELECTRIC SHOCK DO NOT REMOVE COVER (OR BACK). NO USER SERVICEABLE PARTS INSIDE. REFER TO QUALIFIED SERVICE PERSONNEL. The lightning flash with arrowhead symbol, within an equilateral triangle, is intended to alert the user to the presence of uninsulated “dangerous voltage” within the product’s enclosure that may be of sufficient magnitude to constitute a risk of electric shock to persons.
Safety Instructions Safety Instructions WARNING : To Reduce The Risk Of Fire Or Electric Shock, Do Not Expose This Apparatus To Rain Or Moisture. Apparatus shall not be exposed to dripping or splashing and no objects filled with liquids, such as vases, shall be placed on the apparatus. IMPORTANT SAFETY INSTRUCTIONS 1. Read these instructions. Ow ner's Man ual 2. Keep these instructions. 8.
Safety Instructions Safety Instructions continued 12. Use only with a cart, stand, tripod, bracket, or table specified by the manufacturer, or sold with the apparatus. When a cart is used, use caution when moving the cart / apparatus combination to avoid injury from tip-over. 14. Refer all servicing to qualified service personnel.
Contents Contents Warnings . . . . . . . . . . . . . . . . . . . . . . . . . . . .2 Safety Instructions . . . . . . . . . . . . . . . . . . .3~4 Introduction Controls . . . . . . . . . . . . . . . . . . . . . . .6 Connection Options . . . . . . . . . . . . . . .7 Remote Control Key Functions . . . . . .8 Installation Accessories . . . . . . . . . . . . . . . . . . . .9 Kensington Security System(Options) .9 Installation Instruction . . . . . . . . . . . . . .
Introduction Introduction Controls CH VOL ENTER MENU INPUT /I On/Off Button Enter Input Button Volume Button Channel Buttons Menu Buttons Button Remote Control Sensor Power/Standby Indicator Glows amber in Standby mode, Glows blue when the TV is turned on.
Introduction Connection Options ANTENNA INPUT PC SOUND PC INPUT JACK INPUT 15LC1R* COMPONENT (DTV/DVD IN) AUDIO PC INPUT ANT IN ( 75 ) PC SOUND AC INPUT H/P VIDEO IN* AC INPUT COMPONENT (DTV/DVD IN) ((480i/480p), Audio) 20LC1R* S-VIDEO HEADPHONE JACK AUDIO/VIDEO INPUT INPUT FOR SERVICE JACK COMPONENT (DTV/DVD IN) AUDIO S-VIDEO FOR SERVICE ANTENNA INPUT ANT IN ( 75 ) AC INPUT H/P VIDEO IN AC INPUT S-VIDEO AUDIO/VIDEO S-VIDEO COMPONENT (DTV/DVD IN) INPUT INPUT ((480i/480p), Audio) HEADPHO
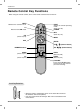
Introduction Remote Control Key Functions - When using the remote control, aim it at the remote control sensor on the TV. MUTE Switches the sound on or off. TV Returns to the TV mode. FAV (Refer to p.19) EXIT INPUT Selects the remote operating mode. (Refer to p.26) POWER MTS (Refer to p.22) MENU ENTER CH D / E (Channel button) NUMBER buttons VOL F / G (Volume button) AUDIO (Refer to p.21) VIDEO (Refer to p.20) CC (Refer to p.25) SLEEP (Refer to p.
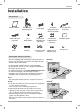
Installation Installation Accessories Owner’s Manual Audio cable (PC) (15LC1R*) Rack AAA Batteries Remote Control 2-TV Bracket Bolts 4-Anchor Power Cord Tie Holder D-sub cable (PC) - Arrange the wires (15LC1R*) with the tie Holder.
Installation Installation Instruction Unfolding the stand base 1. Place the set with its front facing downward on a cushion or soft cloth. 2. Hold down the release button inside the stand and strongly pull out the stand with your two hands. Note: Here shown may be somewhat different from your set. The stand won't move if you don't press release button.
Installation Installation Instruction Continued Connection of TV 1. Connect the aerial cable to the socket marked +75 Ω on the back. For the best reception an outdoor aerial should be used. 2. To connect an additional equipment, see the External Equipment Connections section. 3. Connect the power cord. Note: Here shown may be somewhat different from your set. ( ) Positioning your display Adjust the position of the panel in various ways for maximum comfort.
Installation Please set it up carefully so the product doesn’t fall over Set it up close to the wall so the product doesn’t fall over when it is pushed backwards. The instructions shown below is a safer way to set up the product, which is to fix it on the wall so the product doesn’t fall over when it is pulled in the forward direction. It will prevent the product from falling forward and hurting people. It will also prevent the product from damage caused by fall.
Installation External Equipment Connections Antenna Connection - For optimum picture quality, adjust antenna direction. Connecting to an Inside Antenna Setup - Typical wall antenna jack used in apartment buildings, connect the antenna cable as shown below. (Use the correct type of antenna cable for the type of wall antenna jack.) Turn clockwise to tighten.
Installation External Equipment Connections Continued VCR Setup - In Video mode, TV automatically reverts to TV mode if the TV buttons are pressed. COMPONENT (DTV/DVD IN) AUDIO PC INPUT ANT IN ( 75 ) PC SOUND Connection 1 H/P Connection 2 1. Connect the audio/video output jacks on VCR to the corresponding input jacks on the TV. When connecting the TV to a VCR, match the jack colors (Video = yellow, Audio Left = white, and Audio Right = red). 2.
Installation External A/V Source Setup Connections Connect the audio/video output jacks on the external A/V equipment to the corresponding input jacks on the TV. When connecting the TV to external A/V equipment, match the jack colors (Video = yellow, Audio Left = white, and Audio Right = red). COMPONENT (DTV/DVD IN) AUDIO PC INPUT ANT IN ( 75 ) PC SOUND H/P S-VIDEO VIDEO IN Camcorder Viewing Setup 1. Turn on the external A/V equipment. 2. Use the INPUT button on the remote control to select Video.
Installation DTV Setup COMPONENT (DTV/DVD IN) AUDIO - To watch digitally broadcast programs, purchase and connect a digital set-top box. PC INPUT ANT IN ( 75 ) PC SOUND H/P S-VIDEO VIDEO IN Connections Connect the digital set-top box video outputs to the COMPONENT (Y, PB, PR) jacks and connect the digital set-top box audio outputs to the AUDIO jacks. (or, Connect the set-top box with the D-sub output socket to PC INPUT socket on the set and audio cable of the set-top box to the PC SOUND.
Operation Operation TV Operation Overview 1. First, make all equipment connections. Plug the AC Adapter into the TV, then plug the AC Adapter into a power outlet. At this time, the TV is switched to standby mode. • In standby mode, press the POWER, TV, CH (D,E), INPUT or number button on the remote control or ON/OFF, CH (D,E), INPUT button located on the TV to turn the TV on. 2. Select the viewing source by pressing INPUT.
Operation Channel Menu Options Memorizing the Channels with EZ scan - For Auto program to work, the programming source must be connected to the TV and the TV must be receiving programming signals either over-the-air or from a cable-type service provider. 1. Press the MENU button and then use D the CHANNEL menu. 2. Press the G button and then use EZ Scan. button to select /E CHANNEL D /E button to select EZ Scan Manual program Favorite channel To start 3.
Operation Favorite Channels Setup - Favorite Channel lets you quickly tune in up to 8 channels of your choice without having to wait for the TV to scan through all the in-between channels. CHANNEL EZ Scan Manual program Favorite channel D F G Á E Favourite channel ---------- To set D E MENU 1. Press the MENU button and then use D /E ------------------------------------- FG Á MENU button to select the CHANNEL menu. 2. Press the G button and then use D /E button to select Favorite channel. 3.
Operation Picture Menu Options EZ V ideo - This function adjusts the TV for the best picture appearance. 1. Press the VIDEO button repeatedly to select the picture appearance setup option as shown below. Clear Optimum Soft User • You can also adjust EZ Video in the PICTURE menu. • Clear, Optimum and Soft are preset for good picture quality at the factory and cannot be changed. ACC (Auto Color Control) - Selecting a factory setting colour set. 1.
Operation Sound Menu Options EZ Audio - This function lets you enjoy the best sound without any special adjustment because the TV selects the appropriate sound option based on the program content. 1. Use the AUDIO button to select the appropriate sound setup as shown below. Flat Music Movie Sports User • You can also adjust EZ Audio in the SOUND menu. Equalizer Adjustments SOUND EZ Audio AVL Balance Flat Music Movie Sports User G 0.1 Khz D F G Á E 0.3 D E FG Á MENU 1.
Operation Sound Menu Options continued Sound Balance 1. Press the MENU button and then use D /E button to select the SOUND menu. 2. Press the Balance. G button and then use D / E button to select 3. Press the G button and then use F / G button to adjust the sound balance. • Balance is adjustable from Left 50 to Right 50. 4. Press the ENTER button to save.
Operation T imer Menu Options Auto Clock Setup - The time is set automatically through from a PBS broadcast signal. - The PBS channel signal includes information for the correct time and daylight saving time. TIMER Auto clock Clock Off timer On timer Auto off D F G Á E G Auto Manual - - : - - AM Time zone PBS CH. D.S.T. D F G Á E MENU 1. Press the MENU button and then use D /E Auto TV Auto 1 MENU button to select the TIMER menu. 2.
Operation T imer Menu Options continued On/Of f Timer Setup - Timer function operates only if current time is set. Off-Timer function overrides On-Timer function if they are set to the same time. The TV must be in standby mode for the On-Timer to work. If you don’t press any button within 2 hours after turning on the TV with the On-Timer function, the TV will automatically revert to standby mode. 1. Press the MENU button and then use D the TIMER menu. /E 2.
Operation Special Menu Options Closed Captions Closed captioning is a process which converts the audio portion of a television program into written words which then appear as subtitles on the television screen. Closed captions allow viewers to read the dialogue and narration of television programs. Using Closed Captions Captions are the subtitles of the dialogue and narration of television programs. For prerecorded programs, program dialogue can be arranged into captions in advance.
Operation Special Menu Options continued Select Mode - Inputs can be set for TV, Video or RGB-PC mode. Video mode is used when a video cassette recorder (VCR), or other equipment is connected to the set. 1. Press the MENU button and then D / E button to select the SPECIAL menu. 2. Press the G button and then D / E button to select Input. 3. Press the G button and then D / E button to select TV, Video, Component, RGB-DTV or RGB-PC. • Video: VCR connected to the VIDEO IN socket of the set.
Operation Power indicator - Use this function to set the power indicator on the front side of the product to On or Off. If you set On at any time, the power indicator will automatically be turned on. Although you select Off, set front light turns on for a moment when the set turns on. 1. Press the MENU button and then use D / E button to select the SPECIAL menu. 2. Press the G button and then use D / E button to select Power indicator. 3. Press the G button and then use D or Off. 4.
Operation Lock Menu Options Parental Control can be used to block specific channels, ratings and other viewing sources. The Parental Control Function (V-Chip) is used to block program viewing based on the ratings sent by the broadcast station. The default setting is to allow all programs to be viewed. Viewing can be blocked by the type of program and by the categories chosen to be blocked. It is also possible to block all program viewing for a time period.
Operation Lock Menu Setup Language Input Key lock Power indicator Caption/Text Captions Parental D E F G Á MENU To set Parental Lock Set password MPAA Age block Content block Aux block Canadian D FG Á E On Off MENU 1. Press the MENU button and then use D / E button to select the Special menu. 2. Press the G button and then use D / E button to select Parental. Then, press the G button. • If Lock is already set, enter the password requested. • The TV is set with the initial password “0-0-0-0”. 2.
Operation Screen Menu Options (15LC1R * only) - After setup, be sure to select RGB-PC source to see the PC image on TV screen. SCREEN Auto configure Manual configure Reset To set D H-Position 85 F G E D FG Á E MENU 1. Press the MENU button and then use D / E button to select the SCREEN menu. 2. Press the G button and then use D / E button to select desired item. 3. Use the F / G button to make appropriate adjustments. • H-position/V-position Adjusts picture left/right and up/down.
Maintenance & Product Specifications Maintenance - Early malfunctions can be prevented. Careful and regular cleaning can extend the amount of time you will have your new TV. Be sure to turn the power off and unplug the power cord before you begin any cleaning. Cleaning the Screen 1. Here’s a great way to keep the dust off your screen for a while. Wet a soft cloth in a mixture of lukewarm water and a little fabric softener or dish washing detergent.
Troubleshooting Checklist Troubleshooting Checklist The operation does not work normally. • Check to see if there is any object between the product and the remote control causing obstruction. The remote control • Are batteries installed with correct polarity (+ to +, - to -)? doesn’t work • Correct remote operating mode set: TV, VCR etc.? • Install new batteries. Power is suddenly turned off • Is the sleep timer set? • Check the power control settings.
Troubleshooting Checklist The audio function does not work. Picture OK & No sound • Press the VOL (or Volume) button. • Sound muted? Press MUTE button. • Try another channel. The problem may be with the broadcast. • Are the audio cables installed properly? No output from one of the speakers • Adjust Balance in menu option.
Note Note 34
Note Note 35