OWNER’S MANUAL LED TV* * LG LED TV applies LCD screen with LED backlights. Please read this manual carefully before operating the your TV and retain it for future reference. MT75* www.lg.
TABLE OF CONTENTS ENGLISH ENG TABLE OF CONTENTS 3 LICENSES 26 TROUBLESHOOTING 3 OPEN SOURCE SOFTWARE NOTICE 27 SPECIFICATIONS 4 ASSEMBLING AND PREPARING 4 Unpacking 6 Parts and buttons 7 Lifting and moving the TV 8 Setting up the TV 8 -Attaching the Stand 10 Mounting on a table 12 Mounting on a wall 13 Tidying cables 14 MAKING CONNECTIONS 14 Antenna Connection 14 Satellite dish Connection 15 Euro Scart Connection 16 Other Connections 19 REMOTE CONTROL 20 SETTINGS
licenses / opne source software notice 3 Supported licenses may differ by model. For more information about licenses, visit www.lg.com. Manufactured under license from Dolby Laboratories. “Dolby” and the double-D symbol are trademarks of Dolby Laboratories. The terms HDMI and HDMI High-Definition Multimedia Interface, and the HDMI logo are trademarks or registered trademarks of HDMI Licensing LLC in the United States and other countries.
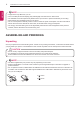
ASSEMBLING AND PREPARING ENGLISH ENG NOTE yy Image shown may differ from your TV. yy Your TV’s OSD (On Screen Display) may differ slightly from that shown in this manual. yy The available menus and options may differ from the input source or product model that you are using. yy New features may be added to this TV in the future. yy The TV can be placed in standby mode in order to reduce the power consumption.
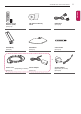
ASSEMBLING AND PREPARING 5 ENGLISH ENG Remote control, batteries (AAA) (See p.19) CD (Owner's Manual), Cards RGB Cable (See p.16) Stand Body (See p.8) Stand Base (See p.8) Cable Holder (See p.13) or Power Cord (See p.10) (Depending on model) AC-DC Adapter (See p.10) AC-DC Adapter (Depending on model) (See p.
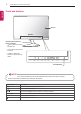
ASSEMBLING AND PREPARING ENGLISH ENG Parts and buttons Screen Speaker Remote Control Sensor Power Indicator yy Red : When the power is turned off yy Off : When the power is turned on yy Amber : When the power is in power saving mode Touch Buttons NOTE yy All of the buttons are touch sensitive and can be operated through simple touch with your finger. Power and control touch button are located on the bottom. Touch button Description Scrolls through the saved programmes.
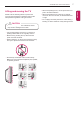
ASSEMBLING AND PREPARING Please note the following advice to prevent the TV from being scratched or damaged and for safe transportation regardless of its type and size. CAUTION yy Avoid touching the screen at all times, as this may result in damage to the screen. yy It is recommended to move the TV in the box or packing material that the TV originally came in. yy Before moving or lifting the TV, disconnect the power cord and all cables.
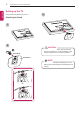
ASSEMBLING AND PREPARING ENGLISH ENG Setting up the TV Image shown may differ from your TV. 3 Attaching the Stand 1 2 CAUTION yy When attaching the stand to the TV, place the screen facing down on a cushioned table or flat surface to protect the screen from scratches. Stand Body 3 Stand Base NOTE yy Remove the stand before installing the TV on a wall mount by performing the stand attachment in reverse.
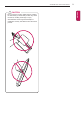
ASSEMBLING AND PREPARING ENGLISH ENG CAUTION yy Do not carry the monitor upside-down by holding the stand body (or stand base) as this may cause it to fall off, resulting in damage or injury. yy The illustration shows a general example of installation and may look different from the actual product.
ASSEMBLING AND PREPARING ENGLISH ENG Mounting on a table CAUTION 1 Lift and tilt the TV into its upright position on a table. - Leave a 10 cm (minimum) space from the wall for proper ventilation. yy Do not place the TV near or on sources of heat, as this may result in fire or other damage. yy Please be sure to connect the TV to the ACDC power adapter before connecting the TV’s power plug to a wall power outlet.
ASSEMBLING AND PREPARING 11 Using the Kensington security system The Kensington security system connector is located at the back of the TV. For more information of installation and using, refer to the manual supplied with the Kensington security system or visit http://www.kensington. com. Connect the Kensington security system cable between the TV and a table. NOTE yy The Kensington security system is optional. You can obtain additional accessories from most electronics stores.
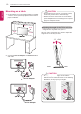
ASSEMBLING AND PREPARING ENGLISH ENG Mounting on a wall Separate purchase(Wall Mounting Bracket) For proper ventilation, allow a clearance of 10 cm on each side and from the wall. Detailed installation instructions are available from your dealer, see the optional Tilt Wall Mounting Bracket Installation and Setup Guide.
ASSEMBLING AND PREPARING 13 yy Disconnect the power first, and then move or install the TV. Otherwise electric shock may occur. yy If you install the TV on a ceiling or slanted wall, it may fall and result in severe injury. Use an authorized LG wall mount and contact the local dealer or qualified personnel. yy Do not over tighten the screws as this may cause damage to the TV and void your warranty. yy Use the screws and wall mounts that meet the VESA standard.
MAKING CONNECTIONS ENGLISH ENG MAKING CONNECTIONS Antenna Connection This section on MAKING CONNECTIONS mainly uses diagrams for the 27MT75V models. Connect various external devices to the TV and switch input modes to select an external device. For more information about an external device’s connection, refer to the manual supplied with each device.
MAKING CONNECTIONS AV 1 (Not Provided) Transmits the video and audio signals from an external device to the TV set. Connect the external device and the TV set with the euro scart cable as shown. Output Type Current input mode Digital TV AV1 (TV Out1) Digital TV Analogue TV Component, AV, HDMI, RGB Analogue TV 1 TV Out : Outputs Analogue TV or Digital TV signals. NOTE yy Any Euro scart cable used must be signal shielded.
MAKING CONNECTIONS UDIO OUT Connect your TV to external devices. For the best picture and audio quality, connect the external device and the TV with the HDMI cable as shown. Some separate cable is not provided.
MAKING CONNECTIONS 17 USB IN 0.5A PCMCIA CARD SLOT ENGLISH ENG USB / HDD1 H/P AUDIO IN (PC) 5V RGB IN (PC) Headphone DVI OUT AUDIO OUT DVD / Blu-Ray / HD Cable Box / PC RGB OUT AUDIO OUT PC 1 USB port supports 0.5A electric current. If you need more electric current in case of HDD, use the separate power adaptor.
MAKING CONNECTIONS ENGLISH ENG Connecting to a PC Your TV supports the Plug & Play* feature and has the built-in speakers with Virtual Surround that reproduces sound clearly with a rich bass. * Plug & Play: The function when a PC recognizes a connected device that users connect to a PC and turn on, without device configuration or user intervention. NOTE yy If you want to use HDMI-PC mode, you must set the Input Label to PC mode.
REMOTE CONTROL 19 The descriptions in this manual are based on the buttons of the remote control. Please read this manual carefully and use the TV correctly. To replace batteries, open the battery cover, replace batteries (1.5 V AAA) matching and ends to the label inside the compartment, and close the battery cover. To remove the batteries, perform the installation actions in reverse. CAUTION yy Do not mix old and new batteries, as this may damage the remote control.
SETTINGS ENGLISH ENG SETTINGS yy Depending on input signal, available range of picture modes may differ. Expert mode is for picture tuning professionals to control and fine-tune using a specific image. For normal images, the effects may not be dramatic. yy The ISF function is only available on some models. yy Automatically Setting Up Programme SETTINGS SETUP Auto Tuning Automatically tunes the programmes. yy If Input Source is not connected properly, programme registration may not work.
SETTINGS To use TV speaker SETTINGS PICTURE Picture Option SETTINGS Picture Mode [Depending on model] Adjusts detailed setting for images. yy Noise Reduction : Eliminates noise in the picture. yy MPEG Noise Reduction : Eliminates noise generated while creating digital picture signals. yy Black Level : Adjusts the brightness and contrast of the screen to suit the black level of the input picture by using the blackness (black level) of the screen. yy Real Cinema : Optimizes the screen for movie viewing.
SETTINGS To synchronize audio and video ENGLISH ENG SETTINGS AUDIO AV Sync. Adjust [Depending on model] Synchronizes video and audio directly when they do not match. yy If you set AV Sync. Adjust to ON, you can adjust the sound output (TV speakers or SPDIF) to the screen image. To use SIMPLINK [Depending on model] SIMPLINK is a feature that enables you to control and manage various multimedia devices conveniently via the SIMPLINK menu.
SETTINGS Warning when using USB storage devices My Media supporting file yy Maximum data transfer rate : 20 Mbps (Mega bit per second) yy External supported subtitle formats : *.srt (SubRip), *.smi (SAMI), *.sub (SubViewer, MicroDVD, DVDsubtitleSystem, SubIdx(Vobsub)), *.ass/*. ssa (SubStation Alpha), *.txt (TMplayer), *.
SETTINGS / TO SEE WEB MANUAL ENGLISH ENG yy File Type : WMA [Bit rate] 128 Kbps ~ 320 Kbps [Sample freq.] 8 kHz ~ 48 kHz [Support] WMA7, WMA8, WMA9 Standard yy File Type : WMA [Bit rate] ~ 768 Kbps [Channel / Sample freq.] M0 : up to 2 Channel @ 48 kHz (Except LBR mode), M1 : up to 5.1 Channel @ 48 kHz, M2 : up to 5.1 Channel @ 96 kHz [Support] WMA 10 Pro yy File Type : OGG [Bit rate] Free Format [Sample freq.
MAINTENANCE 25 Cleaning Your TV Clean your TV regularly to keep the best performance and to extend the product lifespan. CAUTION yy Make sure to turn the power off and disconnect the power cord and all other cables first. yy When the TV is left unattended and unused for a long time, disconnect the power cord from the wall outlet to prevent possible damage from lightning or power surges. Screen, frame, cabinet and stand yy To remove dust, wipe the surface with a dry and soft cloth.
TROUBLESHOOTING ENGLISH ENG TROUBLESHOOTING Problem Cannot control the TV with the remote control. Resolution yy Check the remote control sensor on the product and try again. yy Check if there is any obstacle between the product and the remote control. yy Check if the batteries are still working and properly installed ( to , to ). No image display and no sound is produced. yy Check if the product is turned on. yy Check if the power cord is connected to a wall outlet.
SPECIFICATIONS Product specifications may be changed without prior notice due to upgrade of product functions. 23MT75D 23MT75V MODELS 27MT75D 27MT75V Dimensions (W x H x D) With stand (mm) 533 x 426.2 x 188.4 Without stand (mm) 533 x 325.9 x 54.7 622.7 x 377.9 x 56.1 Weight With stand (kg) 3.7 5.0 3.38 4.58 Without stand (kg) Power Consumption 35 W Power requirement 40 W 19 V AC/DC Adapter 2.0 A 19 V 2.
SPECIFICATIONS RGB (PC) / HDMI (PC) supported mode HDMI (DTV) supported mode ENGLISH ENG Horizontal Frequency(kHz) Vertical Frequency(Hz) 720 x 400 31.468 70.080 720 x 480 640 x 480 31.469 37.500 59.940 75.000 31.469 31.500 59.940 60.000 720 x 576 31.250 50.000 800 x 600 37.879 46.875 60.317 75.000 1280 x 720 1024 x 768 48.363 60.004 37.500 44.960 45.000 50.000 59.940 60.000 1024 x 768 Only HDMI(PC) 56.476 70.069 1920 x 1080 1024 x 768 60.023 75.029 1152 x 864 67.
Make sure to read the Safety Precautions before using the product. Keep the Owner’s Manual (CD) in an accessible place for future reference. The model and serial number of the TV is located on the back and one side of the TV. Record it below should you ever need service.