OWNER’S MANUAL MONITOR SIGNAGE Please read this manual carefully before operating the your set and retain it for future reference. MONITOR SIGNAGE MODELS 29WR30MR www.lg.
CONTENTS ENGLISH ENG CONTENTS 3 LICENSES 4 ASSEMBLING AND PREPARING 4 Accessories 5 Parts and buttons 6 STORAGE METHOD FOR PANEL PROTECTION 6 - Correct Method 6 - Incorrect Method 7 Using the IR Receiver 8 Mounting on a wall 9 REMOTE CONTROL 11 USING THE MONITOR 11 Connecting to a PC 12 - DVI connection 12 - Display Port connection 13 - HDMI connection 13 - IR Receiver connection 14 - LAN connection 15 Daisy Chain Monitors 15 - DP Cable 16 Using additional options
LICENSES Supported licenses may differ by model. For more information of the licenses, visit www.lg.com. The terms HDMI and HDMI High-Definition Multimedia Interface, and the HDMI logo are trademarks or registered trademarks of HDMI Licensing LLC in the United States and other countries.
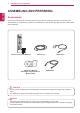
ASSEMBLING AND PREPARING ENGLISH ENG ASSEMBLING AND PREPARING Accessories Check your product box for the following items. If there are any missing accessories, contact the local dealer where you purchased your product. The illustrations in this manual may differ from the actual product and accessories. POWER ENERGY MONITOR INPUT OFF ON .,! GHI PQRS 1/a/A SAVING TUV -*# CLEAR ABC JKL DEF MNO WXYZ MARK ARC PSM P BRIGHT A NESS G E MUTE MENU AUTO BACK TILE S.
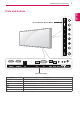
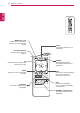
ASSEMBLING AND PREPARING 5 Parts and buttons ENG ENGLISH Screen Buttons/ Screen Marks Connection panel Screen Marks Description INPUT Changes the input source. MENU Accesses the main menus, or saves your input and exits the menus. Adjust the up and down. Adjusts the volume level. AUTO/SET /I Displays the current signal and mode. Turns the power on or off.
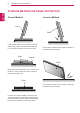
ASSEMBLING AND PREPARING STORAGE METHOD FOR PANEL PROTECTION ENGLISH ENG Correct Method Incorrect Method Panel Panel If the product needs to be set upright, hold both sides of the product, and tilt backward carefully for. Do not let the panel not to touch the floor. Panel If the product is tilted onto the bezel, the bottom of the panel may be damaged. Cushion Panel When laying down the product, lay a cushion on a flat floor. Put the product on it with the panel of the product facing down.
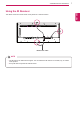
ASSEMBLING AND PREPARING 7 Using the IR Receiver IR Receiver cable NOTE The IR receiver is made with a magnet. You can attach the IR receiver on the side, top, or bottom yy of the product. It may fall down if exposed to external shock. yy ENG ENGLISH This allows a remote control sensor to be placed in a custom location.
ASSEMBLING AND PREPARING CAUTION Mounting on a wall ENGLISH ENG For proper ventilation, allow a clearance of 10 cm on each side and from the wall. Detailed installation instructions are available from your dealer, see the optional Tilt Wall Mounting Bracket Installation and Setup Guide. 10 cm 10 cm 10 cm 10 cm 10 cm To install the monitor to a wall, attach a wall mounting bracket (optional) to the back of the monitor.
REMOTE CONTROL 9 The descriptions in this manual are based on the buttons of the remote control. Please read this manual carefully and use the Monitor correctly. To replace batteries, open the battery cover, replace batteries (1.5 V AAA) matching and ends to the label inside the compartment, and close the battery cover. To remove the batteries, perform the installation actions in reverse. CAUTION Do not mix old and new batteries, as this yy may damage the remote control.
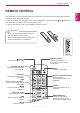
REMOTE CONTROL ENGLISH ENG MENU (See p.19) Accesses the main menus or saves your input and exit menus. AUTO This button selection is not applicable. Navigation buttons Scrolls through menus or options. OK Selects menus or options and confirms your input. S.MENU (SuperSign Menu Key) This button selection is not applicable. BACK Allows the user to move back one step. EXIT Clears all on-screen displays and returns to Monitor viewing from any menu. ID ON/OFF This button selection is not applicable.
USING THE MONITOR 11 Connecting to a PC Your Monitor supports the Plug & Play* feature. * Plug & Play: This is the function that allows a PC to use the monitor without installing a driver. NOTE It is recommended to use the Monitor with the HDMI connection for the best image quality. yy Use a shielded signal interface cable, such as DVI/HDMI cable, with a ferrite core to maintain standard yy compliance for the product. If you turn the Monitor on when the set becomes cold, the screen may flicker.
USING THE MONITOR ENGLISH ENG DVI connection Display Port connection Transmits digital video signals to the monitor. Connect the monitor using the DVI cable as illustrated below. Select the DVI input after connecting. To transmit an audio signal, connect additional audio cables. Transmits the digital video and audio signals from your PC to the Monitor. Connect the PC and the Monitor with the Display Port cable as shown in the following illustrations.
USING THE MONITOR IR Receiver connection Transmits the digital video and audio signals from your PC and A/V devices to the monitor. Connect your PC and AV device to the monitor with the HDMI cable as illustrated below. Allows the use of a wired remote or IR receiver extension. (not included) (not included) Back of the Product NOTE Use a High Speed HDMI™ cable. yy High Speed HDMI™ cables transmit an HD yy signal up to 1080p and higher.
USING THE MONITOR LAN connection ENGLISH ENG A Using a router(Switch) LAN Switch Monitor B Using the Internet.
USING THE MONITOR 15 Daisy Chain Monitors ENG ENGLISH This function displays digital video signals from your PC on multiple monitors. 1 Connect a signal input cable (DVI cable) to the DVI IN port of Monitor 1. 2 Connect the other end of the signal input cable to your PC. 3 Connect one end of another signal input cable to the DIV OUT port of Monitor 1 and the other end to the DIV IN of Monitor 2.
USING THE MONITOR Using additional options ENGLISH ENG Adjusting aspect ratio Resize the image to view the image at its optimal size by pressing ARC while you are watching content. CAUTION If a fixed image displays on the screen for a long period of time, it will be imprinted and become a yy permanent disfigurement on the screen. This is “image burn” or “burn-in” and not covered by the warranty. To prevent image sticking, do not play a still image for more than two hours.
ENTERTAINMENT 17 Connecting to a wired network (Depending on model) Connect the display to a local area network (LAN) via the LAN port as shown on the following illustration and set up the network settings. This monitor only supports a wired network connection. After making a physical connection, a small number of home networks may require the display network settings to be adjusted. For most home networks, the display will connect to automatically without any adjustments.
ENTERTAINMENT NOTE ENGLISH yy If you want to access the Internet directly on your display, the internet connection should always be on. yy If you cannot access the Internet, check the network conditions from a PC on your network. yy When you use Network Setting, check the LAN cable or check if DHCP in the router is turned on. Tips for Network setting yy Use a standard LAN cable with this display. Cat5 or better with a RJ45 connector.
CUSTOMIZING SETTINGS 19 ENG ENGLISH CUSTOMIZING SETTINGS Menu Settings 1 To view the Menu OSD, press the Menu button at the bottom of the monitor. 2 Use the < or > buttons to set the options. 3 Select 100 button to exit the OSD menu. 70 30 Brightness Contrast Volume DVI Wide Input Ratio Func. PIP 전체 Picture Color Settings Time Network Reset Exit Each option is described below. Menu Brightness Contrast Volume Description Adjusts the brightness and contrast of the screen.
CUSTOMIZING SETTINGS Ratio Settings ENGLISH ENG 1 To view the Menu OSD, press the Menu button at the bottom of the monitor. 2 Press < or > to go to Ratio. 3 Press OK to select Ratio. 4 Use the < or > buttons to set the options. 5 Select Ratio to exit the OSD menu. Sub Menu Wide Cinema1 Cinema2 Original 1:1 Back Exit Each option is described below. Menu > Ratio Description Wide Displays the video in wide-screen, regardless of the video signal input.
CUSTOMIZING SETTINGS 21 Func. Settings ENG ENGLISH 1 To view the Menu OSD, press the Menu button at the bottom of the monitor. 2 Press < or > to go to Func. 3 Press OK to select Func. 4 Use the < or > buttons to set the options. 5 Select Func. to exit the OSD menu. Sub Menu Off Custom Func. ECO Picture Mode Reset Back Exit Each option is described below. Menu > Func.
CUSTOMIZING SETTINGS PIP settings ENGLISH ENG 1 To view the Menu OSD, press the Menu button at the bottom of the monitor. 2 Press < or > to go to PIP. 3 Press OK to select PIP. 4 Use the < or > buttons to set the options. 5 Select PIP to exit the OSD menu. Sub Menu Off Balanced Bottom R PIP PIP Size Position Reset Back Exit Each option is described below. Menu > PIP Description PIP Displays the screens of two input modes on one monitor.
CUSTOMIZING SETTINGS 23 PIP/PBP Mode *PIP(Picture In Picture): Displays the Sub screen in the main screen. *PBP (Picture by Picture): Splits the display into the main screen and a sub screen. Sub screen Main screen PIP PBP Position Adjusts the position of the subscreen (top left, bottom left, top right, bottom right) top left top right bottom left bottom right Size Adjusts the size of the subscreen.
CUSTOMIZING SETTINGS Picture ENGLISH ENG 1 To view the Menu OSD, press the Menu button at the bottom of the monitor. 2 Press < or > to go to Picture. 3 Press OK to select Picture. 4 Use the < or > buttons to set the options. 5 Select Picture to exit the OSD menu. Sub Menu 5 Low Middle Sharpness Black Level Response Time Picture Reset Back Exit Each option is described below. Menu > Picture Description Sharpness Adjusts the sharpness of the screen.
CUSTOMIZING SETTINGS 25 Color ENG ENGLISH 1 To view the Menu OSD, press the Menu button at the bottom of the monitor. 2 Press < or >to go to Color. 3 Press OK to select Color. 4 Use the < or > buttons to set the options. Color 5 Select to exit the OSD menu. To return to the upper menu or set other menu items, use the Menu button. Sub Menu Gamma 1 Custom Gamma Color Temp 50 50 50 Red Green Blue Color Six Color Reset Back Exit Each option is described below.
CUSTOMIZING SETTINGS Settings ENGLISH ENG 1 To view the Menu OSD, press the Menu button at the bottom of the monitor. 2 Press < or > to go to Settings. 3 Press OK to select Settings. 4 Use the < or > buttons to set the options. 5 Select Settings to exit the OSD menu. Sub Menu AV Language PC/AV Mode Audio-In Main Audio Off Tile Mode Off ISM Method Key Lock Off On DPM Select Set ID Each option is described below.
CUSTOMIZING SETTINGS 27 Tile Mode Off When the Tile Mode option is disabled 1X2 When using 2 monitors Tile ID 1 ID 2 2X2 When using 4 monitors ID 1 ID 2 ID 3 ID 4 Tile Mode - Natural mode When active, the part of the image that would normally be displayed in the gap between the monitors is omitted. Before After ENG ENGLISH This monitor can be tiled with additional monitors to create a large tiled display.
CUSTOMIZING SETTINGS Time ENGLISH ENG 1 To view the Menu OSD, press the Menu button at the bottom of the monitor. 2 Press < or > to go to Settings. 3 Press OK to select Settings. 4 Use the < or > buttons to set the options. 5 Select Time to exit the OSD menu. Sub Menu Clock On Timer Off Off Off timer Auto off Off Off 4 Hours Off Sleep Timer Time Reset Back Exit Each option is described below. Menu > Time Description Clock Sets the time feature.
CUSTOMIZING SETTINGS 29 Network ENG ENGLISH 1 To view the Menu OSD, press the Menu button at the bottom of the monitor. 2 Press < or > to go to Settings. 3 Press OK to select Settings. 4 Use the < or > buttons to set the options. 5 Select Network to exit the OSD menu. Sub Menu Interface Select Network Setting Back Exit Each option is described below. Menu > Network Interface Select Description Sets communication with Media Player and the connected PC.
TROUBLESHOOTING ENGLISH ENG TROUBLESHOOTING No image is displayed Problem Is the product power cord connected? Does the 'Out of range' message appear? oes the 'Check signal cable' D message appear? Resolution yy See if the power cord is properly connected to the outlet. yy The signal from the PC (video card) is out of the vertical or horizontal frequency range of the product. Adjust the frequency range by referring to the Specifications in this manual.
TROUBLESHOOTING 31 The audio function does not work. No sound? Sound is too low. Resolution yy See if the audio cable is connected properly. yy Adjust the volume. yy See if the sound is set properly. yy Adjust the volume. Screen color is abnormal. Problem Resolution Screen has poor color resolution yy Set the number of colors to more than 24 bits (true color) Select (16 colors). Control Panel - Display - Settings - Color Table menu in Windows.
SPECIFICATIONS ENGLISH ENG SPECIFICATIONS LCD Panel Screen Type Video Signa Pixel Pitch Max. Resolution 1064.67 mm Wide (29 inch) TFT (Thin Film Transistor) LCD (Liquid Crystal Display) Panel. Visible diagonal size : 1064.67 mm 0.4833 mm (H) x 0.4833 mm (V) 2560 x 1080 @ 60 Hz - It may not be supported depending on the OS or video card type. Recommended Resolution 2560 x 1080 @ 60 Hz - It may not be supported depending on the OS or video card type.
SPECIFICATIONS 33 Dimensions (Unit : mm) 48.95 313.2 697.2 200 M4 X L10 (wall mounting screw)/ Depth 11mm (maximum) 200 248.4 29 50.9 Product specifications shown above may be changed without prior notice due to upgrade of product functions. ENG ENGLISH The illustrations in this manual may differ from the actual product and accessories. Please see the "Mounting on a wall" section for sizes of screws. (See p.
SPECIFICATIONS DVI/Display Port/HDMI(PC) supported mode. AV Mode ENGLISH ENG Resolution Horizontal Vertical Frequency(kHz) Frequency(Hz) Resolution HDMI 720 x 400 31.468 70.08 480i x x 640 x 480 31.469 59.94 576i 640 x 480 37.5 75 480p o 800 x 600 37.879 60.317 576p o 800 x 600 46.875 75.0 720p o 1024 x 768 48.363 60.0 1080i o 1024 x 768 60.123 75.029 1080p o 1152 x 864 67.5 75 1280 x 720 45 60 1280 x 1024 63.981 60.02 1280 x 1024 79.976 75.
CONTROLLING THE MULTIPLE PRODUCT 35 CONTROLLING THE MULTIPLE PRODUCT Connecting the cable Connect the RS-232C cable as shown in the picture. The RS-232C protocol is used for communication between the PC and product. You can turn the yy product on/off, select an input source or adjust the OSD menu from your PC.
CONTROLLING THE MULTIPLE PRODUCT Command Reference List ENGLISH ENG Some commands are not supported depending on the model.
CONTROLLING THE MULTIPLE PRODUCT 37 Transmission / Receiving Protocol [Command1][Command2][ ][Set ID][ ][Data][Cr] * [Command1] : Identifies between the factory setting and the user setting modes. * [Command2] : Controls monitor sets. * [Set ID] : U sed for selecting a set you want to control. A unique set ID can be assigned to each set ranging from 1 to 255 (01H to FFH) in Setting on the OSD menu. Selecting '00H' for set ID allows the simultaneous control of all connected monitor sets.
CONTROLLING THE MULTIPLE PRODUCT 01. Power (Command: k a) * Controls switching the set on/off. ENGLISH ENG Transmission [k][a][ ][Set ID][ ][Data][Cr] Data 00: Power off 01: Power on Acknowledgement [a][ ][Set ID][ ][OK/NG][Data][x] * Shows the status of power on/off. Transmission [k][a][ ][Set ID][ ][FF][Cr] Acknowledgement [a][ ][Set ID][ ][OK][Data][x] Data 00: Power off 01: Power on 02. Input Select (Command: x b) * Selects an input signal.
CONTROLLING THE MULTIPLE PRODUCT 07. Sharpness (Command: k k) * Adjusts the screen sharpness. Data 00-0A: Sharpness 0-10 Acknowledgement [k][ ][Set ID][ ][OK/NG][Data][x] 08. Color Temp (Command: x u) * Adjusts the screen color temperature. Transmission [x][u][ ][Set ID][ ][Data][Cr] Data 00: Cool 01: Standard 02: Warm 03: Custom Acknowledgement [u][ ][Set ID][ ][OK/NG][Data][x] 09. MUTE (Command: k e) * Mutes/unmutes the volume (sound).
CONTROLLING THE MULTIPLE PRODUCT 13. Off Timer (repeat mode/time) (Command: f e) * Sets Off Timer (repeat mode/time). ENGLISH ENG Transmission [f][d][ ][Set ID][ ][Data1][ ][Data2][ ][Data3][Cr] 1. f1h to f4h (Read data) Data1 F1: Reads the 1st Off Timer data F2: Reads the 2nd Off Timer data F3: Reads the 3rd Off Timer data F4: Reads the 4th Off Timer data Data2 FF Data3 FF * Checks Off Timer (repeat mode/hour/minute).
CONTROLLING THE MULTIPLE PRODUCT 14. On Timer (repeat mode/time) (Command: f d) * Sets the On Timer (repeat mode/time). * Checks On Timer (repeat mode/hour/minute). Transmission [f][d][ ][Set ID][ ][Data][ ][f][f][ ][f][f][Cr] Data f1-f4: First to fourth index number in the On Timer list Acknowledgement [d][ ][Set ID][ ][OK/NG][Data1][Data2][Data3][Data4] [x] Data1 f1-f4: First to fourth index number in the On Timer list Data2 00: Repeat off 02. Daily 03: Mon. - Fri. 04: Mon. - Sat. 05: Sat. - Sun. 06.
CONTROLLING THE MULTIPLE PRODUCT 15. On Timer Input (Command: f u) * Selects the video input for using On Timer. ENGLISH ENG Transmission [f][u][ ][Set ID][ ][Data][Cr] Data 70: DVI-D (PC) 90: HDMI (DTV) A0: HDMI (PC) D0: Display Port (PC) * This function is only available when Clock 1, Clock 2 and On Timer (repeat mode/time) are set. * To set the On Timer schedule correctly, the On Timer (repeat mode/time) command must be executed prior to this command. 17. Auto Off (Command: f g) * Sets Auto Off.
CONTROLLING THE MULTIPLE PRODUCT 19. ISM Method (Command: j p) * Selects an ISM Method option. Data 02: On 08: Off Acknowledgement [p][ ][Set ID][ ][OK/NG][Data][x] 20. DPM Select (Command: f j) * Sets the DPM mode. Transmission [f][j][ ][Set ID][ ][Data][Cr] * Sets the Tile Mode.
CONTROLLING THE MULTIPLE PRODUCT ENGLISH ENG 24. Natural Mode (in Tile mode) (Command: d j) * Areas corresponding to the gap between each tile are removed to give the screen image a more natural look. This function is only available when Tile Mode is enabled. Transmission [d][j][ ][Set ID][ ][Data][Cr] Data 00: Natural Mode off 01: Natural Mode on 27. Serial No. Check (Command: f y) * Checks the serial number of the product.
Make sure to read the Safety Precautions before using the product. Keep the Owner's Manual(CD) in an accessible place for future reference. The model and serial number of the SET is located on the back and one side of the SET. Record it below should you ever need service. MODEL SERIAL To obtain the source code under GPL, LGPL, MPL and other open source licenses, that is contained in this product, please visit http:// opensource.lge.com.