WD-1259(0~9)RD Washing Machine OWNER'S MANUAL (2P~32P) Thank you for buying a LG Fully Automatic Washing machine. Please read your owner's manual carefully, it provides instructions on safe installation, use and maintenance. Retain it for future reference. Record the model and serial numbers of your washing machine. Lavadora MANUAL DEL PROPIETARIO (33P~63P) Gracias por comprar la lavadora totalmente automática LG. Lea detenidamente el manual del propietario.
P 추가선택, 예약, Í roduct Feature Direct Drive System The advanced Brushless DC motor directly drives the drum without belt and pulley. Water Circulation Sprays detergent solution and water onto the load over and over. Clothes are soaked more quickly and thoroughly during wash cycle. The detergent suds can be removed more easily by the water shower during rinse cycle. The water circulation system uses both water and detergent more efficiently.
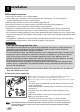
W arnings READ ALL INSTRUCTIONS AND EXPLANATION OF THE INSTALLATION BEFORE USE WARNING! For your safety, the information in this manual must be followed to minimize the risk of fire or explosion, electric shock, or to prevent property damage, personal injury, or loss of life. IMPORTANT SAFETY INSTRUCTIONS WARNING : To reduce the risk of fire, electric shock, or injury to persons when using the washer, follow basic precautions, including the following: • Before installation, check exterior damages.
W arnings To minimize the risk of fire in a tumble dryer, the following should be observed: • Items that have been spotted or soaked with vegetable or cooking oil constitute a fire hazard and should not be placed in a tumble dryer. Oil-affected items can ignite spontaneously, especially when exposed to heat sources Such as in a tumble dryer. The items become warm, causing an oxidation reaction in the oil. Oxidation creates heat. If the heat cannot escape, the items can become hot enought to catch fire.
S pecification Shipping Bolts Drawer Power Plug (For detergent and fabric softener) • If the supply cord is damaged, it must be replaced by the manufacturer or its service agents or a similarly qualified person in order to avoid a hazard.
I nstallation Install or store where it will not be exposed to temperatures below freezing or exposed to the weather. Properly ground washer to conform with all governing codes and ordinances. The base opening must not be obstructed by carpeting when the washing machine is installed on a carpeted floor.
I nstallation Installation place requirement Level floor : Allowable slope under entire washer is 1˚ Power outlet : Must be within 1.5 meters of either side of location of washer. Do not overload the outlet with more than one appliance. Additional Clearance : For wall, door and floor modeling is required. (10cm : rear / 2cm: right & left side) Do not place or store laundry products on top of washer at any times. They can damage the finish or controls.
I nstallation Electrical connection 1. Do not use an extension cord or double adapter. 2. If the supply cord is damaged, it must be replaced by the manufacturer or its service agents or similarly qualified person in order to avoid a hazard. 3. Always unplug the machine and turn off the water supply after use. 4. Connect the machine to an earthed socket in accordance with current wiring regulations. 5. The appliance must be positioned so that the plug is easily accessible.
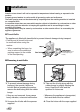
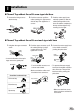
I nstallation Normal Tap without thread & screw type inlet hose 1. Unscrew the fixing screw to attach the tap. 2. Push the connector up till the rubber packing is in tight contact with the tap. Then tighten the 4 screws. 3. Push the water supply hose vertically upwards so that the rubber packing within in the hose can adhere completely to the tap and then tighten it by screwing it to the right. Normal Tap without thread & one touch type inlet hose 1. Untighten the upper connector screw.
I nstallation This equipment is not designed for maritime use or for use mobile installations such as caravans, aircraft etc. Turn off the stopcock if the machine is to be left for any length of time (e.g. holiday), especially if there is no floor drain(gully) in the immediate vicinity. When disposing of the appliance, cut off the mains cable, and destroy the plug Disable the door lock to prevent young children being trapped inside. Packaging material (e.g. Films, Styrofoam) can be dangerous for children.
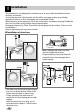
I nstallation Level adjustment 1. Adjusting the washing machine level properly prevents excessive noise and vibration. Install the appliance on a solid and level floor surface, preferably in a corner of the room. NOTE Timber or suspended type flooring may contribute to excessive vibration and unblance errors. 2. If the floor is uneven, adjust the adjustable feet as required. (do not insert pieces of wood etc.
C are before washing WARNING To reduce the risk of fire, electric shock, or injury to persons, read the IMPORTANT SAFETY INSTRUCTIONS before operating this appliance. 1. Fabric Care Labels Look for a care label on your clothes. This will tell you about the fabric content of your garment and how it should be washed. 2. Sorting To get the best results, sort clothes into loads that can be washed with the same wash cycle. Different fabrics need to be washed in different ways.
A dding detergent Adding detergent and fabric softener 1. The Dispenser Drawer • Main wash only ➔ • Pre Wash + Main Wash ➔ Detergent for main wash Fabric softener Detergent for pre wash 2. Adding Fabric Softener • Do not exceed the maximum fill line. Close the dispenser drawer slowly. Overfilling can cause early dispensing of the fabric softener which could stain clothes. • Do not leave the fabric softener in the detergent drawer for more than 2 days.
A dding detergent 3. Detergent dosage • The detergent should be used according to the instruction of the detergent manufacture. • If too much detergent is used, too many suds can occur and this will decrease the washing result or cause heavy load to the motor. • Use powder detergent only for the front loading washer. ❇ If suds occur too much, pleas reduce the detergent amount. • Detergent usage may need to be adjusted for water temperature, water hardness, size and soil level of the load.
F unction Recommended courses according to the laundry type Program Cotton Fabric Type Color fast garments (shirts, night dresses, pajamas...)and lightly soiled white cotton (underwear...) Cotton Quick Cotton Which is lightly soiled. Synthetic Polyamide, Acrylic, Polyester Delicate Wool Hand Wash Duvet Quick 30 Baby Care Delicate laundry easily damaged. Machine washable woolens with pure new wool only. “Hand Wash” marked delicate and wool laundry.
H ow to use washer 1. Cotton automatically selected upon power on. • Press the Power( ) button to start. • Press the Start/Pause( 16 ) button. 2. Manual Selecting • Press the Power( washer on. ) button to turn the • Select the desired cycle with the program dial and if required, make any changes to the washing conditions by pressing the buttons accordingly.
H ow to use washer (1) (2) (1) Button : Power (2) Dial : Program (3) Button : Start/Pause (4) Button : Option (5) Child lock (3) (4) (5) (6) (6) Button : Rinse (7) Button : Temperature (8) Button : Intensive (9) Button : Water Plus (10) Button : Time Delay Power (7) (8,9,10) (11) (12) (13) (11) Button : Spin (12) Button : Tub Clean (13) Button : Dry Program 1. Power • Press the Power( on and off. ) button to turn power • To cancel the Time Delay function, the Power( ) button must be pressed.
H ow to use washer Option Start/Pause • By pressing the option button, only one option function may be selected. NOTE: Depending on the selected program cycle, not all Options may be selectable. 1. Start • This Start/Pause button is used to start wash cycle or pause the wash cycle. 2. Pause • If temporary stop of wash cycle is needed, press “Start/Pause” button. • When in Pause, the power is turned off automatically after 4 minutes. 1. Pre Wash • Use this option for loads that need pretreatment.
H ow to use washer Rinse Child lock • By pressing the Rinse button, the Rinse type can be selected. - Normal - Rinse+ - Rinse++ - Normal+Hold - Rinse++Hold If you choose to lock the buttons on the control assembly to prevent tampering, this function may be selected. • Child lock can be set by pressing and holding the Option and Rinse button simultaneously. (About three seconds) 1.
H ow to use washer Spin Water Temperature • By pressing the Spin button, the spin speed can be chosen. • By pressing the Temp. button, the water temperature can be selected. - Cold - 30˚C / 40˚C / 50˚C / 60˚C 1. Spin selection • Water temperature can be selected as below according to the program. • Spin speed is available according to the program as follows.
H ow to use washer Tub Clean Water Plus • Adds extra water to the wash and rinse cycles for superior results. Time Delay Preparing washing before starting “Time Delay” - Turn on the water tap. - Load laundry and close the door. - Place the detergent and fabric softener in the drawer. • How to set “Time Delay” - Press Power( ) button. - Turn the Program dial to select the program you require. - Press Time Delay button and set the desired time. - Press the Start/Pause( ) button.
H ow to use washer Dry NOTE The maximum drying capacity for this model is 7kg. • Do not overload above the maximum drying capacity indicator. Items must be able to tumble freely. • This washer-dryer’s automatic process from washing to drying can be selected easily. • For most even drying , make sure all articles in the clothes load are similar in material and thickness. • By turning the dial, you can select. Normal ➔ More ➔ 30 ➔ 60 ➔ 90 ➔ 150 ➔ Low Temp➔ Iron➔ Eco • After the end of dry, “ ” is displayed.
H ow to use washer 2. Manual Drying time guide • By turning the Dry button, the drying time can be selected. • Drying course can last up to 150min. When selecting drying only, drying course will start after spining, unless the spin omitted. • These drying times are given as a guide to help you set your dryer for manual drying. Drying times can vary greatly depending on dampness, room temperature and type of fabric and your own experience will be your best guide.
H ow to use washer Display 3. Completion of washing • When washing cycle is completed, “ ” is displayed on the “Multi display”. 1. Special function display • When Child lock is selected, the “ displayed. • After the end of dry, “ 4. Time left ” is ” is displayed. • When time delay is selected, it shows the remaining time before the finish of the selected program. 2. Self diagnose display • If the washer encounters a fault during operation, the associated fault will be displayed.
M aintenance ❋ Before cleaning the washer interior, unplug the electrical power cord to avoid electrical shock to avoid electrical shock hazards. ❋ When disposing of the appliance, cut off the mains cable, and destroy the plug disable the door lock to prevent young children being trapped inside. The water inlet filter -" " error message will blink on the control panel when water does not enter the detergent drawer.
M aintenance The drain pump filter ❋ The drain filter collects threads and small objects left in the laundry. Check regularly that the filter is clean to ensure smooth running of your machine. ! CAUTION First drain using the drain hose and then open the pump filter to remove whatever any threads or objects. Be careful when draining if the water is hot. ❋ Allow the water to cool down before cleaning the drain pump, carrying out emergency emptying or opening the door in an emergency. 1.
M aintenance Dispenser drawer ❋ After a while detergents and fabric softeners leave a deposit in the drawer. • It should be cleaned from time to time with a jet of running water. • If necessary it can be removed completely from the machine by pressing the catch downward and by pulling it out. • To facilitate cleaning, the upper part of the fabric softener compartment can be removed.
M aintenance The water circulation nozzle • Clean the water circulation nozzle, if clogged. Cleaning your washer 1. Exterior Proper care of your washer can extend its life. The outside of the machine can be cleaned with warm water and a neutral non abrasive household detergent. Immediately wipe off any spills. Wipe with damp cloth. Try not to hit surface with sharp objects. ❋ IMPORTANT: Do not use methylated spirits, diluents or similar products. 2.
T roubleshooting guide ❋ This washing machine is equipped with automatic safety functions which detect and diagnose faults at an early stage and react appropriately. When the machine does not function properly or does not function at all, check the following points before you contact your service provider. Symptom Possible Cause Solution Rattling and clanking noise • Foreign objects such as coins or safety pins maybe in drum or pump. Stop washer and check drum and drain filter.
roubleshooting guide T Symptom Washer does not start Possible Cause • Electrical power cord may not be plugged in or connection may be loose. Make sure plug fits tightly in wall outlet. • House fuse blown, circuit breaker tripped,or a power outage has occurred. Reset circuit breaker or replace fuse. Do not increase fuse capacity. If problem is a circuit overload, have it corrected by a qualified electrician. Turn on water supply tap. • Water supply tap is not turned on.
T roubleshooting guide Symptom Possible Cause Solution • Water supply is not adequate in area • Water supply taps are not completely open. • Water inlet hose(s) are kinked. • The filter of the inlet hose(s) are clogged. Check another tap in the house. Fully open tap. • Drain hose is kinked or clogged. • The drain filter is clogged. Clean and straighten the drain hose. Clean the drain filter. • Load is too small. • Load is out of balance.
T erms of Warranty What Is Not Covered: • Service trips to your home to teach you how to use the product. • If the product is connected to any voltage other than that shown on the rating plate. • If the fault is caused by accident, neglect, misuse or Act of God. • If the fault is caused by factors other than normal domestic use or use in accordance with the owner's manual. • Provide instruction on use of product or change the set-up of the product.
C aracterísticas del producto ■ Sistema “Direct Drive”. La avanzada tecnología del motor de corriente continua sin escobillas mueve directamente el tambor sin necesidad de transmisión ni poleas. ■ Circulación de Agua. Se rocía la solución de detergente y agua sobre la carga una y otra vez. La ropa se remoja más rápidamente y a la perfección durante el ciclo de lavado. La espuma del detergente puede ser removida más fácilmente por la regadera de agua durante el ciclo de enjuague.
A dvertencias LEA TODA LA INFORMACIÓN ANTES DE SU USO ADVERTENCIA Por su seguridad, siga la información de este manual para minimizar el riesgo de provocar un incendio, una explosión, o una descarga eléctrica, y para evitar que se dañe el electrodoméstico, que alguien resulte herido, o que alguien pierda la vida. INSTRUCCIONES DE SEGURIDAD IMPORTANTES • Instálelo o guárdelo donde no quede expuesto a temperaturas bajo cero o a la intemperie.
A dvertencias Para minimizar el riesgo de fuego en una secadora prendida, lo siguiente debe de ser observado: • Artìculos que han sido manchados o remojados en aceite de cocina, constituyen un riesgo de fuego y no deben de ser colocados en la secadora. Articulos con aceite pueden incendiarse espontàneamente, especialmente cuando se exponen a fuentes de calor como la secadora. Los artìculos se calientan, causando una reacciòn de oxidaciòn en el aceite. La oxidaciòn crea el calentamiento.
E specificaciones Tornillos de transporte Cajón Enchufe de toma de corriente (Para el detergente y el suavizante para tejidos) Si el cable de alimentación se daña, debe ser sustituido por el fabricante o sus representantes de servicio o por una persona igualmente calificada, con el fin de evitar cualquier peligro.
I nstalación Instálelo o guárdelo donde no quede expuesto a temperaturas bajo cero o a la intemperie. La apertura de la base no debe estar obstruida por alfombras cuando se instala la lavadora sobre un suelo con alfombras u otro elemento. Instàlela o guárdela donde no estè expuesta a temperaturas bajo cero o expuesta al ambiente. Lavadora compatible con todas las òrdenes y códigos para su uso. La base no debe de ir obstruida por carpetas o tapetes cuando la lavadora sea instalada en piso alfombrado.
I nstalación Requisitos del lugar de instalación Lavadora Manguera de drenaje Pila de la colada aprox. 2 cm Nivel del suelo: La pendiente admisible debajo de la lavadora es de 1° Toma de corriente: Debe estar dentro de 1,5 metros de cada lado de la ubicación de la lavadora. No sobrecargue la toma con más de un aparato.
I nstalación Conexión eléctrica 1. No utilice una extensión o un adaptador doble. 2. Si el cable de alimentación está dañado, debe ser sustituido por el fabricante o sus representantes de servicio o por una persona igualmente calificada con el fin de evitar cualquier peligro. 3. Desenchufe siempre la máquina y cierre el suministro de agua después del uso. 4. Conecte la máquina a un enchufe con puesta a tierra según las normativas de cableado vigentes. 5.
nstalación I Grifo normal sin manguera de entrada de tipo de rosca y tornillo 1.Desenrosque el tornillo de fijación para conectar el grifo. Conector superior Empaquetadura de goma 2. Empuje hacia arriba el conector la manguera de suministro de agua de manera que la empaquetadura de goma dentro de la manguera se adhiera completamente al grifo y apriétela luego enroscando hacia la derecha. Empaguetadur a de goma Conector superior Tomillo de fijación 3.
nstalación I Este equipo no està diseñado para uso marítimo o para instalaciones móviles como caravanas, avionetas, etc. Desconecte la lavadora si no se va a utilizar por un perìodo largo de tiempo (por ejemplo, vacaciones), especialmente si no hay un drenaje en el piso del lugar. Cuando ya no utilice la lavadora, quite los cables principales y destruya el conector. Deconecte el seguro de la puerta para evitar que niños pequeños se queden atrapados dentro de la lavadora.
I nstalación Ajuste de nivel 1. La nivelación correcta de una lavadora impide el ruido y la vibración excesivos. Instale el aparato sobre una superficie de suelo sólida y nivelada, preferiblemente en la esquina de una habitación. NOTA Contratuerca Pata de nivelación Más arriba Pata de nivelación Más abajo Pata de nivelación Vigas o pisos suspendidos pueden contribuir a la excesiva vibraciòn y a errores de balance. 2.
C uidados antes del lavado ADVERTENCIA Para reducir el riesgo de incendio, descarga eléctrica o daño a personas, lea las Instrucciones Importantes de Seguridad antes de operar este artefacto. 1. Etiquetas de cuidados Busque la etiqueta de cuidados de sus prendas. Ésta le indicará el contenido del tejido de su prenda y cómo se debe lavado. 2. Clasificación Para obtener los mejores resultados, clasifique la ropa en cargas que se puedan lavado con el mismo ciclo de lavado.
C ómo añadir detergente Cómo añadir detergente y suavizante para tejidos 1. El cajón distribuidor • Solamente lavado principal ➔ • Prelavado + Lavado principal ➔ Detergente para lavado principal Suavizante para tejidos Detergente para el Blanquedor 2. Cómo añadir suavizante para tejidos • No supere los límites máximos que están marcados por una línea. Cierra ligeramente el cajón de dispensador. Sobrellenar el dispensador puede causar daños y manchar las ropas.
C ómo añadir detergente 3. Dosis de detergente • El detergente se debe utilizar de acuerdo con las instrucciones del fabricante del detergente. • Si se utiliza más detergente que la cantidad recomendada, se produce demasiada espuma y esto hará que disminuya el resultado del lavado o provocará una pesada carga en el motor. (Provocará fallas de funcionamiento). ❋ Consejos Carga completa: según las recomendaciones del fabricante. Carga parcial: 3/4 de la cantidad normal.
F unción Programas recomendados de acuerdo con el tipo de carga Programa Tipo de tejido Algodón Prendas de color rápidas (camisetas, camisones, pijamas) y algodón blanco ligeramente sucio (ropa interior) Algodón Rápido Prendas ligeramente sucias y cargas pequeñas Sintéticos Poliamida, acrílico, poliéster Delicados Prendas delicadas que se dañan fácilmente Seda/Lana Prendas delicadas y de lana Lavado a Mano marcadas con “lavado a mano” Ropa de cama de algodón con Edredones/ relleno, colcha, a
C ómo utilizar la lavadora 1. El ciclo Algodón está seleccionado automáticamente al prender la unidad. • Pulse el botón Encendido Apagado ( para prender la Lavadora. • Pulse el botón Inicio/Pausa ( ). ) 2. Selección manual • Pulse el botón Encendido Apagado ( para prender la Lavadora.
C ómo utilizar la lavadora (1) (2) (1) Botón: Encendido Apagado (2) Dial: Programa (3) Botón: Inicio/Pausa (4) Botón: Opción (3) (4) (5) (6) (5) Bloqueo infantil (6) Botón: Enjuague (7) Botón: Temp. (8) Botón: Intensivo (9) Botón: Más Aqua Encendido Apagado (7) (8,9,10) (11) (12) (13) (10) Botón: Reserva (11) Botón: Centrifugado (12) Botón: Limpieza de la tina (13) Dial: Secado Programa 1. Encendido Apagado • Pulse el botón Encendido Apagado ( para prender y apagar la Lavadora.
C ómo utilizar la lavadora Inicio/Pausa Opción • Pulsando el botón de opción, sólo puede seleccionarse una de sus funciones. NOTA: En función del ciclo programado, no todas las opciones estarán disponibles. 1. Inicio • Este botón (Inicio/Pausa) se utiliza para comenzar el ciclo de Lavado o detenerlo temporalmente. 2. Pausa • Si fuese necesario detener temporalmente el ciclo de Lavado, pulse el botón “Inicio/Pausa”. • En modo Pausa, la unidad se apagará automáticamente pasados 4 minutos. 1.
C ómo utilizar la lavadora Bloqueo infantil Enjuague • Pulsando el botón Enjuague, puede escoger el tipo de Enjuague. - Normal - Enjuague+ - Enjuague++ - Normal+Pausa - Enjuague++Pausa Puede seleccionar esta función si desea bloquear los botones del conjunto de control para evitar una manipulación indebida. • La función Bloqueo infantil se ajusta manteniendo pulsados, simultáneamente, los botones Opción y Enjuague. (Durante tres segundos) 1. Normal • Los programas Cuidado infantil realizan 4 Enjuague.
C ómo utilizar la lavadora Centrifugado Temperatura del agua • Pulsando el botón Centrifugado, puede escoger la velocidad de funcionamiento para dicha función. • Pulsando el botón Temp., podrá seleccionar la temperatura del agua. - Fría - 30º C / 40º C / 50º C / 60º C 1. Selección de Centrifugado 1.
C ómo utilizar la lavadora Más Agua Escoja esta opción para añadir agua extra a los ciclos de lavado y aclarado a fin de obtener resultados óptimos, especialmente con prendas grandes o voluminosas. Limpieza de la tina • El programa de limpieza de la tina puede ajustarse pulsando el botón “Limpieza de la tina”. Reserva Preparativos del Lavado antes de iniciar la función “Reserva”. - Abra el grifo de agua. - Cargue prendas y cierre la puerta. - Añada detergente y suavizante al compartimento.
C ómo utilizar la lavadora Secado NOTA La máxima capacidad de Secado de este modelo es de 7 kg. 1. Guía de Secado automático • Utilice sus ciclos automáticos para Secado la mayoría de los tipos de colada. Los sensores electrónicos miden la temperatura de la salida para aumentar o reducir la temperatura del Secado y así obtener un tiempo de reacción más rápido y un control de tempe • No cargue más de lo que muestra el indicador de máxima carga de Secado. Las prendas deben poder girar libremente.
C ómo utilizar la lavadora 2. Guía de tiempos de Secado manual • Girando el botón Secado, puede seleccionar el tiempo de Secado. • El ciclo de Secado puede durar hasta 150 minutos. Al seleccionar Sólo Secado, el ciclo de Secado comenzará tras terminar el Centrifugado, a menos que esta función se anule. • Estos tiempos de Secado son una orientación para ayudarle en el ajuste de su Secadora cuando utilice el modo de Secado manual.
C ómo utilizar la lavadora Pantalla de visualización 3. Finalización del Lavado • Al completarse el ciclo de Lavado, se aparecerá el mensaje “ ” en la pantalla de visualización. 1. Visualización de funciones especiales • Al seleccionar el bloqueo infantil, se enciende el testigo luminoso “ ”. 4. Tiempo restante • Durante el ciclo de Lavado, se visualizará el tiempo restante de Lavado. • Tras acabar de Secado, aparecerá el mensaje “ ” (Enfriamiento). • Programa recomendados por el fabricante.
M antenimiento ❋ Retire las prendas de la lavadora tan pronto como termine el ciclo. En los artículos que quedan en la lavadora se puede desarrollar un exceso de arrugamiento, transferencia de color y olores. ❋ Antes de limpiar el interior de la lavadora, desenchufe el cable de alimentación eléctrica para evitar riesgos de descarga eléctrica. ❋ Cuando ya no utilice la lavadora, desconecte los cables principales y quite el conector.
M antenimiento El filtro de la bomba de drenaje ❋ El filtro de drenaje recoge los hilos y pequeños objetos que quedan en la coladera. Compruebe con regularidad que el filtro está limpio para garantizar un funcionamiento uniforme de su máquina. ! PRECAUCIÓN Primero utilice la Manguera de drenaje y después abra la bomba para eliminar aquello que pueda haberla detenido. ❋ Permita que el agua se enfrìe antes de limpiar el drenaje, permitiendo un drenado de emergencia o abriendo la puerta en una emergencia.
M antenimiento Cajón distribuidor de detergente ❋ Cuando los detergentes blancos y suavizantes para tejidos dejan un depósito en el cajón. • Se deben limpiar de vez en cuando con un chorro de agua corriente. • Si es necesario, se puede sacar de la máquina pulsando el pestillo hacia abajo y tirando hacia fuera. • Para facilitar la limpieza, se puede quitar la parte superior del compartimiento del suavizante para tejidos.
M antenimiento El inyector de la circulación del agua • Limpie el inyector de la circulación del agua, si está estorbando. Limpieza de su lavadora 1. Exterior El cuidado adecuado de su lavadora puede ampliar su vida útil. La parte exterior de la máquina se puede limpiar con agua templada y un detergente doméstico no abrasivo neutro. Seque inmediatamente cualquier agua que se derrame. Límpiela con un trapo húmedo. Procure no dañar la superficie con objetos afilados.
G uía para la resolución de fallas ❋ Esta lavadora está equipada con funciones automáticas de seguridad que detectan y diagnostican averías en un estado inicial y que reaccionan de forma adecuada. Cuando la máquina no funciona correctamente o no funciona en absoluto, compruebe los puntos siguientes antes de llamar al Departamento de Servicio. Síntoma Posible causa Ruido de traqueteo y chirridos • Puede haber objetos extraños tales como monedas o clips en el tambor o en la bomba.
G uía para la resolución de fallas Síntoma La lavadora no arranca La lavadora no centrifuga Posible causa • El cable de alimentación eléctrica quizás no esté enchufado o la conexión puede estar floja. Asegúrese de que el enchufe ajusta correctamente en la toma de corriente. • Fusible de la casa fundido, disyuntor disparado o se ha producido un corte en el suministro eléctrico. Reinicie el disyuntor o sustituya el fusible. No aumente la capacidad del fusible.
G uía para la resolución de fallas Síntoma Posible causa Solución • El suministro de agua local no es suficiente. • Los grifos de suministro de agua no están completamente abiertos. • La manguera(s) de entrada de agua está doblada. • El filtro de la manguera(s) de entrada está obstruido. Revise otro grifo de la casa. Abra el grifo por completo. • La manguera de descarga de agua está aplastada o doblada. • El filtro de drenaje está obstruido. Limpie y enderece la manguera de descarga de agua.
T érminos de la garantía EXCLUSIONES DE LA GARANTIA : • Incumplimiento de cualquiera de los requisitos del punto anterior. • Todo componente o accesorio interior o exterior del aparato, que no esté especificado e incluido en este certificado de garantía. • Las puestas en marcha y demostraciones de funcionamiento al usuario. • Si la avería es producida por incendio, inundación, agentes meteorológicos, golpeo, aplastamiento o aplicación de voltaje o energía inadecuada.
P/No.