OWNER’S MANUAL LED LCD TV Please read this manual carefully before operating your set and retain it for future reference. LT36** www.lg.
TABLE OF CONTENTS ENG ENGLISH TABLE OF CONTENTS 3 LICENSES 25 EXTERNAL CONTROL DEVICE SETUP 3 OPEN SOURCE SOFTWARE NOTICE 25 25 4 INSTALLATION PROCEDURE 4 ASSEMBLING AND PREPARING RS-232C Setup Type of connector; D-Sub 9-Pin Male RS-232C Configurations Communication Parameters Command reference list Transmission / Receiving Protocol 4 7 8 9 9 11 12 14 Unpacking Parts and buttons Lifting and moving the TV Setting up the TV - Attaching the stand - Mounting on a table - Mounting on a wall - T
LICENSES / OPEN SOURCE SOFTWARE NOTICE 3 Supported licenses may differ by model. For more information about licenses, visit www.lg.com. Manufactured under license from Dolby Laboratories. “Dolby” and the double-D symbol are trademarks of Dolby Laboratories. HDMI, the HDMI logo and High-Definition Multimedia Interface are trademarks or registered trademarks of HDMI Licensing LLC. ABOUT DIVX VIDEO: DivX® is a digital video format created by DivX, LLC, a subsidiary of Rovi Corporation.
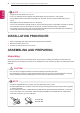
INSTALLATION PROCEDURE / ASSEMBLING AND PREPARING ENG ENGLISH NOTE Image shown may differ from your TV. yy Your TV’s OSD (On Screen Display) may differ slightly from that shown in this manual. yy The available menus and options may differ from the input source or product model that you are yy using. New features may be added to this TV in the future. yy The TV can be placed in standby mode in order to reduce the power consumption.
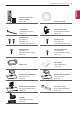
ASSEMBLING AND PREPARING ENGLISH ENG ENERGY TV/RAD SAVING GUIDE INFO RATIO ENERGY AV MODE INPUT TV SAVING LIST SETTINGS 1 2 4 5 7 8 LIST 0 3 6 Q.VIEW 9 FLASHBK Q.MENU MARK FAV VOL 3D CH P A G E MUTE EXIT MENU INFO Q.MENU FAV ENTER P P A G E MUTE BACK EXIT L/R SELECT FREEZE RATIO or Remote control and batteries (AAA) (See p.20) Owner’s manual Cable Holder (Depending on model) (See p.14) Power Cord holder (Only 32/37/42/47LT36**) (See p.
ASSEMBLING AND PREPARING ENG ENGLISH NOTE Antenna Isolator Installation Guide yy -- Use this to install TV in a place where there is a voltage difference between TV Set and GND of antenna signal. »» If there is a voltage difference between TV Set and GND of antenna signal, the antenna contact might be heated and excessive heat might cause an accident. -- You can improve the safety when watching TV by efficiently removing power voltage from TV antenna.
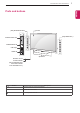
ASSEMBLING AND PREPARING 7 (Only 32/37/42/47LT36**) ENGLISH ENG Parts and buttons Screen (Only 22/26LT36** ) HDMI IN USB IN USB input IN 3 COMPONENT IN COMPONENT IN PCMCIA Card Slot Speakers Remote control Power Indicator (Can be adjusted using the Power Indicator in the OPTION menu.) Button Description ∨∧ Scrolls through the saved programmes. -+ Adjusts the volume level. Turns the power on or off.
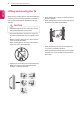
ASSEMBLING AND PREPARING ENG ENGLISH Lifting and moving the TV When moving or lifting the TV, read the following to prevent the TV from being scratched or damaged and for safe transportation regardless of its type and size. yy When transporting a large TV, there should be at least 2 people. yy When transporting the TV by hand, hold the TV as shown in the following illustration. CAUTION Avoid touching the screen at all times, as this yy may result in damage to the screen.
ASSEMBLING AND PREPARING 9 ENGLISH ENG Setting up the TV Image shown may differ from your TV.
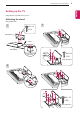
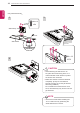
ASSEMBLING AND PREPARING ENG ENGLISH Only 32/37/42/47LT36** 1 3 M4 x 14 4 EA Stand Body M4X20 Front Stand Base Top View M4 x 14 2 4 EA CAUTION When attaching the stand to the TV yy set, place the screen facing down on a cushioned table or flat surface to protect the screen from scratches. Make sure that the screws are fastened yy completely. (If they are not fastened securely enough, the TV may tilt forward after being installed.
ASSEMBLING AND PREPARING Securing the TV to a table 1 Lift and tilt the TV into its upright position on a table. - Leave a 10 cm (minimum) space from the wall for proper ventilation. Fix the TV to a table to prevent from tilting forward, damage, and potential injury. Mount the TV on a table, and then insert and tighten the supplied screw on the rear of the stand. Only 32/37/42/47LT36** 2 Connect the power cord to a wall outlet.
ASSEMBLING AND PREPARING ENG ENGLISH Securing the TV to a wall (This feature is not available for all models.) Mounting on a wall Attach an optional wall mount bracket at the rear of the TV carefully and install the wall mount bracket on a solid wall perpendicular to the floor. When you attach the TV to other building materials, please contact qualified personnel. LG recommends that wall mounting be performed by a qualified professional installer.
ASSEMBLING AND PREPARING Make sure to use screws and wall mount bracket that meet the VESA standard. Standard dimensions for the wall mount kits are described in the following table.
ASSEMBLING AND PREPARING ENG ENGLISH Tidying cables Only 32/37/42/47LT36** 1 Install the Power Cord Holder and Power Cord. It will help prevent the power cable from being removed by accident. Power Cord Holder 2 Gather and bind the cables with the Cable Holder. Cable Holder Only 22/26LT36** 1 Gather and bind the cables with the Cable Holder.
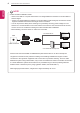
MAKING CONNECTIONS This section on MAKING CONNECTIONS mainly uses diagrams for the LT36** models. Connect various external devices to the TV and switch input modes to select an external device. For more information on external device’s connection, refer to the manual provided with each device. Available external devices are: HD receivers, DVD players, VCRs, audio systems, USB storage devices, PC, gaming devices, and other external devices. NOTE The external device connection may differ yy from the model.
MAKING CONNECTIONS DVI to HDMI connection Transmits the digital video and audio signals from your PC to the TV. Connect the PC and the TV with the HDMI cable as shown. Choose any HDMI input port to connect. It does not matter which port you use. Transmits the digital video signal from an external device to the TV. Connect the external device and the TV with the DVI-HDMI cable as shown. To transmit an audio signal, connect an audio cable. Choose any HDMI input port to connect.
MAKING CONNECTIONS 17 Component connection Transmits the video signal from PC to the TV. To transmit an audio signal, connect an audio cable. Transmits the analogue video and audio signals from an external device to the TV. Connect the external device and the TV with the component cable as shown.
MAKING CONNECTIONS Speaker output SETUP Transmits analog video and audio signals from an external device to the TV. Connect the external device and the TV with th e composite cable as shown. Connect the external speaker to the SPEAKER IN (PC) OUTPUT(STEREO)RGB jack on the TV.
MAKING CONNECTIONS ▼PCMCIA CARD SLOT▼ Euro Scart connection Transmits the video and audio signals from an external device to the TV set. Connect the external device and the TV set with the euro scart cable as shown. To display images by using progressive scan, make sure to use the euro scart cable. (*Not Provided) View the encrypted (pay) services in digital TV mode. This feature is not available in all countries.
REMOTE CONTROL ENG ENGLISH REMOTE CONTROL The descriptions in this manual are based on the buttons on the remote control. Please read this manual carefully and use the TV correctly. To replace batteries, open the battery cover, replace batteries (1.5 V AAA) matching the and ends to the label inside the compartment, and close the battery cover. To remove the batteries, perform the installation actions in reverse. CAUTION Do not mix old and new batteries, as this may damage the remote control.
MAINTENANCE / TROUBLESHOOTING 21 Cleaning your TV Clean your TV regularly to keep the best performance and to extend the product lifespan. CAUTION Make sure to turn the power off and disconnect the power cord and all other cables first. yy When the TV is left unattended and unused for a long time, disconnect the power cord from the wall yy outlet to prevent possible damage from lightning or power surges.
SPECIFICATIONS ENG ENGLISH SPECIFICATIONS Product specifications may be changed without prior notice due to upgrade of product functions. For the power supply and power consumption, refer to the label attached to the product. MODELS 22LT36** 26LT36** 22LT360C-ZA 26LT360C-ZA Dimensions (W x H x D) With stand 517.0 mm x 386.0 mm x 192.0 mm 626.0 mm x 454.0 mm x 192.0 mm Without stand 517.0 mm x 332.0 mm x 41.6 mm 626.0 mm x 393.0 mm x 46.6 mm Weight With stand 3.7 kg Without stand 3.
SPECIFICATIONS Analogue TV DVB-T PAL/SECAM B/G/D/K, DVB-C SECAM L/L’ Television System Programme Coverage VHF, UHF VHF: E2 to E12, UHF: E21 to E69, CATV: S1 to S20, HYPER: S21 to S47 Maximum number of storable programmes 1,086 External Antenna Impedance 75 Ω RGB-PC, HDMI/DVI-PC supported mode Component port connecting information Resolution Horizontal Frequency (kHz) Vertical Frequency (Hz) 720x400 31.468 70.08 640x480 31.469 59.94 800x600 37.879 60.31 1024x768 48.363 60.
IR CODES ENG ENGLISH IR CODES This feature is not available for all models. yy Code (Hexa) Function 08 (POWER) Note Remote control Button (Power On/Off) 95 ENERGY SAVING Remote control Button 0B INPUT Remote control Button F0 TV/RAD Remote control Button 10-19 Number Key 0-9 Remote control Button 53 LIST Remote control Button 1A Q.
EXTERNAL CONTROL DEVICE SETUP 25 RS-232C Setup RS-232C Configurations Connect the RS-232C (serial port) input jack to an external control device (such as a computer or an A/V control system) to control the product’s functions externally. Connect the serial port of the control device to the RS-232C jack on the product back panel. Note: RS-232C connection cables are not supplied with the product.
EXTERNAL CONTROL DEVICE SETUP ENG ENGLISH Communication Parameters yy Baud rate: 9600 bps (UART) yy Data length: 8 bits yy Parity : None yy Stop bit: 1 bit yy Communication code: ASCII code yy Use a crossed (reverse) cable. Command reference list (Depending on model) 01. Power 02. Aspect Ratio 03. Screen Mute 04. Volume Mute 05. Volume Control k a DATA (Hexadecimal) 00 to 01 k c (See p.28) 14. Bass k s 00 to 64 k d (See p.28) 15.
EXTERNAL CONTROL DEVICE SETUP 27 Transmission [Command1][Command2][ ][Set ID][ ][Data][Cr] [Command 1] [Command 2] [Set ID] : First command to control the TV.(j, k, m or x) : Second command to control the TV. : You can adjust the set ID to choose desired monitor ID number in option menu. Adjustment range is 1 to 99. When selecting Set ID ‘0’, every connected set is controlled. Set ID is indicated as decimal (1 to 99) on menu and as Hexa decimal (0x0 to 0x63) on transmission/receiving protocol.
EXTERNAL CONTROL DEVICE SETUP ENG ENGLISH 01. Power (Command: k a) 04. Volume Mute (Command: k e) ►► To control Power On/Off of the set. ►► To control volume mute on/off. You can also adjust mute using the MUTE button on remote control. Transmission[k][a][ ][Set ID][ ][Data][Cr] Data 00 : Power Off 01 : Power On Ack [a][ ][Set ID][ ][OK/NG][Data][x] ►► To show Power On/Off.
EXTERNAL CONTROL DEVICE SETUP 13. Treble (Command: k r) ►► To adjust the screen tint. You can also adjust tint in the PICTURE menu. ►► To adjust treble. You can also adjust treble in the AUDIO menu. Transmission [k][j][ ][Set ID][ ][Data][Cr] Data Red : 00 to Green : 64 * Refer to ‘Real data mapping’. See p.31. Transmission [k][r][ ][Set ID][ ][Data][Cr] Data Min : 00 to Max : 64 * Refer to ‘Real data mapping’. See p.31.
EXTERNAL CONTROL DEVICE SETUP ENG ENGLISH 17. Energy Saving (Command: j q) 19. Tune Command (Command: m a) ►► To reduce the power consumption of the TV. You can also adjust Energy Saving in PICTURE menu. ►► Select channel to following physical number.
EXTERNAL CONTROL DEVICE SETUP 31 23. Input select (Command: x b) ENGLISH ENG (Main Picture Input) ►► To select input source for main picture.
The model and serial numbers of the TV is located on the back of the TV Record it below should you ever need service.