OWNER’S MANUAL LED TV* * LG LED TV applies LCD screen with LED backlights. Please read this manual carefully before operating your set and retain it for future reference. LY33** LY34** LY54** LY31** www.lg.
TABLE OF CONTENTS ENG ENGLISH TABLE OF CONTENTS 3 LICENSES 27 SPECIFICATIONS 3 OPEN SOURCE SOFTWARE NOTICE 31 IR CODES 32 EXTERNAL CONTROL DEVICE SETUP 32 32 RS-232C Setup Type of Connector: D-Sub 9-Pin Male RS-232C Configurations Communication Parameters Command Reference List Transmission / Receiving Protocol 4 ASSEMBLING AND PREPARING 4 6 6 7 8 9 9 10 10 12 Unpacking Separate Purchase Parts and Button Using the Joystick Button Lifting and Moving the TV Setting up the TV - Attaching th
LICENSES / OPEN SOURCE SOFTWARE NOTICE 3 Supported licenses may differ by model. For more information about licenses, visit www.lg.com. Manufactured under license from Dolby Laboratories. “Dolby” and the double-D symbol are trademarks of Dolby Laboratories. The terms HDMI and HDMI High-Definition Multimedia Interface, and the HDMI logo are trademarks or registered trademarks of HDMI Licensing LLC in the United States and other countries.
ASSEMBLING AND PREPARING ENG ENGLISH NOTE y y Image shown may differ from your TV. y y Your TV’s OSD (On Screen Display) may differ slightly from that shown in this manual. y y The available menus and options may differ from the input source or product model that you are using. y y New features may be added to this TV in the future. y y The TV can be placed in standby mode in order to reduce the power consumption.
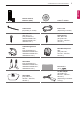
ENGLISH ENG ENGLISH ENG ASSEMBLING AND PREPARING 5 ENGLISH ENG Remote Control, Batteries (AAA) Owner’s manual Cable Holder (Depending on model) Power cord (Depending on model) Stand Screws 4EA, M4 x L14 (Only 42/49LY31**, 39/42/47/55/60LY33**, 39/42/47/55/60LY34**, 39/42/47LY54**) Stand Screws 4EA, M4 x L20 (Only 32LY33**, 32LY34**, 32LY54**, 32LY31**) Cable Managements 2EA (Only 32/42/49LY31**, 32/39/42/47/55/60LY33**, 32/39/42/47/55/60LY34**, 32/39/42/47LY54**) Wall Mount Spacers 2EA (Only 42L
ASSEMBLING AND PREPARING ENG ENGLISH Separate Purchase Separate purchase items can be changed or modified for quality improvement without any notification. Contact your dealer to buy these items. These devices only work with certain models. LG Audio Device LED Clock LEC-003 (Only 32/39/42/47LY54**) The model name or design may be changed depending on the upgrade of product functions, manufacturer’s circumstances or policies.
ASSEMBLING AND PREPARING 7 You can simply operate the TV functions, pressing or moving the joystick button up, down, left or right. Basic Functions Power On When the TV is turned off, place your finger on the joystick button and press it once and release it. Power Off When the TV is turned on, place your finger on the joystick button and press it once for a few seconds and release it.
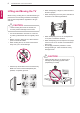
ASSEMBLING AND PREPARING ENG ENGLISH Lifting and Moving the TV When moving or lifting the TV, read the following to prevent the TV from being scratched or damaged and for safe transportation regardless of its type and size. y y When transporting a large TV, there should be at least 2 people. y y When transporting the TV by hand, hold the TV as shown in the following illustration. CAUTION y y Avoid touching the screen at all times, as this may result in damage to the screen.
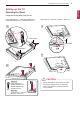
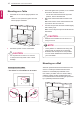
ASSEMBLING AND PREPARING 9 Setting up the TV ENGLISH ENG Attaching the Stand * Image shown may differ from your TV.
ASSEMBLING AND PREPARING ENG ENGLISH 1 Mounting on a Table 1 Lift and tilt the TV into its upright position on a table. - - Leave a 10 cm (minimum) space from the wall for proper ventilation. 2 3 10 cm 10 cm 10 cm 10 cm Insert and tighten the eye-bolts, or TV brackets and bolts on the back of the TV. - - If there are bolts inserted at the eye-bolts position, remove the bolts first. Mount the wall brackets with the bolts to the wall.
ASSEMBLING AND PREPARING Make sure to use screws and wall mount bracket that meet the VESA standard. Standard dimensions for the wall mount kits are described in the following table.
ASSEMBLING AND PREPARING ENG ENGLISH How to use Dual Lock™ NOTE y y Only 42LY33**, 42LY34**, 42LY54**, 42LY31** (Only LY54**) Fix the set-top box to the TV and use it when you want to. Wall Mount Spacers 1 After removing the protection paper from the Dual Lock, stick it to the TV and the set-top box as shown. Dual Lock™ 2 Attach the set-top box to the TV by pressing the Velcro strips together.
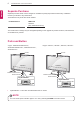
MAKING CONNECTIONS Antenna Connection Connect the TV to a wall antenna socket with an RF cable (75 Ω). * Image shown may differ from your TV. * Any separate cable is not provided. This section on MAKING CONNECTIONS mainly uses diagrams for the LY33** models. Connect various external devices to the TV and switch input modes to select an external device. For more information on external device’s connection, refer to the manual provided with each device.
MAKING CONNECTIONS ENG ENGLISH Satellite Dish Connection Adapter Connection (Only satellite models) PCMCIA CARD SLOT Connect the TV to a satellite dish to a satellite socket with a satellite RF cable (75 Ω).
GB IN (PC) Network Setup Wired network connection (Only LY340C, LY54**) This TV can be connected to a Pro:Centric server via the LAN port. After making the physical connection, the TV needs to be set up for network communication. Connect the LAN port of the Modem or Router from Pro:Centric server to the LAN port on the TV.
IN V 1 GB) AV (RGB) Other Connections Connect your TV to external devices. For the best picture and audio quality, connect the external device and the TV with the HDMI cable as shown. * Image shown may differ from your TV. * Any separate cable is not provided.
(Only 32/39/42/47/55/60LY33**, 32/39/42/47/55/60LY34**, 32/39/42/47LY54**) PCMCIA Card AV AV (RGB) (RGB) P H/P OUTOUT DIOAUDIO IN IN PONENT/RGB/DVI) ENT/RGB/DVI) ANTENNA/Card PCMCIA ANTENNA/ CABLE CABLE IN IN USB IN 2 AUDIO USB H/PAUDIO OUTIN (COMPONENT/DVI) CONTROL (COMPONENT/RGB/DVI) or RS-232C IN AUDIO IN IN RGB IN (PC) COMPONENT AUDIO H/P OUT (CONTROL & SERVICE) (CONTROL & SERVICE) (COMPONENT/DVI) IN (COMPONENT/RGB/DVI) RGB IN (PC) LNB ANTENNA/ H/P OUT COMPONENT H/P OUT Satellite CABLE IN IN RG
MAKING CONNECTIONS (Only 28LY33**, 28LY34**) ENG ENGLISH /DVI /DVIIN IN 11 22 AV AV (RGB) ININ/DVI IN (RGB) AUDIO COMPONENT OPTICAL AUDIOININ COMPONENT OPTICAL OPTICAL (COMPONENT/RGB/DVI) ININ OPTICAL AUDIO (COMPONENT/RGB/DVI) AUDIOOUT OUT DIGITAL DIGITAL AUDIO AUDIOOUT OUT EXTERNAL EXTERNAL SPEAKER SPEAKEROUT OUT OPTICAL DIGITAL AUDIO OUT EXTERNAL SPEAKER SPEAKER SPEAKER OUT H/P H/POUT OUT OUT Network OUTModel) IN1 (Only Support AUDIO RS-232C IN AUDIOININ (COMPONENT/DVI) (CONTROL & SERVICE) (
MAKING CONNECTIONS ENGLISH ENG (Only 28LY33**, 28LY34**, 28LY54**) Mobile Phone PCMCIA Card PCMCIA Card Mobile Phone USB IN 2PCMCIA CARD SLOT PCMCIA Card USB IN2 USB IN DIGITAL AUDIO OUT H/P OUT EXTERNAL SPEAKER OUT CLOCK OPTICALSPEAKER H/P OUT OUT (RGB) IN 1 AV (RGB) Mobile Phone Headphone EXTERNAL OPTICAL SPEAKER DIGITAL AUDIO OUT OUT AV (RGB) RGB IN (PC) IN 1 Mobile Phone 13/18V EXTERNAL OPTICAL AV 700mA Max DIGITAL SPEAKER (RGB) RGB IN (PC) AUDIO OUT LNB OUT RGB IN (PC) OPTICAL EXTERN
MAKING CONNECTIONS PCMCIA CARD SLOT PCMCIA CARD SLOT PCMCIA Card PCMCIA Card USB IN USB IN 1 2 (MHL) USB IN USB HUB USB / HDD1 /DVI IN HUB 1 H/P OUTH / P USB IN 1 H/P USB IN USB IN 2 USB IN 2 PCMCIA Card Mobile Phone 2 AV (RGB) IN AUDIO IN COMPONENT OPTICAL OPTICAL AUDIO OUT (COMPONENT/RGB/DVI) IN L (MONO) IN 2 (MHL) VOLUME CONTROL RS-232C IN L (MONO) R L R R L STEREO (8 Ω) (MONO) L (MONO) (MONO)(MONO) L R R L (MONO) (MONO) RS-232C IN ANTENNA/ LNB IN ANTEN
MAKING CONNECTIONS PCMCIA Card /DVI IN PCMCIA Card DIGITAL DIGITAL AUDIO OUT AUDIO OUT EXTERNAL ER KER OUT T OUT UT N DVI) T/DVI) ECONTROL CONTROL OEO(8(8Ω)Ω) CONTROL 11 IN 1 AUDIO IN (COMPONENT/DVI) CABLE CABLE ININ Satellite CABLE Satellite CABLE (Only AUDIO IN (COMPONENT/RGB/DVI) Satellite R COMPONENT IN HDD Mobile Phone 13/18V 700mA Max RS-232C IN CLOCK (CONTROL & SERVICE) (MONO) 1 Mobile Phone AV (RGB) L L (MONO) L R (MONO) (MONO) R R ANTENNA/ CABLE IN R RS-232C
REMOTE CONTROL The descriptions in this manual are based on the buttons on the remote control. Please read this manual carefully and use the TV correctly. To replace batteries, open the battery cover, replace batteries (1.5 V AAA) matching the and ends to the label inside the compartment, and close the battery cover. To remove the batteries, perform the installation actions in reverse. or CAUTION y y Do not mix old and new batteries, as this may damage the remote control.
REMOTE CONTROL 23 ENERGY AV MODE (POWER) Turns the TV on or off. ꕊ ENERGY SAVING Adjusts the brightness of the screen to reduce energy consumption. AV MODE Selects an AV mode. INPUT Changes the input source. TV/RAD Selects Radio, TV and DTV programme. INPUT TV/ RAD SAVING 1 2 3 4 5 6 7 8 9 LIST 0 Q.VIEW Number buttons Enters numbers. LIST Accesses the saved programme list. Q.VIEW Returns to the previously viewed programme.
REMOTE CONTROL ENG ENGLISH (Only 28LY31**) TV/ RAD PIP/ SUBTITLE 1 4 7 LIST INPUT AD TV/PC 2 5 8 0 3 6 9 Q.VIEW FAV GUIDE P MUTE TEXT INFO SETTINGS T.OPT Q.MENU EXIT REC/ (POWER) Turns the TV on or off. TV/RAD Selects Radio, TV and DTV programme. SUBTITLE Recalls your preferred subtitle in digital mode. PIP/ Turns the PIP mode on or off. (Depending on model) AD By pressing the AD button, audio descriptions function will be enabled. TV/PC Selects TV or PC mode.
REMOTE CONTROL 25 TV/ RAD RATIO SUBTITLE 1 4 7 LIST INPUT AD 2 5 8 0 3 6 9 Q.VIEW FAV GUIDE P MUTE TEXT INFO SETTINGS T.OPT Q.MENU EXIT AV MODE REC/ (POWER) Turns the TV on or off. TV/RAD Selects Radio, TV and DTV programme. SUBTITLE Recalls your preferred subtitle in digital mode. AD By pressing the AD button, audio descriptions function will be enabled. RATIO Resizes an image. INPUT Changes the input source. Number buttons Enters numbers. LIST Accesses the saved programme list.
MAINTENANCE / TROUBLESHOOTING ENG ENGLISH MAINTENANCE Cleaning your TV Clean your TV regularly to keep the best performance and to extend the product lifespan. CAUTION y y Make sure to turn the power off and disconnect the power cord and all other cables first. y y When the TV is left unattended and unused for a long time, disconnect the power cord from the wall outlet to prevent possible damage from lightning or power surges.
SPECIFICATIONS Product specifications may be changed without prior notice due to upgrade of product functions. MODELS 32LY33** 39LY33** 42LY33** 32LY330C-ZA 39LY330C-ZA 42LY330C-ZA Dimensions (W x H x D) With stand (mm) 732 x 481 x 207 885 x 567 x 218 961 x 612 x 218 Without stand (mm) 732 x 431 x 55.5 885 x 524 x 55.5 961 x 567 x 55.5 Weight With stand (kg) 6.2 8.3 9.5 Without stand (kg) 6.0 8.0 9.
SPECIFICATIONS ENG ENGLISH MODELS 47LY54** 28LY31** 32LY31** 47LY540H-ZA 28LY310C-ZA 32LY310C-ZA Dimensions (W x H x D) With stand (mm) 1073 x 676 x 247 641.5 x 432 x 175 731 x 480 x 208 Without stand (mm) 1073 x 629 x 55.8 641.5 x 395.8 x 57.6 731 x 437 x 56.5 Weight With stand (kg) 12.7 4.6 5.9 Without stand (kg) 12.3 4.
SPECIFICATIONS Component ports on the TV Video output ports on DVD player HDMI/DVI-DTV Supported Mode Y PB PR Resolution Horizontal Frequency (kHz) Vertical Frequency (Hz) Y PR R-Y 720 x 480 Y PB B-Y 31.469 31.5 59.94 60 Y Cb Cr 720 x 576 31.25 50 Y Pb Pr 1280 x 720 37.5 44.96 45 50 59.94 60 1920 x 1080i 33.72 33.75 28.125 59.94 60 50 1920 x 1080p 26.97 27 33.716 33.75 56.25 67.43 67.5 23.97 24 29.976 30.00 50 59.
SPECIFICATIONS ENG ENGLISH (Only 28/32/39/42/47LY54**, 32/42/49LY31**) (Only 28LY31**) HDMI (PC) supported mode HDMI/DVI-PC Supported Mode (Use HDMI IN 1 for PC mode) Resolution Horizontal Frequency (kHz) Vertical Frequency (Hz) 720 x 400 31.468 70.080 640 x 480 31.469 37.500 59.940 75.000 800 x 600 37.879 46.875 60.317 75.000 1024 x 768 48.363 60.023 60.004 75.029 Resolution Horizontal Frequency (kHz) Vertical Frequency (Hz) 640 x 350 31.468 70.09 720 x 400 31.469 70.
IR CODES * This feature is not available for all models. Code (Hexa) Function 08 (POWER) Note Remote control Button (Power On/Off) F0 TV/RAD Remote control Button 39 SUBTITLE Remote control Button 91 AD Remote control Button 79 RATIO Remote control Button 0B INPUT Remote control Button 10-19 Number Key 0-9 Remote control Button 53 LIST Remote control Button 1A Q.
EXTERNAL CONTROL DEVICE SETUP ENG ENGLISH EXTERNAL SPEAKER OUT VOLUME CONTROL EXTERNAL CONTROL DEVICE SETUP RS-232C Setup RS-232C Configurations Connect the RS-232C (serial port) input jack to an external control device (such as a computer or an A/V control system) to control the product’s functions externally. Connect the serial port of the control device to the RS232C jack on the product back panel. Note: RS-232C connection cables are notINsupplied with 1 the product. AVTV.
EXTERNAL CONTROL DEVICE SETUP 33 y y Baud rate: 9600 bps (UART) y y Data length: 8 bits y y Parity : None ENGLISH ENG Communication Parameters y y Stop bit: 1 bit y y Communication code: ASCII code y y Use a crossed (reverse) cable. Command Reference List (Depending on Model) model) 01. Power 02. Aspect Ratio 03. Screen Mute 04. Volume Mute 05. Volume Control k a DATA (Hexadecimal) 00 to 01 k c (See p. 35) k d (See p. 35) k e 00 to 01 k f 00 to 64 06. Contrast k g 00 to 64 07.
EXTERNAL CONTROL DEVICE SETUP ENG ENGLISH Transmission / Receiving Protocol Transmission [Command1][Command2][ ][Set ID][ ][Data][Cr] [Command 1] [Command 2] [Set ID] : First command to control the TV.(j, k, m or x) : Second command to control the TV. : You can adjust the set ID to choose desired monitor ID number in option menu. Adjustment range is 1 to 99. When selecting Set ID ‘0’, every connected set is controlled.
EXTERNAL CONTROL DEVICE SETUP Transmission[k][a][ ][Set ID][ ][Data][Cr] Data 00 : Power Off 01 : Power On Ack [a][ ][Set ID][ ][OK/NG][Data][x] ► ► To show Power On/Off. Transmission [k][a][ ][Set ID][ ][FF][Cr] Ack [a][ ][Set ID][ ][OK/NG][Data][x] * Similarly, if other functions transmit ‘0xFF’ data based on this format, Acknowledgement data feed back presents status about each function. * OK Ack., Error Ack. and other message may display on the screen when TV is power On. 04.
EXTERNAL CONTROL DEVICE SETUP ENG ENGLISH 09. Tint (Command: k j) 13. Balance (Command: k t) ► ► To adjust the screen tint. You can also adjust tint in the PICTURE menu. ► ► To adjust balance. You can also adjust balance in the AUDIO menu. Transmission [k][j][ ][Set ID][ ][Data][Cr] Data Red : 00 to Green : 64 * Refer to ‘Real data mapping’. See p. 38 Ack [j][ ][Set ID][ ][OK/NG][Data][x] Transmission [k][t][ ][Set ID][ ][Data][Cr] Data Min : 00 to Max : 64 * Refer to ‘Real data mapping’. See p.
EXTERNAL CONTROL DEVICE SETUP ► ► Select channel to following physical number. ► ► To adjust picture position and minimize image shaking automatically. It works only in RGB (PC) mode. Transmission [m][a][ ][Set ID][ ][Data0][ ][Data1][ ][Data2][Cr] Data00 : High channel data Data01 : Low channel data ex. No. 47 -> 00 2F (2FH) No. 394 -> 01 8A (18AH), DTV No.
EXTERNAL CONTROL DEVICE SETUP 22. Input select (Command: x b) ENG ENGLISH (Main Picture Input) ► ► To select input source for main picture.
The model and serial numbers of the TV is located on the back of the TV Record it below should you ever need service.