ENG ENGLISH OWNER’S MANUAL MONITOR SIGNAGE Please read this manual carefully before operating the your set and retain it for future reference. MONITOR SIGNAGE MODELS 65VS10 www.lg.
TABLE OF CONTENTS ENGLISH ENG CONTENTS 3 LICENSES 4 ASSEMBLING AND PREPARING 4 Unpacking 5 Optional Accessories 6 Parts and buttons 7 Connecting the Speakers 7 Portrait Layout 8 Installing on a wall 9 REMOTE CONTROL 11 USING THE MONITOR SET 11 Connecting to a PC 11 - Using the input list 12 - RGB connection 12 - HDM/DVI connection 13 - HDMI connection 14 CUSTOMIZING SETTINGS 14 Accessing main menus 15 - PICTURE settings 20 - AUDIO settings 21 34 - Deactivating th
LICENSES 3 Supported licenses may differ by model. For more information of the licenses, visit www.lg.com. HDMI, the HDMI logo and High-Definition Multimedia Interface are trademarks or registered trademarks of HDMI Licensing LLC. ABOUT DIVX VIDEO: DivX® is a digital video format created by DivX, LLC, a subsidiary of Rovi Corporation. This is an official DivX Certified® device that plays DivX video. Visit divx.com for more information and software tools to convert your files into DivX videos.
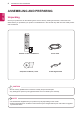
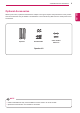
ASSEMBLING AND PREPARING ENGLISH ENG ASSEMBLING AND PREPARING Unpacking Check your product box for the following items. If there are any missing accessories, contact the local dealer where you purchased your product. The illustrations in this manual may differ from the actual product and accessories. POWER ENERGY MONITOR INPUT OFF ON .,! GHI PQRS 1/a/A SAVING TUV -*# CLEAR ABC JKL DEF MNO WXYZ MARK ARC PSM P BRIGHT A NESS G E MUTE MENU AUTO BACK TILE S.
ASSEMBLING AND PREPARING 5 Optional Accessories Speaker Screws/Cable Cable holder/ Cable Tie Speaker kit NOTE Cable holder/Cable tie may not be available in some areas or for some models. yy Optional accessories are not included for all models. yy ENG ENGLISH Without prior notice, optional accessories are subject to change to improve the performance of the product, and new accessories may be added. The illustrations in this manual may differ from the actual product and accessories.
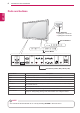
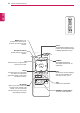
ASSEMBLING AND PREPARING Parts and buttons ENGLISH ENG Power Indicator Lighting On: Turned on Lighting Off: Turned off Screen Buttons Screen Marks RS-232C (CONTROL) HDMI / DVI RGB IN AUDIO (RGB/DVI) COMPONENT IN AV IN / OUT OUT IN USB LAN IN RGB OUT VIDEO AUDIO VIDEO AUDIO OUT Connection panel ( See p.36 to p.38 ) Screen Marks Description INPUT Changes the input source. MENU Accesses the main menus, or saves your input and exits the menus. ▼▲ Adjust the up and down.
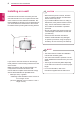
ASSEMBLING AND PREPARING Portrait Layout - Only on some models. - Only on some models. 1 Mount the speaker by using a screw as shown in the following. Then connect the speaker cable. 2 After installing your speakers, use holders and cable ties to organize the speaker cables. (This feature is not available in all model.) When installing in a Portrait Layout, rotate the monitor clockwise 90 degrees (when facing the screen).
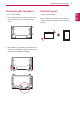
ASSEMBLING AND PREPARING Installing on a wall CAUTION ENGLISH ENG Install the monitor at least 10 cm away from the wall and leave about 10 cm of space at each side of the monitor to ensure sufficient ventilation. Detailed installation instructions can be obtained from your local retail store. Please refer to the manual to install and set up a tilting wall mounting bracket. 10 cm Disconnect the power cord first, and then yy move or install the Monitor set. Otherwise electric shock may occur.
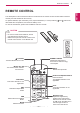
REMOTE CONTROL The descriptions in this manual are based on the buttons of the remote control. Please read this manual carefully and use the Monitor set correctly. To replace batteries, open the battery cover, replace batteries (1.5 V AAA) matching and ends to the label inside the compartment, and close the battery cover. To remove the batteries, perform the installation actions in reverse. CAUTION Do not mix old and new batteries, as this yy may damage the remote control.
USING THE MONITOR SET ENGLISH ENG POWER ENERGY MONITOR INPUT OFF ON 1 4 7 .,! GHI PQRS 1/a/A 2 5 8 0 SAVING TUV 3 6 9 -*# CLEAR ABC JKL DEF MNO WXYZ MARK ARC PSM POWER P BRIGHT A NESS G E MUTE MENU AUTO BACK TILE S.MENU OK ENERGY MONITOR MENU (See p.14) Accesses the main menus or saves your input and exit menus. .,! GHI PQRS 1/a/A TUV -*# CLEAR ABC JKL DEF MNO WXYZ ARC Navigation buttons Scrolls through menus or options.
USING THE MONITOR SET 11 Connecting to a PC Your Monitor set supports the Plug & Play* feature. * Plug & Play: The function when a PC recognizes a connected device that users connect to a PC and turn on, without device configuration or user intervention. Using the input list Selecting an input source 1 Press INPUT to access the input source list. - The connected device displays on each input source. 2 Press the Navigation buttons to scroll to one of the input sources and press OK.
USING THE MONITOR SET ENGLISH ENG RGB connection HDM/DVI connection Transmits the analog video signal from your PC to the Monitor set. Connect the PC and the Monitor set with the D-sub 15 pin cable as shown the following illustrations. Select RGB input source. Transmits the digital video signal from your PC to the Monitor set. Connect the PC and the Monitor set with the HDMI/DVI cable as shown the following illustrations. Select HDMI/DVI input source.
USING THE MONITOR SET 13 HDMI connection PC (not included) HDMI/DVI Back of the product. NOTE Use a High Speed HDMI™ Cable. yy Please check the PC environment if you yy cannot hear the sound in HDMI mode. Some PCs require you to manually change the default audio output to HDMI. If you want to use HDMI-PC mode, you must yy set the input label to PC mode. ENG ENGLISH Transmits the digital video and audio signals from your PC to the Monitor set.
CUSTOMIZING SETTINGS ENGLISH ENG CUSTOMIZING SETTINGS Accessing main menus 1 MARK ARC PSM Press MENU to access the main menus. P BRIGHT A NESS G E MUTE MENU 2 Press the Navigation buttons to scroll to one of the following menus and S.MENU OK press OK. BACK 3 Press the Navigation buttons to scroll to the setting or option you want AUTO TILE EXIT ID ON OFF and press OK. 4 When you are finished, press EXIT. When you return to the previous menu, press BACK. PICTURE (See p.
CUSTOMIZING SETTINGS PICTURE settings PICTURE Energy Saving 2 Press the Navigation buttons to scroll to PICTURE and Picture Mode press OK. 3 Press the Navigation buttons to scroll to the setting or option you want and press OK. - To return to the previous level, press BACK. : 16:9 : Off : Standard • Backlight 70 • Contrast 90 • Brightness 50 • Sharpness 70 • Color 60 • Tint 4 When you are finished, press EXIT.
CUSTOMIZING SETTINGS ENGLISH ENG SCREEN (In RGB Mode Only) Customizes the PC display options in RGB mode. Option Resolution Selects a proper resolution. See “Customizing PC display options”. Auto Configure Sets to adjust the screen position, clock, and phase automatically. The displayed image may be unstable for a few seconds while the configuration is in progress.
CUSTOMIZING SETTINGS 17 Advanced image options Dynamic Contrast Description Option Cool Sets the screen color to a bluish tone. Medium Sets the screen to the standard color. Warm Sets the screen color to a reddish tone. Adjusts the contrast to keep it at the best level according to the brightness of the screen. The picture is improved by making bright parts brighter and dark parts darker. (This function can be used only under AV(CVBS) and Component.
CUSTOMIZING SETTINGS Aspect Ratio ENGLISH ENG Resize the image to view the image at its optimal size by pressing ARC button. CAUTION If a fixed image displays on the screen for a yy long period of time, it will be imprinted and become a permanent disfigurement on the screen. This is “image burn” or “burn-in” and not covered by the warranty. If the aspect ratio is set to 4:3 for a long yy period of time, image burn may occur on the letterboxed area of the screen.
CUSTOMIZING SETTINGS - Cinema Zoom 1 : Choose Cinema Zoom when you want to enlarge the picture in correct proportion. Note: When enlarging or reducing the picture, the image may become distorted. - Full Wide : When Monitor set receives the wide screen signal,it will lead you to adjust the picture horizontally or vertically, in a linear proportion,to fill the entire screen fully.
CUSTOMIZING SETTINGS AUDIO settings ENGLISH ENG AUDIO 1 Press MENU to access the main menus. 2 Press the Navigation buttons to scroll to AUDIO and press OK. Auto Auto Volume Volume Off :: Off Clear Voice II : Off • Level Balance Sound Mode 3 Press the Navigation buttons to scroll to the setting or option you want and press OK. Move OK 3 0 : Standard • Treble 50 • Bass 50 • Reset - To return to the previous level, press BACK.
CUSTOMIZING SETTINGS TIME settings TIME 2 Press the Navigation buttons to scroll to TIME and press OK. 3 Press the Navigation buttons to scroll to the setting or option you want and press OK. OK : −− : −− −−−− Off Time : Off On Time : Off Sleep Timer : Off Auto Off : On Power On Delay : Off Automatic Standby : On(4hours) - To return to the previous level, press BACK. 4 When you are finished, press EXIT. When you return to the previous menu, press BACK.
CUSTOMIZING SETTINGS OPTION settings OPTION Move ENGLISH ENG 1 Press MENU to access the main menus. Language Input Label English :: English 2 Press the Navigation buttons to scroll to OPTION and press Key Lock : Off Set ID : Off ISM Method : Normal DPM Select : On Power Indicator : ON Interface Select : RS232C OK. 3 Press the Navigation buttons to scroll to the setting or option you want and press OK. OK Network Setup - To return to the previous level, press BACK.
CUSTOMIZING SETTINGS Setting Description Sets up network connections. Option Network Setup RS-232C Enables communication via Serial. Network LAN - Enables communication via Ethernet. Option DHCP Allocates and sets up IP automatically. Manual Sets up IP address, Gateway, Subnet Mask, Primary DNS and Secondary DNS. The setup process is complete when you select Execute, and "IP Setup Completed" is displayed at the bottom of the screen.
CUSTOMIZING SETTINGS TILE settings TILE ENGLISH ENG 1 Press MENU to access the main menus. 2 Press the Navigation buttons to scroll to TILE and press OK. 3 Press the Navigation buttons to scroll to the setting or option you want and press OK. Move Tile TileMode Mode :: 2x2 Off Tile ID :0 Natural Mode : Off H Size :0 V Size :0 H Position : 0 V Position : 0 OK Reset - To return to the previous level, press BACK. 4 When you are finished, press EXIT.
CUSTOMIZING SETTINGS 25 Tile Mode • Off: When the Tile Mode option is disabled • 2X1: When using 2 monitors ID 1 • 3X3: When using 9 monitors • 2X2: When using 4 monitors ID 2 ENG ENGLISH This monitor can be tiled with additional monitors to create a large tiled display.
ENTERTAINMENT ENGLISH ENG ENTERTAINMENT Using integrated media features Connecting USB storage devices Connect USB storage devices such as a USB flash memory, external hard drive, or MP3 player to the Monitor set and use multimedia features (“Browsing files” See p.27). Connect a USB flash memory or USB memory card reader to the Monitor set as shown on the following illustration. The USB screen appears.
ENTERTAINMENT Browsing files Access the Photo, Music or Movie lists and browse files. ENG ENGLISH recognized as a file name. y Please back up the important file because a data of USB device may be damaged. Data management is consumer's responsibility and in consequence the manufactures does not cover the product bearing data damage. y If the USB is connected in Standby Mode, specific hard disk will automatically be loaded when the Set is turned on.
ENTERTAINMENT 6 Select a folder you want. Supported file format ENGLISH ENG - To return to the previous level, select Up Folder. Photo List Type yy JPG yy Available size Baseline: 64 pixel (W) x 64 pixel (H) 15360 pixel (W) x 8640 pixel (H) Progressive: 64 pixel (W) x 64 pixel (H) 1024 pixel (W) x 768 pixel (H) Music yy MP3 yy Bit rate range 32 Kbps to 320 Kbps yy Sampling rate (Sampling Frequency) MPEG1 layer 3: 32 kHz, 44.1 kHz, 48 kHz * A copy-protected file will not play.
ENTERTAINMENT Viewing Photos 29 Using photo options Use the following options while viewing photos. 1 Press the Navigation buttons to scroll to USB and press OK. 2 Press the Navigation buttons to scroll to Photo List and press OK. ◄ 1/17 ► 3 Press the Navigation buttons to select Drive1 Slideshow ◘ to access the connected USB storage device. 5 Press the Navigation buttons to scroll to a file you want and press OK.
ENTERTAINMENT Listening to Music 7 Control playback by using the following ENGLISH ENG buttons. 1 Press the Navigation buttons to scroll to USB and press OK. Button Description Stops playback 2 Press the Navigation buttons to scroll to Music Plays a music file List and press OK. Pauses or resumes playback 3 Select Drive1 to access the connected USB Skips to the next file storage device. Skips to the previous file 4 Press the Navigation buttons to scroll to a folder you want and press OK.
ENTERTAINMENT Viewing Movies Movie (*.dat / *.mpg / *.mpeg / *.vob/ *.m4v / yy *.avi / *.divx) supporting file. Video format: MPEG1, MPEG2, yy MPEG4(Doesn’t support Microsoft MPEG 4-V2, V3), DivX 3.xx, DivX 4.xx, DivX 5.xx, DivX VOD(DRM), XviD, DivX 6.xx(Playback) Audio format: Mpeg, Mp3, PCM yy Bit rate: within 32 kbps to 320 kbps (MP3) yy Subtitle format: *.smi / *.srt / *.sub (Micro yy DVD, SubViewer 2.0) / *.ass / *.ssa / *.txt (DVD Subtitle System).
ENTERTAINMENT 1 Press the Navigation buttons to scroll to USB ENGLISH ENG and press OK. 2 Press the Navigation buttons to scroll to Movie List and press OK. 3 Select Drive1 to access the connected USB storage device. 4 Press the Navigation buttons to scroll to a Option folder you want and press OK. 5 Press the Navigation buttons to scroll to a file Picture Size you want and press OK. A pop-up window will appears.
ENTERTAINMENT 1 Press the Navigation button to show the 2 Press the Navigation button to make appropriate adjustments.
ENTERTAINMENT ENGLISH ENG DivX registration code Deactivating the DivX feature Check and register the DivX registration code of your Monitor set so that you can rent or purchase the latest movies at www.divx.com/vod . To play a rented or purchased DivX file, the file’s registration code should be same with your Monitor set’s DivX registration code. Deactivate all of the devices through the web server and block devices from activating.
MAKING CONNECTIONS 35 MAKING CONNECTIONS 1 Find an external device you want to connect to your Monitor set shown on the following illustration. 2 Check the connection type of the external device. 3 Go to the appropriate illustration and check the connection details. HD Receiver HDMI - See p.36 DVI - See p.36 AV(CVBS) - See p.37 Component - See p.37 DVD VCR HDMI - See p.36 DVI - See p.36 AV(CVBS) - See p.37 Component - See p.37 Speaker AV(CVBS) - See p.37 Component - See p.
MAKING CONNECTIONS ENGLISH ENG Connecting to a HD receiver, DVD, Camcorder, Camera, Gaming Device or VCR player Connect a HD receiver, DVD, or VCR player to the Monitor set and select an appropriate input mode. HDMI/DVI connection Transmits the digital video signal from an external device to the Monitor set. Connect the external device and the Monitor set with the HDMI/DVI cable as shown in the following illustration. To transmit an audio signal, connect an optional audio cable.
MAKING CONNECTIONS 37 AV(CVBS) connection Transmits the analog video and audio signals from an external device to the Monitor set. Connect the external device and the Monitor set with the component cable as shown on the following illustration. To display images by using progressive scan, make sure to use the component cable. Transmits the analog video and audio signals from an external device to the Monitor set.
MAKING CONNECTIONS Connecting to the LAN ENGLISH ENG LAN connection Connect the LAN cable and install the eZ-Net Manager program on the CD-ROM. For more information about the program, please refer to eZ-Net Guide in the enclosed CD-ROM. A Connect PC to Monitor directly. LAN PC Monitor Set B Using a router(Switch) LAN Switch Monitor Set PC Network C Using the Internet.
MAKING CONNECTIONS 39 Daisy Chain Monitors RGB Mode 15-pin D-Sub Signal Cable (Max 3m) Product 1 Product 2 Product 3 Product 4 AV(CVBS) Mode Audio Cable (Not included) AV IN / OUT IN AV IN / OUT AV IN / OUT IN AV IN / OUT AUDIO VIDEO IN OUT VIDEO IN AV IN / OUT AUDIO VIDEO IN OUT AUDIO OUT VIDEO AV IN / OUT AUDIO IN OUT VIDEO AUDIO OUT VIDEO AUDIO OUT BNC Cable (Not included) Product 1 Product 2 NOTE When multi-connecting in/out cascade format, no loss cables are recommended
TROUBLESHOOTING ENGLISH ENG TROUBLESHOOTING No image is displayed Problem Resolution Is the product power cord connected? yy See if the power cord is properly connected to the outlet. Is the power indicator light on? yy See if the power switch is turned on. yy May need service. yy Adjust brightness and contrast again. yy Backlight may need repair. ower is on, power indicator P is blue but the screen appears extremely dark.
TROUBLESHOOTING 41 Problem The 'Key Lock On' message appears when pressing the Menu button. Resolution yy The control locking function prevents unintentional OSD setting change due to careless usage. To unlock the controls, simultaneously press the Menu button and ► button for several seconds. (You cannot set this function using the remote control buttons. You can set this function in the product only.) The screen image looks abnormal.
TROUBLESHOOTING ENGLISH ENG The audio function does not work. Problem No sound? Resolution Sound is too dull. yy See if the audio cable is connected properly. yy Adjust the volume. yy See if the sound is set properly. yy Select the appropriate equalize sound. Sound is too low. yy Adjust the volume. Screen color is abnormal. Problem Resolution Screen has poor color resolution yy Set the number of colors to more than 24 bits (true color) Select (16 colors).
SPECIFICATIONS LCD Panel Screen Type Video Signal Pixel Pitch Max. Resolution 1638.3 mm Wide (64.5 inch) TFT (Thin Film Transistor) LCD (Liquid Crystal Display) Panel. Visible diagonal size : 1638.3 mm 0.744 mm (H) x 0.744 mm (V) RGB : 1920 X 1080 @60Hz HDMI/DVI : 1920 X 1080 @60Hz - It may not be supported depending on the OS or video card type. Recommended Resolution RGB : 1920 X 1080 @60Hz HDMI/DVI : 1920 X 1080 @60Hz - It may not be supported depending on the OS or video card type.
SPECIFICATIONS ENGLISH ENG / Dimensions (Width x Height x Depth) / Weight H W D 1535.4 mm x 136.7 mm x 907.6 mm / 51.1 kg H W D 1535.4 mm x 136.7 mm x 907.6 mm / 51.85 kg * Applicable only for models that support the speakers Audio RMS Audio Output Input Sensitivity Speaker Impedance 10 W + 10 W (R + L) 0.7 Vrms 8Ω Product specifications shown above may be changed without prior notice due to upgrade of product functions.
SPECIFICATIONS 45 DTV Mode RGB (PC) supported mode Horizontal Vertical Frequency(kHz) Frequency(Hz) Resolution Component HDMI/DVI (DTV) 640 x 350 31.469 70.8 480i o x o x 720 x 400 31.468 70.8 576i 640 x 480 31.469 59.94 480p o o 640 x 480 37.5 75 576p o o 800 x 600 37.879 60.317 720p o o 800 x 600 46.875 75 1080i o o 832 x 624 49.725 74.55 1080p o o 1024 x 768 48.363 60 1024 x 768 60.123 75.029 1280 x 720 44.772 59.855 1280 x 768 47.
IR CODES IR CODES ENGLISH ENG This feature is not available for all models.
EXTERNAL CONTROL DEVICE SETUP Use this method to connect several products to a single PC. You can control several products at a yy time by connecting them to a single PC. In the Option menu, Set ID must be between 1 and 225 without being duplicated. yy Connecting the cable Connect the RS-232C cable as shown in the picture. The RS-232C protocol is used for communication between the PC and product. You can turn the yy product on/off, select an input source or adjust the OSD menu from your PC.
EXTERNAL CONTROL DEVICE SETUP Command reference list ENGLISH ENG COMMAND DATA 1 2 1 01. Power k a 00H to 01H 02. Input Select k b 02H to 09H 03. Aspect Ratio k c 01H to 1FH 04. Screen Mute k d 00H to 01H 05. Volume Mute k e 00H to 01H 06. Volume Control k f 00H to 64H 07. Contrast k g 00H to 64H 08. Brightness k h 00H to 64H 09. Color k i 00H to 64H 10. Tint k j 00H to 64H 11. Sharpness k k 00H to 64H 12. OSD Select k l 00H to 01H 13.
EXTERNAL CONTROL DEVICE SETUP COMMAND 49 DATA 2 1 39. Sleep Time f f 00H to 08H 40. Auto Sleep f g 00H to 01H 41. Power On Delay f h 00H to 64H 42. Language f i 00H to 09H 43. DPM Select f j 00H to 01H 44. Reset f k 00H to 02H 45. Power Saving f l 00H to 03H 46. Power Indicator f o 00H to 01H 47. Serial no. f y FFH 48. S / W Version f z FFH 49.
EXTERNAL CONTROL DEVICE SETUP Transmission / Receiving protocol ENGLISH ENG Transmission [Command1][Command2][ ][Set ID][ ][Data][Cr] * [Command 1]: First command. (k, j, m, d, f, x) * [Command 2]: Second command.(a to u) * [Set ID]: Set up the Set ID number of product. range : 01H to 63H. by setting '0', server can control all products. * In case of operating with more than 2 sets using set ID as '0' at the same time, it should not be checked the ack message.
EXTERNAL CONTROL DEVICE SETUP 01. Power (Command: k a) To control Power On/Off of the set. Data 00 : Power Off Data 01 : Power On Acknowledgement [a][ ][Set ID][ ][OK][Data][x] To show the status of Power On/Off. 04. Screen Mute (Command: k d) To select screen mute on / off.
EXTERNAL CONTROL DEVICE SETUP ENGLISH ENG 07. Contrast (Command: k g) To adjust screen contrast. You can also adjust the contrast in the Picture menu. Transmission [k][g][ ][Set ID][ ][Data][Cr] Data Min : 00H to Max : 64H Acknowledgement [g][ ][Set ID][ ][OK][Data][x] Data Min : 00H to Max : 64H * Refer to 'Real data mapping ’. See p.51 10. Tint (Command: k j) To adjust the screen tint. You can also adjust the tint in the Picture menu.
EXTERNAL CONTROL DEVICE SETUP Transmission [k][m][ ][Set ID][ ][Data][Cr] Data 00: Off Data 01: On Acknowledgement [m][ ][Set ID][ ][OK][Data][x] Data 00: Off Data 01: On 14. Balance (Command: k t) To adjust the sound balance. Transmission [k][t][ ][Set ID][ ][Data][Cr] Data Min : 00H to Max : 64H (Hexadecimal code) 00H : Step L50 64H : Step R50 Acknowledgement [t][ ][Set ID][ ][OK][Data][x] 16. Abnormal state (Command: k z) Used to Read the power off status when Stand-by mode.
EXTERNAL CONTROL DEVICE SETUP 19. Key (Command: m c) To send IR remote key code. 22. Tile V Position (Command: d f) To set the Vertical position. ENGLISH ENG Transmission [m][c][ ][Set ID][ ][Data][Cr] Transmission [d][f][ ][Set ID][ ][Data][Cr] Data Key code : Refer to ‘IR CODES’. See p.46 00H : Step -10(Down) 14H : Step 10(Up) Acknowledgement [c][ ][Set ID][ ][OK][Data][x] Acknowledgement [f][ ][Set ID][ ][OK/NG][Data][x] 20. Tile Mode (Command: d d) Change a Tile Mode. 23.
EXTERNAL CONTROL DEVICE SETUP 25. Tile ID Set (Command: d i) To assign the Tile ID for Tiling function. 28. Sound Mode (Command: d y) To adjust the Sound mode. Transmission [d][y][ ][Set ID][ ][Data][x] Data Min : 00H to Max : 19H (Hexadecimal code) Data Structure Acknowledgement [i][ ][Set ID][ ][OK/NG][Data][x] Data(Hex) Mode 01 02 03 04 05 Standard Music Cinema Sport Game Acknowledgement [y][ ][Set ID][ ][OK/NG][Data][x] 26.
EXTERNAL CONTROL DEVICE SETUP 31. Temperature value (Command: d n) To read the inside temperature value. ENGLISH ENG Transmission [d][n][ ][Set ID][ ][Data][x] * The data is always FF(in Hex). Acknowledgement [n][ ][Set ID][ ][OK/NG][Data][x] 34. Speaker (Command: d v) Turn the speaker on or off. Transmission [d][v][ ][Set ID][ ][Data][x] Data 00: Off Data 01: On Acknowledgement [v][ ][Set ID][ ][OK/NG][Data][x * The data is 1 byte long in Hexadecimal. 32.
EXTERNAL CONTROL DEVICE SETUP 36. On Timer (On/Off Timer) Time (Command: f d) Set On Timer. 37. Off Timer (On/Off Timer) Time (Command: f e) Set Off Timer. Transmission [f][e][ ][Set ID][ ][Data1][ ][Data2][ ][Data3][Cr] [Data1] 1. f1h to f4h(read one index) f1: read 1st index of On Time List f2: read 2nd index of On Time List f3: read 3rd index of On Time List f4: read 4th index of On Time List [Data 1] 1.
EXTERNAL CONTROL DEVICE SETUP ENGLISH ENG 38. Scheduling Input select (Command: f u) (Main Picture Input) To select input source for Set depending on day. Transmission [f][u][ ][Set ID][ ][Data1][ ][Data2][Cr] [Data 1] 1. f1h to f4h(write/read one index) f1: read 1st index of Scheduling Input f2: read 2nd index of Scheduling Input f3: read 3rd index of Scheduling Input f4: read 4th index of Scheduling Input 40. Auto Sleep (Command: f g) Set Auto Sleep.
EXTERNAL CONTROL DEVICE SETUP 43. DPM Select (Command: f j) Set the DPM (Display Power Management) function. Data 00 : Off 01 : On Acknowledgement [j][ ][Set ID][ ][OK/NG][Data][x] 44. Reset (Command: f k) Set the DPM (Display Power Management) function. Transmission [f][k][ ][Set ID][ ][Data][Cr] Data 00 : Picture Reset 01 : Screen Reset 02 : Factory Reset Acknowledgement [k][ ][Set ID][ ][OK/NG][Data][x] 45. Power saving (Command: f l) To set the Power saving mode.
EXTERNAL CONTROL DEVICE SETUP 49. Input Select (Command: x b) To select input source for the Set.
Make sure to read the Safety Precautions before using the product. Keep the Owner's Manual(CD) in an accessible place for future reference. The model and serial number of the SET is located on the back and one side of the SET. Record it below should you ever need service. MODEL SERIAL Temporary noise is normal when powering ON or OFF this device.