OWNER’S MANUAL MONITOR SIGNAGE Please read this manual carefully before operating the your set and retain it for future reference. MONITOR SIGNAGE MODELS 84WT70PS www.lg.
TABLE OF CONTENTS ENGLISH ENG TABLE OF CONTENTS 4 33 CUSTOMIZING SETTINGS 33 - PICTURE Settings ASSEMBLING AND PREPARING 37 Using the Additional Options 37 - Adjusting Aspect Ratio 5 Accessories 39 - SOUND Settings 6 Optional Accessories 40 - TIME Settings 7 Parts and Buttons 41 - OPTION Settings 9 Using the Mounting Cable Tie 43 - NETWORK Settings 9 Connecting the Eye-Bolt Bracket 43 - SUPPORT Settings 10 Connecting the Pentray Assy 11 Connecting the Media Player 44
TABLE OF CONTENTS TROUBLESHOOTING 57 SPECIFICATIONS 62 IR CODES 63 CONTROLLING THE MULTIPLE PRODUCT 63 Connecting the Cable 63 RS-232C Configurations 63 Communication Parameter 64 Command Reference List 66 Transmission/ Receiving protocol ENG ENGLISH 52 3
LICENSES ENGLISH LICENSES Supported licenses may differ by model. For more information of the licenses, visit www.lg.com. The terms HDMI and HDMI High-Definition Multimedia Interface, and the HDMI logo are trademarks or registered trademarks of HDMI Licensing LLC in the United States and other countries. ABOUT DIVX VIDEO: DivX is a digital video format created by DivX, LLC, a subsidiary of Rovi Corporation. This is an official DivX Certified device that plays DivX video. Visit divx.
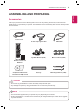
ASSEMBLING AND PREPARING 5 Accessories Check your product box for the following items. If there are any missing accessories, contact the local dealer where you purchased your product. The illustrations in this manual may differ from the actual product and accessories.
ASSEMBLING AND PREPARING Optional Accessories ENGLISH ENG Without prior notice, optional accessories are subject to change to improve the performance of the product, and new accessories may be added. The illustrations in this manual may differ from the actual product and accessories. Media Player Screws CD (Owner's Manual) / Card Media Player Kit NOTE Optional accessories are not included for all models.
ASSEMBLING AND PREPARING 7 Parts and Buttons ENG ENGLISH IR Receiver/ Power Indicator Lighting On: Turned on Lighting Off: Turned off Connection panel NOTE You can set the Power indicator to on or off by selecting OPTION in the main menu.
ASSEMBLING AND PREPARING Screen Marks Description ENGLISH ENG INPUT Changes the input source. MENU Accesses the main menus, or saves your input and exits the menus. Moves the selection up and down. Adjusts the volume level. AUTO/SET /I Displays the current signal and mode. Press this button to adjust the screen automatically (available only in RGB mode) Turns the power on or off. IR Receiver This is where the unit receives signals from the remote control.
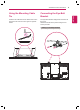
ASSEMBLING AND PREPARING Connecting the Eye-Bolt Bracket Insert the two cable ties into the bottom hole on the back of the set as shown in the figure to organize cables. The eye-bolt bracket is designed to be used to lift the set up. Attach the bracket to the product using the two screws provided.
ASSEMBLING AND PREPARING ENGLISH ENG Connecting the Pentray Assy Use the screws provided to attach the Pentray Assy.
ASSEMBLING AND PREPARING 11 1 Place a soft cloth on the table and put the set with the screen facing downward. Remove the handle at the bottom of the section where the Media Player is mounted on the set. 3 Attach the Media Player using the four provided screws. 2 To mount the Media Player, push it into the special compartment located on the back of the monitor. NOTE Use the screws provided with the product yy (diameter 3.0 mm x pitch 0.5 mm x length 6.0 mm).
ASSEMBLING AND PREPARING Mounting on a Wall CAUTION ENGLISH ENG For proper ventilation, allow a clearance of 10 cm on each side and from the wall. Detailed installation instructions are available from your dealer, see the optional Tilt Wall Mounting Bracket Installation and Setup Guide. 10 cm 10 cm 10 cm 10 cm 10 cm If you intend to mount the monitor to a wall, attach a Wall mounting interface (optional parts) to the back of the set.
ASSEMBLING AND PREPARING Securing the product to a wall (optional) 1 Insert and tighten the eye-bolts, or product brackets and bolts on the back of the product. - If there are bolts inserted at the eye-bolts position, remove the bolts first. 2 Mount the wall brackets with the bolts to the wall. Match the location of the wall bracket and the eye-bolts on the rear of the product. 3 Connect the eye-bolts and wall brackets tightly with a sturdy rope.
REMOTE CONTROL ENGLISH ENG REMOTE CONTROL The descriptions in this manual are based on the buttons of the remote control. Please read this manual carefully and use the Monitor correctly. To replace batteries, open the battery cover, replace batteries (1.5 V AAA) matching and ends to the label inside the compartment, and close the battery cover. To remove the batteries, perform the installation actions in reverse. CAUTION Do not mix old and new batteries, as this yy may damage the remote control.
REMOTE CONTROL 15 ENG ENGLISH INFO ⓘ Displays the input information. SETTINGS Accesses the main menus or saves your input and exit menus. OK Selects menus or options and confirms your input. AUTO Automatically adjusts picture position and minimizes image instability. (RGB input only) W.BAL Enters the White Balance menu. S.MENU (SuperSign Menu Key) Select the SuperSign OSD menu. (SuperSign input only) Navigation Buttons Scrolls through menus or options.
REMOTE CONTROL ENGLISH ENG Change Device Name SimpLink Setting You can edit the name of the external device connected to the input port to display which device is connected to the port. SimpLink allows you to control various multimedia devices to enjoy the multimedia simply by using the remote control through the SimpLink menu. 1 Press INPUT to access Input List. 1 Press INPUT to access Input List. INPUT 2 In the Input List screen, press the ID ON (red) on the remote control.
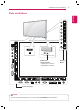
USING THE MONITOR 17 Connecting to a PC Your Monitor supports the Plug & Play* feature. * Plug & Play: This is the function that allows a PC to use the monitor without installing a driver. NOTE It is recommended you use an HDMI yy connection for the best image quality. Use a shielded signal interface cable, such yy as D-sub 15-pin signal cable and DVI cable, with a ferrite core to maintain standard compliance for the product. If you turn the Monitor on when the set is yy cold, the screen may flicker.
USING THE MONITOR ENGLISH ENG RGB Connection DVI-D Connection Transmits an analog video signal from your PC to the Monitor. Connect the PC and the Monitor set with the 15 pin signal cable as shown in the following illustrations. Select RGB input source on the monitor. Transmits a digital video signal from your PC to the Monitor. Connect the PC and the Monitor with a DVI cable as shown the following illustrations. Select DVI-D input source on the monitor. Back of the product. Back of the product.
USING THE MONITOR 19 Display Port Connection Transmits the digital video and audio signals from your PC to the Monitor. Connect the PC and the Monitor with an HDMI cable as shown in the following illustration. Select HDMI input source. Transmits the digital video and audio signals from your PC to the Monitor. Connect the PC and the Monitor with a Display Port cable as shown in the following illustrations. Select Display Port input source. Back of the product.
USING THE MONITOR TOUCH USB Cable Connection ENGLISH ENG Plug a USB cable into a TOUCH USB port on the back of the monitor. Back of the product.
USING THE MONITOR 21 Using the Input List ENG ENGLISH 1 Press INPUT to access the INPUT LIST. INPUT 2 Press the Navigation buttons to scroll to one of the input sources and press OK. Input source Description AV Watch video from a VCR or other external devices. RGB-PC View a PC display on the screen. HDMI1 Watch contents in a PC, DVD of Digital set-top box other high definition devices. HDMI2 Watch contents in a PC, DVD of Digital set-top box other high definition devices.
ENTERTAINMENT ENGLISH ENG ENTERTAINMENT Connecting to a Wired Network (Depending on model) Connect the display to a local area network (LAN) via the LAN port as shown in the following illustration and set up the network settings. This monitor only supports a wired network connection. After making a physical connection, a small number of home networks may require the display network settings to be adjusted. For most home networks, the display will connect to automatically without any adjustments.
ENTERTAINMENT NOTE Tips for Network setting yy Use a standard LAN cable with this display. Cat5 or better with a RJ45 connector. yy Many network connection problems during set up can often be fixed by re-setting the router or modem. After connecting the display to the home network, quickly power off and/or disconnect the power cable of the home network router or cable modem. Then power on and/or connect the power cable again.
ENTERTAINMENT ENGLISH ENG Connecting USB Storage Devices Connect a USB storage device (external HDD, USB memory) to the USB port of Monitor to enjoy the content files stored in the USB device on your Monitor. or CAUTION yy Back up your files saved on a USB storage device frequently, as you may lose or damage the files and this may be not covered by the warranty. Tips for using USB storage devices yy Only a USB storage device is recognizable.
ENTERTAINMENT yy It is recommended you use a certified USB storage device and cable. Otherwise, a USB storage device may not be detected or a playback error may occur. yy Only a USB memory stick can be used to play back the files distributed and stored by SuperSign Manager. A USB hard disk or multi-card reader will not work. yy Only an FAT 32 file formatted storage device can play back the files distributed and stored by SuperSign manager. yy A USB 3.0 storage device may not work.
ENTERTAINMENT Using My Media ENGLISH ENG Provides video/ photo/ music files on your Monitor by connecting to a USB device 1 Connecting a USB device. 2 Press INPUT to access the INPUT LIST. 3 Press the Navigation buttons to scroll to USB device and press OK. 4 Press the Navigation buttons to scroll to the VIDEO/ PHOTO/ MUSIC you want and press OK. Displays video/ photo/ music files on all devices connected to the Monitor.
ENTERTAINMENT Type Supporting file yy Maximum: 1920 x 1080 @30p Extension .asf .wmv Video Audio Video .divx .avi .mp4 .m4v .mov .mkv .ts .trp .tp .vob .mpg .mpeg Music File type Audio File type DivX3.11, DivX4, DivX5, DivX6, XViD, H.264/AVC, Motion Jpeg MPEG-1 Layer I, II, MPEG-1 Layer III (MP3), Dolby Digital, Dolby Digital Plus, LPCM, ADPCM, DTS H.264/AVC, MPEG-4 Part 2 Audio AAC Video H.264/AVC Audio HE-AAC, Dolby Digital Video H.
ENTERTAINMENT Playing Video ENGLISH ENG Controls playback and sets options while viewing videos. 1 In the MY MEDIA screen, press the Navigation button to scroll to Video and press OK. 2 Press the Navigation buttons to scroll to the file you want and press OK. Selects the desired point and plays. Plays. Remote Button Option List Sets options. Stops playback and returns to the list. Description Stops the playback. Plays a video. Pauses or resumes the playback. Scans backward in a file.
ENTERTAINMENT 29 Menu Description Repeat Turn on/off repeat function of movie playback. When turned on, the file within the folder will be played back repeatedly. Even when the repeated playback is turned off, it can run the playback if the file name is similar to the previous file. Changes the Language Group of the audio during movie play. Files with a single audio track cannot be selected. Turn on or off the subtitles.
ENTERTAINMENT NOTE ENGLISH ENG yy Only 10,000 of sync blocks are supported within a subtitle file. yy When playing a video, you can adjust the Picture Size by pressing the ARC button. yy Subtitles in your language are only supported when the OSD menu is also in this language. yy The code page options may be disabled depending on the language of the subtitle files. yy Select the appropriate code page for the subtitle files. CAUTION yy Some subtitles created by users may not work properly.
ENTERTAINMENT 31 Viewing Photos ENG ENGLISH Controls playback and sets options while viewing pictures in full screen. 1 In the MY MEDIA screen, press the navigation button to scroll to PHOTO and press OK. 2 Press the navigation buttons to scroll to the file you want and press OK. Slideshow Displays photos as a slideshow. Menu Slideshow BGM Option Option BGM Plays background music. Rotates or enlarges the picture. Sets options. List Stops playback and returns to the list.
ENTERTAINMENT Listening to Music ENGLISH ENG Controls playback and sets options while playing music. 1 In the MY MEDIA screen, press the navigation button to scroll to MUSIC and press OK. 2 Press the navigation buttons to scroll to the file you want and press OK. Option Plays. Selects the desired point and plays. Remote Button Sets options. List Returns to the list. Description Stops playback. Plays a music file. Pauses or resumes playback. Skips to the next file. Skips to the previous file.
CUSTOMIZING SETTINGS 33 PICTURE Settings PICTURE Energy Saving 1 Press the navigation buttons to scroll to PICTURE. : Off Smart Energy Saving : Off 2 Press the navigation buttons to scroll to the setting Picture Mode : Touch Backlight 100 or option you want and press OK. Contrast 100 - To return to the previous level, press BACK. 3 ENG ENGLISH CUSTOMIZING SETTINGS Brightness 50 Sharpness 10 When you are finished, press EXIT. When you return to the previous menu, press BACK.
CUSTOMIZING SETTINGS Setting ENGLISH ENG Picture Mode Description Selects the picture mode optimized for the viewing environment or the programme. Mode Vivid Heightens contrast, brightness and sharpness to display vivid images. Standard Displays images in standard levels of contrast, brightness and sharpness. Cinema/ Game Displays images that have been optimized for movies or games.
CUSTOMIZING SETTINGS 35 Picture Mode options Description Backlight Adjusts the display brightness by varying the brightness of the LCD panel. Contrast Adjusts the difference between bright and dark regions of the screen. Brightness Adjusts the overall screen brightness. Sharpness Adjusts the sharpness of the borders between bright and dark. Color Adjusts the color on the screen darker or lighter. Tint Adjusts the red/green color balance. Color Temp.
CUSTOMIZING SETTINGS Picture Option ENGLISH ENG Setting Description Noise Reduction Reduces screen noise in the video. MPEG Noise Reduction Reduces noise caused by compressing digital video. Black Level Adjusts the brightness or darkness of the screen to suit the black level of the picture input using the degree of darkness (black level) of the screen. Real Cinema Optimizes the screen for movie viewing. Eye Care Adjusts screen brightness to prevent eye glare.
CUSTOMIZING SETTINGS Using the Additional Options Resize the image to view the image at its optimal size by pressing ARC while you are watching content. CAUTION If a fixed image displays on the screen for a long period of time, it will be imprinted and become a yy permanent disfigurement on the screen. This is image retention or burn-in and not covered by the warranty. If the aspect ratio is set to 4:3 for a long period of time, image burn may occur on the letterboxed area yy of the screen.
CUSTOMIZING SETTINGS ENGLISH ENG - 16:9 : This selection will allow you to adjust the picture horizontally, in linear proportion, to fill the entire screen (useful for viewing 4:3 formatted DVDs). - 4:3 : This selection will allow you to view a picture with an original 4:3 aspect ratio, black bars will appear on both the left and right of the screen. This may cause image retention around the border of the black bars.
CUSTOMIZING SETTINGS SOUND Settings 39 SOUND Sound Mode : Standard 2 Press the navigation buttons to scroll to the setting Virtual Surround : Off Clear Voice II : On AV Sync. : Off User EQ or option you want and press OK. - To return to the previous level, press BACK. 2 Sound Setting 3 When you are finished, press EXIT. When you return to the previous menu, press BACK.
CUSTOMIZING SETTINGS TIME Settings TIME ENGLISH ENG 1 Press the navigation buttons to scroll to TIME. Clock Off Time : Off 2 Press the navigation buttons to scroll to the setting OnTime : Off Sleep Timer : Off Power On Delay : Off Auto Off : Off Automatic Standby : Off or option you want and press OK. - To return to the previous level, press BACK. 3 When you are finished, press EXIT. When you return to the previous menu, press BACK.
CUSTOMIZING SETTINGS OPTION Settings 41 OPTION Power Indicator 2 Press the navigation buttons to scroll to the setting or option you want and press OK. - To return to the previous level, press BACK. ISM Method : Normal Key Lock : Off Fail Over : Off DPM Select : Off DivX® VOD 3 When you are finished, press EXIT. SimpLink When you return to the previous menu, press BACK.
CUSTOMIZING SETTINGS Setting ENGLISH ENG Set ID Description You can assign a unique Set ID NO (name assignment) to each product when several products are connected for display. Specify the number (1 to 255) using the button and exit. Use the assigned Set ID to individually control each product using the Product Control Program. PC Power Control Controls the power of the monitor with Media Player turned on. On: Turns on or off the monitor with Media Player on. Off: Turns on or off the whole system.
CUSTOMIZING SETTINGS NETWORK Settings NETWORK Network Status 2 Press the navigation buttons to scroll to the setting or option you want and press OK. - To return to the previous level, press BACK. 3 When you are finished, press EXIT. When you return to the previous menu, press BACK. The available NETWORK settings are described in the following: Setting Description Configure the network settings. Network Status Display the network status. SUPPORT Settings SUPPORT Product/Service Info.
MAKING CONNECTIONS MAKING CONNECTIONS ENGLISH ENG Connect various external devices to the ports on the monitor’s back panel. 1 Find an external device you want to connect to your monitor shown on the following illustration. 2 Check the connection type of the external device. 3 Go to the appropriate illustration and check the connection details.
MAKING CONNECTIONS 45 External Device Connection HDMI Connection Transmits the digital video and audio signals from an external device to the monitor. Connect the external device and the monitor with the HDMI cable as shown on the following illustration. Back of the product. (not included) (not included) NOTE Use a High Speed HDMI™ Cable. yy High Speed HDMI™ Cables are tested to carry an HD signal up to 1080p and higher.
MAKING CONNECTIONS AV (CVBS) Connection ENGLISH ENG Transmits the analog video and audio signals from an external device to the monitor. Connect the external device and the Monitor with the 15-pin signal to RCA cable as shown on the following illustration. Back of the product.
MAKING CONNECTIONS Connecting to a USB or Connecting to the LAN ENG ENGLISH Connect a USB storage device such as s USB flash memory, external hard drive, MP3 player or a USB memory card reader to the Monitor and access the USB menu to use various multimedia files. 47 A Connect PC to monitor directly. LAN Monitor PC B Using a router (Switch) LAN Switch Monitor Network PC Network C Using the Internet.
MAKING CONNECTIONS Daisy Chain Monitors ENGLISH ENG Use this function to share the RGB video signal with other monitors without having to use a separate signal splitter box.
USING THE TOUCH SCREEN 49 To Use the Touch Screen on Windows 7 Plug a USB cable into a TOUCH USB port on the back of the monitor. Then, connect the USB cable to your PC so that it automatically recognizes the touch screen monitor. Back of the product PC Go to Control Panel > System and Security > System. You will see the number of touch-points supported under Pen and Touch. CAUTION Once your PC recognizes the monitor, you yy will be able to use the touch screen.
USING THE TOUCH SCREEN ENGLISH Precaution When Using the Touch Screen CAUTION The monitor is optimized for indoor use. yy The touch screen monitor is optimized for Windows 7. yy Do not remove the USB cable when using the touch screen monitor. yy If touch does not respond, remove the USB cable and connect it back in ten seconds. yy Touch responds when the monitor is powered on. yy Touch accuracy is optimized by using full screen mode.
USING THE TOUCH SCREEN 51 ENGLISH LG Touch Screen Software Specifications Minimum System Requirements for Windows PC CPU Intel Core 2 Duo or higher RAM 1 GB or more Recommended System Requirements for Windows PC CPU Intel Core i3 or higher RAM 2 GB or more Supported OS Windows 7 professional, Ultimate (32/64 bit) Precaution When Using LG Touch Screen Software CAUTION When running a separate application on LG Touch Screen software, the application screen may yy flicker.
TROUBLESHOOTING ENGLISH ENG TROUBLESHOOTING No image is displayed Problem Is the product power cord connected? Is the power indicator light on? ower is on, power indicator P is red but the screen appears extremely dark. The power indicator amber? oes the 'Out of range' D message appear? oes the 'Check signal cable' D message appear? Resolution yy See if the power cord is properly connected to the outlet. yy See if the power switch is turned on. yy May need service.
TROUBLESHOOTING 53 The screen image looks abnormal. Resolution yy D-Sub analog signal - Press the "AUTO" button in the remote control to automatically select the optimal screen status that fits into the current mode. If adjustment is not satisfactory, select [PICTURE] [Screen] - [Position] in OSD menu. yy See if the video card resolution and frequency are supported by the product. If the frequency is out of range, set to the recommended resolution in the Control Panel "Display" Setting menu.
TROUBLESHOOTING The audio function does not work. ENGLISH ENG Problem No sound? Resolution Sound is too dull. yy See if the audio cable is connected properly. yy Adjust the volume. yy See if the sound is set properly. yy Adjust the Clear Voice ll, Treble and Bass appropriately. Sound is too low. yy Adjust the volume. Screen color is abnormal. Problem Resolution Screen has poor color resolution yy Set the number of colors to more than 24 bits (true color) Select (16 colors).
TROUBLESHOOTING 55 I have a problem with touch response. Touch does not respond. The location of a touch does not correspond to the touch coordinates. touch is applied to a monitor A other than the one I intended. Resolution yy Check the USB cable connection. - This may occur when the USB cable between PC and monitor is not connected. Check the USB cable and make it firmly connected.
TROUBLESHOOTING ENGLISH ENG Problem I cannot use 10 touch points in Windows 7. Resolution yy Make sure that you use a content that supports up to 10 touch points. - The content played (e.g. Flash Player, Paint, etc.) may not support 10 touch points. yy Remove the USB cable and connect it again in 10 seconds. yy Run the content (e.g. Flash Player, Paint, etc.) again. yy Restart your PC. yy If the gap between two touch points is 20 mm or less, the touch error may occur.
SPECIFICATIONS 57 LCD Panel Screen Type Video Signal Pixel Pitch Max. Resolution 2134.62 mm Wide TFT (Thin Film Transistor) LCD (Liquid Crystal Display) Panel. Visible diagonal size : 2134.62 mm 0.4845 mm (H) x 0.4845 mm (V) RGB, DVI-D: 1920 X 1080 @60 Hz HDMI, Display Port: 3840 X 2160 @30 Hz - It may not be supported depending on the OS or video card type.
SPECIFICATIONS ENGLISH ENG * Touch Screen OS (Operating System) Windows 7 10 Points Space between touches : at least 20 mm or more * Applicable only for models that support the speakers Audio RMS Audio Output Input Sensitivity Speaker Impedance 10 W + 10 W (R + L) 0.7 Vrms 8Ω Product specifications shown above may be changed without prior notice due to upgrade of product functions.
SPECIFICATIONS RGB (PC) supported mode 59 HDMI/Display Port/SuperSign (DTV) supported mode Horizontal Vertical Frequency(kHz) Frequency(Hz) Resolution Horizontal Vertical Frequency(kHz) Frequency(Hz) 640 x 350 31.469 70.8 640 x 480 31.469 59.94 720 x 400 31.468 70.8 800 x 600 37.879 60.317 640 x 480 31.469 59.94 1024 x 768 48.363 60 640 x 480 37.5 75 1280 x 720 44.772 59.855 800 x 600 37.879 60.317 1366 x 768 47.7 60 800 x 600 46.875 75 1152 x 864 53.783 59.
SPECIFICATIONS DTV Mode ENGLISH ENG Resolution HDMI/Display Port/ SuperSign (DTV) 480i x 480p o 576i x 576p o 720p o 1080i o 1080p o 2160p o Power Indicator Mode Product On Mode Red Sleep Mode Amber Off Mode - NOTE When the cable is connected to the HDMI or yy the display port, you can select the PC/DTV mode optionally. It is recommended you to set to the PC mode when connecting to PC; the DTV mode when connecting to DTV.
SPECIFICATIONS 61 Dimensions 82.1 91.7 90.1 (Unit: mm) 111.9 62.9 34 34 1951.2 675.6 472.5 1194.7 34 32.1 R12 600 121.5 675.6 472.5 130.6 57.5 368.6 400 Wall Mount Screw 4-M8, L19.8(Max.) 82 121.5 93.6 130.6 34 499.9 368.6 93.6 57.2 1137.2 1046.52 (A/Area) 1860.48 (A/Area) Product specifications shown above may be changed without prior notice due to upgrade of product functions.
IR CODES IR CODES ENGLISH ENG All models do not support the HDMI/USB function. yy Some key codes are not supported, depending on the model.
CONTROLLING THE MULTIPLE PRODUCT Use this method to connect several products to a single PC. You can control several products at a yy time by connecting them to a single PC. In the Option menu, Set ID must be between 1 and 255 without being duplicated. yy Connecting the Cable Connect the RS-232C cable as shown in the picture. The RS-232C protocol is used for communication between the PC and product. You can turn the yy product on/off, select an input source or adjust the OSD menu from your PC.
CONTROLLING THE MULTIPLE PRODUCT Command Reference List ENGLISH ENG COMMAND DATA 1 2 01 Power k a 00H to 01H 02 Aspect Ratio k c 01H to 1FH 03 Screen Mute k d 00H to 01H 04 Volume Mute k e 00H to 01H 05 Volume Control k f 00H to 64H 06 Contrast k g 00H to 64H 07 Brightness k h 00H to 64H 08 Color k i 00H to 64H 09 Tint k j 00H to 64H 10 Sharpness k k 00H to 32H 11 OSD Select k l 00H to 01H 12 Remote Lock/ key Lock k m 00H to 01H 13 Audio Balance k
CONTROLLING THE MULTIPLE PRODUCT COMMAND 65 DATA 2 42 S / W Version f z FFH 43 Time 1(Years/ Months/ Days) f a Refer to ‘Time 1’ 44 Time 2(Hours/ Minutes/Seconds) f x Refer to ‘Time 2’ 45 Off Time Schedule f c 00H to 01H 46 On Time Schedule f b 00H to 01H 47 Off Timer(Repeat mode/ Time) f e Refer to ‘Off Timer’ 48 On Timer(Repeat Mode/ Time) f d Refer to ‘On Timer’ 49 On Timer Input f u Refer to ‘On Timer Input’ 50 H Position f q 00H to 64H 51 V Position f r 00H t
CONTROLLING THE MULTIPLE PRODUCT Transmission/ Receiving protocol ENGLISH ENG Transmission [Command1][Command2][ ][Set ID][ ][Data][Cr] * [Command 1]: First command. (k, j, m, d, f, x) * [Command 2]: Second command.(a to z) * [Set ID]: Set up the Set ID number of product. range : 01H to 63H. by setting '0', server can control all products. * In case of operating with more than 2 sets using set ID as '0' at the same time, it should not be checked the ack message.
CONTROLLING THE MULTIPLE PRODUCT * Real data mapping Decimal Num. (Real Value) 0 0 A 10 F 15 10 16 20 32 64 100 FE 254 FF 255 01. Power(Command: k, a) To control Power On/Off of the set. Transmission [k][a][ ][Set ID][ ][Data][Cr] Data 00: Power Off 01: Power On Acknowledgement [a][ ][Set ID][ ][OK/NG][Data][x] 03. Screen Mute(Command: k, d) To select screen mute on / off.
CONTROLLING THE MULTIPLE PRODUCT ENGLISH ENG 06. Contrast(Command: k, g) To adjust screen contrast. You can also adjust the contrast in the Picture menu. Transmission [k][g][ ][Set ID][ ][Data][Cr] Data Min. 00H to Max. 64H : 0~100 * Refer to 'Real data mapping’. Acknowledgement [g][ ][Set ID][ ][OK/NG][Data][x] 07. Brightness(Command: k, h) To adjust screen brightness. You can also adjust the brightness in the Picture menu. Transmission [k][h][ ][Set ID][ ][Data][Cr] Data Min. 00H to Max.
CONTROLLING THE MULTIPLE PRODUCT Transmission [k][m][ ][Set ID][ ][Data][Cr] Data 00: Off 01: On 15. White Balance Red Gain(Command: j, m) To adjust white balance red gain. Transmission [j][m][ ][Set ID][ ][Data][Cr] Data 00~FE: Red gain 0~254 Acknowledgement [m][ ][Set ID][ ][OK/NG][Data][x] Acknowledgement [m][ ][Set ID][ ][OK/NG][Data][x] 13. Balance(Command: k, t) To adjust the sound balance. Transmission [k][t][ ][Set ID][ ][Data][Cr] Data Min. 00H to Max.
CONTROLLING THE MULTIPLE PRODUCT 18. ISM Method(Command: j, p) Used to select the afterimage preventing function. ENGLISH ENG Transmission [j][p][ ][Set ID][ ][Data][Cr] Data 20: Color Wash 08: Normal Acknowledgement [p][ ][Set ID][ ][OK/NG][Data][x] 19. Energy Saving(Command: j, q) To reduce the power consumption of the Monitor. Transmission [j][q][ ][Set ID][ ][Data][Cr] Data 00: Off 01: Minimum 02: Medium 03: Maximum 05: Screen Off Acknowledgement [q][ ][Set ID][ ][OK/NG][Data][x] 20.
CONTROLLING THE MULTIPLE PRODUCT Transmission [m][j][ ][Set ID][ ][Data1][ ][Data2][ ][Data3][ ] [Data4][ ][Data5][Cr] Data1~5(Priority 1~5) 60: RGB 70: DVI-D 90: HDMI1 91: HDMI2 C0: Display Port * Use 0x70 as data for DVI-D input, 0x90 as data for HDMI1 input, 0x91 as data for HDMI2 input, 0xC0 as data for DisplayPort input, regardless their input labels. 27. PC Power(Command: d, s) To control the PC power when the PC and the monitor are not synchronized.
CONTROLLING THE MULTIPLE PRODUCT 29. Sound Mode(Command: d, y) To adjust the Sound mode. 32. Speaker(Command: d, v) Turn the speaker on or off. ENGLISH ENG Transmission [d][y][ ][Set ID][ ][Data][Cr] Transmission [d][v][ ][Set ID][ ][Data][Cr] Data Structure Data(Hex) Mode 01 Standard 02 Music 03 Cinema 04 Sport 05 Game 06 Vivid 07 User Setting Data 00: Off 01: On Acknowledgement [v][ ][Set ID][ ][OK/NG][Data][x] Acknowledgement [y][ ][Set ID][ ][OK/NG][Data][x] 30.
CONTROLLING THE MULTIPLE PRODUCT Transmission [f][h][ ][Set ID][ ][Data][Cr] Data Min. 00H to Max. 64H : 0~100 seconds * Refer to 'Real data mapping’. Acknowledgement [h][ ][Set ID][ ][OK/NG][Data][x] 36. Language(Command: f, i) Set the OSD language. 38. Reset(Command: f, k) Execute the Picture, Screen and Factory Reset functions. Transmission [f][k][ ][Set ID][ ][Data][Cr] Data 00 : Picture Reset (Reset the values set in the PICTURE menu.
CONTROLLING THE MULTIPLE PRODUCT 41. Serial no.Check(Command: f, y) Check the Serial no. ENGLISH ENG Transmission [f][y][ ][Set ID][ ][Data][Cr] Data FF: Check the Serial no. Acknowledgement [y][ ][Set ID][ ][OK/NG][Data1] to [Data13][x] 44. Time 2(Hours/Minutes/Seconds)(Command: f, x) To set Time 2 (Hours/ Minutes/ Seconds).
CONTROLLING THE MULTIPLE PRODUCT 47. Off Timer(Repeat mode/Time)(Command: f, e) To set Off Time (Repeat mode/Time). Data1 01: Once 02. Daily 03: Mon. - Fri. 04: Mon. - Sat. 05: Sat. - Sun. 06. Every Sunday 07. Every Monday 08. Every Tuesday 09. Every Wednesday 0A. Every Thursday 0B. Every Friday 0C. Every Saturday Data2 00 - 17: 00 - 23 hours Data3 00 - 3B: 00 - 59 minutes * If Time 1, 2 are not set, this command does not work. * Data 1 (07, 08, 09, 0A, 0B, 0C) is displayed as "Select day" on the OSD.
CONTROLLING THE MULTIPLE PRODUCT 48. On Timer(Repeat mode/Time)(Command: f, d) To set On Time (Repeat mode/Time). ENGLISH ENG Transmission [f][d][ ][Set ID][ ][Data1][ ][Data2][ ][Data3][Cr] Data1 01: Once 02. Daily 03: Mon. - Fri. 04: Mon. - Sat. 05: Sat. - Sun. 06. Every Sunday 07. Every Monday 08. Every Tuesday 09. Every Wednesday 0A. Every Thursday 0B. Every Friday 0C.
CONTROLLING THE MULTIPLE PRODUCT 49. On Timer Input(Command: f, u) Select the video input when using On Timer. Data 20: AV 60: RGB 70: DVI-D 90: HDMI1 91: HDMI2 C0: Display Port B0: SuperSign * If the Time 1, 2, and On Time (Repeat mode/Time) are not set, this command does not work. * To set the On Time schedule correctly, the On Timer (Repeat mode/Time) command must be executed prior to this command. Acknowledgement [u][ ][Set ID][ ][OK/NG][Data][x] To check the On Timer Input settings.
CONTROLLING THE MULTIPLE PRODUCT 54. Color Temperature(Command: x, u) To adjust the screen color temperature.
Make sure to read the Safety Precautions before using the product. Keep the Owner's Manual(CD) in an accessible place for future reference. The model and serial number of the SET is located on the back and one side of the SET. Record it below should you ever need service. MODEL SERIAL To obtain the source code under GPL, LGPL, MPL and other open source licenses, that is contained in this product, please visit http:// opensource.lge.com.