OWNER’S MANUAL Blu-ray™/ DVD Home Theater System Please read this manual carefully before operating your set and retain it for future reference.
Getting Started Safety Information 1 CAUTION Getting Started RISK OF ELECTRIC SHOCK DO NOT OPEN CAUTION: TO REDUCE THE RISK OF ELECTRIC SHOCK DO NOT REMOVE COVER (OR BACK) NO USER-SERVICEABLE PARTS INSIDE REFER SERVICING TO QUALIFIED SERVICE PERSONNEL.
Getting Started Disposal of your old appliance 1. When this crossed-out wheeled bin symbol is attached to a product it means the product is covered by the European Directive 2002/96/EC. 3. The correct disposal of your old appliance will help prevent potential negative consequences for the environment and human health. 4. For more detailed information about disposal of your old appliance, please contact your city office, waste disposal service or the shop where you purchased the product.
Getting Started This device is equipped with a portable battery or accumulator. 1 Getting Started Safety way to remove the battery or the battery from the equipment: Remove the old battery or battery pack, follow the steps in reverse order than the assembly. To prevent contamination of the environment and bring on possible threat to human and animal health, the old battery or the battery put it in the appropriate container at designated collection points.
Getting Started 5 Important Notice for TV colour system The colour system of this player differs according to currently playing discs. Only the multi system colour TV can receive all signals output from the player. yy If you have a PAL colour system TV, you will see just distorted images when using discs or video contents recorded in NTSC. yy The multi system colour TV changes the colour system automatically according to input signals.
Table of Contents Table of Contents 1 Getting Started 2 8 8 12 12 12 13 14 15 Safety Information Introduction – Playable Discs and symbols used in this manual – About the “7” Symbol Display – Compatibility Notes – File compatibility – AVCHD (Advanced Video Codec High Definition) – Certain System Requirements – Regional Code – System Select (Optional) Remote control Front panel Rear panel 2 Connecting 16 17 17 18 18 20 20 21 22 22 22 23 23 Positioning the system Speaker Connection – Attaching the
Table of Contents 43 – Open source software notice 6 Appendix 44 Controlling a TV with the Supplied Remote Control – Setting up the remote to control your TV Area Code List Language code List Trademarks and Licenses Audio Output Specifications Specifications Maintenance – Handling the Unit – Notes on Discs 44 45 46 47 49 50 52 52 52 7 1 2 3 4 5 6
Getting Started Introduction 1 Playable Discs and symbols used in this manual Getting Started Media/Term Logo Symbol e Blu-Ray y u i r DVD-ROM Description yy Discs such as movies that can be purchased or rented. yy BD-R/RE discs that are recorded in BDAV format. yy BD-R/RE discs that contain Movie, Music or Photo files. yy ISO 9660+JOLIET, UDF and UDF Bridge format yy Discs such as movies that can be purchased or rented.
Getting Started ,,Note yy Depending on the recording software & the finalization, some recorded discs (CD-R/RW, DVD±R/RW, BD-R/RE) may not be playable. yy BD-R/RE, DVD±R/RW and CD-R/RW discs recorded using a personal computer or a DVD or CD Recorder may not play if the disc is damaged or dirty, or if there is dirt or condensation on the player’s lens.
Getting Started File compatibility Movie files 1 Getting Started File Location File Extension Codec Format Disc, USB “.avi”, “.divx”, “.mpg”, “.mpeg”, “.mkv”, “.mp4”, “.asf”, “.wmv”, “.m4v” (DRM free), “.vob”, “.3gp” DIVX3.xx, DIVX4.xx, DIVX5.xx, DIVX6.xx (Standard playback only), XVID, MPEG1 SS, H.264/MPEG-4 AVC, MPEG2 PS, MPEG2 TS, VC-1 SM (WMV3) Audio Format Dolby Digital, DTS, MP3, WMA, AAC, AC3 Subtitle SubRip (.srt / .txt), SAMI (.smi), SubStation Alpha (.ssa/.txt), MicroDVD (.sub/.
Getting Started ,,Note yy The file name is limited to 180 characters. yy Maximum files/folder: Less than 2 000 (total number of files and folders) yy The file requirements on page 10 are not always compatible. There may have some restrictions by file features. yy This unit cannot support the ID3 Tag embedded MP3 file. yy The total playback time of audio file indicated on the screen may not correct for VBR files. yy HD movie files contained on the CD, DVD or USB 1.0/1.1 may not played properly.
1 Getting Started Certain System Requirements Regional Code For high definition video playback: This unit has a regional code printed on the rear of the unit. This unit can play only BD-ROM or DVD discs labeled same as the rear of the unit or “ALL”. yy High definition display that has HDMI input jack. yy BD-ROM disc with high definition content. Getting Started yy HDMI or HDCP capable DVI input on your display device is required for some content (as specified by disc authors).
Getting Started 13 Remote control FUNCTION • • • • • • c • • • • • • SPEAKER LEVEL: Sets the sound level of desired speaker. SUBTITLE: Selects a subtitle language. 1 (POWER): Switches the player ON or OFF. MUTE: Mute the unit. SLEEP: Sets a certain period of time after which the unit will switch to off. Colored (R, G, Y, B) buttons: - Use to navigate BD-ROM menus. They are also used for [MOVIE], [PHOTO], [MUSIC] menu. - B button: Selects mono/ stereo in FM mode.
Getting Started Front panel 1 Getting Started a Disc tray b Display Window c PORT. IN d USB Port e Operation buttons R (Open / Close) T (Play / Pause) I (Stop) F (Function) Changes the input source or function.
Getting Started 15 Rear panel 1 Getting Started a AC power cord f HDMI OUT TO TV b Speakers connectors g VIDEO OUT c Cooling Fan d Antenna Connector e AUX (L/R) INPUT
C G Connecting 16 F A D 2 A A Positioning the system E A The following illustration shows an example of positioning the system. Note that the illustrations Ain these instructions differ from the actual unit for explanation purposes. For the best possible surround sound, all the speakers other than the subwoofer should be placed at the same distance from the listening position (A). A B C D E F G Connecting B C A A A GB B A yy Before using the subwoofer, remove the protective vinyl.
Connecting 17 Speaker Connection Attaching the speakers to the player 1. To connect the cable to the unit, press each plastic finger pad to open the connection terminals on the unit. Insert the wire and release the finger pad. 2 Connecting Speaker Position Rear Rear right Rear Rear left Center Center Sub woofer Any front position Front Front right Front Front left 2. Connect the black stripe of each wire to the terminals marked - (minus) and the other end to the terminals marked + (plus).
Connecting Connecting to Your TV Make one of the following connections, depending on the capabilities of your existing equipment. yy HDMI connection (page 18) yy Video connection (page 20) 2 HDMI Connection If you have a HDMI TV or monitor, you can connect it to this player using a HDMI cable (Type A, High speed HDMI™ cable with Ethernet). Connect the HDMI jack on the player to the HDMI jack on a HDMI compatible TV or monitor.
Connecting 19 ,,Note yy If a connected HDMI device does not accept the audio output of the player, the HDMI device’s audio sound may be distorted or may not output. yy When you use HDMI connection, you can change the resolution for the HDMI output. (Refer to “Resolution Setting” on page 20.) yy Changing the resolution when the connection has already been established may result in malfunctions. To solve the problem, turn off the player and then turn it on again.
Connecting Video Connection Resolution Setting Connect the VIDEO OUT jack on the player to the video in jack on the TV using a video cable. You can hear the sound through the system’s speakers. The player provides several output resolutions for HDMI OUT jack. You can change the resolution using [Setup] menu. 1. Press HOME ( ). 2. Use A/D to select the [Setup] and press ENTER (b). The [Setup] menu appears. Rear of the unit 3.
Connecting ,,Note yy If your TV does not accept the resolution you have set on the player, you can set resolution to 576p as follows: 1. Press B to open the disc tray. 21 Antenna connection Connect the supplied antenna for listening to the radio. 2 Press Z (STOP) for more than 5 seconds. yy When you set the resolution to 576i with HDMI connection, actual resolution is outputted to 576p. 2 yy If you select a resolution that your TV does not accept, the warning message will appear.
Connecting Connections with external device AUX Connection You can enjoy the sound from an external component through the speakers of this system. 2 Connecting Connect the analog audio output jacks of your component into the AUX L/R (INPUT) on this unit. And then select the [AUX] option by pressing FUNCTION and ENTER (b). PORT. IN connection You can enjoy the sound from your portable audio player through the speakers of this system.
Connecting 23 USB device connection This player can play movie, music and photo files contained in the USB device. Playback content in the USB device 1. Insert a USB device to the USB port until it fits into place. ,,Note yy This player supports USB flash drive/external HDD formatted in FAT16, FAT32 and NTFS when accessing files (music, photo, movie). yy This unit can support up to 4 partitions of the USB device. yy Do not extract the USB device during operation (play, etc.).
System Setting Settings 4. Check all the settings that you have set in the previous steps. Initial Setup When you turn on the unit for the first time, the initial setup wizard appears on the screen. Set the display language, speaker setup on the initial setup wizard. 1. Press 1 (POWER). The initial setup wizard appears on the screen. 2. Use W/S/A/D to select a display language and press ENTER (b). 3 System Setting 3. Press ENTER (b) to verify the test tone signals of the speakers.
System Setting 25 Adjust the Setup Settings [DISPLAY] Menu You can change the settings of the player in the [Setup] menu. TV Aspect Ratio 1. Press HOME ( ). Select a TV aspect ratio option according to your TV type. [4:3 Letter Box] Select when a standard 4:3 TV is connected. Displays theatrical images with masking bars above and below the picture. 2. Use A/D to select the [Setup] and press ENTER (b). The [Setup] menu appears. [4:3 Pan Scan] Select when a standard 4:3 TV is connected.
System Setting Resolution HDMI Color Setting Sets the output resolution of the HDMI video signal. Refer to page 20 for details about the resolution setting. Select the type of output from the HDMI OUT jack. For this setting, please refer to the manuals of your display device. [Auto] [YCbCr] If the HDMI OUT jack is connected to TVs providing display information (EDID), automatically selects the resolution best suited to the connected TV. Select when connecting to a HDMI display device.
System Setting 27 [LANGUAGE] Menu [AUDIO] Menu Display Menu Each disc has a variety of audio output options. Set the player’s Audio options according to the type of audio system you use. Select a language for the [Setup] menu and onscreen display. Disc Menu/Disc Audio/ Disc Subtitle Select the language you prefer for the audio track (disc audio), subtitles, and the disc menu. [Original] Refers to the original language in which the disc was recorded. Press ENTER (b) to select another language.
System Setting Speaker Setup HD AV Sync To obtain the best possible sound, use the speaker setup display to specify the volume of the speakers you have connected and their distance from your listening position. Use the test to adjust the volume of the speakers to the same level. Sometimes Digital TV encounters a delay between picture and sound. If this happens you can compensate by setting a delay on the sound so that it effectively ‘waits’ for the picture to arrive: this is called HD AV Sync.
System Setting 29 [LOCK] Menu DVD Rating The [LOCK] settings affect only BD-ROM and DVD playback. Blocks playback of rated DVD based on their content. (Not all discs are rated.) To access the any features in [LOCK] settings, you must enter the 4-digit security code you have created. If you have not entered a password yet, you are prompted to do so. Enter a 4-digit password twice, and press ENTER (b) to create a new password. Password You can create or change the password.
System Setting [OTHERS] Menu DivX(R) VOD ABOUT DIVX VIDEO: DivX® is a digital video format created by DivX, LLC, a subsidiary of Rovi Corporation. This is an official DivX Certified® device that plays DivX video. Visit divx.com for more information and software tools to convert your files into DivX videos. 3 ABOUT DIVX VIDEO-ON-DEMAND: This DivX Certified® device must be registered in order to play purchased DivX Video-on-Demand (VOD) movies.
System Setting Sound Effect 31 Setting the [User EQ] You can select a suitable sound mode. Press SOUND EFFECT repeatedly until the desired mode appears on the front panel display or the TV screen. The displayed items for the equalizer maybe different depending on sound sources and effects. [Natural Plus]: You can enjoy the natural sound effect same as 5.1 channel. [Natural]: You can enjoy comfortable and natural sound. 1. Use W/S to select the desired frequency.
Operating General Playback Playing a Disc erot Using [HOME] menu 1. Press B (OPEN/CLOSE), and place a disc on the disc tray. The home menu appears when you press HOME ( ). Use A/D to select a category and press ENTER (b). 2. Press B (OPEN/CLOSE) to close the disc tray. For the most Audio CD, BD-ROM and DVD-ROM discs, playback starts automatically. 3. Press HOME ( ). 4. Select [Movie] or [Music] using A/D, and press ENTER (b). 5.
Operating 33 Basic operations for video and audio content Basic operations for photo content To stop playback To play a slide show Press Z (STOP) while playback. Press d (PLAY) to start slide show. To pause playback To stop a slide show Press M (PAUSE) while playback. Press d (PLAY) to resume playback. Press Z (STOP) while slide show. To play frame-by-frame (Video) Press M (PAUSE) while movie playback. Press M (PAUSE) repeatedly to play Frame-by-Frame playback.
Operating Resume playback eroyt u The unit records the point where you pressed the Z (STOP) depending on the disc. If “MZ (Resume Stop)” appears on the screen briefly, press d (PLAY) to resume playback (from the scene point). If you press Z (STOP) twice or unload the disc, “Z(Complete Stop)” appears on the screen. The unit will clear the stopped point. ,,Note yy The resume point may be cleared when a button is pressed (for example; 1 (POWER), B (OPEN/CLOSE), etc).
Operating 35 Repeating a specific portion eroty Changing content list view yui This player can repeat a portion you have selected. On the [Movie], [Music] or [Photo] menu, you can change the content list view. 1. While playback, press REPEAT (h) to select [A-] at the beginning of the portion you wish to repeat. 2. Press ENTER (b) at the end of the portion. Your selected portion will be repeated continually. Method 1 Press red (R) colored button repeatedly. 3.
Operating Selecting a subtitle file y Options while viewing a photo i If the subtitle file name is different from the movie file name, you need to select the subtitle file on the [Movie] menu before playing the movie. You can use various options during viewing a photo in full screen. 1. Use W/S/A/D to select the subtitle file you wish to play in the [Movie] menu. 2. Press ENTER (b). 4 Operating Press ENTER (b) again to deselect the subtitle file.
Operating 37 Listening to music while slide show i You can display photo files while listening to music files. 1. While viewing a photo in full screen, press INFO/ MENU (m) to display the option menu. 2. Use W/S to select [Music Select] option, and press ENTER (b) to display the [Music Select] menu. 3. Use W/S to select a device, and press ENTER (b). 4. Use W/S to select a file or a folder you wish to play. 4 5. Use D to select [OK], and press ENTER (b) to complete music selection.
Operating On-Screen display 2. Select an option using W/S. You can display and adjust various information and settings about the content. 4. Press BACK ( ) to exit the On-Screen display. Displaying content information on-screen eroy 1. While playback, press INFO/MENU (m) to show various playback information.
Operating 39 Playing from selected time eroy Hearing a different audio eroy 1. Press INFO/MENU (m) during playback. The time search box shows the elapsed playing time. 1. During playback, press INFO/MENU (m) to display the On-Screen display. 2. Select the [Time] option and then input the required start time in hours, minutes, and seconds from left to right. 3. Use A/D to select desired audio language, audio track or audio channel.
Operating Changing the TV Aspect Ratio eoy Changing the Picture Mode eroy You can change the TV aspect ratio setting while playback. You can change the [Picture mode] option while playback. 1. During playback, press INFO/MENU (m) to display the On-Screen display. 1. During playback, press INFO/MENU (m) to display the On-Screen display. 2. Use W/S to select the [TV Aspect Ratio] option. 2. Use W/S to select the [Picture Mode] option. 3. Use A/D to select desired option. 4.
Operating Radio Operations Be sure that the antennas are connected. (Refer to the page 21) Listening to the radio 1. Press FUNCTION until TUNER (FM) appears in the display window. The last received station is tuned in. 41 Deleting a saved station 1. Press PRESET (- / +) to select a preset number you want to delete. 2. Press CLEAR, the preset number will blink in the display window. 3. Press CLEAR again, to delete the selected preset number. Deleting all the saved stations 2.
Troubleshooting Troubleshooting General Symptom Cause & Solution The Power does not turned on. yy Plug the power cord into the wall outlet securely. The unit does not start playback. yy Insert a playable disc. (Check the disc type, color system, and regional code.) yy Insert the disc with the playback side down. yy Clean the disc. yy Cancel the Rating function or change the rating level. The angle cannot be changed. yy Multi-angles are not recorded on the DVD Video being played.
Troubleshooting 43 Picture Symptom Cause & Solution There is no picture. yy Select the appropriate video input mode on the TV so the picture from the unit appears on the TV screen. yy Connect the video connection securely. yy Check the [HDMI Color Setting] in the [Setup] menu is set to the appropriate item that conforms to your video connection. yy Your TV may not support the resolution you have set on the player. Change the resolution that your TV accepts.
Appendix Controlling a TV with the Supplied Remote Control You can control your TV using the buttons below. 6 Setting up the remote to control your TV You can operate your TV with the supplied remote control. If your TV is listed in the table below, set the appropriate manufacturer code. 1. While holding down 1 (TV POWER) button, and press the manufacturer code for your TV with the numerical buttons (see the table below).
Appendix 45 Area Code List Choose an area code from this list.
Appendix Language code List Use this list to input your desired language for the following initial settings: [Disc Audio], [Disc Subtitle] and [Disc Menu].
Appendix 47 Trademarks and Licenses Blu-ray Disc™, Blu-ray™, BONUSVIEW™ and the logos are trademarks of the Blu-ray Disc Association. “DVD Logo” is a trademark of DVD Format/Logo Licensing Corporation. Java is a trademark of Oracle and/or its affiliates. HDMI, the HDMI logo and High-Definition Multimedia Interface are trademarks or registered trademarks of HDMI Licensing LLC in the United States and other countries. Manufactured under license under U.S.
Appendix Cinavia Notice This product uses Cinavia technology to limit the use of unauthorized copies of some commerciallyproduced film and videos and their soundtracks. When a prohibited use of an unauthorized copy is detected, a message will be displayed and playback or copying will be interrupted. More information about Cinavia technology is provided at the Cinavia Online Consumer Information Center at http://www.cinavia.com.
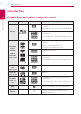
Appendix 49 Audio Output Specifications Jack/Setting Source Dolby Digital HDMI OUT PCM Stereo PCM Multi-Ch DTS Re-encode *3 Bit Stream *1 *2 PCM 2ch PCM 5.1ch DTS Dolby Digital Dolby Digital Plus PCM 2ch PCM 5.1ch DTS Dolby Digital Plus Dolby TrueHD PCM 2ch PCM 5.1ch DTS Dolby TrueHD DTS PCM 2ch PCM 5.1ch DTS DTS DTS-HD PCM 2ch PCM 5.1ch DTS DTS-HD Linear PCM 2ch PCM 2ch PCM 2ch DTS Linear PCM 2ch Linear PCM 5.1ch PCM 2ch PCM 5.1ch DTS Linear PCM 5.1ch Linear PCM 7.
Appendix Specifications General Power requirements Refer to main label. Power consumption Refer to main label. Dimensions (W x H x D) Approx. 360 x 60.5 x 304 mm Net Weight (Approx.) 2.5 kg Operating temperature 5 °C to 35 °C (41 °F to 95 °F) Operating humidity 5 % to 90 % Inputs/Outputs VIDEO OUT 1.0 V (p-p), 75 Ω, sync negative, RCA jack x 1 HDMI OUT (video/audio) 19 pin (Type A, HDMI™ Connector) ANALOG AUDIO IN 2.0 Vrms (1 kHz, 0 dB), 600 Ω, RCA jack (L, R) x 1 PORT. IN 0.
Appendix 51 System Laser Semiconductor laser Wavelength 405 nm / 650 nm Signal system Standard PAL/NTSC color TV system Frequency response 20 Hz to 18 kHz (48 kHz, 96 kHz, 192 kHz sampling) Harmonic distortion Less than 0.05 % Dynamic range More than 80 dB Bus Power Supply (USB) DC 5 V 0 500 mA Speakers Front speaker (Left/ Right) Type 1 Way 1 speaker Max. Input power 84 W Impedance Rated 3Ω Net Dimensions (W x H x D) 92.5 x 115 x 79 mm Input Power 42 W Net Weight 0.
Appendix Maintenance Notes on Discs Handling Discs Handling the Unit When shipping the unit Please save the original shipping carton and packing materials. If you need to ship the unit, for maximum protection, re-pack the unit as it was originally packed at the factory. Keeping the exterior surfaces clean Cleaning the unit To clean the player, use a soft, dry cloth. If the surfaces are extremely dirty, use a soft cloth lightly moistened with a mild detergent solution.