Table of Contents Table of Contents Appendices Troubleshooting.................................................... 34 Usage Notice Safety Instructions.................................................. 2 Replacing the lamp............................................... 39 Computer Compatibility........................................ 40 Product Features.................................................... 5 Configurations of Terminals..................................
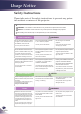
Usage Notice Safety Instructions Please take note of the safety instructions to prevent any potential accident or misuse of the projector. Safety Instructions are given in two forms as detailed below. . . WARNING : The violation of this instruction may cause serious injuries and even death. NOTES : The violation of this instruction may cause injuries or damage to the projector. After reading this manual, keep it in the place that you can access easily.
Usage Notice Power WARNING Never touch the power plug with a wet hand Do not plug-in too many items into one power outlet. Prevent dust from collecting on the power plug pins or outlet. This may cause an electric shockhazard! It may result in overheating of the outlet and create a fire hazard! This may cause a fire hazard! Power NOTES Hold the plug firmly when unplugging. If you pull the cord, it may be damaged.
Usage Notice Using WARNING If the projector is in a room that experiences a gas leak, do not touch the projector. Don’t look at laser beam directly as it can cause eye damage! Alway open the lens door or remove the lens cap when the projector lamp is on. It can cause a fire or a burn by a spark. Using NOTES Do not place heavy objects on top of projector. This may cause mechanical failure orpersonal injury! Do not use any sharp tools on the projector as this will damage the casing.
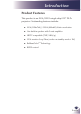
Introduction Product Features This product is an XGA/SVGA single chip 0.55” DLP® projector.
Introduction Package Overview This projector comes with all the items shown below. Check to make sure your unit is complete. Contact your dealer immediately if anything is missing. CR2025 3V N ot e Due to the difference in applications for each country, some regions may have different accessories.
Introduction Product Overview 4 1 7 2 3 4 7 5 6 8 9 Air Flow 1. 2. 3. 4. 5. 6. 7. 8. 9.
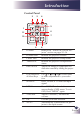
Introduction Connection Ports 1 2 3 4 5 RGB IN S-VIDEO VIDEO RS232C RGB OUT 6 AUDIO-IN Installing and Composition 7 8 1. RGB IN Connector 2. S-VIDEO Connector 3. VIDEO Connector 4. RS232C Service Port 5. RGB OUT Connector 6. AUDIO-IN Jack 7. AC IN 8. KensingtonTM Lock Kensington Security System T his projector has a Kensington Security System Connector on the side panel. Connect the Kensington Security System cable as below.
Introduction Control Panel 2 3 4 5 1 6 11 7 10 Menu 9 8 1 POWER Refer to the “Power On/Off the Projector” section on pages 15~16. 2 POWER LED Indicate the projector’s status. 3 LAMP LED Indicate the projector’s lamp status. 4 TEMP LED Indicate the projector’s temperature status. 5 KEYSTONE Adjust the image to compensate for distortion caused by tilting the projector. 6 Four Directional Select Keys Use or or or to select items or make adjustments to your selection.
Introduction Remote Control 1 N ot e 2 11 S 3 LT C R 20 25 Before using the remote control for the first time, remove the transparent insulation tape. See page 12 for battery installation. O 3V 4 12 13 5 14 15 6 7 16 17 8 18 9 10 N ot e You can only turn the projector on/off with POWER button on the projector. You can operate all of the functions of the projector via the remote control. Make sure not to lose the remote control.
Introduction 7 Auto Automatically synchronize the projector to the input source. 8 Menu Press “Menu” to launch the Onscreen display (OSD), back to the top level of OSD for the OSD main menu operation 9 Keystone Adjust the image to compensate for distortion caused by tilting the projector. 10 AV-Mute Momentarily turn off/on the audio and video. 11 Reset Return the adjustments and settings to the factory default values.
Introduction Remote Control Battery Installation 25 20 M LT Remove the old Lithium coin cell and install new one (CR2025). Ensure that the side with a “+” is facing up. 3V To ensure safe operation, please observe the following precautions : ■ Use CR2025 type battery. ■ Avoid contact with water or liquid. ■ Do not expose the remote control to moisture or heat. ■ Do not drop the remote control. ■ If the battery has leaked in the remote control, carefully wipe the case clean and install new battery.
Installation Connecting the Projector Connect to Computer/Notebook 2 3 4 VGA, DVI AUDIO-IN RGB IN E62405SP S-VIDEO VIDEO RS232C RGB OUT R 5 N ot e Due to the difference in applications for each country, some regions may have different accessories. 1 Monitor Output 1............................................................................................Power cable (supplied) 2..............................................................................................
Installation Connect to Video DVD player, Set-top Box HDTV receiver Video Output 5 3 4 2 AUDIO-IN RGB IN E62405SP S-VIDEO RS232C RGB OUT R 6 N ot e VIDEO 5 1 Due to the difference in applications S-Video Output for each country, some regions may have differ- 1............................................................................................Power cable (supplied) ent accessories. 2..............................................................................................
Installation Powering On/Off the Projector Powering On the Projector 1. Ensure that the power cable and signal cable are securely connected. The POWER LED will turn amber. 2. Remove the lens cap. 3. Turn on the lamp by pressing “POWER” on the control panel or the remote control. The POWER LED will flash green. The startup screen will display in approximately 5 seconds. When disappear startup screen, the POWER LED will turn green. 4. Turn on your source (computer, notebook, video player, etc.
Installation Powering Off the Projector 1. Press the “POWER” to turn off the projector lamp, you will see a message as below on the on-screen display. 2. Press the “POWER” again to confirm. 3. The cooling fan continues to operate for about 120 seconds for cooling cycle and the POWER LED will flash green. When the light stop flashing and turn amber, the projector has entered standby mode.
Installation Warning Indicator When the “TEMP” LED indicator lights red, it indicates the projector has overheated. The projector will automatically shut itself down. When you see the message below displays on-screen, the projector has detected that the lamp is approaching its end of life. Please change the lamp as soon as possible or contact your local dealer or our service center. When the “TEMP” LED indicator flashes red and the message below displays on-screen, it indicates the fan failed.
Installation Adjusting the Projected Image Adjusting the Height of Projector Image The projector is equipped with adjustable feet to raise and lower the image to fill the screen. To raise/lower the image: 1. Use to fine-tune the display angle. N ot e You can raise the projector front up to 3.7 degrees by rotating the adjustable feet. 18 English Front Adjustable feet Maximum Length:9.
Installation Adjusting the Projector Zoom and Focus You may turn the zoom ring to zoom in or out. To focus the image, rotate the focus ring until the image is clear. The projector will focus at distances from 3.94 to 39.36 feet (1.2 to 12.0 meters) with mechanical travel. Zoom Ring Focus Ring Adjusting Projection Image Size H : A = 6.78 B ÷ H x 100% = 115%(Offset) Diagonal H B A Lens Center 40" (101.6cm) 100" (254.0cm) 150" (381.0cm) 200" (508.0cm) 250" (635.0cm) 307" (779.
User Controls On Screen Display The Projector has multilingual On-screen Display menus that allow you to make image adjustments and change a variety of settings. The projector will automatically detect the source. How to operate 1. To open the OSD, press “MENU” on the Remote Control or Control Panel. 2. When OSD is displayed, use keys to select any item in the main menu. While making a selection on a particular page, press or “OK” key to enter sub menu. 3.
User Controls IMAGE Image Mode There are many factory presets optimized for various types of images. Use the or to select the item. Presentation: For computer or notebook. Bright: For bright room. Movie: For home theater. sRGB: For standard color. Blackboard: This mode should be selected to achieve optimum color settings when projecting onto a blackboard (green). Classroom: This mode is recommended for projecting in a classroom. User1/User2: Memorize user’s settings.
User Controls Sharpness Adjust the sharpness of the image. N ot e Press the to decrease the sharpness. Press the to increase the sharpness. Saturation “Sharpness”, “Saturation” and “Tint” Adjust a video image from black and white to fully saturated color. functions are only supported under Video Press the to decrease the amount of color in the image. mode. Press the Tint to increase the amount of color in the image. Adjust the color balance of red and green.
User Controls IMAGE | Advanced Gamma This allows you to choose a gamma table that has been fine-tuned to bring out the best image quality for the input. Film: For home theater. Video: For video or TV source. Graphics: For image source. PC: For computer or notebook. BrilliantColorTM Produces an expanded onscreen color spectrum that delivers enhanced color saturation for bright, true-to-life images. Color Temp. Adjust the color temperature.
User Controls IMAGE | Advanced | Color Color Use these settings for advanced adjustment of the individual Red, Green, Blue, Cyan, Magenta and Yellow Colors. Reset Choose “Yes” to return the factory default settings for “Color” menu. IMAGE | Advanced | Input Input Use this option to enable / disable input sources. Press to enter the sub menu and select which sources you require. Press “OK” to finalize the selection. The projector will not search for inputs that are not selected.
User Controls SCREEN Aspect Ratio Use this function to choose your desired aspect ratio. 4:3: This format is for 4×3 input sources not enhanced for Widescreen TV. 16:9-I: This format is for 16×9 input sources, like HDTV and DVD enhanced for Wide screen TV. (576i/p) 16:9-II: This format is for 16×9 input sources, like HDTV and DVD enhanced for Wide screen TV. (480i/p) Native: This format displays the original image without any scaling.
User Controls D. zoom Adjust the size of projector’s display area. Press the screen. to reduce the size of an image on the projection Press the to magnify an image on the projection screen. H Image Shift Shift the projected image position horizontally. V Image Shift Shift the projected image position vertically. V Keystone N ot e “3D Mode” and “3D Sync. Invert” functions only supports 800x600@120Hz or 1024x768@120Hz PC signal.
User Controls SETTING | Language Language Choose the multilingual OSD. Press into the sub menu and then use the or or or key to select your preferred language. Press “OK” to finalize the selection. SETTING Mounting Front-Desktop The factory default setting. The image is projected straight on the screen. Rear-Desktop Front-Ceiling When you select this function, the projector reverses the image so you can project behind a translucent screen.
User Controls Rear-Ceiling When you select this function, the projector reverses and turns the image upside down at same time. You can project from behind a translucent screen with ceiling mounted projection. Menu Location Choose the menu location on the display screen. Projector ID ID definition can be set up by menu (range 0~99), and allow user control an individual projector by RS232C. Mute Choose “On” to mute the volume. Choose “Off” to restore the volume.
User Controls SETTING | Signal Fine Sync N ot e “Signal” is only supported in Analog VGA (RGB) signal. liminate flicker from the image displayed. Use the E the value. or to adjust Total Dots A djust the number of total dots in one horizontal period. Use the or to adjust number to match your PC image. H. Position (Horizontal Position) Press the to move the image left. Press the to move the image right. V. Position (Vertical Position) Press the Press the to move the image down.
User Controls SETTING | Advanced Logo Use this function to set the desired startup screen. If changes are made they will take effect the next time the projector is powered on. On: LG startup screen. Off: No logo is displayed.
User Controls OPTIONS Input Search When this function is turned “On”, the projector will search for other signals if the current input signal is lost. When this function is turned “Off”, it will only search a specified connection port. High Altitude When “On” is selected, the fans will spin faster. This feature is useful in high altitude areas where the air is thin. Information Hide On: Choose “On” to hide the “searching” message. Off: Choose “Off” to show the “searching” message.
User Controls OPTIONS | Advanced Power Mode Standby: Choose “Standby” to save power dissipation further < 1W. Active: Choose “Active” to return to normal standby mode and the “MONITOR OUT” port will be enabled. Direct Power On Choose “On” to activate Direct Power mode. The projector will automatically power on when AC power is supplied, without pressing the “POWER” key on the projector control panel or “POWER” key on the remote control. Auto Power Off (min) Sets the countdown timer interval.
User Controls OPTIONS | Lamp Settings Lamp Counter (Normal) Display the projection time of normal mode. Lamp Counter (ECO) Display the projection time of ECO mode. Lamp Life Reminder On: Choose “On” to show the lamp end of life warning message. Off: Choose “Off” to hide the lamp end of life warning message. Eco Mode On: Choose “On” to dim the projector lamp which will lower power consumption and extend the lamp life. Off: Choose “Off” to increase the brightness.
Appendices Troubleshooting If you experience trouble with the projector, refer to the following information. If the problem persists, please contact your local dealer or service center. Problem: No image appears on screen Ensure all the cables and power connections are correctly and securely connected as described in the “Installation” section. Ensure the pins of connectors are not crooked or broken. Check if the projection lamp has been securely installed.
Appendices 4. Verify the resolution setting is less than or equal to 1600 x 1200 resolution. 5. Select the “Change” under the “Monitor” tab . 6. Click on “Show all devices”. Next, select “Standard monitor types” under the SP box; choose the resolution mode you need under the “Models” box. If you are using a Notebook: 1. First, follow the steps above to adjust resolution of the computer. 2. Press the toggle output settings.
Appendices Check and reconfigure the display mode of your graphic card to make it compatible with the product. Problem: Image is out of focus Adjust the Focus Ring on the projector lens. Make sure the projection screen is between the required distance 3.94 to 39.36 feet (1.2 to 12.0 meters) from the projector (refer to page 19).
Appendices not turn on until the lamp module has been replaced. To replace the lamp, follow the procedures in the “Replacing the Lamp”.
Appendices Problem: Message Reminders Over temperature - the projector has exceeded its recommended operating temperature and must be allowed to cool down before it may be used. Replacing the lamp - the lamp is about to reach its maximum lifetime. Prepare to replace it soon. Fan failed - the system fan is not working.
Appendices Replacing the lamp The projector will detect the lamp life itself. It will show you a warning message Warning: Lamp compartment may be hot! Allow it to cool down before changing the lamp! When you see this message, please contact your local reseller or service center to change the lamp as soon as possible. Make sure the projector has been cooled down for at least 45 minutes before changing the lamp.
Appendices Computer Compatibility N ot e “*” compressed computer image. Modes VGA If projector does not support the input signal,” Out of display range” message appears on the screen. If the input signal is not in the compatibility table, the image may not be displayed clearly. The 3D function only supports 800x600@120Hz or 1024x768@120Hz PC signal. When projector gets the PC signal is 800x600@120Hz or 1024x768@120Hz, the 3D function will be turned “On” automatically.
Appendices Configurations of Terminals Terminal : Analog RGB (Mini D-sub 15 pin) 5 4 10 15 3 9 14 2 8 13 1 7 12 6 11 1 Red (R/Cr) Input/R Output 9 5V / *** 2 Green (G/Y) Input/G Output 10 Ground (Ver. sync.) 3 Blue (B/Cb) Input/B Output 11 ICP download 4 *** 12 DDC data / *** 5 Ground (Horiz.sync.) 6 Ground (Red) 13 Horiz. sync. Input / Output (Composite H/V sync. Input) 7 Ground (Green) 14 Vert. sync.
Appendices Regulation & Safety Notices This appendix lists the general notices of your projector. FCC notice This device has been tested and found to comply with the limits for a Class B digital device pursuant to Part 15 of the FCC rules. These limits are designed to provide reasonable protection against harmful interference in a residential installation.
Appendices Operation conditions This device complies with Part 15 of the FCC Rules. Operation is subject to the following two conditions: 1. This device may not cause harmful interference and 2. This device must accept any interference received, including interference that may cause undesired operation. Notice: Canadian users This Class B digital apparatus complies with Canadian ICES-003.
Appendices Dimensions 1.75"/44.39mm 1.67"/42.39mm 3.96"/100.60mm 3.47"/88.15mm Lens Center 3.7° Max. 7.56"/192.00mm 11.27"/286.31mm Menu Lens Center 4.67"/118.65mm English 4.94"/125.53mm 0.41"/10.54mm 6.60"/167.66mm 3.03"/77.00mm 2.17"/55.00mm 2.48"/63.00mm 44 Screw Holes for Ceiling Mount Screw: M3 Depth: 0.30~0.39"/7.5~10.0mm 2.28"/57.79mm 3.06"/77.75mm 3.24"/82.30mm 4.33"/110.