MODELS: L8004R, L1004R, CL8000ER IMPORTANT Please read through this manual. It contains valuable information about your air conditioner. This manual may help save time and money by explaining proper air conditioner maintenance and preventing improper use. PRECAUTIONS Pay close attention to precautions in order to prevent potential hazards and damage from misuse or improper installation. LG is not responsible for any damages caused by misuse of the air conditioner.
Window-Type Air Conditioner Owner’s Manual TABLE OF CONTENTS Safety Precautions..........................3 FOR YOUR RECORDS Write the model and serial numbers here: Before Operation .............................7 Model # Serial # Introduction ....................................8 Symbols Used in this Manual ........8 Features ........................................8 Electrical Safety ..............................9 Temporary Use of an Adapter ........................................
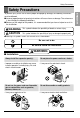
Safety Precautions Safety Precautions WARNING This symbol indicates the possibility of death or serious injury. CAUTION This symbol indicates the possibility of injury or damage to property only. ■ Meanings of symbols used in this manual are as shown below. Be sure not to do. Be sure to follow the instruction. WARNING ■ Installation Always install the expansion panel(s). • Improper assembly or installation may cause incorrect operation, including injury, fire, and electric shock hazards.
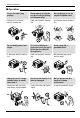
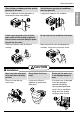
Safety Precautions ■ Operation Plug in the power plug properly. • Otherwise, it will cause electric shock or fire. Do not operate or stop the unit by inserting or pulling out the power plug. Do not damage or use an unspecified power cord. • It will cause electric shock or fire. • It will cause electric shock or fire. ON ON Do not modify power cord length. • It will cause electric shock or fire. Unplug the unit if strange sounds, odors, or smoke come from it.
Safety Precautions Close all doors, windows and other outside openings to the room. • It may cause explosion, fire, and burn. If water enters the product, turn off the the power switch of the main body of appliance. Contact service center after taking the powerplug out from the socket. • It will cause electric shock or failure of machine. Do not clean the air conditioner with water. • Water may enter the unit and degrade the insulation. It may cause an electric shock.
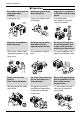
Safety Precautions ■ Operation Be cautious not to touch the sharp edges when installing. • It may cause injury. Sharp edges Unplug the air conditioner before cleaning it. Hold the plug by the head when taking it out. • It may cause electric shock and damage. Do not put a pet or house plant where it will be exposed to direct air flow. • Since the fan rotates at high • This could injury the pet or speed during operation, it may plant. cause injury. Always insert the filter securely.
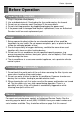
Before Operation Before Operation 1. 2. 3. 4. 5. Plug in the power cord properly. Use a dedicated circuit. Overloading the line could create a fire hazard. Do not use an extension cord. See page 10 for more details. Do not start/stop operation by plugging/unplugging the power cord. If the power cord is damaged and requires replacement, have an Authorized Servicer install an exact replacement part. Usage 1. Being exposed to direct airflow for an extended period of time could be hazardous to your health.
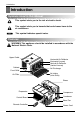
Introduction Introduction Symbols Used in this Manual This symbol alerts you to the risk of electric shock. This symbol alerts you to hazards that could cause harm to the air conditioner. Tip! This symbol indicates special notes. Features WARNING: This appliance should be installed in accordance with the National Electric Code.
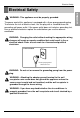
Electrical Safety Electrical Safety The power cord of this appliance is equipped with a three-prong grounding plug. To minimize the risk of electric shock, use the plug with a standard three-slot grounding wall power outlet. If the power outlet does not include a grounding slot, have a qualified electrician replace the outlet before you use the room air conditioner.
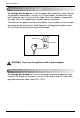
Electrical Safety Temporary Use of an Adapter We strongly discourage the use of an adapter due to potential safety hazards. For temporary connections, use only a UL-listed adapter, available from most local hardware stores. Ensure that the large slot in the adapter is aligned with the large slot in the receptacle for a proper polarity connection. To disconnect the power cord from the adapter, use one hand on each to avoid damaging the ground terminal.
Installation Installation Type C: 1 EA (Drain Joint Pipe) Type D: 3 EA (L Bracket) 16mm 10mm Type B: 5 EA (Wood Screw) Type E: 1 EA (Seal Strip) Type F: 1 EA (Sash Seal) (Adhesive backed) (Not adhesive backed) Type G: 2 EA (Guide Panel) Type H: 1 EA (Support Bracket) Have the following tools available for installation: * Screwdriver (Slotted and Phillips) * Knife * Pencil * Ruler * Hammer * Level Window Requirements Size This room air conditioner is designed for installation in standard double
Installation Clearance Proper clearance enhances the cooling efficiency of the unit and prevents heat radiation of the condenser. 1. If a storm window presents interference, fasten a 2" wide wood strip to the inner window sill across the full width of the sill. The wood strip should be thick enough to raise the height of the window sill so that the unit can be installed without interference by the storm window frame. 2. See Figure. B.
Installation Preparation of Chassis ENGLISH 1. Insert the guide panels into the guides of the air conditioner. Fasten the curtains to the unit with screws (Type A). Type A Tip! : Use a long screwdriver and installing the screws will be easier. Type A 2. Cut the adhesive-backed seal strip (Type E) to the window width. Remove the backing from the seal strip and attach the seal strip to the underside of the bottom window. 3.
Installation Unit Installation Caution: During the following step, hold unit firmly until window sash is lowered to top channel behind side panel frames. Personal injury or property damage may result if unit falls from window. 1. Install the air conditioner in the window 1-1. Carefully lift the air conditioner and slide it into the open window. Make sure the bottom guide of the air conditioner drops into the notches of the L bracket.
Installation Type B Support Bracket (Type H) 4. Window installation of room air conditioner is now completed. See ELECTRICAL DATA for attaching power cord to electrical outlet. Owner’s Manual 15 ENGLISH 3-4. Fasten the support bracket (Type H) using a screw removed from the air conditioner cabinet. Attach the support bracket (Type H) to the inner window sill with a screw (Type B).
Operating Instructions Remote Control Operations The controls look like this: Controls Cool F F1 LOW F2 MED F3 HIGH Energy Saver 6 Fan Dry Timer 4 3 5 TEMP 2 1 1 POWER Operation starts when this button is pressed and stops when you press the button again. 2 FAN SPEED SELECTOR For increased power while cooling, select a higher fan speed. 3 steps: High Low Med 3 ON/OFF TIMER The timer can be set to start and stop the unit in hourly increments (up to 12 hours).
Operating Instructions Remote Controller Power Operation starts when this button is pressed and stops when you press the button again. Temperature Control The thermostat monitors room temperature to maintain the desired temperature. The thermostat can be set between 60 F~86 F (16 C~30 C). The unit takes an average of 30 minutes to adjust the room temperature by 1 F. Power Temp Fan Speed Fan Speed For increased power while cooling, select a higher fan speed.
Operating Instructions Additional Features Air Direction Airflow can be adjusted by changing the direction of the air conditioner's louvers. This can also increase the cooling efficiency of the air conditioner. Adjusting Horizontal Air Flow Direction Adjusting the vertical louvers left and right will change horizontal airflow. Adjusting Vertical Air Flow Direction Adjusting horizontal air flow Adjusting the horizontal vane up and down will change vertical airflow.
Operating Instructions Additional Features ENGLISH Drain Pipe In humid weather, excess water may cause the Base Pan to overflow. To drain the water, remove the Drain Cap and secure the Drain Pipe to the rear hole of the Base Pan. Press the drain pipe into the hole by pushing down and away from the fins to avoid injury. This air conditioner is equipped with a slinger fan. (See drawing, below.) The fan has an outer ring that runs in the water that collects in the base pan if it gets deep.
Maintenance and Service Maintenance and Service Air Filter Check the air filter at least twice a month to see if cleaning is necessary. Trapped particles in the filter can build up and block the airflow, reducing cooling capacity and causing an accumulation of frost on the evaporator. To clean the air filter: Do not force open or open to far. 1. Pull the inlet grille forward. 2. Remove the air filter from the front grille by pulling the air filter up slightly. 3.
Maintenance and Service How to Remove the Front Grille 2. Remove the screw securing the Front Grille. 3. Push the grille up from the bottom and pull the top of the grille away from the case as the top tabs lift out of their slots. Cool F1 LOW F2 MED F3 HIGH Energy Saver F Fan Dry Timer TEMP Owner ,s Manual 21 ENGLISH 1.
Maintenance and Service Common Problems and Solutions Before Calling for Service If you have problems with your air conditioner, read the following information and try to solve the problem. If you cannot find a solution, turn off the air conditioner and contact your dealer. Air conditioner does not operate 1. Ensure that the air conditioner is plugged into a proper outlet. 2. Check the fuse or circuit breaker. 3. Check whether the voltage is unusually high or low.
Maintenance and Service Troubleshooting Problem Air conditioner does not start Air conditioner does not cool as it should Possible Causes What To Do ■ The air conditioner is unplugged. • Make sure the air conditioner plug is pushed completely into the outlet. ■ The fuse is blown/circuit breaker is tripped. • Check the house fuse/circuit breaker box and replace the fuse or reset the breaker. ■ Power failure. • If power failure occurs, turn the mode control to Off.
Room Air Conditioner
Manual del usuario del acondicionador de aire tipo Ventana TABLA DE CONTENIDOS Precauciones de Seguridad .........26 Antes de poner en marcha...........30 Escriba aquí el modelo y número de serie: Modelo n°: Serie n°: Puede encontrar los números en la etiqueta de la parte lateral del producto. Nombre del distribuidor: Fecha de compra: Seguridad Eléctrica ......................32 Uso Transitorio de un Adaptador .....................................33 Uso Temporal de un Cable Alargador ....................
Precauciones de Seguridad Precauciones de Seguridad Para prevenir tanto lesiones al usuario u otras personas como daños materiales, es preciso seguir estas instrucciones. ■ La incorrecta operación del aparato como consecuencia de ignorar las instrucciones provocará daños o lesiones. ■ A cause del peso pesado del producto, se recomienda que usted tenga a un ayudante a participa en la instalación. ADVERTENCIA Este símbolo indica la posibilidad de lesiones mortales o graves.
Precauciones de Seguridad ■ Funcionamiento Enchufe la corriente adecuadamente. • De otro modo, causará descarga eléctrica o incendio. No haga funcionar o detenga la unidad insertando o tirando del enchufe. No dañe ni use un cable no especificado. • Causará descarga eléctrica o incendio. • Causará descarga eléctrica o incendio. ON ESPAÑOL No modifique la longitud del cable de corriente eléctrica. Use el aparato de aire acondicionado en un solo circuito. (Consulte la página 30).
Precauciones de Seguridad Cierre todas las puertas, ventanas y otras aberturas de la sala. • El aparato de aire acondicionado debe operarse en un área cerrada para ser más efectivo. Si entra agua a la unidad, gire el interruptor principal del artefacto. Tome contacto con el centro de servicio después de desconectar el enchufe del tomacorriente. • Causará descarga eléctrica o incendio. Ventile antes de hacer funcionar el acondicionador de aire cuando sale el gas.
Precauciones de Seguridad ■ Funcionamiento Al momento de su instalación, evite que se contacte con los bordes afilados. • Hay riesgo de lesiones personales. Sostenga el enchufe por el cuerpo (no del cable) cuando lo saque. • Puede causar descarga eléctrica y daño. Desenchufe el aparato de aire acondicionado si no va a utilizarlo durante un largo período de tiempo. • Gastará energía en vano y podría provocar un accidente.
Previo al Funcionamiento Antes de poner en marcha Preparar para el funcionamiento 1. Coloque el enchufe correctamente. 2. Use un único circuito para este aparato. Recargar el circuito podría provocar un riesgo de incendios. 3. No utilice un alargador. Consulte la página 33 para más detalles. 4. No arranque/detenga el funcionamiento enchufando/desenchufando el cable de corriente eléctrica. 5. Si el alargador está dañado y ha de ser recambiado, solicite a un técnico autorizado que instale un recambio exacto.
Introducción Introducción Símbolos Utilizados en Este Manual Este símbolo lo advierte de un peligro de accidente por corriente eléctrica. CONSEJO Este símbolo significa condicciones especiales. Características ADVERTENCIA : Este aparato debería instalarse de acuerdo con las normas del Código Eléctrico Nacional.
Seguridad Eléctrica Seguridad Eléctrica Este equipo debe estar puesto a tierra debidamente. El cable de alimentación está equipado de una toma de tierra con tres pins. Para minimizar el peligro de una lesión por corriente eléctrica, utilice una toma con enchufe de tierra estándar con tres contactos. Si el enchufe de pared no contiene un borne de tierra, antes de usar el ventilador haga cambiar el enchufe por un electricista.
Seguridad Eléctrica Uso Transitorio de un Adaptador Debido a eventuales peligros de seguridad no recomendamos en absoluto el uso de un adaptador. Sólo para una conexión transitoria se puede usar el adaptador clasificado como UL que está a disposición en la mayoría de las tiendas de productos eléctricos. Atienda que e orificio grande en el adaptador corresponda al orificio grande en el enchufe para lograr la conexión con la polaridad correcta.
Instalación Instalación Tipo B: 5 (Tornillo Mediano) Tipo D: 3 (El Paréntesis L) Tipo C:1 (Tube de Drenaje) 16mm 10mm Tipo A: 11 (Tornillo corto) Tipo E: 1 (Banda Adhesiva) Tipo F: 1 (Banda del Marco) (Adhesivo posterior) (No adhesivo posterior) Tipo G: 2 (Panel Guía) Tipo H: 1 (Sostenga Paréntesis) Para la instalación debería tener a disposición los instrumentos siguientes: * Destornillador (Estrella y Phillips) * Regla * Cucjillo * Martillo * Lápiz Nivel Requerimientos de Ventana Tamaño
Instalación Espacio libre El suficiente espacio libre aumenta la eficiencia de refrigeración de la unidad e impide la irradiación del calor del condensador. 2. Ver Figura. B. La parte superior de la tira de madera debe estar aproximadamente a 3/4 de pulg más alta que el marco de la sobre ventana, (storm window) para ayudar a que el agua de condensación de la unidad fluya hacia afuera. 3. Instale una segunda tira de madera (aproximadamente 6 pulg.
Instalación Preparación de la Carcasa 1. Introduzca los paneles en los guías del aire acondicionado. Las cortinas atorníllelas con los tornillos (Tipo A). Tipo A CONSEJO Use un atornillador largo. Así le será más fácil instalar los tornillos. Tipo A 2. Corte la banda adhesiva (Tipo E) y colóquela del ancho de la ventana. Remueva el plástico de la banda adhesiva y colóquela en la parte superior de el marco inferior de la ventana. 3.
Instalación Instalación de la Unidad Precautión: En las siguientes instrucciones, sostenga la unidad firmemente hasta que la parte corrediza de la ventana descanse sobre la parte superior del canal y por detrás del marco de los paneles corredizos. Puede haber lesiones o daños si la unidad se cae de la ventana. 1.
Instalación 3-4. Amarre la escuadra de soporte (Tipo H) usando un tornillo que puede sacar del cabinete del aparato de aire acondicionado. Acople la escuadra (Tipo H) a la parte interior de la repisa de la ventana con un tornillo (Tipo B). Tipo B Sostenga Parentesis (Tipo H) 4. La instalación del aire acondicionado de ventana no estará completa. Vea SEGURIDAD ELECTRICA para conectar la extensión eléctrica al toma corriente.
Instrucciones de funcionamiento Funcionamiento del control remoto Cool ˚F F1 LOW F2 MED F3 HIGH Energy Saver 6 Fan Dry 3 TEMP 2 5 1 1 POWER (encendido) El funcionamiento se inicia cuando se pulsa esta tecla y se detiene cuando se la presiona nuevamente. 2 SELECTOR DE VELOCIDAD DEL VENTILADOR (FAN SPEED) Para aumentar la capacidad mientras se refresca, seleccione una mayor velocidad del ventilador.
Instrucciones de funcionamiento Control Remoto CAUTION: The Remote Controller will not function properly if strong light strikes the sensor window of the air conditioner or if there are obstacles between the Remote Controller and the air conditioner. POWER (encendido) El funcionamiento se inicia cuando se pulsa esta tecla y se detiene cuando se la presiona nuevamente. CONTROL DE TEMPERATURA Power El termostato monitorea la temperatura de la habitación para mantener la temperatura deseada.
Instrucciones de funcionamiento Ajustar la dirección del flujo de aire El flujo de aire puede ser ajustado cambiando la dirección de las rejillas de ventilación del acondicionador deaire. Esto puede también incrementar la eficacia del acondicionador de aire. Ajustar la dirección del flujo de aire vertical Ajustar el álabe horizontal hacia arriba y abajocambiará el flujo de aire vertical. El álabe puedeser ajustado moviendo la parte posterior del álabehacia arriba o abajo.
Operating Instructions Adicionales e Características Tubo de Desagüe En climas húmedos, es posible que la Bandeja Evaporadora se llenne de agua. Para quitar el agua acumulado, es preciso conectar el tubo de desagüe. Quite la Tapa del Desagüe y conecte el Tubo a la Bandeja Evaporadora. Este aparato de aire acondicionado va equipado con un ventilador de extracción. (Véase la ilustración de abajo).
Mantenimiento y servicio Mantenimiento y servicio Filtro de Aire Revise por lo menos dos veces al mes si no es necesario limpiar el filtro de aire. Las partículas detenidad se pueden acumular en el filtro impidiendo el flujo del aire, limitando el rendimiento de enfriamiento y causando la acumulación de hielo en el evaporador. Proceder de la limpieza del filtro de aire: ESPAÑOL No debe forzar a abrir o abrir a lo lejos. 1. Levante la rejilla de entrada 2.
Mantenimiento y servicio Como Remover la Parilla Frontal 1. Tire de la rejilla de entrada hacia delante agarrando ambas lengüetas y tire del filtro del aire hasta sacarlo. 2. Saque el tornillo que asegura la Parrilla Frontal. 3. Suelte el lado izquierdo primero. Después cuidadosamente hale desde la parte de arriba y empuje hacia la derecha. Las lengüetas están aseguradas.
Mantenimiento y servicio Problemas y Soluciones habituales Antes de Llamar el Servicio de Asistencia Técnica Si tiene problemas con su ventilador, lea las informaciones siguientes y trate de resolver el problema. Si no puede encontrar la solución, desconecte el ventilador y diríjase a su suministrador. El ventilador no funciona 1. Compruebe que el ventilador esté conectado en un enchufe correcto. 3. Compruebe que la tensión no sea demasiado alta o baja.
Mantenimiento y servicio Resolución de problemas El acondicionador de aire puede estar funcionando anormalmente cuando: Problema Causas posibles ■ El aire acondicionado está desconectado. ■ El fusible está quemado/el El aire interruptor de energía se ha acondiciona bloqueado. do no enciende ■ Falta de energía. Qué hacer • Asegúrese que ei aire acondicionado está conectado completamente a la fuente de energia.
LG ROOM AIR CONDITIONER LIMITED WARRANTY - USA LG Electronics Inc. will repair or at its option replace, without charge, your product if it proves to be defective in material or workmanship under normal use during the warranty period set forth below, effective from the date of original consumer purchase of the product. This limited warranty is good only to the original purchaser of the product and effective only when used in the United States including Alaska, Hawaii, and U.S. Territories.