ENGLISH OWNER'S MANUAL CINEMA 3D MONITOR Please read the safety information carefully before using the product. List of Cinema 3D Monitor Models DX2343 D2343P DX2743 D2743P www.lg.
TABLE OF CONTENTS ENGLISH ENG TABLE OF CONTENTS 3 ASSEMBLING AND PREPARING 23 TROUBLESHOOTING 3 Product Components 4 Component and Button Description 25 5 Monitor Installation TROUBLESHOOTING WHEN USING 3D MODE 5 - Assembling the stand base 6 - Detaching the stand base - Installing on a table 26 SPECIFICATIONS 7 7 - Using the cable holder 28 Preset Mode 9 - Installing on a wall 28 HDMI video 3D timing 29 HDMI timing 10 USING THE MONITOR SET 29 POWER INDICATOR 10 Connect
ASSEMBLING AND PREPARING Product Components Please check whether all the components are included in the box before using the product. If there are missing components, contact the retail store where you purchased the product. Note that the product and components may look different from those shown here. Owner's Manual CD/Cards D-Sub Signal Cable DVI-D Signal Cable (This feature is not available in all countries.
ASSEMBLING AND PREPARING Component and Button Description ENGLISH ENG Power Indicator On: Power is on yy Off: Power is off yy (Power Button) Monitor Setting Buttons (See p.12) Input Connectors (See p.
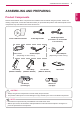
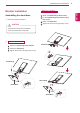
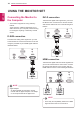
ASSEMBLING AND PREPARING Monitor Installation 1 Place the monitor face down. DX2743 / D2743P 1 Attach the stand body to the monitor. 2 Fix the stand body to the monitor using two screws. 3 Attach the stand base. CAUTION 4 Tighten the screw to the right using a coin. To protect the screen from scratches, cover the surface with a soft cloth. 2 DX2343 / D2343P 1 Attach the stand body to the monitor. Stand Body 2 Attach the stand base. 3 Tighten the screw to the right using a coin.
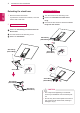
ASSEMBLING AND PREPARING Detaching the stand base ENGLISH ENG 1 Place the monitor face down. To protect the screen from scratches, cover the surface with a soft cloth. 2 DX2743 / D2743P 1 Turn the screws to the left using a coin. 2 Detach the stand base from the stand body. 3 Unscrew the two screws to detach the stand DX2343 / D2343P body from the monitor. 1 Detach the stand body and stand base from the monitor. 2 Turn the screws to the left using a coin. 3 Detach the stand base.
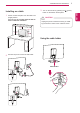
ASSEMBLING AND PREPARING 3 Turn on the monitor by pressing the Installing on a table (power) 1 Lift the monitor and place it on the table in an Install at least 10 cm away from the wall to ensure sufficient ventilation. CAUTION Unplug the power cord before moving or installing the monitor. There is risk of electric shock. 10 cm 10 cm 10 cm 10 cm Using the cable holder 2 Connect the power cord to the wall outlet. Cable Holder or ENG ENGLISH button on the bottom switch panel. upright position.
ASSEMBLING AND PREPARING Using the Kensington security lock WARNING ENGLISH ENG To avoid injury to the fingers when adjusting the screen, do not hold the lower part of the monitor's frame as illustrated below. The Kensington lock connector is located at the rear of the monitor. For more information on installation and usage, refer to the Kensington lock user manual or visit the website: http://www.kensington.com. Connect the monitor to the table with the Kensington lock cable.
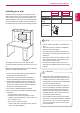
ASSEMBLING AND PREPARING Installing on a wall MODELS VESA (A x B) Stand Screw Required Screw Wall Mount Plate (Optional) 75 x 75 M4 4 DX2743 D2743P 100 x 100 M4 4 RW120 10 cm 10 cm 10 cm 10 cm To install the monitor to the wall, attach a wall mounting bracket (optional) to the back of the monitor. Make sure that the wall mounting bracket is securely fixed to the monitor and to the wall. . 1 Use the screws and wall mounting bracket that comply with the VESA standard.
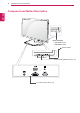
USING THE MONITOR SET ENGLISH ENG USING THE MONITOR SET Connecting the Monitor to the Computer This monitor supports the *Plug and Play yy feature. *Plug and Play: A feature that allows you to add a device to your computer, without having to reconfigure anything or install any manual drivers. DVI-D connection Transmits the digital video signal from your PC to the Monitor set. Connect the PC and the monitor with the DVI cable as shown in the following illustrations.
USING THE MONITOR SET CAUTION NOTE If you want to connect two computers to the yy monitor, connect signal cables (D-SUB/DVID/HDMI) to each computer. When using D-SUB or DVI input, earphones yy cannot be used to play sound. Instead, connect speakers to your PC's audio output. When connecting the power cord to the outyy let, use a grounded (3-hole) multi-socket or a grounded wall outlet. The monitor may flicker when turned on in an yy area of low temperature. This is normal.
CUSTOMIZING SETTINGS ENGLISH ENG CUSTOMIZING SETTINGS 1 Press a button at the bottom of the monitor. 2 Use the ◄, ►, and ▼ buttons to adjust options. To return to the upper menu or set other menu items, use the up arrow ( ) button. 3 Select EXIT to leave the OSD menu. Monitor Setting Buttons Button MENU ( Description ) Activates the main menu. (See p. ��) OSD LOCKED/UNLOCKED Locks/unlocks the OSD screen. yy To lock the OSD screen, press and hold the MENU button for several seconds.
MENU CUSTOMIZING SETTINGS 13 1)29 " 2)<8 1)29 " '3036 BRIGHTNESS CONTRAST WIDE/ORIGINAL WIDE CUSTOMIZING SETTINGS RESET MENU NO +%11% +%11% '3036 8)14 '97831 6)( 1)29 " MENU Settings ENG ENGLISH BRIGHTNESS +6))2 CONTRAST NEXT MENU &09) 1 To display the OSD MENU, press the MENU button at the bottom of the monitor. WIDE/ORIGINAL WIDE RESET NO 2 Press the ◄, ►, or ▼ button to change settings. + ' NEXT MENU 3 To set up more options, go to the "NEXT MENU" menu.
WIDE/ORIGINAL 14 RESET WIDE '3036 8)14 '97831 NO 6)( CUSTOMIZING SETTINGS +6))2 NEXT MENU &09) PICTURE ENGLISH ENG 1 To display the OSD MENU, press the MENU button at the bottom of the monitor. 2 In the OSD menu, go to the "NEXT MENU" menu. 1)29 " 2)<8 1)29 " 4-'896) button to go to the PICTURE settings. 3 Press the ▼ SUPER ENERGY SAVING IS 7,%642)77 ACTIVE YOU,SAVED ► , 0.00 or TREES ▼ button to change settings.
CUSTOMIZING SETTINGS 15 COLOR ENG ENGLISH 1 To display the OSD MENU, press the MENU button at the bottom of the monitor. MENU go to the "NEXT MENU" menu. 2 In the OSD menu, BRIGHTNESS 1)29 " 2)<8 1)29 " '3036 CONTRAST to select COLOR menu. 3 Press the ► button WIDE/ORIGINAL WIDE to go to the COLOR settings. 4 Press the ▼ button NO RESET +%11% +%11% '3036 8)14 '97831 6)( 5 Press the ◄ , ► , or ▼ button to change settings. +6))2 menu.
CUSTOMIZING SETTINGS DISPLAY ENGLISH ENG 1 To display the OSD MENU, press the MENU button at the bottom of the monitor. 1)29 " 2)<8 1)29 " '3036 menu, go to the "NEXT MENU" menu. 2 In the OSD 1)29 " 2)<8 1)29 " (-740%= button to select DISPLAY menu. 3 Press the ► +%11% +%11% '3036 8)14 ,36->328%0 '97831 4 Press the ▼ button to go to the DISPLAY settings. :)68-'%0 '03'/ 6)( , or ▼ button to change settings. 5 Press the ◄ , ►+6))2 4,%7) &09) the OSD menu.
CUSTOMIZING SETTINGS 17 OTHERS ENG ENGLISH 1 To display the OSD MENU, press the MENU button at the bottom of the monitor. 1)29 " 2)<8 1)29 " :3091) go to the "NEXT MENU" menu. 2 In the OSD menu, 1)29 " 2)<8 1)29 " 38,)67 to select OTHERS menu. 3 Press the ► button :3091) 0%2+9%+) 4 Press the ▼ button to move to OTHERS settings. *92' " ( 7)88-2+7 ( 13() % % ) button. ( '3036 )**)'8 32 ( ()48, 32 3** 6)7)8 Each option is explained below.
CUSTOMIZING SETTINGS FUNC. Settings ENGLISH ENG 3D SETTINGS 1 To display the 3D OSD, press the FUNC. button at the bottom of the monitor. *92' " ( 7)88-2+7 2 Press the ◄ , ► , or ▼ button to change settings. * ( 13() % % 32 3 Select EXIT to leave the OSD menu. To return to the upper menu or set other menu items, use the up arrow ( ) button. ( '3036 )**)'8 ( ()48, 7 % 4 ' ( 0 6 ',%2+) Each option is explained below. FUNC.
CUSTOMIZING SETTINGS 19 Setting Dual Play 2 To start Dual Play mode, press the FUNC. button at the bottom of the monitor. 3 Select the screen split mode supported by the game. 4 Put on the Dual Play glasses to enjoy game. NOTE What is Dual Play mode? yy When playing a 1:1 battle game with a game console, such as Playstation, XBox and Wii, users used to play the game with the screen divided top and bottom or side by side. With Dual Play mode, each player can enjoy the game with a full screen.
CUSTOMIZING SETTINGS *92' " ( 7)88-2+7 *92' " ( 7)88-2+7 ( 13() ( 13() *92' " 794)6 )2)6+= 7%:-2+ *92' " 794)6 )2)6+= 7%:-2+ % % PICUTRE MODE % % 794)6 )2)6+= 7%:-2+ -7 794)6 )2)6+= 7%:-2+ -7 %'8-:) %'8-:) ENGLISH ENG =39 7%:)( 86))7 =39 7%:)( 86))7 43;)6 6)(9'8-32 43;)6 6)(9'8-32 '3 6)(9'8-32 '3 6)(9'8-32 32 3** 32 the PICTURE MODE OSD, the FUNC. button at the bottom of the monitor.
CUSTOMIZING SETTINGS '97831 8)<8 4,383 '-2)1% +%1) 21 '9783 SUPER+ RESOLUTION ENG ENGLISH 1 To display SUPER+ RESOLUTION OSD, press the FUNC. button at the bottom of the monitor. 2 Press the ◄ , ► , or ▼ button to change settings. *92' " 794)6 6)73098-32 3 Select EXIT to leave the OSD menu. 3** 03; 1)(-91 ,-+, Each option is explained below. FUNC. > SUPER+ RESOLUTION Description OFF Select this option for everyday viewing. SUPER+RESOLUTION is turned off in this mode.
CUSTOMIZING SETTINGS SUPER ENERGY SAVING ENGLISH ENG 1 To display SUPER ENERGY SAVING OSD, press the FUNC. button at the bottom of the monitor. *92' " ( 7)88-2+7 *92' " 794)6 )2)6+= 7%:-2+ ▼ button to change settings. 2 Press the ◄ , ► , or ( 13() % % 794)6 )2)6+= 7%:-2+ -7 %'8-:) 3 Select EXIT to leave the OSD menu. ( '3036 )**)'8 =39 7%:)( 86))7 32 ( ()48, 43;)6 6)(9'8-32 '3 6)(9'8-32 32 3** ( 0 6 ',%2+) 6)7)8 Each option is explained below. FUNC.
TROUBLESHOOTING 23 Nothing is displayed on the screen Is the monitor's power cord plugged in? yy Check if the power cord is correctly plugged in to the outlet. Is the power indicator on? yy Check the power indicator. Is the power indicator displaying as red? yy Adjust the brightness and the contrast. yy Connect the signal cable to your computer. yy If the signal cable is connected, make sure that your computer is turned on.
TROUBLESHOOTING The image is displayed abnormally. ENGLISH ENG Does the display area appear uncentered? Pressing the AUTO button will automatically optimize the screen to the current display mode. Does the screen exhibit vertical lines? Pressing the AUTO button will automatically optimize the screen to the current display mode. Does the screen display horizontal Pressing the AUTO button will automatically optimize the screen to the current frequencies, or does the text appear display mode.
TROUBLESHOOTING 25 I can see a swirling oil-like pattern on the screen when the monitor is turned off. yy This is caused by the interference of external light in the air layer between the LCD surface and 3D filter. The pattern becomes almost invisible when you turn on the monitor. Images displayed are not in 3D. yy When you view 3D images with this monitor, it is very important that you use the glasses provided with the monitor.
SPECIFICATIONS ENGLISH ENG SPECIFICATIONS DX2343 D2343P LCD Panel Type Resolution Pixel Pitch Maximum Resolution Video Signal Recommended Resolution Horizontal Frequency Vertical Frequency 584 mm (23 inch) TFT (Thin Film Transistor) LCD (Liquid Crystal Display) Panel Diagonal length of the screen: 686 mm 0.2652 mm x 0.
SPECIFICATIONS DX2743 D2743P Type Resolution Pixel Pitch Maximum Resolution Recommended Resolution Horizontal Frequency Vertical Frequency 686 mm (27 inch) TFT (Thin Film Transistor) LCD (Liquid Crystal Display) Panel Diagonal length of the screen: 686 mm 0.3114 mm x 0.3114 mm D-Sub (Analog): 1920 x 1080 @ 60 Hz DVI (Digital) / HDMI: 1920 x 1080 @ 60 Hz 1920 x 1080 @ 60 Hz 30 kHz to 83 kHz 56Hz to 75Hz (D-Sub, DVI-D) 56Hz to 61Hz (HDMI) Synchronization Separate Sync.
SPECIFICATIONS Preset Mode ENGLISH ENG Preset Mode Horizontal Frequency (kHz) Vertical Frequency (Hz) Polarity (H/V) Remark 720 x 400 31.468 70 -/+ 640 x 480 31.469 60 -/- 640 x 480 37.500 75 -/- 800 x 600 37.879 60 +/+ 800 x 600 46.875 75 +/+ 1024 x 768 48.363 60 -/- 1024 x 768 60.023 75 +/+ * 1152 x 864 67.500 75 +/+ * 1280 x 1024 63.981 60 +/+ 1280 x 1024 79.976 75 +/+ 1680 x 1050 65.290 60 -/+ 1920 x 1080 67.
SPECIFICATIONS 29 HDMI timing Horizontal Frequency (kHz) Vertical Frequency (Hz) 576P 31.25 50 720P 37.5 50 720P 45 60 1080i 28.12 50 1080i 33.75 60 1080P 56.25 50 1080P 67.
SPECIFICATIONS ENGLISH ENG CAUTION WHEN WATCHING 3D VIDEO When watching 3D video If you watch 3D images too closely for a long period of time, this may cause blurred vision. If you watch 3D images for a long time, you may feel dizzy or experience eye fatigue. If you are pregnant, a senior, drunk, have heart problems, or easily feel motion sickness, we recommend that you do not watch 3D images. Because 3D images can be recognized as real, some viewers may get surprised or overexcited.
PROPER POSTURE 31 ENG ENGLISH PROPER POSTURE Proper Posture for Using the Monitor Adjust your distance from the monitor to allow you to view images from the optimal distance (L). Adjust the monitor and your posture to allow you to view images at the optimal viewing angle (D). Adjust the position of the screen to minimize reflections. Place your hands gently on the keyboard, keeping your arms bent at the elbows and extended horizontally in front of you.
Make sure to read the Safety Precautions before using the product. Keep the Owner’s Manual (CD) in an accessible place for future reference. The model and serial number of the SET is located on the back and one side of the SET. Record it below should you ever need service. MODEL SERIAL ENERGY STAR is a set of power-saving guidelines issued by the U.S. Environmental Protection Agency (EPA). As an ENERGY STAR Partner LGE U. S. A.,Inc.