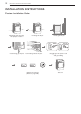
2 INSTALLATION INSTRUCTIONS INSTALLATION INSTRUCTIONS Preview Installation Order Checking and choosing the proper location Leveling the dryer Venting the dryer 120V Connecting gas dryers Connecting electric dryers Exhaust check test (Refer to page 30.
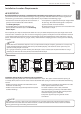
INSTALLATION INSTRUCTIONS 13 Installation Location Requirements Read all installation instructions completely before installing and operating your dryer! It is important that you review this entire manual before installing and using your dryer. Detailed instructions concerning electrical connections, gas connections, and exhaust requirements are provided on the following pages. •A location that allows for proper exhaust installation. A gas dryer must be exhausted to the outdoors. See Venting the dryer.
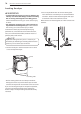
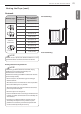
14 INSTALLATION INSTRUCTIONS Installation location requirements (Cont.) wWarning Read all installation instructions completely before installing and operating your dryer! 81.6 " It is important that you review this entire manual before installing and using your dryer. Detailed instructions concerning electrical (207.2 cm) connections, gas connections, and exhaust requirements are provided on the following pages. • A location that allows for proper exhaust installation.
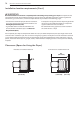
INSTALLATION INSTRUCTIONS Installation with optional pedestal base or stacking kit 7"* (17.8 cm) 14" max.* (35,6 cm) 18" min.* (45,7 cm) 7"* (17.8 cm) ENGLISH Recommended installation spacing for cabinet installation • F or cabinet installation with a door, minimum ventilation openings in the top of the cabinet are required. *Required spacing 15 1"* 32,1" 5"** 1"* 32,1" (81,4 cm) (12,71"* (2,5 cm)5"** cm) (2,5 cm) (81,4 cm) (12,7 cm) (2,5 cm) ** For side or bottom venting, 2 inches (5.
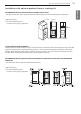
16 INSTALLATION INSTRUCTIONS Leveling the dryer wWarning • To reduce the risk of injury to persons, adhere to all industry recommended safety procedures including the use of long sleeved gloves and safety glasses. Failure to follow this warning can cause serious injury or death. • The appliances are heavy. Two or more people are required when installing the dryer. Failure to follow this warning can cause serious injury or death.
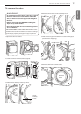
INSTALLATION INSTRUCTIONS 17 To remove the door Latch Screw • Always reverse the door BEFORE stacking the dryer on top of the washer. • Avoid dropping the door to avoid damage to the door or the floor. THE DRYER DOOR IS VERY LARGE AND HEAVY. Failure to follow the instructions below can result in damage to the dryer, property damage or injury to persons. 1. Open the door to reverse. 5. Hold on the hinge while remove 2 screws of hinge (to prevent door dropping). Hinge Screw Open Door 2.
18 INSTALLATION INSTRUCTIONS To install the door 4. Screw down four dummy screws right side. wWarning • To avoid damage to the dryer or the door, support the door with a stool or box that fits under the door, or have an assistant support the weight of the door. Hinge Dummy Screw • Always reverse the door BEFORE stacking the dryer on top of the washer. • Avoid dropping the door to avoid damage to the door or the floor. THE DRYER DOOR IS VERY LARGE AND HEAVY.
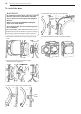
INSTALLATION INSTRUCTIONS 19 Installing the Side Vent Kit • Use a heavy metal vent. • Do not use plastic or thin foil duct. • Clean old ducts before installing this dryer. • To reduce the risk of injury to persons, adhere to all industry recommended safety procedures including the use of long sleeved gloves and safety glasses. • F ailure to follow all of the safety warnings in this manual could result in property damage, injury to persons, or death. 3. P reassemble a 4 inches (10.
20 INSTALLATION INSTRUCTIONS Venting the Dryer wWarning To reduce the risk of fire, electric shock, or injury to persons when using this appliance, follow basic precautions, including the following: • Do not crush or collapse ductwork. Failure to follow these instructions can result in fire or death. • Do not allow ductwork to rest on or contact sharp objects. Failure to follow these instructions can result in fire or death.
INSTALLATION INSTRUCTIONS 21 Venting the Dryer (cont.) Wall Cap Type Number Of 90° Elbows Maximum Length Of 4-inch Diameter Rigid Metal Duct Recommended 0 65 ft. (19.8 m) 1 55 ft. (16.8 m) 2 47 ft. (14.3 m) 3 36 ft. (11.0 m) 4 28 ft. (8.5 m) 0 55 ft. (16.8 m) 1 47 ft. (14.3 m ) 2 41 ft. (12.5 m) 3 30 ft. (9.1 m) 4 22 ft. (6.7 m) 4” (10.2 cm) 4” (10.2 cm) Use only for short run installations 22/4” (6.35 cm) NOTE educt 6 ft. (1.8 m) for each additional elbow.
22 INSTALLATION INSTRUCTIONS Connecting Gas Dryers wWarning To reduce the risk of fire, electric shock, or injury to persons when using this appliance, follow basic precautions, including the following: •G as supply requirements: As shipped from the factory, this dryer is configured for use with natural gas. It can be converted for use with LP (Liquefied Propane) gas. Gas pressure must not exceed 13 inches of water column.
INSTALLATION INSTRUCTIONS 23 Connecting Gas Dryers (cont.) Connecting the gas supply To reduce the risk of fire, electric shock, or injury to persons when using this appliance, follow basic precautions, including the following: 1. M ake sure that the gas supply to the laundry room is turned OFF. Confirm that the type of gas available in your laundry room is appropriate for the dryer. The dryer is prepared for Natural Gas with a 3⁄₈ - inch NPT gas connection.
24 INSTALLATION INSTRUCTIONS Connecting Electric Dryers wWarning wWarning To help prevent fire, electric shock, serious injury, or death, the wiring and grounding must conform to the latest edition of the National Electrical Code, ANSI/NFPA 70 and all applicable local regulations. Please contact a qualified electrician to check your home’s wiring and fuses to ensure that your home has adequate electrical power to operate the dryer.
INSTALLATION INSTRUCTIONS wWarning •C onnect the power cord to the terminal block. Connec teach power cord wire to the terminal block screw that has the same colored wire. For example, connect the black power cord wire to the terminal block screw with the black wire. Failure to follow these instructions may result in a short, overload, fire or death.
26 INSTALLATION INSTRUCTIONS Connecting Electric Dryers (cont.) USA only wWarning •C onnect the power cord to the terminal block. Connect each power cord wire to the terminal block screw that has the same colored wire. For example, connect the black power cord wire to the terminal block screw with the black wire. Failure to follow these instructions may result in a short, overload, fire or death.
INSTALLATION INSTRUCTIONS wWarning •C onnect the power cord to the terminal block. Connect each power cord wire to the terminal block screw that has the same colored wire. For example, connect the black power cord wire to the terminal block screw with the black wire. Failure to follow these instructions may result in a short, overload, fire or death.
28 INSTALLATION INSTRUCTIONS Connecting Electric Dryers (cont.) USA only wWarning •C onnect the power cord to the terminal block. Connect each power cord wire to the terminal block screw that has the same colored wire. For example, connect the black power cord wire to the terminal block screw with the black wire. Failure to follow these instructions may result in a short, overload, fire or death.
INSTALLATION INSTRUCTIONS Any installation in a manufactured or mobile home must comply with the Manufactured Home Construction and Safety Standards Title 24 CFR, Part 3280 or Standard CAN/CSA Z240 MH and local codes and ordinances. If you are uncertain whether your proposed installation will comply with these standards, please contact a service and installation professional for assistance. •A gas dryer must be permanently attached to the floor.
30 INSTALLATION INSTRUCTIONS Installation Test (Exhaust check) Once you have completed the installation of the dryer, use this test to make sure the condition of the exhaust system is adequate for proper operation of the dryer. This test should be performed to alert you to any serious problems in the exhaust system of your home. •Y our dryer features Flow Sense™, an innovative sensing system that automatically detects blockages and restrictions in dryer ductwork.