CDMA/AMPS DUAL MODE PHONE User Guide LG-DM110
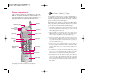
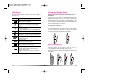
Phone components This section provides an introduction to the LGDM110. It includes illustrations and descriptions of the important phone parts and instructions for getting your phone powered up and ready to use. Antenna Handstrap hole Lamp Headset Jack Buzzer Side Keys Soft Key1 MSG key Alphanumeric keypad Earpiece LCD screen Soft Key2 Scroll keys Microphone Active Flip See page 11 for an overview of your phone.
7. Do not engage in stressful or emotional conversations that may be distracting. Make people you are talking with aware you are driving and suspend conversations that have the potential to divert your attention from the road. 8. Use your wireless phone to call for you. Dial 9-1-1 or other local emergency number in the case of fire, traffic accident or medical emergencies. Remember, it is a free call on your wireless phone! 9.
otherwise, including, but not limited to any implied warranty of marketability or fitness for a particular use. (7) Damage resulting from use of non-LG approved accessories. (8) All plastic surfaces and all other externally exposed parts that are scratched or damaged due to normal customer use. (9) Products operated outside published maximum ratings. (10) Products used or obtained in a rental program. (11) Consumables (such as fuses). 3.
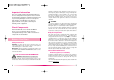
Important Information This user’s guide contains important information on the use and operation of this phone. Please read all the information carefully for optimal performance and to prevent any damage to or misuse of the phone. Any changes or modifications not expressly approved in this user’s guide could void your warranty for this equipment. Check Components Each standard unit comes with the LG-DM110 phone, a one-slot desktop charger, and one rechargeable battery.
Contents FCC Part 15 Class B Compliance Introduction 3 This device and its accessories comply with part 15 of FCC rules. Operation is subject to the following two conditions: (1) This device and its accessories may not cause harmful interference, and (2) this device and its accessories must accept any interference received, including interference that cause undesired operation.
Caller ID 22 PC-Sync 43 Phone Book Features 22 Viewing Your Telephone Number 43 Entering information using the keypad 24 Chapter 5 Message Features 44 Entering text using “Eng” mode. 24 New Text 45 Entering text using T9 mode. 25 Reading Newly Received Text Messages 45 Entering special characters using SYM mode. 26 Old Text 46 Entering text using 123 mode.
Chapter 1. Getting Started Cautions Phone Overview Function Key Descriptions The red light goes on when you use the power key to turn on the phone and when there are incoming calls and messages. Using the phone in proximity to receiving equipment (i.e., TV or radio) may cause interference. Lamp Keep your phone in a safe place when not in use. LCD screen Displays messages & indicator icons. Use only the batteries, antennas, and chargers provided by LG.
LCD Icons Using the Battery Pack An icon display which shows the function available when in use. Charge the battery fully before the initial use of the phone. Icons D Descriptions Digital indicator Digital service is available. NO service The phone is not receiving a system signal. In use A call is in progress. No icon indicates the phone is in standby mode. In manner mode The phone comes with a rechargeable battery pack. On purchasing the phone, one must charge the battery fully.
Battery Charge Level The battery charge level is shown at the top right of the LCD screen on the phone. When the battery charge level becomes low, the low battery sensor will alert you in three ways: Sounding an audible tone, blinking the battery icon outline, and displaying “LOW BATTERY WARNING”. If the battery charge level becomes exceedingly low, the phone will automatically switch off and any function in progress will not be saved.
Chapter 2. Basic Functions Turning the Phone On and Off Turning the Phone On 1. Install a charged battery pack or connect the phone to an external power source such as the cigarette lighter adapter or car kit. 2. Press for a few seconds until the red light at the top of the phone flashes. If you want to make a call, fully extend the antenna for optimum performance. As with any other radio device, avoid any unnecessary contact with the antenna while your phone is on. 4. Press to disconnect the call. 5.
Using Quick Mode Call Waiting Manner Mode Your cellular service may offer the call waiting feature. While you are answering a call, you may hear two beeps indicating another incoming call. When call waiting is enabled, you may put the active call on hold while you answer the other incoming call. Check with your cellular service about this feature. Using Manner Mode in a public place. 1. In the standby mode, activate manner mode by pressing the .
The ringer volume can also be adjusted through Menu feature. If you adjust the ringer volume to minimum, the LCD displays “-Ringer Off-” and you will not hear the ringer sound. The key beep volume is adjusted through Menu feature. The message volume is adjusted through Menu feature. Power Save Mode When the phone is in an area without service for 15 minutes, it stops searching for service and enters into the Power Save Mode. When your phone activates this feature, “Power Save” is displayed on your screen.
Caller ID This feature enables the phone number of the caller to be displayed when you receive the call. You should check if the cellular service carrier provides this feature. Use of Caller ID The phone number of the caller will be displayed on the LCD screen when the call is received. The ‘Number is Restricted’ message will be displayed if the phone is blocked displaying the caller’s phone number. In addition, the ‘Number is Unavailable’ message will be displayed when the Caller ID cannot be used.
Entering information using the keypad Press three times to enter the letter L The phone has four modes for entering characters Press one time to enter the letter G To toggle the modes in an entry field, press the desired mode is displayed. Entering text using T9 mode. until ENG : Enters characters by pressing each corresponding key until the character you want is displayed. “ENG” indicates upper case letters will be entered. “eng” indicates lower case letters will be entered.
For multi line editing in SMS Edit, the functions of several keys will work differently. (Next) : In T9 mode, press to display other matching words. Retrieving Phone Numbers Using Memory Location Number. (Space) : In multi - tap mode, press to complete a word or punctuation and to insert space. 1. Enter Phone Entry Number (up to 2 digits) to be retrieved on the initial display. (Space) : In T9 mode or numeric mode, press to complete a word or punctuation and insert a space. 2.
new telephone number, followed by addition of necessary settings such as Label or Secret . Editing Stored Memory Location Edit Entry (You may not delete the last number.) 5. To delete an Entry, select “Erase Entry” on the sub-menu, and select Soft Key 1 OK to confirm. Entry View with next Entry will return. 1. Locate corresponding Entry by name or Entry #. 2. By pressing Soft Key 1 OPT in Entry View the sub-menu will appear. 3. Select “Edit Entry” in the sub-menu. 4.
1) Press the first digit and second digit, then press . Three-Touch Dialing (Speed Dialing) : This dialing feature enables you to dial numbers in your phone book through three keys (for location 100 to 199). 1) Press the first digit and second digit. 2) Press and hold the key of the third digit. : Hyphens are used for appearance only (e.g. 1800-555-1234). They will not add a pause between numbers. 2. Storing a Number with Pauses 1) Enter the phone number. 2) Press Soft Key 1 OPT .
Chapter 3. Menu Features Key Beep (MENU ) Set Key beep length and touch tone playback speed. General Guidelines to MENU Access and Settings 1. Press Soft Key 1 MENU . The first 3 menu items will appear. 2. Press , or to go through the list of menu features, or use the side keys. Normal : Sends out a tone for a fixed period of time only even if you keep the button pressed. Long : Sends out a continuous tone for as long as you keep the button pressed. Key Volume (MENU ) 3.
4.Call Connect (MENU ) System (MENU ) Alert sound to notify the user when the call is connected. Set NAM Display (MENU Select the phone’s NAM (Number Assignment Module) if the phone is registered with multiple service provides. Backlight ) (MENU ) Choose the settings of the LCD and keypad backlight. “10 seconds” turns the backlight off 10 seconds after the last key was pressed. “30 seconds” waits 30 seconds after the last key was pressed.
Displays the total number and time (minutes and seconds) of all calls made while in the home system (i.e. not roaming), since last reset. You can reset it by pressing Soft Key 1 OPT and Press Soft Key 1 SEL after select [Zero] using the [ ] button. Data In : This setting enables the subscriber terminal to receive data calls. No incoming calls can be received with this setting. Outgoing calls (Voice Fax and data) can be made.
Utility (MENU Country on. “Always” means that the phone is always locked. ) (MENU Restrict (MENU ) You can search for the national code of all countries in the world.(total 123 countries) Calculator (MENU ) You can calculate simple mathematics. (Can be entered up to the second decimal place) For example) 25 100=2500 1) Press and in order. 2) Select using buttons, then press [SEL] button. 3) Press and in order. 4) Select using buttons, then press [SEL] button.
Chapter 4. Book Features Call History (BOOK ) The phone maintains a list of the calls made, inclusive of Outgoing, Incoming and Missed calls. The most recent entry is stored at the top. Once all 30 locations are filled, the next entry will drop the oldest entry. Depending on the operating mode and available features, each entry may contain a phone number, name and time stamp (which indicates when the call is generated).
Find Name (BOOK 2. Press [Phone Book] [Find Email] ) Select the item you want to view using the 1. Press Soft Key 2 BOOK 3. Press Soft Key 1 VIEW 2. Press [Phone Book] [Find Name] 3. Enter the character(s) that you want to search for (such as the few letters of the name). Add Email 4. Press Soft Key 1 FIND 2. Press [Phone Book][Add Email] The phone then searches for names with that character string. (Searches will ignore difference between upper and lower case letters.) 5.
Chapter 5. Message Features Text message, page and voice mailbox become available as soon as the power is on. You can access the above types of messages using the message key . In addition, you can make a call to the call back number by pressing the during a message check. The phone can store up to 20 messages (Voice message : 1, Text messages 19) at 245 characters per message. However, you should check whether your carrier provides the above features.
Protect? : Select auto-delete disable function. It toggles between function disable and enable each time by selection. A “ ” will be added on head of message when you select [Protect?]. Out of Memory Warning Auto Delete function: In the case of message storage is full, the oldest message is automatically replaced by a new message. When marked as [Protect?], the message will be kept on storage. At this time, the message “NOT ENOUGH MEMORY! New Message is rejected.” Old Text ( 1. Press ( ) ). 2.
Next : ‘Next’ enables the user to enter the next destination address. The field is in loop type. Back : ‘Back’ enables the user to enter the previous destination address. addr book: ‘addr book’ enables the user to refer to the addresses in the phone book. Selecting the address in the phone book copies the address to the destination address field. email book : ‘email book’ enables the user to refer to the email in the phone book.
The Option menu has open, erase, cancel sub menu - Open : ‘Open’ is used to copy the saved message to destination address, callback, and user data field. - Erase : ‘Erase’ is used to delete the list on the line. Pressing without destination entered will display a warning message. If the message is normally transmitted, the message is displayed to confirm the normal transmission. If the message is not normally transmitted, the failed destination address is displayed.
Auto Save ( Chapter 6 Functions used during a call ) Setting menu to save sent messages in the outbox automatically. Browser Msg ( ) , Browser Set ( See “Chapter 7. MiniBrowser” on page 54~ 59 ) Mute (During a call : MENU ) Switching microphone on and off during in a call. When the microphone is off, the other party can not hear you. Press Soft Key 1 MENU and during a call. Then, “MUTE” is displayed on the screen. If you need to release mute press the Soft Key 1 MENU and key again.
Chapter 7. Mini Browser The MiniBrowser feature allows you to view internet content specially designed for mobile phone interface. Access and selections within this feature are service providerdependent. For specific information on MiniBrowser access through your phone, refer to your service Provider. Overview The MiniBrowser allows the user to use a variety of Internet service.
Ending browser calls - Users should be able to end a browser session by press and hold . Go to Home Page Navigating through the Browser View Browser Menu While using the MiniBrowser, you will find that onscreen items may be presented in one of the following ways: Press and hold button to use browser menu when the MiniBrowser is being used. numbered options (some options may not be numbered) links (embedded in content) To go back to the Home Page, press and hold .
Entering Text, Numbers, or Symbols When you are prompted to enter text, the current text entry method will appear on the Soft Key 2 as ALPHA, alpha, smart, Number, or Symbol (exact label depends on implementation.) A message will appear confirming that the bookmark was added to the list. Select Soft Key 1 OK to return to the screen that you marked to resume navigation within the Mini Browser. The new bookmark is added to the bottom of your bookmark list. To change the input mode, use the Soft Keys.
Chapter 8. Accessories There are a variety of accessories available for the phone. You can select these options according to your personal communication requirements. Consult your local dealer for availability. Travel Charger This charger, model TC-10W, allows you to charge the battery pack. It supports standard U.S. 120Volt 60Hz outlets. A Orange light indicates that it is charging while a green light indicates charging is complete. It takes 5 hours to charge a completely discharged battery.
Chapter 9. Appendix Menu Tree or / 1. Data/ Fax Off Data In Fax In 2. Auto Answer Off after 1 ring after 3 rings after 5 rings Features 1. Last call 2. Home calls 3. Roam calls 4. All calls Call Information 1. Set NAM 2. Auto NAM 3. Force Mode 4. System Sel 5. Version 6. Serving Sys. System Default Star theme 4. Auto Hyphen Press Soft Key 1 MENU . Press Sound 1. Ring Sound 2. Ring Type Ring Lamp Vib +Ring Vibrate 3. Ring & Vib Volume 4. Key Beep Normal Long 5. Key Volume 6. Ear Volume 7.
Chapter 10. Safety Guidelines Safety Information Exposure to Radio Frequency Signal Your wireless handheld portable telephone is a low power radio transmitter and receiver. When it is ON, it receives and also sends out radio frequency(RF) signals. European and international agencies have set standards and recommendations for the protection of public exposure to RF electromagnetic energy.
Do not touch the antenna unnecessarily when the phone is in use. Contact with the antenna affects call quality and may cause the phone to operate at a higher power level than otherwise needed. For Vehicles Equipped with an Air Bag An air bag inflates with great force. DO NOT place objects, including both installed or portable wireless equipment, in the area over the air bag or in the air bag deployment area.
atmosphere and obey all signs and instructions. Sparks in such areas could cause an explosion or fire resulting in bodily injury or even death. Areas with a potentially explosive atmosphere are not always clearly marked.
that the average length of mobile phone exposure in this study was less than three years. When 20 types of glioma were considered separately, however, an association was found between mobile phone use and one rare type of glioma, neuroepithelliomatous tumors. It is possible with multiple comparisons of the same sample that this association occurred by chance. Moreover, the risk did not increase with how often the mobile phone was used, or the length of the calls.
does with new drugs or medical devices. However, the agency has authority to take action if mobile phones are shown to emit radiation at a level that is hazardous to the user. In such a case, FDA could require the manufacturers of mobile phones to notify users of the health hazard and to repair, replace or recall the phones so that the hazard no longer exists.
Licensed by QUALCOMM Incorporated under one or more of the following Patents; U.S. Patent No. 4,901,307 U.S. Patent No. 5,056,109 U.S. Patent No. 5,099,204 U.S. Patent No. 5,101,501 Patent No. 5,103,459 U.S. Patent No. 5,107,225 U.S. Patent No. 5,109,390 Product manufactured or sold in US; This product is covered by U.S. Pat. 5,818,437, U.S. Pat. 5,953,541, U.S. Pat. 6,011,554 and other patents pending. P/N Date 503-E15177-UEVE 2000. 8. 11 Version 1.