LG-DM510 User Manual 1 DM510 Ver. 1.1.
FCC RF EXPOSURE INFORMATION WARNING! Read this information before using your phone In August 1996 the Federal Communications Commission (FCC) of the United States with its action in Report and Order FCC 96-326 adopted an updated safety standard for human exposure to radio frequency (RF) electromagnetic energy emitted by FCC regulated transmitters. Those guidelines are consistent with the safety standard previously set by both U.S. and international standards bodies.
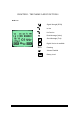
CHAPTER 1. THE NAME AND FUNCTIONS Hold Icon Signal Strength (RSSI) In Use No Service Short Message (Voice) Short Message (Text) D Digital Service is available Rm Roaming Vibrator Enabled Battery Level 2 DM510 Ver. 1.1.
CHAPTER 2. BASIC FUNCTIONS Turning the Phone On and Off 1. Connect the terminal to the charged battery or the external power supply. 2. Press the [END/PWR] key for about 1.5 seconds until a red right appears on the upper side of the terminal. < Turning the Terminal Off > 1. Press the [END/PWR] key until the end message appears on the LCD, and then stop pressing the key. 2. If an antenna is stretched, push it in for safety.
2. If you are not sure of the phone entry number, select the Soft Key(BOOK) with the Right Mouse Button. 3. Place the cursor on the Phone Book, and press the Soft Key(SEL) with the Left Mouse Button. 4. Search the Phone Book Entry number or name requested in the Phone Book to attempt a call to the phone number stored in it. Using the Recent Call History 1. Select the Soft Key(BOOK) with the Right Mouse Button.. 2. If the screen changes, place the cursor on the Call History.
Correcting Dialing Mistakes 1. Press the Soft Key(CLR) with the Right Mouse Button of the screen to erase the number or character of the last entry. 2. Press the Soft Key(CLR) with the Right Mouse Button for one second, then all the number or character requested will be erased. Receiving Calls 1. Press any key except for the [END/PWR] key to receive a call. HPress the END Key once to stop the bell or vibration. HH Press the END Key twice to end the incoming call 2.
3. Then, three menus will appear. - “Outgoing”: Ten last outgoing calls are stored in this menu. - “Incoming”: Ten last incoming calls are stored in this menu. - “Missed”: Ten last missed calls are stored in this menu. 4. Place the cursor on the menu requested, and press the Soft Key(SEL) with the Left Mouse Button. e.g.) Place the cursor on the “Outgoing” menu and press the Soft Key (SEL) with the Left Mouse Button. 5. The phone number list will appear.
CHAPTER 3. PHONE BOOK FEATURES Two types of Phone Books This service enables easier use of the outgoing or incoming phone numbers because it is possible to store up to 200 phone numbers in the memory. It is possible to store the phone numbers either in the Personal Phone Book memory or in the Recent Call History List Personal Phone Book Memory It is possible to store up to 4 phone numbers of 32 digits including name up to 12 characters in each entry of the Phone Book.
Entering Characters You will be provided with 5types of modes (English Lower, English Upper, Digil, Special Char, Icon) to enter the characters. Use the upside (é) key to change among the modes while entering the characters. The present mode is indicated on the lower center of the screen. Whenever you press the upside (é) key, the modes will change in the order of “ENG” - “eng” - “DIG” - “SPC ” - “ENG” `````` . Select the mode before you enter the characters, and enter the characters. 1.
indicated in the order of 12 keypads with the Right Mouse Button of the screen in a “SPEC ” mode. Press the key corresponding to the symbol (icon) to be entered in reference of them, and then the symbol (icon) will be entered on the space where the cursor is placed. Press the Soft Key(MORE) with the Right Mouse Button when the symbol (icon) set is indicated on the screen, and then another set of symbols (icons) will be indicated on the screen. The symbol (icon) set is composed of three types of sets.
Retrieving Numbers 1. Enter the Phone Entry number (up to three digits) to be retrieved in an initial state. 2. Press the Soft Key(OPT) with the Left Mouse Button, and then a popup menu will appear. 3. Place the cursor on the “Entry” item on the popup menu and press the Soft Key(SEL) with the Left Mouse Button. And then, the information stored in the input entry number will appear. Press the [OK] key to attempt a call to that number. 4.
Dialing Numbers from Your Phone Book This function enables fast dialing with the entry number stored with the phone number requested. One-Touch Dialing enables the call with the touch of just one key by its function to store the phone numbers requested in the Phone Book. This service is available only for the phone number stored in the entry numbers 01~09. 1. Press the Phone Book Entry number for 2. The Entry 9 is designated for the some time to connect a call. number ‘911’.
time. 2. Press the last digit number for some time to attempt dialing. 1. Press the Soft Key(BOOK) with the Right Mouse Button. 2. Select the “Phone Book” menu. 3. Select the “Find Entry” item. 4. Use the upside and downside key instead of the Entry number, and then the contents of the Phone Book Memory will appear in the order of the Entry numbers. 5. Place the cursor on the number requested, and press the [OK] key. 1.
2. Press the Soft Key(OPT) on the left to use the Pause function. 3. Select the [Hard Pause] item on the popup menu, and then a character “H” will be indicated on the screen. 4. Select the [Time Pause] item, and then the 2 Sec Pause will be indicated as the character “T”. [Hard Pause] [Time Pause] **Note – Press the items in the orders of the Soft Key(MENU) on the left, the [Auto Hyphen] and [ON] items on the screen in a call waiting state to select the Auto Hyphen function.
2. Press the [OK] key to attempt a call. 14 DM510 Ver. 1.1.
CHAPTER 4. MENU FEATURE Main Menu It is possible to verify or change various functions or setup the terminal status on the main menu. General Guidelines to MENU Access and Settings 1. Press the Soft Key(MENU) on the left and the menu items will appear. 2. Use the upside and downside keys (é ê) to move to the menu items not indicated on the screen. 3. Place the cursor on the menu item requested with the direction keys to select a menu item, and press the Soft Key(SEL) on the left.
2. Ring Type ( F [MENU]-1-2 ) Set one of three Ring Types (Ring, Vibrator, and LED) with the direction keys. 3. Ring & Vibr Vol ( F [MENU]-1-3 ) - Ring type: Adjust the ring volume in seven levels (High - Medium – Low - Off - Vib1 - Vib2 - Viv3) with the direction keys. The ring volume is also adjustable with the side keys while the bell is ringing or in a call waiting state. - Vibrator type: Adjust the vibrator volume in four levels. (Low – Middle – High – Escalating). - Lamp 4.
6.Ear Volume (F [MENU]-1-6) Adjust the earpiece volume in three levels (High > Medium > Low) with the direction keys. It is also adjustable with the side keys in a busy line state. 7. Alerts Sound ( F [MENU]-1-7 ) An alert signal is activated according to each situation by five submenus under the Alert menus. - Fade: It is activated if the call is disconnected in a busy line state. (On / Off) - Minute : This signal is activated when 1minute elapses from the call connection.
3. THEME ( F [MENU]-2-3 ) - Default - Srar Theme Select one of the above items. 4. Auto Hyphen (F [MENU]-2-4 ) It is possible to set the function to enter the Hyphen to the input number automatically to an “On” or “Off” state. . 5. Languages ( F [MENU]-2-5 ) < TBD> It is possible to set the language to be used in the terminal among four languages with the direction keys (Select one of four languages of English, French, Spanish, and Portuguese) Menu 3. 1.
2. Auto NAM ( F [MENU]-3-2 ) This service enables setting of the NAM to the identified subscribed number for one or more than one NAMs. Use the direction keys to set the service to either “On” or “Off” state. 3. Version ( F [MENU]-3-5 ) This service informs on the present terminal S/W version. It has two items of “S/W” and “PRL” as the submenu. Menu 4. 1. Last Call ( F [MENU]-4-1 ) This service shows the last call time. 2.
4. All Calls ( F [MENU]-4-4 ) It shows the total call time to the present either at the Home system or the roaming system or both. Menu 5. 1. Auto Answer ( F [MENU]-513 ) Auto answer service is one of the most useful functions while driving a vehicle, and it enables automatic answering to the incoming call after the bell rings for designated times. (Off, 1 ring after, 3 ring after, 5 ring after) 2.
Menu 6. Utility - Country - Calculator Menu 7. Select the Soft Key(MENU) on the left in an initial call waiting state, and select [6. Security]. Then a message will appear on the LCD to request the Lock Code. If you fail to enter the correct Lock Code of four characters, the process will not proceed to the following low level menu. And if the Lock Code is not correct, the process will return to the Main Menu. 1.
Key(SAVE) on the left, to add the emergency phone numbers. Enter the memory address when a message appears to request the memory address on the following image, and then press the Soft Key(SAVE) on the left to store it. Select “Erase All” to erase all the emergency phone numbers. Then, a message will appear to confirm the command. Select the Soft Key(YES) on the left to erase all the emergency phone numbers. 6.
CHAPTER 6. Message Message Service This service supports reception of the text message, alerting, and the voice mailbox. It is possible to access the above functions with the text message key Call back service is also available with the call key ([OK] key) , if the calling number is indicated on the message received. It is possible to store up to 23 messages and to receive up to 120 characters per message.
Select the OPT, and the sub menu related to the message will appear. - [Next]: It indicates that there is another message received. (If no more new message has been received, the old text list will be indicated.) - [Erase]: It erases the message. - [Call back]: It calls back to the calling number. 2. Old Text (*) - - It indicates the checked but not erased messages in the form of the list.
3. Voice (*) - It indicates the number of the voice messages in the voice mailbox. - Press the voice mailbox identification number or the [Call] menu key. Then, the voice mailbox will connect. - Select the [Erase] menu item. Then, the messages will be erased, as many as indicated on the LCD, without need to verify the number of messages 4. Erase All - This service enables erasing of all the messages stored by the message service. 5.
- Selecting the setting menu - Selecting the Alert menu Selecting the2 Min Alert menu 26 DM510 Ver. 1.1.
TIA Safety Language Provided herein is the TIA Safety Information for Wireless Handheld phones. Inclusion of this text in the terminal unit’s owner’s manual is required for CTIA Certification. EXPOSURE TO RADIO FREQUENCY SIGNALS Your wireless handheld portable telephone is a low power radio transmitter and receiver. When it is ON, it receives and also sends out radio frequency (RF) signals.
inches be maintained between a handheld wireless phone and a pacemaker to avoid potential interference with the pacemaker. These recommendations are consistent with the independent research by and recommendations of Wireless Technology Research. Persons with pacemakers: should ALWAYS keep the phone more than six inches from their pacemaker when the phone is turned ON; Should not carry the phone in a breast pocket; Should use the ear opposite the pacemaker to minimize the potential for interference.
normally be advised to turn off your vehicle engine. For Vehicles Equipped with an Air Bag An air bag inflates with great force. DO NOT place objects, including both installed or portable wireless equipment, in the area over the air bag or in the air bag deployment area. If in-vehicle wireless equipment is improperly installed and the air bag inflates, serious injury could result. 29 DM510 Ver. 1.1.
10-Driver Safety Tips Your wireless telephone gives you the powerful ability to communicate by voice-almost anywhere, anytime. But an important responsibility accompanies the benefits of wireless phones, one that every user must uphold. When driving a car, driving is your first responsibility. When using your wireless phone behind the wheel of a car, practice good common sense and remember the following tips: 1.Get to knew your wireless phone and its features such as speed dial and redial.
FDA Consumer Update The U.S. Food and Drug Administration’s Center for Devices and Radiological Health Consumer Update on Mobile Phones FDA has been receiving inquiries about the safety of mobile phones, including cellular phones and PCS phones. The following summarizes what is known –and what remains unknown— ab out whether these products can pose a hazard to health, and what can be done to minimize any potential risk. This information may be used to respond to questions.
1. In a hospital-based, case-control study, researchers looked for an association between mobile phone use and either glioma (a type of brain cancer) or acoustic neuroma (a benign tumor of the nerve sheath). No statistically significant association was found between mobile phone use and acoustic neuroma. There was also no association between mobile phone use and gliomas when all types of types of gliomas were considered together.
In summary, we do not have enough information at this point to assure the public that there are, or are not, any low incident health problems associated with use of mobile phones. FDA continues to work with all parties, including other federal agencies and industry, to assure that research is undertaken to provide the necessary answers to the outstanding questions about the safety of mobile phones.
Periods of time on their hands-held models for shorter conversations or for situation when other types of Phones are not available. People who must conduct extended conversations on their cars every day could switch to a type of mobile phone That places more distance between their bodies and the source of the RF, since the exposure level drops off dramatically with distance.
INDEX [END/PWR] .............................................................................................................................................4, 6 [SND] ..................................................................................................................... 4, 5, 6, 10, 11, 13, 15, 25 alert ...................................................................................................................................................25, 27 Backlight ............................