DR7400KSM_AA3FLL_ENG DVD RECORDER OWNER’S MANUAL MODEL : DR7400 Before connecting, operating or adjusting this product, please read this instruction booklet carefully and completely.
CAUTION RISK OF ELECTRIC SHOCK DO NOT OPEN CAUTION: TO REDUCE THE RISK OF ELECTRIC SHOCK DO NOT REMOVE COVER (OR BACK) NO USER-SERVICEABLE PARTS INSIDE REFER SERVICING TO QUALIFIED SERVICE PERSONNEL. This lightning flash with arrowhead symbol within an equilateral triangle is intended to alert the user to the presence of uninsulated dangerous voltage within the product’s enclosure that may be of sufficient magnitude to constitute a risk of electric shock to persons.
Introduction . . . . . . . . . . . . . . . . . . . . . . . . . . . . .4-8 Symbol Used in this Manual . . . . . . . . . . . . . . . .4 Notes on Discs . . . . . . . . . . . . . . . . . . . . . . . . . .4 Recordable and Playable Discs . . . . . . . . . . . . .5 Playable Discs . . . . . . . . . . . . . . . . . . . . . . . . . .5 Disc-related terms . . . . . . . . . . . . . . . . . . . . . . .6 Front and Rear Panel . . . . . . . . . . . . . . . . . . . . .7 Remote Control . . . . . . . . . . . . . . . . . . . .
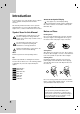
Introduction To ensure proper use of this product, please read this owner’s manual carefully and retain for future reference. This manual provides information on the operation and maintenance of your recorder. Should the unit require service, contact an authorized service location. Symbol Used in this Manual The lightning flash symbol alerts you to the presence of dangerous voltage within the product enclosure that may constitute a risk of electric shock.
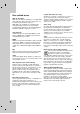
Introduction Recordable and Playable Discs DVD+RW (Digital Video Disc + ReWritable) These Discs can be recorded on repeatedly. Recordings can be erased, then you can record again on the same Disc. Playable on DVD+RW compatible players (automatically finalization) The edited contents is playable on DVD+RW compatible players only after finalizing Recordings can be edited the title/chapter DVD+R (Digital Video Disc + Recordable) These Discs can be recorded only once.
Disc-related terms DVD +R / DVD +RW DVD +R is two different standards for recordable DVD drives and discs. This format allows information to be recorded onto the DVD disc only once. DVD +RW is two standards for re-writable media, meaning the DVD content can be erased and rerecorded. Single-sided discs can hold 4.38 Gigabytes and double-sided discs hold twice as much.
a b c d j e f g h i k a POWER button Switches the recorder ON or OFF. g Z (OPEN/CLOSE) Opens or closes the disc tray. b PLAY (N) Starts playback. h Display window Shows the current status of the recorder (clock, program number, etc). c x (STOP) Stops playback or recording. d z (REC) Starts recording. Press repeatedly to set the recording time. e PROG. (V/v) Scans up or down through memorized channels. c i Remote Sensor Point the recorder remote control here.
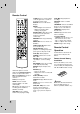
Remote Control CLEAR: Removes a track number on the Program List or a mark on the Marker Search menu. DISPLAY: Accesses On-Screen Display. ENTER - Acknowledges menu selection. - Displays information while viewing a TV program. INSTANT SKIP: Skips 30 seconds forward on the disc (about the length of a typical TV: commercial). MARKER: Marks any point during playback. MENU/LIST: Accesses menu on a DVD disc. OPEN/CLOSE (Z): Opens and closes the disc tray.
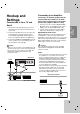
Connecting to an Amplifier Connections to Your TV and Aerial 1. Remove the aerial cable plug from your TV set and insert it into the aerial socket at the back of the recorder. 2. Connect the RF. OUT jack on the recorder to the aerial input jack on the TV using the 75-ohm Coaxial Cable supplied (R). The RF. OUT jack passes the signal through from the AERIAL jack. 3. Connect the EURO AV1 AUDIO/VIDEO scart jack on the recorder to the corresponding in jacks on the TV using the scart cable (T).
Accessory Audio/Video (A/V) Connections Connecting to the EURO AV2 jack Connect a VCR or similar recording device to the EURO AV2 jack of this recorder. TV Connecting to the Front Panel’s Input Jacks Connect the input jacks on the recorder’s front panel to the audio/video out jacks on your accessory component, using audio/video cables. Note: If you use the S-VIDEO IN jack on the front panel, the VIDEO IN jack on the front panel is not available. VCR, Cable Box, or Satellite Tuner, etc.
After the POWER is pressed for the first time to turn on the unit, the [Initial Setup Wizard] function sets the clock, OSD language and tuner channels automatically. Follow the step-by-step questions until the setup is complete. About DVD Recorder Initial Setup menu By using the Setup Displays, you can make various adjustments to items such as picture and sound. 1. Press SETUP and the [DVD Recorder Initial Setup] menu appears. Hookup and Settings Auto Set Up 1. Press ENTER to move next step. 2.
Using the Initial Setup menu TV Setup 1. Press SETUP and the [DVD Recorder Initial Setup] menu appears. Auto Scan 2. Use b / B to select [Init Setup] option then press ENTER. Initial Setup Menu appears. This recorder is equipped with a frequency synthesized tuner capable of receiving up to 99 TV channels. Preparation: Connect the recorder to the desired type of aerial, as shown in “Connections to Your TV and Aerial” on page 9. 1. Select the [Auto Scan] option. 3.
Manual Setting You can edit a channel manually (add, delete, name, move, etc.). You can perform a search to select and store TV channels manually. 1. Select [Program Edit] option on the [Initial Setup] menu. 1. Select [Manual Setting] option on the [Initial Setup] menu. 2. Press ENTER. The [Program Edit] menu appears. 2. Press ENTER. The [Manual Setting] menu appears. 3. Use v / V / b / B to select a PR number then press ENTER. Hookup and Settings Program Edit [PR] Selects a PR number.
Auto Install Chapter Mark Re-configure initial settings. Select [Auto Install] option on the [Initial Setup] menu then press ENTER. [Initial Setup Wizard] menu screen appears. See “Auto Set Up” on page 11. Chapter markers are put in specified setting. You can change this interval to 5 minutes, 10 minutes or 15 minutes. If you select [Off], switch off automatic chapter marking altogether with the [Off] setting.
Last Memory TV Display This recorder memorizes the user settings for the last disc that you have viewed. Settings remain in memory even if you remove the disc from the recorder or switch off the recorder. If you load a disc that had its settings memorized, the latest stop position is automatically recalled. To use this effect, set [Last Memory] option to [On]. Selects the aspect ratio of the connected TV. [Pan Scan] Select when a standard 4:3 TV is connected.
Video Setup SPDIF Setup Quality - SPDIF (Digital Audio) Output Set video quality in the aspects of brightness, contrast, hue, or saturation. 1. Select [Quality] option then press B on the [Initial Setup] menu Selects the signal type when using the DIGITAL OUT jack. [SPDIF RAW] Select this when the recorder is connected to an audio component without a built-in Dolby Digital, DTS or MPEG decoder.
Dolby Digital 3D Surround - Dual Mono This unit can produce a 3D Surround effect, which simulates multi-channel audio playback from two conventional stereo speakers, instead of the five or more speakers normally required to listen to multichannel audio from a home theater system. To use this effect, set [3D Surround] option to [On]. You can select a audio channel of Dolby Digital.
Preference - Parental TV Type Selects the limitation level. Rating one (1) has the most restrictions and rating eight (8) is the least restrictive. You must select the appropriate system mode for your TV system. • When the selected system does not coincide with the system of your TV, normal color picture may not be displayed. [PAL] When this recorder is connected with PAL-TV. [Auto] When this recorder is connected with Multi system TV. [NTSC] When this recorder is connected with NTSC-TV.
- Password Mode If you forget your password Activates or disables the Parantal Control feature. [On] To play back a rated movies or to change setting an Parental Control options (Parantal, Area Code, etc.), you must enter the 4-digit password. [Off] Parental control is not active and the disc plays in full. If you forget your password, to clear the current password, follow the procedure below. Hookup and Settings 1. Press SETUP to display the [DVD Recorder Initial Setup] menu. 2.
Using the Disc Operation menu Disc Erase 1. Press SETUP and the [DVD Recorder Initial Setup] menu appears. If you load a completely blank disc, The recorder will erase the disc automatically. 2. Use b / B to select [Disc Oper] option then press ENTER. Disc Operation Menu appears. Also, you can erase the DVD+RW from the Setup menu as below. 1. Select [Erase] option on the [Disc Oper] menu. 3. Use v / V to select an option. 2. Press ENTER. [Erase] menu appears. 3.
Finalize Disc Protect Finalizing ‘fixes’ the DVD+R recordings in place so that the disc can be played on a regular DVD player or computer equipped with a suitable DVD-ROM drive. Finalizing a disc creates a menu screen for navigating the disc. This is accessed by pressing MENU/LIST or TITLE. Use the [Protect] option to prevent accidental recording, editing or deleting of the disc loaded. Hookup and Settings 1. Select [Protect] option on the [Disc Oper] menu.
Adapt Disc recorded on other recorder will not use on your recorder. You can use the disc after adapting the disc at your recorder. 1. Select [Adapt] option on the [Disc Oper] menu. 2. Press ENTER. [Adapt] menu appears. 3. Select [OK] then press ENTER. Disc Information You can view the informations for loaded DVD+R/RW disc. (Disc Label, Media, Title number, Status, Remaining time) 1. Select [Disc Info] option on the [Disc Oper] menu. 2. Press ENTER. [Disc Info] menu appears. 3.
This manual gives basic instructions for operating the recorder. Some DVDs require specific operation or allow only limited operation during playback. When this occurs, the symbol appears on the TV screen, indicating that the operation is not permitted by the recorder or is not available on the disc. Displaying Information While Watching TV During viewing the TV, press DISPLAY to display/remove the information displayed on-screen.
Playback Playing a DVD, Video CD, or Audio CD Playback Setup Turn the TV on and select the video input source connected to the recorder. Audio system: Turn the audio system on and select the input source connected to the recorder. 1. Load your chosen disc in the tray, with the playback side down. If a menu screen is displayed The menu screen may be displayed first after loading a DVD or Video CD which contains a menu.
Search Repeat A-B 1. Press SCAN (m or M) during playback. To repeat a sequence. 2. Press SCAN (m or M) repeatedly to select the required speed. DVD; 5 steps (forward and backward) Video CD, Audio CD; 3 steps (forward and backward) 1. Press A-B at your chosen starting point. “A -” appears briefly on the TV screen. 3. To exit SEARCH mode, press PLAY. 3. Press A-B again to cancel. Still Picture and Frame-by-Frame Playback +RW +R DVD VCD Time Search 1. Press PAUSE/STEP (X) during playback.
Marker Search +RW +R DVD VCD To enter a Marker You can start playback from up to 12 memorized points. To enter a marker, press MARKER at the desired point on the disc. The Marker icon appears on the TV screen briefly. Repeat to enter up to 12 markers. To Recall or Clear a Marked Scene 1. During disc playback, press SEARCH. The marker search menu appears on the screen. 2. Use b / B / v / V to select a marked scene that you want to recall or clear. 3. Press ENTER and playback starts from the marked scene.
Last Condition Memory DVD Using the Program Play Feature ACD This recorder memorizes the user settings for the last disc that you have viewed. Settings remain in memory even if you remove the disc from the recorder or switch off the recorder. If you load a disc that had its settings memorized, the latest stop position is automatically recalled. To use the Program Playback option, you must enter the order in which you want the tracks on the Audio CD to play by creating a program.
Playing an MP3 File About MP3 audio files The recorder can play MP3 files on CD-ROM, CD-R/RW or DVD±R/RW discs. Before playing MP3 files, read “About MP3 audio files” on the right. MP3 file compatibility with this recorder is limited as follows: Sampling frequency: within 8 - 48 kHz 1. Load a disc that contains MP3 files. The Browser menu appears on the TV screen. Bit rate: within 8 - 320kbps The recorder cannot read an MP3 file that has a file extension other than “.mp3” .
Viewing a JPEG File The recorder can play JPEG files on the CD-R/RW or DVD±R/RW. Before playing JPEG recordings, read “About JPEG image files” on page 30. 1. Load a disc that contains JPEG file. The [Browser] menu appears on the TV screen. To Pause the Slide Show 1. Press PAUSE/STEP (X) during slide show. 2. When you want to continue slide show, press PLAY (N) or PAUSE/STEP (X). Skip Images While viewing a picture, press SKIP (.or >) once to advance to the next file or return to the previous file.
Using the thumbnail menu for JPEG file Erasing a file from the [Playlist] menu If you press STOP during Slide Show, the thumbnail menu will appear. You can find a picture you want to view easily. 2. Repeat step 1 to mark additional file. Use v / V / b / B to select a picture or option icon then press ENTER. 1. Select the file you wish to erase then press MARKER. 3. Press b repeatedly to select [Delete] word on the [Playlist] menu then press ENTER. The marked file(s) is erased from the menu.
Notes for recording About DVD recording Notes: This recorder cannot make recordings on CD-R or CD-RW discs. Our company takes no responsibility for recording failure due to power outages, defective discs, or damage to the Recorder. Fingerprints and small scratches on a disc can affect playback and/or recording performance. Please take proper care of your discs.
Basic Recording from a TV OTR (One Time Recording) Follow the instructions below to record a TV program. Recording starts immediately and continues until the disc is full or you stop the recording. OTR (One Time Recording) allows you to make a recording easily of a preset length without using the program timer. Note: You must load a recordable disc for DVD recording. 1. Set a recording mode as necessary by pressing REC MODE repeatedly. (HQ, SQ, LQ, EQ) 2.
Timer Recording This recorder can be programmed to record up to 7 programs within a period of 1 month. For unattended recording, the timer needs to know the channels to be recorded, the starting and ending time. 1. Press TIMER REC. The [Timer Recording] list screen will appear. 4. Press ENTER, the program will be memorized by the recorder. To check the programming, the [Timer Recording] list screen will appear.
Checking Timer Recording Details Programming can be checked whenever the recorder is turned on. Press TIMER REC. Use v / V to select a timer recording. Press ENTER to edit the selected program. Timer Record menu appears. Press CLEAR to delete the selected program from the Timer Record List. If two or more timer programs overlap: The earlier program takes priority. When the earlier program finishes, the later program starts.
Editing You can edit video content using [Title List] menu or [Disc Edit] menu. To use Title List menu, see pages 35-38. To use Disc Edit menu, see pages 39-42. Title List and Chapter List Menu Overview Using the Title List menu you can edit video content. The editing features available in the Title List menu depend on whether you are editing video on DVD. 1. Press MENU/LIST to display the Title List menu. Playback should be stopped when you do this.
Deleting a Title If you choose to delete a title from the Title List menu, the title is actually deleted from the disc. 2. Use v/V to select [Rename] option then press ENTER. Keyboard menu appears. 1. Use b / B / v / V to choose a title you want to delete on the Title List menu then press ENTER. The menu options appears on the left side of the screen. 2. Select [Delete] option from the options on the menu. Delete options appears. 3. Enter a name for the title.
Changing Title Thumbnails Divide One Titles Into Two You can select a favorite scene for the thumbnail picture shown in the Title List menu. Use this command to split a title up into two new titles. 1. Use b / B / v / V to choose a title on the Title List menu then press ENTER. The menu options appears on the left side of the screen. +RW 1. On the Title List menu, select a title you want to divide then press ENTER. The menu options appears on the left side of the screen. 2. Select [Divide] option. 2.
Adding Chapter Markers Deleting Chapter Markers You can create chapters within a title by inserting chapter marks at the desired points. You can delete chapter markers. 1. Use b / B / v / V to choose a chapter on the Chapter List menu then press ENTER. The menu options appears on the left side of the screen. 1. Use b / B / v / V to choose a chapter on the Chapter List menu then press ENTER. The menu options appears on the left side of the screen. 2. Select [Delete] from the options. 2.
Using the Disc Edit menu Naming a Title 1. Press SETUP and the [DVD Recorder Initial Setup] menu appears. You can name titles independently. Names can be up to 32 characters long. 2. Use b / B to select [Disc Edit] option then press ENTER. Disc Edit Menu appears. 1. Choose the title you want to name on the [Edit] menu, then press ENTER. The menu options appears on the right side of the menu. 3. Use v / V to select a title then press ENTER. The menu options appears on the right side of the menu. 2.
Erasing a Title If you choose to erase a title from the [Edit] menu, the title or chapter is actually deleted from the disc. 4. Use b / B to select [OK] then press ENTER. The lock mark will appear to the left of the title name. 1. Use b / B / v / V to choose a title you want to erase on the [Edit] menu then press ENTER. Repeat this step to select additional title. The menu options appears on the right side of the screen.
Editing a Title by Chapter Adding Chapter Markers The [Chapter Edit] menu is where you can add/delete chapter mark and use other function for chapter. 1. Use b / B / v / V to choose a title on the [Edit] menu then press ENTER. The menu options appears on the right side of the screen. You can create chapters within a title by inserting chapter marks at the desired points. 1. Use b / B / v / V to choose a chapter on the [Chap Edit] menu then press ENTER.
Deleting Chapter Markers Overwriting Recording +RW You can delete chapter markers. 1. Use b / B / v / V to choose a chapter on the [Chap Edit] menu then press ENTER. Repeat this step to select additional chapter. The menu options appears on the right side of the screen. To overwrite a new video recording on a previously recorded title, follow these steps. This feature is not available for DVD+Rs, that always record at the end of the Disc. 2. Select [Del Mark] from the options. 1.
Controlling other TVs with the remote Reference Controlling Your TV with the Supplied Remote Control You can control the sound level, input source, and power switch of your LG TV with the supplied remote. You can control your TV using the buttons below. You can control the sound level, input source, and power switch of non-LG TVs as well. If your TV is listed in the table below, set the appropriate manufacturer code. 1.
Language Codes Use this list to input your desired language for the following initial settings: Disc Audio, Disc Subtitle, Disc Menu.
Troubleshooting Check the following guide for the possible cause of a problem before contacting service. Cause Solution The power cord is disconnected. Plug the power cord into the wall outlet securely. No picture. The TV is not set to receive recorder signal output. Select the appropriate video input mode on the TV so the picture from the recorder appears on the TV screen. The video cable is not connected securely. Connect the video cable securely.
Cause Symptom Cannot play a disc recorded using this recorder on another player. Cannot record or did not record successfully. Timer recording is not possible. Stereo Audio Record and/or Playback is not present. The remote control does not work properly. 46 Solution The disc was recorded in Video mode. Finalize the disc. (page 21) Some players will not play even a finalized disc recorded in Video mode. No solution.
Specifications General Power requirements Power consumption Dimensions (approx.) Mass (approx.) Operating temperature Operating humidity Television system Recording format AC 110-240V, 50/60 Hz 19W 430 X 49 X 300 mm (w x h x d) without foot 2.