User’s Guide L196WTG L196WTQ L196WTY Make sure to read the Important Precautions before using the product. Keep the User's Guide(CD) in an accessible place for future reference. See the label attached on the product and give the information to your dealer when you ask for service.
Important Precautions This unit has been engineered and manufactured to ensure your personal safety, however improper use may result in potential electrical shock or fire hazards. In order to allow the proper operation of all safeguards incorporated in this display, observe the following basic rules for its installation, use, and servicing. On Safety Use only the power cord supplied with the unit.
Important Precautions On Installation Do not allow anything to rest upon or roll over the power cord, and do not place the display where the power cord is subject to damage. Do not use this display near water such as near a bathtub, washbowl, kitchen sink, laundry tub, in a wet basement, or near a swimming pool. Displays are provided with ventilation openings in the cabinet to allow the release of heat generated during operation.
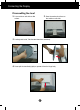
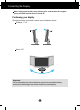
Connecting the Display Before setting up the monitor, ensure that the power to the monitor, the computer system, and other attached devices is turned off. Connecting the stand 1. Place the monitor with its front facing downward on a soft cloth. 2. Assemble the Stand Body into the product in the correct direction as shown in the picture. Hinge Body Stand Body 3. Assemble the Stand Base(Front, Rear) into the Stand Body in the correct direction.
Connecting the Display Disassembling the stand 1. Put a cushion or soft cloth on aflat 2. Place the monitor face Down on surface. the cushion or soft cloth. 3. Pushing Latch inside, Take the stand base from stand body. 4. Please pull the stand body lightly to separate it from the hinge body.
Connecting the Display Before setting up the monitor, ensure that the power to the monitor, the computer system, and other attached devices is turned off. Positioning your display 1. Adjust the position of the panel in various ways for maximum comfort. Tilt Range : -5˚~15˚ Swivel : 355˚ Ergonomic It is recommended that in order to maintain an ergonomic and comfortable viewing position, the forward tilt angle of the monitor should not exceed 5 degrees.
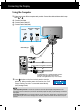
Connecting the Display Using the Computer 1. Make sure to turn off the computer and product. Connect the cable as below sketch map form 1 to 2 . A Connect DVI Cable B Connect Dsub Cable (PC) C Connect Dsub Cable (Mac) Power Cord Analog signal Digital signal D-sub DVI Wall-outlet type PC-outlet type B DVI-D(This feature is not available in all countries.
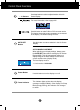
Control Panel Functions Front Panel Controls 6 ZOOMING At the current display, Use 'ez Zooming' Key, then the display resolution is transferred to the one step low resolution. Use 'ez Zooming' Key one more, the display is back to the original display. *Only One touch of ez-zoom, you can fine the best resolution you want and it is possible to magnify the size of characters and pictures for the old not having good eye sight, housewives not dealing with computer well and children.
Control Panel Functions - + Buttons Use these buttons to select or adjust functions in the On Screen Display. For more information, refer to page A15. Use this button to make D-Sub or DVI connector active. This feature is used when two computers are connected to the display. The default setting is D-Sub. AUTO/SET Button Use this button to enter a selection in the On Screen Display.
On Screen Display (OSD) Control Adjustment Screen Adjustment Making adjustments to the image size, position and operating parameters of the display is quick and easy with the On Screen Display Control system. A short example is given below to familiarize you with the use of the controls. The following section is an outline of the available adjustments and selections you can make using the OSD. NOTE Allow the display to stabilize for at least 30 minutes before making image adjustments.
On Screen Display(OSD) Selection and Adjustment The following table indicates all the On Screen Display control, adjustment, and setting menus.
On Screen Display(OSD) Selection and Adjustment You were introduced to the procedure of selecting and adjusting an item using the OSD system. Listed below are the icons, icon names, and icon descriptions of the all items shown on the Menu. Press the MENU Button, then the main menu of the OSD appears.
On Screen Display(OSD) Selection and Adjustment Main menu Sub menu Description PICTURE PICTURE BRIGHTNESS To adjust the brightness of the screen. CONTRAST To adjust the contrast of the screen. GAMMA Set your own gamma value. : -50/0/50 On the monitor, high gamma values display whitish images and low gamma values display high contrast images. MENU : Exit - : Decrease + : Increase SET : Select another sub-menu COLOR PRESET Select the screen color.
On Screen Display(OSD) Selection and Adjustment Main menu Sub menu Description POSITION POSITION HORIZONTAL To move image left and right. VERTICAL To move image up and down. MENU : Exit - : Decrease + : Increase SET : Select another sub-menu TRACKING CLOCK To minimize any vertical bars or stripes visible on the screen background. The horizontal screen size will also change. PHASE To adjust the focus of the display.
On Screen Display(OSD) Selection and Adjustment Main menu Sub menu LANGUAGE To choose the language in which the control names are displayed. OSD POSITION To adjust position of the OSD window on the screen. WHITE BALANCE If the output of the video card is different the required specifications, the color level may deteriorate due to video signal distortion. Using this function, the signal level is adjusted to fit into the standard output level of the video card in order to provide the optimal image.
On Screen Display(OSD) Selection and Adjustment The OSD screen will appear when you touch the button on the left side of the monitor. Menu Name Icons Sub-menu Name FLATRON F-ENGINE Screen when applied Screen when not applied When you execute F-ENGINE, two tones will appear on the screen as shown. The applied screen will appear on the left side, whereas the non-applied screen will appear on the right side.Touch the SET button to use the adjusted screen.
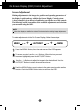
Troubleshooting Check the following before calling for service. No image appears ● Is the power cord of the • Check and see if the power cord is connected properly to the power outlet. display connected? ● Is the power on and the • Adjust the brightness and the contrast. power indicator blue or green? ● Is the power indicator amber? • If the display is in power saving mode, try moving the mouse or pressing any key on the keyboard to bring up the screen. • Try to turn on the PC.
Troubleshooting Display image is incorrect ● Display Position is incorrect. • Press the AUTO/SET button to automatically adjust your display image to the ideal setting. If the results are unsatisfactory, adjust the image position using the H position and V position icon in the on screen display. ● On the screen background, vertical bars or stripes are visible. • Press the AUTO/SET button to automatically adjust your display image to the ideal setting.
Troubleshooting Display image is incorrect ● The screen color is mono or abnormal. • Check if the signal cable is properly connected and use a screwdriver to fasten if necessary. • Make sure the video card is properly inserted in the slot. • Set the color setting higher than 24 bits (true color) at Control Panel - Settings. ● The screen blinks. • Check if the screen is set to interlace mode and if yes, change it to the recommend resolution.
Specifications L196WTG/L196WTQ/L196WTY Display 19 inches (48.14 cm) Flat Panel Active matrix-TFT LCD Glare coating(L196WTG), Anti-Glare coating(L196WTQ/L196WTY) 19 inches viewable 0.285*0.285 mm pixel pitch Sync Input Horizontal Freq. Vertical Freq.
Specifications Preset Modes (Resolution) 19 inch monitor Display Modes (Resolution) 1 2 3 4 5 6 7 8 9 10 11 12 13 14 *15 **16 Horizontal Freq. (kHz) 640 x 350 720 x 400 640 x 480 640 x 480 800 x 600 800 x 600 832 x 624 1024 x 768 1024 x 768 1152 x 870 1152 x 900 1280 x 1024 1280 x 1024 1440 x 900 1440 x 900 1440 x 900 31.469 31.468 31.469 37.500 37.879 46.875 49.725 48.363 60.123 68.681 61.805 63.981 79.976 55.500 55.935 70.635 Vertical Freq.
Installing the Wall mount plate This monitor satisfies the specifications of the Wall mount plate or the interchange device. 1. Place the monitor with its front facing downward on a soft cloth. 2. Separate the stand using a screwdriver as shown in the picture. 3. Install the Wall mount plate. Wall mount plate(Separate purchase) This is stand-type or wall mount type and is connectable with Wall mount plate.
Digitally yours