
Installation Guide


11
INSTALLATION INSTRUCTIONS
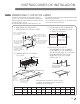
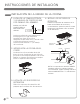
5. ASSEMBLE THE SURFACE BURNERS
CAUTION
DO NOT operate the burners without all parts in
place.
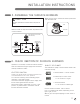
Place the burner caps and heads on the cooktop.
Make sure that the caps and heads are placed in the
correct locations.
Make sure the hole in the burner head is positioned
over the electrode.
6. CHECK IGNITION OF SURFACE BURNERS
Operation of all cooktop burners should be checked
after the COOKTOP and gas supply lines have been
carefully checked for leaks.
ELECTRIC IGNITION
Select a top burner knob, push down and then turn
counterclockwise to the “LITE” position.
You can hear a clicking sound indicating proper
operation of the spark module.
Once the air has been purged from the supply lines,
burner should ignite within 4 seconds.
After burner ignites, rotate knob out of the “LITE”
position. Try each burner in succession until all
burners have been checked.
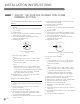
QUALITY OF FLAMES
The combustion quality of burner flames needs to be
confirmed visually.
A Yellow flames — Call for service
B Yellow tips on outer cones
— It is normal for LP gas
C Soft blue flames
— It is normal for natural gas
If burner flames look like A, call for service.
B or C is normal burner flames, depending on the
type of gas you use.
With LP gas, some yellow tipping on outer cones is
normal.
Hole
Electrode
(Center)
Medium burner
head and cap
Lrage burner
head and cap
Small burner
head and cap
Extra large burner
head and cap