INSTALLATION Installation Overview Please read the following installation instructions first after purchasing this product or transporting it to another location.
1_MFL67855701_Eng.indd 2 11 2013.7.24 11:44:56 AM INSTALLATION Specifications ENGLISH improvements. 24 cu. ft. models 32 3/4’’ (W) X 34 7/8’’ (D) X 69 7/8’’ (H), 62 ¾’’ (D w/ door open) 833.1 mm (W) X 886.4 mm (D) X 1775.5 mm (H), 1592.5 mm (D w/ door open) Dimensions Net weight 22 cu. ft. models 29 3/4’’ (W) X 34 7/8’’ (D) X 68 ½’’ (H), 59 ¾ (D w/ door open) 756.9 mm (W) X 886.4 mm (D) X 1739.9 mm (H), 1516.5 mm (D w/ door open) 24 cu. ft. models 248.5 lb. (112.
1_MFL67855701_Eng.indd 3 2013.7.24 11:44:58 AM INSTALLATION Unpacking Your Refrigerator Choosing the Proper Location . . Use two or more people to move and . install the refrigerator. Failure to do so can result in back or other injury. Your refrigerator is heavy. When moving the refrigerator for cleaning or service, the refrigerator straight out when moving it. Do not wiggle or walk the refrigerator . could occur. such as gasoline, away from the refrigerator.
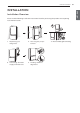
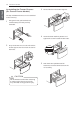
1_MFL67855701_Eng.indd 4 2013.7.24 11:44:58 AM 13 INSTALLATION Ambient Temperature ENGLISH Install this appliance in an area where the temperature is between 55°F (13°C) and 110°F (43°C). If the temperature around the appliance is too low or high, cooling ability may be adversely affected. Removing/Assembling the Refrigerator Door Handles NOTE When it is necessary to move the refrigerator through a narrow opening, removing the doors is the recommended procedure.
1_MFL67855701_Eng.indd 5 2013.7.24 11:44:59 AM INSTALLATION 14 Removing the Handle Removing/Assembling the Doors and Drawers When it is necessary to move the refrigerator through a narrow opening, removing the doors is the recommended procedure. 1 Loosen the set screws located on the 3 lower side of the handle with a /32 in. (2.5 mm) Allen wrench and remove the handle. 2 Loosen the mounting fasteners . that connect to the freezer drawer and handle using a 1/4 in. (6.
1_MFL67855701_Eng.indd 6 2013.7.24 11:44:59 AM 15 INSTALLATION ENGLISH Removing the Refrigerator Door Assembling the Refrigerator Door 1 Remove the top hinge cover screws . Lift the hook (not visible), located at the bottom of the front side of the cover , with a flat-head screwdriver. 1 Make sure that the plastic sleeve is inserted in the bottom of the door. Lower the door onto the middle hinge pin as shown in the figure.
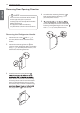
1_MFL67855701_Eng.indd 7 2013.7.24 11:44:59 AM INSTALLATION 4 Slide out the bar. ENGLISH Removing the Freezer Drawers (On Freezer Drawer Models) The top and bottom drawers are all removed in the same way. In the following figures, the Pullout Drawer located above the freezer drawer is not shown for clarity. WARNING . Use two or more people to remove and install the freezer drawer. Failure to do so can result in back or other injury. . Do not hold the handle when removing or replacing the drawer.
1_MFL67855701_Eng.indd 8 17 2013.7.24 11:45:0 AM INSTALLATION ENGLISH Assembling the Freezer Drawers (On Freezer Drawer Models) 3 Reinstall the bar in the drawer supports. 4 Lower the door into final position and tighten the screws located on both sides. 5 With the drawer pulled out to full extension, insert the lower basket in the rail assembly. The top and bottom drawers are all assembled in the same way. 1 2 Using two hands, pull out both rails simultaneously until they are fully extended.
1_MFL67855701_Eng.indd 9 2013.7.24 11:45:2 AM INSTALLATION Assembling the Freezer Door (On Freezer Swing Models) Before beginning, make sure you completely remove the refrigerator door. 1 P lac e the f re e ze r door dow n on the bottom hinge pin. See Removing the Refrigerator Door (p.15) WARNING . Use two or more people to remove and Bottom Hinge Pin install the freezer door. Failure to do so can result in back or other injury. . When you lay the door down, be careful .
1_MFL67855701_Eng.indd 10 19 2013.7.24 11:45:2 AM INSTALLATION Reversing Door Opening Direction ENGLISH 4 NOTE To assist in the installation of the handle on the right side, place a piece of masking tape near the top of the handle before removing it. The appearance of the handle may vary from what is shown in the illustrations. Reversing the Refrigerator Handle 1 Loosen the set screws with a 3/32 in. (2.5 mm) Allen wrench and remove the handle.
1_MFL67855701_Eng.indd 11 2013.7.24 11:45:3 AM INSTALLATION 20 4 Remove the four screws , the hinge and the hinge pin brackets pin insert from the bottom right side of the door. 1 2 3 1 Remove the top hinge cover screws . Lift the hook (not visible), located at the bottom of the front side of the cover , with a at-head screwdriver. 3 5 Reinstall the hinge pin brackets 1 , screws 2 and hinge pin insert left side of the door. 3 on the bottom 2 Using a13/32 in.
1_MFL67855701_Eng.indd 12 2013.7.24 11:45:4 AM 21 INSTALLATION 7 ENGLISH With a flat-head screwdriver, carefully pry off and remove the cover over the bolt holes on the left side of the refrigerator. 11 Insert the decorative screw into the outer hole on the right side of the flange. Attach the cover on the right side. Cover is forcefitted. Decorative Screw 8 9 10 Remove the outer lower decorative screw from the flange on the frame between the freezer and refrigerator doors.
1_MFL67855701_Eng.indd 13 2013.7.24 11:45:5 AM INSTALLATION 22 NOTE 14 1 Remove the top hinge cover screws . Lift the hook (not visible), located at the bottom of the front side of the cover , with a flat-head screwdriver. 2 Using a 10mm or 13/32 in. socket wrench, remove the three bolts and lift off the top hinge. Set parts aside. Line up the left top hinge with the holes in the top of the refrigerator. Use the three bolts to replace the hinge. Assemble the left hinge cover with the two screws.
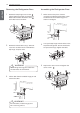
1_MFL67855701_Eng.indd 14 2013.7.24 11:45:6 AM 23 INSTALLATION 4 ENGLISH Remove the four screws 1 , the hinge pin insert 2 and the hinge pin brackets from the bottom right side of the door. NOTE 3 Before removing the freezer door, make sure you completely remove the refrigerator door. 6 3 Use a ¼ in. (6.35 mm) hex socket wrench to loosen the hinge pin 1 and remove it. Remove the two bolts 2 , the screw 3 and the hinge 4 . Remove the washer.
1_MFL67855701_Eng.indd 15 2013.7.24 11:45:9 AM INSTALLATION 24 9 12 On th cap 1 and a pivot 2 . Remove them with on the opposite side ( the cap goes on the right and the pivot on the left). Screw Bolts 10 Remove the four screws 1 , the hinge pin brackets 2 and the hinge pin insert from the bottom right side of the freezer door. 3 3 11 Reinstall the hinge pin insert 1 , the hinge pin brackets 2 and the screws 3 on the bottom left side of the door.
1_MFL67855701_Eng.indd 16 2013.7.24 11:45:11 AM 25 INSTALLATION 14 Using a 13/32 in. or 10 mm socket wrench ENGLISH with a 2 in. (50.8 mm) extension and a screwdriver, tighten the two bolts and the screw, and assemble the bottom hinge on the left side of the flange. 15 Attach the hinge pin using a ¼ in. (6.35 mm) socket wrench. 18 Flip the middle hinge bracket and position it on the left side of the refrigerator and reattach it with two bolts and a screw.
1_MFL67855701_Eng.indd 17 2013.7.24 11:45:13 AM INSTALLATION 26 21 Insert the decorative screw into the outer hole on the right side of the flange. Attach the cover on the right side. Cover is forcefitted. The left top hinge, right hinge cap and left hinge cover are provided for reversing doors. 24 Line up the left top hinge with the holes in the top of refrigerator. Use the three bolts to replace the the hinge. Assemble the left hinge cover with the two screws.
1_MFL67855701_Eng.indd 18 2013.7.24 11:45:14 AM 27 INSTALLATION Connecting the Water Line ENGLISH Before You Begin This water line installation is not covered by the refrigerator warranty. Follow these instructions carefully to minimize the risk of expensive water damage. Water hammer (water banging in the pipes) in house plumbing can cause damage to refrigerator before installing the water supply line to the refrigerator.
1_MFL67855701_Eng.indd 19 2013.7.24 11:45:15 AM INSTALLATION 28 . Shutoff valve to connect to the cold water line. The shutoff valve should have a water inlet with a minimum inside diameter of 5/32 in. (4 mm) at the point of connection to the COLD WATER LINE. Saddle-type shutoff valves are included in many water supply kits. Before purchasing, make sure a saddle-type valve complies with your local plumbing codes. 2 CHOOSE THE VALVE LOCATION Choose a location for the valve that is easily accessible.
1_MFL67855701_Eng.indd 20 2013.7.24 11:45:16 AM 29 INSTALLATION 5 ENGLISH TIGHTEN THE PIPE CLAMP Tighten the clamp screws until the sealing washer begins to swell. 8 NOTE: Do not overtighten the clamp or you may crush the tubing. Shut the water off at the water valve after about one quart of water has been flushed through the tubing. Washer Pipe Clamp FLUSH OUT THE TUBING Turn the main water supply on and flush out the tubing until the water is clear.
1_MFL67855701_Eng.indd 21 2013.7.24 11:45:19 AM INSTALLATION 30 10 CAUTION Check to see if leaks occur at the water line connections. 11 PLUG IN THE REFRIGERATOR Arrange the coil of tubing so that it does not vibrate against the back of the refrigerator or against the wall. Push the refrigerator back to the wall. 12 START THE ICEMAKER Set the icemaker power switch to the ON position. The icemaker will not begin to operate until it reaches its operating temperature of 15°F (–9°C) or below.
1_MFL67855701_Eng.indd 22 2013.7.24 11:45:20 AM 31 INSTALLATION Leveling and Door Alignment ENGLISH Leveling Door Alignment After installing, plug the refrigerator’s power cord into a 3-prong grounded outlet and push the refrigerator into the final position. If the space between your doors is uneven, follow the instructions below to align the doors. Your refrigerator has two front leveling legs— one on the right and one on the left.