
Use and Care Manual

13
ENGLISH
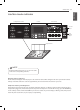
FEATURES
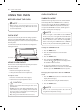
If UPPER TIMER ON/OFF or LOWER TIMER ON/OFF
is not pressed, the timer will return to the time of day.
NOTE
4. When the set time has run out, End will show in
the display. The indicator tones will sound every
15 seconds until UPPER TIMER ON/OFF or LOWER
TIMER ON/OFF is touched.
If the remaining time is not in the display, recall the
remaining time by touching the UPPER TIMER ON/
OFF or LOWER TIMER ON/OFF.
NOTE
• If you press UPPER TIMER ON/OFF or LOWER
TIMER ON/OFF once, it allows you to set the time in
seconds.
• If you press UPPER TIMER ON/OFF or LOWER
TIMER ON/OFF twice, it allows you to set the time
in minutes.
NOTE
To cancel the Timer before the set time has run
out:
1. Press UPPER TIMER ON/OFF or LOWER TIMER ON/
OFF once.
The display will return to the time of day
OVEN TEMPERATURE
ADJUSTMENT
You may find that your new oven cooks differently than
the one it replaced. Use your new oven for a few weeks
to become more familiar with it before changing the
temperature settings. If after familiarizing yourself with
the new oven, and you still think that it is too hot or too
cold, you can adjust the oven temperature yourself.
Adjusting the oven temperature
1. Press the SETTING button once for lower oven or
twice for upper oven. “L-AJ” or “U-AJ” will appear in
the display
2. Using the number buttons, enter the amount of
degrees that you wish to adjust the oven.
3. Press the SETTING button repeatedly to toggle
between plus (+) or minus (-) to adjust the
temperature either up or down.
4. Press the START button to accept the change.
• This adjustment will not affect the broiling or
Self Clean temperatures. The adjustment will be
retained in memory after a power failure. The oven
temperature can be increased (+) or decreased (-)
as much as 35°F or 19°C.
• Once the temperature is increased or decreased,
the display will show the adjusted temperature
until it readjusts.
NOTE
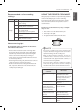
PREHEATING ALARM LIGHT
When the oven reaches its set-temperature, the
preheating alarm light will flash until the oven door is
opened.
You can activate or deactivate the preheating alarm light.
1. Press the SETTING button three times. “PrE” will
appear in the display.
2. You can change ON or OFF by pressing the number 1
button.
3. Press the START button to accept the change.
BEEPER VOLUME
1. Press the SETTING button four times and “BEEP” will
appear in the display.
2. You can change Hi or Lo, OFF by pressing the number
1 button.
3. Press the START button to accept the change.
FAHRENHEIT OR CELSIUS
The oven temperature settings can either be set to
Fahrenheit or Celsius. The oven defaults to Fahrenheit
unless changed by the user.
1. Press the SETTING button five times. “UNIT” will
appear in the display.
2. You can change F (Fahrenheit) or C (Celsius) by
pressing the number 1 button.
3. Press the START button to accept the change.