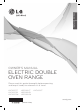
ENGLISH ESPAÑOL OWNER’S MANUAL ELECTRIC DOUBLE OVEN RANGE Please read this guide thoroughly before operating and keep it handy for reference at all times. LDE3037ST LDE3037SB LDE3037SW LDE3035ST LDE3035SB LDE3035SW LDE3031ST www.lg.com (REV.
TABLE OF CONTENTS TABLE OF CONTENTS 3 10 iMPORTANT SAFETY INSTRUCTIONS 23 Recommended convection roast guide (on some models) 24 OVERVIEW 10 Accessories 11 Range overview 13 Control panel overview 14 FEATURES 14 Settings 14 Clock 15 Timer on/off 15 Convection auto conversion (on some models) 15 Oven temperature adjustment 16 Language (on some models) 16 Preheating alarm light 16 Beeper volume 16 Fahrenheit or celsius 16 Oven light 16 Lockout 17 Start time (Delayed timed
IMPORTANT SAFETY INFORMATION 3 Read and follow all instructions before using your oven to prevent the risk of fire, electric shock, personal injury, or damage when using the range. This guide does not cover all possible conditions that may occur. Always contact your service agent or manufacturer about problems that you do not understand. Download this owner's manual at: http://www.lg.com. This is the safety alert symbol.
IMPORTANT SAFETY INFORMATION Anti-tip bracket Screw must enter wood or concrete Wall plate • B e cer tain that your appliance is properly installed and grounded by a qualified technician. approximately 0.65”(16.5mm) • D o not repair or replace any part of the appliance unless specifically r ecommended in the manual. All other servicing should be performed by a qualified technician. • Always disconnect power from the appliance before servicing.
IMPORTANT SAFETY INFORMATION 5 REMOVE FLAMMABLE AND EXPLOSIVE MATERIAL FROM THE APPLIANCE WARNING • B e certain that all packing materials are removed from the appliance before operating. Keep plastic, clothes, paper, and other flammable materials away from parts of the appliance that may become hot. • Do not store or use flammable material in the oven or near or on the cooktop.
IMPORTANT SAFETY INFORMATION • Do Not allow aluminum foil or the temperature probe to contact heating elements. • Before replacing your oven light bulb, switch off the electrical power to the oven at the main fuse or circuit breaker panel. Failure to do so can result in severe personal injury, death, or electrical shock. PAN PLACEMENT • Do not place food or cookware on the bottom of the oven cavity. Doing so will cause permanent damage to the oven bottom finish.
IMPORTANT SAFETY INFORMATION 7 CHILD SAFETY WARNING • Keep children and pets away from the oven. • Accessible parts may become hot when the grill is in use. • During normal operation (self-clean cycle, bake, etc.) DO NOT touch the hot surface between the bottom of the oven door and the top of the drawer on the front of the oven. Doing so is a burn hazard and will cause injury. • Never let a child hang on the oven door. • Do not allow children to crawl into the oven.
IMPORTANT SAFETY INFORMATION • Let hot utensils cool in a safe place, out of reach of small children. •C hildren should not be allowed to play with controls or other parts of the appliance. GLASS/CERAMIC COOKING SURFACES Stand to the side of the range when opening the oven door. The hot air and steam that escape can cause burns to hands, face and eyes. WARNING • DO NOT TOUCH SURFACE UNITS OR AREAS NEAR UNITS. • Do not use the pan less than 7" diameter for the front surface units.
IMPORTANT SAFETY INFORMATION 9 SAFETY WHEN CLEANING CAUTION • Open a window or turn on a ventilation fan or hood before self cleaning. • Do Not Use Oven Cleaners. No commercial oven cleaner or oven liner protective coating of any kind should be used in or around any part of the oven. • Before self cleaning the oven. Remove broiler pan, all oven racks, meat probe and any other utensils from the oven cavity. • Never keep pet birds in the kitchen.
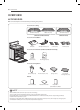
OVERVIEW OVERVIEW ACCESSORIES Make sure that all parts are included after purchasing this product.
OVERVIEW Make sure to understand the names and function of each part. * Throughout this manual, the features and appearance may vary depending on your model.
OVERVIEW RANGE OVERVIEW For model : LDE3031 Single element Single element Ceramic glass Name & Rating label Single element Single element Automatic oven light switch Gasket Racks Warning label Upper oven door Racks Anti-tip bracket Lower oven door
OVERVIEW 13 ENGLISH CONTROL PANEL OVERVIEW For model : LDE3037 Cooktop Element Control Features Oven Controls Clear Off Button Start/ Lockout Button For model : LDE3035 Number Buttons For model : LDE3031 NOTE Cooktop Element Controls are set up in the same order as the corresponding elements. HS (Hot Surface) Indicator The HS indicator will appear in the display once the element is turned off or during the self clean cycle.
FEATURES FEATURES SETTINGS Use the SETTING button to set Convection Auto Conversion (on some models), Language (on some models), Adjust oven temperature, Preheating Alarm Light, Beeper Volume and to switch temperature scale between Fahrenheit and Celsius. Minimum & Maximum default settings All of the features listed have a minimum and a maximum time or temperature setting that may be entered into the control. An entry acceptance beep will sound each time a control key is pressed.
FEATURES 15 The UPPER or LOWER TIMER ON/OFF serves as an extra timer in the kitchen that will beep when the set time has run out. It does not start or stop cooking. The UPPER or LOWER TIMER ON/OFF feature can be used during any of the other oven control functions. The UPPER and LOWER TIMER can be operated independently of each other. To set the Timer (example to set 5 minutes): 1. Press UPPER TIMER ON/OFF or LOWER TIMER ON/ OFF twice. 0:00 will appear and TIMER will flash in the display. 2.
FEATURES LANGUAGE (ON SOME MODELS) OVEN LIGHT The default language of the display is English. It can be changed to Spanish or French. The interior oven light automatically turns ON when the door is opened. The oven light may also be manually turned ON or OFF by pressing the OVEN LIGHT button. 1. Press the SETTING button until “Lng” appears in the display. Press the 1 button for English, 2 button for Spanish, or the 3 button for French. 2. Press the START button to accept the change.
FEATURES 17 COOK TIME (TIMED COOK) The automatic timer of the DELAYED TIMED COOK function will turn the oven ON and OFF at the time you select. This feature can only be used with the: BAKE, CONVECTION BAKE and CONVECTION ROAST modes. The TIMED COOK feature allows you to set the oven to cook for a specific length of time. This feature can only be used with the BAKE, CONVECTION BAKE, CONVECTION ROAST and FAVORITE modes.
USING THE COOKTOP USING THE COOKTOP COOKING AREAS The cooking areas on your range are identified by permanent circles on the glass cooktop surface. For the most efficient cooking, fit the pan size to the element size. Pans should not extend more than 1/2 to 1-inch beyond the cooking area. When a control is turned on, a glow can be seen through the glass cooktop surface. The element will cycle on and off to maintain the preset heat setting, even on Hi.
USING THE COOKTOP 19 To turn on the Warming Zone (on some models) WARM ZONE DUAL You are able to adjust the dual element according to the pot/pan size that you are using. Inner element Outer element Use the Warming Zone to keep food warm after it has already been cooked. The warming zone is not meant for cooking food. Attempting to cook uncooked or cold food on the warming zone could result in a food borne illness. 1. Press the warming zone ON/OFF button. The warming zone indicator light will flash.
USING THE COOKTOP Recommended surface cooking settings 5.5-8.0 • Hold a rapid boil, frying, deep fat fry • Quickly brown or sear food Using the proper cookware can prevent many problems, such as food taking longer to cook or achieving inconsistent results. Proper pans will reduce cooking times and cook food more evenly. Stainless steel is recommended. 3.5-5.
USING THE OVEN 21 BEFORE USING THE OVEN NOTE • W hen using an oven thermometer in the oven cavity, the temperature may differ from the actual set oven temperature. NOTE (ON SOME MODELS) • I t is normal for the convection fan to run while preheating during a regular bake cycle. • T he convection fan motor may run periodically during a regular bake cycle. OVEN VENT Areas near the vent may become hot during operation and may cause burns. Do not block the vent opening.
USING THE OVEN BAKE BAKE is used to prepare foods such as pastries, breads, casseroles. The oven can be programmed to bake at any temperature from 170°F (77°C) to 550°F (288°C). The default temperature is 350°F (177°C). Setting the BAKE function (example, 375°F): 1. Press the BAKE button. 2. Set the oven temperature using the number buttons: Press 3, 7 and 5. 3. Press the START button. The oven will start to preheat.
USING THE OVEN 23 RECOMMENDED CONVECTION ROAST GUIDE (ON SOME MODELS) The CONVECTION ROAST feature is designed to give optimum roasting performance. CONVECTION ROAST combines cooking with the convection fan to roast meats and poultry. The heated air circulates around the food from all sides, sealing in juices and flavors. Foods are crispy brown on the outside while staying moist on the inside. Convection roasting is especially good for large tender cuts of meat, uncovered.
USING THE OVEN RECOMMENDED BAKING AND ROASTING GUIDE For model : LDE3037 Baking results will be better if baking pans are centered in the oven as much as possible. If cooking on multiple racks, place the oven racks in positions AS SHOWN BELOW FIGURE.
USING THE OVEN 25 Smoking The Broil function uses intense heat from the upper heating element to cook food. BROIL works best for tender cuts of meats, fish, and thinly cut vegetables. Due to the intense heat associated with broiling, it is normal to experience smoke during the cooking process. This smoke is a natural byproduct of searing and should not cause you to worry. If you are experiencing more smoke than you are comfortable with, use the following tips to reduce the amount of smoke in your oven.
USING THE OVEN RECOMMENDED BROILING GUIDE The size, weight, thickness, starting temperature, and your preference of doneness will affect broiling times. This guide is based on meats at refrigerator temperature. For best results when broiling, use a pan designed for broiling (refer to the Fig.1) Fig.1 NOTE (ON SOME MODELS) • When doing the broil cook on the rack position ‘E’ in the lower oven, use the offset rack provided for better cooking result.
USING THE OVEN 27 To set the WARM function after timed cooking: Beef 1. Select the cooking function. • Steaks and chops should always be allowed to rest for five minutes before cutting into them and eating. This allows the heat to distribute evenly through the food and creates a more tender and juicy result. • Consider removing thick pieces of meat from the refrigerator 30 minutes prior to cooking. This will help them cook more quickly and evenly, and will produce less smoke when broiling.
USING THE OVEN KIDS MEAL (ON SOME MODELS) FAVORITES (ON SOME MODELS) This function is specially designed to cook popular kids foods such as regular crust pizza, rising crust pizza, fresh pizza, chicken nuggets, french fries, and hamburger patties. The FAVORITES function is used to record and recall your favorite recipe settings. You can store and recall up to three different settings. When using this function, there is no need to preheat the oven prior to cooking. Setting the KIDS MEAL function: 1.
USING THE OVEN 29 Pizza is used when cooking pizza especially. Pizza adds the oven from top to bottom to give more evenly browned foods. This is designed to give the most optimum cooking performance for the pizza selected by automatic combination of broil and bake heating system. When using this function, there is no need to preheat the oven prior to cooking. By using smaller space than lower oven, it also provides heating efficiency. NOTE This function is offered only for the UPPER OVEN.
CARE AND CLEANING CARE AND CLEANING CLEANING THE GLASS/CERAMIC COOKTOP CAUTION Burned-on Residue 1. While the cooktop is still hot, remove any burnton deposits or spilled food from the glass/ceramic cooking surface with a suitable metal razor scraper (similar to scraping paint off of a windowpane - it will not damage the decorated cooking surface). Hold the scraper at an approximate 30° angle to the cooktop. • DO NOT use scrub pads or abrasive cleaning pads. They may damage your cooktop surface.
CARE AND CLEANING 31 1. Be careful not to slide pots and pans across the cooktop. Doing so will leave metal markings on the cooktop surface. To help remove these marks, use a ceramic cooktop cleaner with a cleaning pad for ceramic cooktops. 2. If pots with a thin overlay of aluminum or copper are allowed to boil dry, the overlay may leave black discoloration on the cooktop. This should be removed immediately before heating again or the discoloration may be permanent.
CARE AND CLEANING Setting Self Clean During Self Clean The Self- Clean function has cycle times of 3, 4, or 5 hours. • The self clean cycle uses extremely hot temperatures to clean the oven cavity. While running the Self Clean cycle, you may notice smoking or an odor. This is normal, especially if the oven is heavily soiled. • As the oven heats, you may hear sounds of metal parts expanding and contracting. This is normal and will not damage the oven.
CARE AND CLEANING 33 LG’s new oven with EasyClean™ enamel technology gives you two cleaning options for the inside of your range. The EasyClean™ feature takes advantage of LG’s new enamel to help lift soils without harsh chemicals, and it runs using ONLY WATER for just 20 minutes in low temperatures to help loosen LIGHT soils before hand-cleaning. While EasyClean™ is quick and effective for small and LIGHT soils, the Self Clean feature can be used to remove HEAVY builtup soils.
CARE AND CLEANING EasyClean™ INSTRUCTION GUIDE 1. Remove oven racks and accessories from the oven. 2. Scrape off and remove any burnt-on debris with a plastic scraper. Suggested plastic scrapers: • Hard plastic spatula • Plastic pan scraper • Plastic paint scraper • Old credit card 3. Fill a spray bottle with 1¼ cups (10 oz or 300 ml) of water and use the spray bottle to thoroughly spray the inside surfaces of the oven. 7. A tone will sound at the end of the 20-minute cycle.
CARE AND CLEANING 35 Broiler Pan and Grid Painted and Decorative Trim For general cleaning, use a cloth with hot soapy water. For more difficult soils and built-up grease, apply a liquid detergent directly onto the soil. Leave it on for 30 to 60 minutes. Rinse with a damp cloth and dry. Do not use abrasive cleaners. Stainless Steel Surfaces (on some models) To avoid scratches, do not use a steel wool pads. 1.
CARE AND CLEANING REMOVING & REPLACING THE LIFT-OFF OVEN DOOR CAUTION • Be careful when removing and lifting the door. • DO NOT lift the door by the handle. - The door is very heavy. To replace the door: 1. Be sure both hinges are in a 30 degree position. 2. Slide the door back onto the hinges until you hear a solid click and the release buttons have engaged. UPPER OVEN To remove the door: 1. Fully open the door. 2. Lift up on the hinge lock toward the oven frame until they stop. 3.
CARE AND CLEANING 37 To replace the door: To remove the door: 1. Firmly grasp both sides of the door at the top. 1. Fully open the door. 2. Pull the hinge locks up toward the door frame to the unlocked position. Lock Unlock Slot 2. With the door at the same angle as the removal position, seat the indentation of the hinge arm into the bottom edge of the hinge slot. The notch in the hinge arm must be fully seated into the bottom edge of the slot. Hinge lock Hinge arm 3.
FAQs FAQs What types of cookware are recommended to use with my cook top? During convection cooking the fan stops when I open the door. Is that normal? • The pans must have a flat bottom and straight sides. • Only use heavy- gauge pans. • The pan size must match the amount of food to be prepared and the size of the surface element. • Use tight fitting lids. • Only use flat bottom woks. Yes, this is normal. When the door is opened, the convection fan will stop until the door is closed.
FAQs 39 Make sure that the range is not in Lockout mode. The lock symbol will show in the display if Lockout is activated. To deactivate Lockout, press and hold the START button for three seconds. The unlock melody will sound and UNLOCKING will appear in the display until the controls are unlocked. My range is still dirty after running the EasyClean™ cycle. What else should I do? The EasyClean™ cycle only helps to loosen light soils in your oven range to assist in hand-cleaning of your oven.
TROUBLESHOOTING TROUBLESHOOTING BEFORE CALLING FOR SERVICE Before you call for service, review this list.It may save you time and expense. The list includes common occurrences that are not the result of defective workmanship or materials in this appliance. Problem Possible Causes / Solutions Range is not level. • P oor installation. Place oven rack in center of oven. Place a level on the oven rack. Adjust leveling legs at base of range until the oven rack is level.
TROUBLESHOOTING 41 Possible Causes / Solutions Oven will not work • Plug on range is not completely inserted in the electrical outlet. - Make sure electrical plug is plugged into a live, properly grounded outlet. • A fuse in your home may be blown or the circuit breaker tripped. - Replace the fuse or reset the circuit breaker. • Oven controls improperly set. - See the Using the oven section. • Oven too hot. - Allow the oven to cool to below locking temperature. Steam is exhausted through the oven vent.
TROUBLESHOOTING Problem Possible Causes / Solutions Food does not broil properly • A luminum foil used on the the broiling pan and grid has not been fitted properly and slit as recommended. - See the Using the Oven section. • In some areas the power voltage may be low. - Preheat the broil element for 5-7 minutes - See the Broiling Guide. Oven temperature too hot or too cold • Oven Sensor needs to be adjusted. - See the adjusting your oven Temperature in option section.
TROUBLESHOOTING 43 Possible Causes / Solutions Excessive smoking during a self clean cycle • Excessive soil. - Press the CLEAR OFF button. Open the windows to rid the room of smoke. Wait until the self clean mode is cancelled. Wipe up the excess soil and reset the clean. Oven door do not open after a self clean cycle • Oven is too hot. - Allow the oven to cool below locking temperature. Oven not clean after a self clean cycle • Oven controls not properly set. - See the Self Clean section.
WARRANTY WARRANTY (USA) LG Electronics Inc. will repair or replace your product, at LG’s option, if it proves to be defective in material or workmanship under normal use, during the warranty period set forth below, effective from the date of original consumer purchase of the product. This limited warranty is good only to the original purchaser of the product and effective only when used in U.S.A. WARRANTY PERIOD HOW SERVICE IS HANDLED One Year From the date of the original purchase.
ESPAÑOL MANUAL DE PROPIETARIO ESTUFA ELÉCTRICA DE DOBLE HORNO Lea detenidamente estas instrucciones antes utilizar y guárdelas como referencia para el futuro. LDE3037ST LDE3037SB LDE3037SW LDE3035ST LDE3035SB LDE3035SW P/No.: MFL63291204 LDE3031ST www.lg.
2 ÍNDICE ÍNDICE 3 IMPORTANTES INSTRUCCIONES DE SEGURIDAD 11 (en algunos modelos) 25 Guía de Recomendaciones para Hornear y Asar 26 Asado a la parrilla DESCRIPCIÓN GENERAL 11 Accesorios 12 Descripción general de la cocina 14 Descripción general del panel de control 15 CARACTERÍSTICAS 15 Configuración 15 Reloj 16 Temporizador encendido/apagado 16 Conversión automática de convección (en algunos modelos) 16 Ajustes para la Temperatura del Horno 17 Idioma (en algunos modelos) 17 Luz de
IMPORTANTES INSTRUCCIONES DE SEGURIDAD 3 IMPORTANTES INSTRUCCIONES DE SEGURIDAD Usted puede descargar el manual de usuario en http://www.lg.com. E ste es el símbolo de alerta de seguridad. Este símbolo lo alerta sobre los posibles riesgos que pueden causar daños a la propiedad y/o lesiones físicas graves o la muerte. Todos los mensajes de seguridad estarán precedidos por el símbolo de alerta de seguridad y la palabra «ADVERTENCIA» o «PRECAUCIÓN».
4 IMPORTANTES INSTRUCCIONES DE SEGURIDAD Soporte Anti-vuelco Debe introducirse el tornillo en la madera o en el hormigón • Asegúrese de que un técnico calificado realice la instalación y puesta a tierra de este electrodoméstico en forma Aproximadamente adecuada. 0,65” (16,5mm) • N o repare ni reemplace ninguna parte del electrodoméstico, salvo que esté específicamente recomendado en el manual. Cualquier otra reparación deberá ser realizada por un técnico calificado.
IMPORTANTES INSTRUCCIONES DE SEGURIDAD 5 ADVERTENCIA • No pise ni se siente sobre la puerta del horno. Instale el soporte anti-vuelco que se encuentran embalados junto con la cocina. - La cocina podría tumbarse y el derrame de líquidos o alimentos calientes o la caída de la cocina misma podrían provocar lesiones.
6 IMPORTANTES INSTRUCCIONES DE SEGURIDAD • Use prendas adecuadas. No lleve prendas sueltas o colgantes que pueden encenderse si entran en contacto con superficies calientes y causen quemaduras graves. • Los objetos metálicos como latas sin abrir no se deben dejar en la superficie de la unidad o ser calentados en el horno. La presión en los contenedores puede hacerlos estallar y provocar lesiones • NO utilice el horno para secar ropa.
IMPORTANTES INSTRUCCIONES DE SEGURIDAD 7 SEGURIDAD DURANTE SU USO ESPAÑOL • No toque los estantes del horno cuando estén calientes. • Si el bastidor debe ser movido mientras el horno está caliente, no permita que la agarradera en contacto con el elemento de calentamiento en el horno caliente. • Siempre utilice agarraderas o guantes de cocina al retirar la comida del horno o de la hornalla calentadora central. Los recipientes de cocción estarán calientes.
8 IMPORTANTES INSTRUCCIONES DE SEGURIDAD SEGURIDAD DE LOS NIÑOS ADVERTENCIA • Mantenga a los niños y a las mascotas lejos del horno. • Nunca permita que un niño se cuelgue de la puerta del horno. • No permita que los niños se arrastren hacia adentro del horno. • Las partes accesibles pueden calentarse cuando la parrilla está en uso.
IMPORTANTES INSTRUCCIONES DE SEGURIDAD 9 • Limpie inmediatamente los derrames sobre el área de cocción para evitar una posterior tarea intensa de limpieza. •S i posee gabinetes de almacenamiento directamente sobre la superficie de cocción, limítelos a objetos que se usen con poca frecuencia y que puedan almacenarse de manera segura en un lugar expuesto al calor. Las altas temperaturas pueden ser peligrosas para objetos como líquidos volátiles, limpiadores o aerosoles.
10 IMPORTANTES INSTRUCCIONES DE SEGURIDAD SEGURIDAD AL LIMPIAR PRECAUCIÓN • Abra una ventana y encienda un ventilador o extractor antes de realizar la auto-limpieza. • N o Utilizar Limpiadores de Horno. No debe utilizarse ningún limpiador de hornos o protector de recubrimiento del horno comercial de ningún tipo dentro o alrededor de alguna parte del horno. • Antes de realizar la auto-limpieza del horno.
DESCRIPCIÓN GENERAL 11 DESCRIPCIÓN GENERAL ACCESORIOS ESPAÑOL Asegúrese de que todas las piezas estén incluidas antes de comprar el producto.
12 DESCRIPCIÓN GENERAL DESCRIPCIÓN GENERAL DE LA COCINA Asegúrese de entender los nombres y función de cada pieza. * A lo largo de este manual, las características y apariencia del producto pueden variar dependiendo de su modelo.
DESCRIPCIÓN GENERAL 13 DESCRIPCIÓN GENERAL DE LA COCINA Para el modelo LDE3031 Elemento doble Vidrio cerámica Nombre y etiqueta de características Elemento único Elemento doble Interruptor automático de la luz del horno Junta Rejillas Etiqueta de advertencia Puerta superior del horno Rejillas Soporte anti-volcaduras Puerta del horno inferior ESPAÑOL Elemento único
14 DESCRIPCIÓN GENERAL DESCRIPCIÓN GENERAL DEL PANEL DE CONTROL Para el modelo LDE3037 Control de la Hornalla de la Estufa Características Controles del Horno Botón Clear Off (Borrar) Botón Start/ Lockout (Inicio/Bloqueo) Para el modelo LDE3035 Botones Numéricos Para el modelo LDE3031 NOTA Los Controles de las Hornallas de la Estufa están ubicados en el mismo orden que las hornallas correspondientes.
CARACTERÍSTICAS 15 CARACTERÍSTICAS CONFIGURACIÓN RELOJ Debe configurarse el reloj con la hora correcta del día en el orden correcto para que las funciones de temporización automática del horno funcionen correctamente. 1. Presione CLOCK. 2. Presione los botones numéricos para ingresar la hora. Por ejemplo, para poner el reloj a las 10:30, presione los números: 1, 0, 3 y 0. 3. Presione START. NOTA • No puede modificarse la hora del día durante el Horneado Temporizado o un ciclo de Auto-Limpieza.
16 CARACTERÍSTICAS TEMPORIZADOR ENCENDIDO/ APAGADO TIMER ON/OFF SUPERIOR o INFERIOR sirve como temporizador adicional en al cocina y emitirá una señal acústica cuando se haya agotado el tiempo. No se inicia o deja de cocinar. La función TIMER ON/OFF SUPERIOR o INFERIOR se puede usar durante cualquiera de las funciones de control del horno. El TEMPORIZADOR SUPERIOR e INFERIOR se puede utilizar de forma independiente para cada uno de ellos.
CARACTERÍSTICAS 17 FAHRENHEIT O CELSIUS El idioma predeterminado de la pantalla es el inglés. Puede cambiarse a español o francés. La temperatura del horno se puede configurar en grados Fahrenheit o Celsius. El horno muestra en forma predeterminada grados Fahrenheit salvo que sea cambiado por el usuario. 1. Presione el botón SETTING hasta que aparezca “Lng" en la pantalla. Presione el botón 1 para inglés, el botón 2 para español, o el botón 3 para francés. 2.
18 CARACTERÍSTICAS HORA DE INICIO (COCCIÓN temporizada retardada) TIEMPO DE COCCIÓN (COCCIÓN TEMPORIZADA) El temporizador automático de la función COCCIÓN TEMPORIZADA RETARDADA ENCENDERÁ y APAGARÁ el horno en el horario que usted seleccione. Esta función puede utilizarse únicamente con los: Modos HORNEAR, HORNEADO POR CONVECCIÓN y ASADO POR CONVECCIÓN. La función COCCIÓN TEMPORIZADA le permite configurar el horno para que cocine durante un período de tiempo específico.
USO DE LA ESTUFA 19 USO DE LA ESTUFA ÁREAS DE COCCIÓN Los recipientes de cocción no deberían sobrepasar más de 1/2 a 1 pulgada el área de cocción. Cuando se enciende un control, puede verse un brillo a través de la superficie de vidrio de la estufa. La hornalla realizará ciclos de encendido y apagado para mantener la configuración de calor preestablecida, incluso cuando esté configurada en HI (Alta).
20 USO DE LA ESTUFA Encender una hornalla DUAL (en algunos modelos) DUAL Encender la Zona de Calentamiento (en algunos modelos) WARM ZONE Usted puede ajustar las hornallas duales de acuerdo al tamaño de la olla/sartén que está usando. Hornalla interior Hornalla exterior A B 1. Presione el botón ON/OFF que controla la hornalla que usted desea usar. 2. Presione el botón SELECT para seleccionar la función de la hornalla interior (más pequeña) o exterior (más grande).
USO DE LA ESTUFA 21 Configuración de cocción de superficie recomendada Hornalla Temp. Uso Recomendado 5,5-8,0 • Realizar un hervor, rehogado o freído rápido • Dorar o sellar los alimentos en forma rápida. Simple o 3,5-5,0 • Realizar un hervor lento Dual • Freír o saltear alimentos • Cocinar sopas, salsas y fondos de cocción El uso de los recipientes de cocción adecuados puede evitar muchos problemas, tales como que la comida tarde más tiempo en cocinarse o lograr resultados diferentes.
22 USO DEL HORNO USO DEL HORNO SACAR Y VOLVER A COLOCAR LOS ESTANTES DEL HORNO NOTA • Cuando se utiliza un termómetro de horno en la cavidad del horno, la temperatura puede diferir de la temperatura de ajuste real del horno. NOTA (EN ALGUNOS MODELOS) • E s normal que el ventilador de convección funcione mientras se precalienta durante un ciclo de horneado regular. • El motor del ventilador de convección se puede ejecutar periódicamente durante un ciclo de horneado regular.
USO DEL HORNO 23 BAKE (HORNEADO) Configuración de la función BAKE (por ejemplo, 375° F): 1. Presione el botón BAKE. El sistema de convección utiliza un ventilador para hacer circular el aire en forma pareja dentro del horno. Esta distribución del calor mejorada permite una cocción pareja y excelentes resultados cuando se cocina en uno o varios estantes. 2. Configure la temperatura del horno usando los botones numéricos: Presione 3, 7 y 5.
24 USO DEL HORNO CONVECTION ROAST (ASADO POR CONVECCIÓN) (EN ALGUNOS MODELOS) GUÍA RECOMENDADA PARA ASADO POR CONVECCIÓN (EN ALGUNOS MODELOS) The CONVECTION ROAST feature is designed to give optimum roasting performance. CONVECTION ROAST combines cooking with the convection fan to roast meats and poultry. The heated air circulates around the food from all sides, sealing in juices and flavors. Foods are crispy brown on the outside while staying moist on the inside.
USO DEL HORNO 25 GUÍA DE RECOMENDACIONES PARA HORNEAR Y ASAR Para el modelo LDE3037 Bandeja estandar (Posición 'D') Bandeja estandar (Posición 'B') Horneado con bandejas múltiples Colocación del Estante y la Bandeja Bandeja estandar Horneado con bandeja simple Para el modelo LDE3035, LDE3031 Bandeja estandar (Posición 'D') Bandeja estandar (Posición 'B') Horneado con bandejas múltiples Bandeja Bandeja estandar Horneado con bandeja simple Guía de bandeja para hornear Guia de bandeja para asa
26 USO DEL HORNO BROIL (ASADO A LA PARRILLA) La función Asado a la parrilla utiliza el calor intenso de la hornalla superior para cocinar la comida. El ASADO A LA PARRILLA funciona mejor con cortes tiernos de carne, pescado y vegetales finamente cortados. Algunos modelos pueden tener una asadera híbrida que consiste de una asadera interna que utiliza una hornalla calentadora de carbón que brinda calor instantáneo y una hornalla asadora externa tradicional.
USO DEL HORNO 27 GUÍA DE ASADO RECOMENDADO ESPAÑOL El tamaño, peso, grosor, temperatura inicial y el punto de cocción preferido afectarán los tiempos de asado. Esta guía está basada en carnes a temperatura de refrigerador. Para mejores resultados durante el asado, utilice un recipiente diseñado para asar (ver Fig. 1) Fig.1 NOTA (EN ALGUNOS MODELOS) •A l asar en la posición E use la bandeja de altura compensada para obtener el mejor resultado de cocción.
28 USO DEL HORNO Consejos para el Asado a la Parrilla Carne vacuna • Siempre debe dejarse descansar el lomo y las costillas durante cinco minutos antes de cortarlos y comerlos. Esto permite que el calor se distribuya en forma pareja en toda la comida y brindando un resultado más tierno y jugoso. • Considere retirar los trozos anchos de carne del refrigerador 30 minutos antes de la cocción. Esto ayudará a que se cocinen más rápidamente y en forma más pareja y se producirá menos humo al asarlos.
USO DEL HORNO 29 FAVORITOS (EN ALGUNOS MODELOS) Esta función está especialmente diseñada para cocinar los alimentos más populares entre los niños como la pizza de bordes regulares, pizza de bordes levantados, croquetas de pollo, papas fritas y hamburguesas. La función FAVORITOS se usa para grabar y recuperar la configuración de sus recetas favoritas. Usted puede almacenar y recuperar hasta tres configuraciones diferentes. Al utilizar esta función no es necesario precalentar el horno antes de la cocción.
30 USO DEL HORNO PIZZA (EN ALGUNOS MODELOS) El modo de pizza se usa cuando se va a preparar especificamente una pizza. Este modo calienta la cavidad del horno de arriba hacia abajo para cocinar uniformemente los alimentos y dejarlos crujientes. Esta diseñado para dar un desempeno optimo al momento de seleccionar el modo de pizza al combinar automaticamente los sistemas de asado y horneado. No se necesita precalentar el horno para esta función. No es necesario precalentar el horno antes de cocinar.
CUIDADO Y LIMPIEZA 31 CUIDADO Y LIMPIEZA PRECAUCIÓN • NO utilice esponjas de fibra o esponjas de limpieza abrasivas. Podrían dañar la superficie de su estufa. • Para su seguridad, utilice un guante de cocina o agarradera para limpiar la superficie caliente de la estufa. Use Limpiador para Estufas Cerámicas sobre la estufa de vidrio. Otras cremas podrían no ser tan efectivas o podrían rayar, dañar o manchar la superficie de la estufa.
32 CUIDADO Y LIMPIEZA Marcas de Metal y Rayones 1. Tenga cuidado de no deslizar ollas y sartenes por la estufa. Si lo hace, dejará marcas de metal sobre la superficie de la estufa. Para intentar quitar estas marcas, utilice un limpiador para estufas cerámicas con una esponja limpiadora para estufas cerámicas. 2. Si se deja una olla con una delgada capa de revestimiento de aluminio o cobre que hierva hasta secarse, el revestimiento podría dejar una coloración negra sobre la estufa.
CUIDADO Y LIMPIEZA 33 Configuración de la Auto-limpieza La función de Auto-Limpieza tiene ciclos que pueden durar 3, 4, o 5 horas. Guía de Suciedad para la Auto-limpieza Configuración del Ciclo Cavidad del horno levemente Auto-limpieza de 3 Horas sucia Cavidad del horno moderadamente sucia Auto-limpieza de 4 Horas Cavidad del horno muy sucia Auto-limpieza de 5 Horas 1. Extraiga todos los estantes y accesorios del horno. 2. Presione el botón SELF CLEAN.
34 CUIDADO Y LIMPIEZA EasyClean™ El nuevo horno de LG con tecnología EasyClean™ le otorga dos opciones de limpieza para el interior de su estufa. La función EasyClean™ toma ventaja de la nueva tecnología de esmalte de LG para ayudar a remover suciedades sin químicos severos, y funciona tan solo usando AGUA por tan solo 20 minutos a bajas temperaturas para ayudar a soltar suciedades LIJERAS antes de ser limpiadas manualmente.
CUIDADO Y LIMPIEZA 35 GUÍA DE INSTRUCCIÓN EasyClean™ 4. Use al menos ¼ de taza (2oz o 50ml) de agua para saturar completamente la suciedad en las paredes y esquinas del horno. 5. Rocié o vierta la restante 1 taza (8 oz o 250 ml) de agua sobre el centro de la base de la cavidad. El desnivel en la parte inferior debe estar completamente cubierto de tal manera que las suciedades queden sumergidas. Añada agua si es necesario.
36 CUIDADO Y LIMPIEZA LIMPIEZA EXTERIOR Asadera y Rejilla Revestimiento Pintado y Decorativo Para la limpieza general, utilice un paño con agua caliente jabonosa. Para suciedades más difíciles y grasa acumulada, aplique detergente líquido directamente sobre la suciedad. Déjelo actuar de 30 a 60 minutos. Enjuague con un paño empapado y seque. No utilice limpiadores abrasivos. Superficies de Acero Inoxidable (en algunos modelos) Para evitar rayones, no utilice esponjas de lana de acero. 1.
CUIDADO Y LIMPIEZA 37 CÓMO QUITAR Y REEMPLAZAR LA PUERTA DEL HORNO DESMONTABLE To replace the door: 1. Asegúrese de que las dos bisagras estén en una posición de 30 grados. PRECAUCIÓN 2. Deslice la puerta hacia atrás en las bisagras hasta oír un clic y se habrán enganchado los botones de apertura. HORNO SUPERIOR Para quitar la puerta: 1. Abra la puerta completamente. 2. Eleve el cierre de la bisagra hacia el marco del horno hasta que haga tope. 3.
38 CUIDADO Y LIMPIEZA HORNO INFERIOR 3. Abra la puerta completamente. Si la puerta está completamente abierta, la hendidura no asentará correctamente en el borde inferior de la ranura. Para retirar la puerta: 1. Abra la puerta completamente. 2. Tire de los cierres de las bisagras hacia el marco de la puerta a la posición desbloqueada. Bloqueo Ranura 4. Presione los cierres de las bisagras hacia abajo contra el marco frontal de la cavidad del horno a la posición bloqueada.
PREGUNTAS FRECUENTES 39 PREGUNTAS FRECUENTES ¿Qué tipo de recipientes de cocción se recomiendan para usar con mi estufa? ¿Por qué aparece “HS” en la pantalla de la estufa? Aparecerá HS (Superficie Caliente) en la pantalla cuando se haya apagado la hornalla o durante el ciclo de autolimpieza. El indicador HS permanecerá encendido hasta que la superficie se haya enfriado hasta aproximadamente 150˚F/66˚C o cuando finalice el ciclo de auto-limpieza.
40 PREGUNTAS FRECUENTES ¿Por qué no funcionan los botones de funciones? Asegúrese de que la cocina no esté en el modo Lockout (Bloqueo). El símbolo de bloqueo se mostrará en la pantalla si la función Bloqueo de Horno está activada. Para desactivar la función Bloqueo, presione y mantenga el botón START durante tres segundos. Sonará la melodía de desbloqueo, y UNLOCKING (DESBLOQUEO) aparecerá en la pantalla hasta que se desbloqueen los controles.
IDENTIFICACIÓN Y SOLUCIÓN DE PROBLEMAS 41 IDENTIFICACIÓN Y SOLUCIÓN DE PROBLEMAS ANTES DE LLAMAR AL SERVICIO TÉCNICO Problema Causas / Soluciones posibles La estufa está desnivelada. • U na mala instalación. Coloque la bandeja del horno en el centro del horno. Coloque una regla sobre la bandeja del horno. Ajuste las patas de nivelación de la base de la estufa hasta que la bandeja del horno se encuentre niveladal.
42 IDENTIFICACIÓN Y SOLUCIÓN DE PROBLEMAS Problema Causas / Soluciones posibles El horno no funciona • El enchufe de la estufa no está introducido del todo en el tomacorriente. - Verifique que el enchufe eléctrico esté conectado a un tomacorriente con tensión y adecuada conexión a tierra. • Un fusible puede haberse quemado o el interruptor de circuitos puede haber saltado. - Cambie el fusible o reconfigure el interruptor de circuitos. • Los controles del horno están mal configurados.
IDENTIFICACIÓN Y SOLUCIÓN DE PROBLEMAS 43 Problema Causas / Soluciones posibles • E l papel de aluminio usado en la asadera y la rejilla no se ha colocado de manera correcta y no se han realizado los cortes recomendados. - Ver la sección “Cómo usar el horno”. • En algunas regiones el voltaje puede ser bajo. - Precaliente el elemento de asado durante 5-7 minutos. - Ver la Guía de asado. La temperatura del horno es muy alta o muy baja • El sensor del horno debe ajustarse.
44 IDENTIFICACIÓN Y SOLUCIÓN DE PROBLEMAS Problema Causas / Soluciones posibles Humo excesivo durante el ciclo de autolimpieza • Suciedad excesiva. - Pulse el botón CLEAR OFF. Abra la ventana para ventilar el humo de la estancia. Espere hasta que el modo de autolimpieza sea cancelado. Limpie el exceso de suciedad y reinicie el proceso de limpieza. La puerta del horno no se abre tras un ciclo de autolimpieza • El horno está excesivamente caliente.
GARANTÍA 45 GARANTÍA (EE. UU.) PERÍODO DE GARANTÍA COMO SÉ MANEJA EL SERVICIO TÉCNICO Un Año A partir de la fecha original de compra. Cualquier parte del horno que falle debido a materiales o confección defectuosos. Durante esta garantía completa durante un año, LG además brindará, sin cargo, la mano de obra y servicio técnico en el domicilio para reemplazar la parte defectuosa.
NOTAS
NOTAS
LG Customer Information Center 1-800-243-0000 USA, Consumer User 1-888-865-3026 USA, Commercial User 1-888-542-2623 CANADA Register your product Online! www.lg.