INSTALLATION 13 INSTALLATION Please read the following installation instructions first after purchasing this product or transporting it to another location. Unpacking the Refrigerator Connecting the Water Line CAUTION • Connect to potable water supply only. • Fill with potable water only.
14 INSTALLATION Unpacking the Refrigerator WARNING Choosing the Proper Location Water ••Use two or more people to move and install the refrigerator. Failure to do so can result in back injury or other injury. Water supply must be easily connected for the automatic icemaker. ••The refrigerator is heavy. Protect the floor when moving the refrigerator for cleaning or service. Always pull the refrigerator straight out when moving it.
INSTALLATION 15 Dimensions and Clearances ••Check the dimensions of the appliance and the installation path to ensure there is sufficient room to move the refrigerator through doors or narrow openings. ••The installation location chosen for the refrigerator should allow space behind the unit for connections and airflow and space in front to open the doors and drawers. ••Too small of a distance from adjacent items may result in lowered freezing capability and increased electricity consumption charges.
16 INSTALLATION Removing/Assembling Handles ••When moving the refrigerator through a narrow opening, removing the doors is preferred. ••The appearance of the handles may vary from what is shown. Removing the Refrigerator Handles 1 Loosen the set screws (1) with a 3/32 in. Allen wrench and remove the handle. 2 Loosen the mounting fasteners (2) that connect to the refrigerator door and handle using a 1/4 in. Allen wrench, and remove the mounting fasteners.
INSTALLATION 17 Removing the Freezer Drawer Handle Loosen the set screws (1) located on the lower side of the handle with a 1/8 in. Allen wrench and remove the handle. 2 Loosen the mounting fasteners (2) with a 1/4 in. Allen wrench, and remove the mounting fasteners. If the entrance door is too narrow for the refrigerator to pass through, remove the refrigerator doors and move the refrigerator sideways through the doorway.
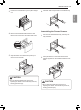
18 INSTALLATION 2 3 Disconnect all the wire harnesses. Removing the Right Refrigerator Door 1 Remove the top hinge cover screw (1). Lift the hook (not visible), located at the bottom of the front side of the cover (2), with a flat-head screwdriver. 2 Detach the wire harness (1). 3 Rotate the hinge lever (1) clockwise. Lift the top hinge (2) free of the hinge lever latch. Rotate hinge lever counterclockwise. Lift the top hinge free of the hinge lever latch.
INSTALLATION 19 4 Lift the door from the middle hinge pin and remove the door. Connect the wire harness (1). 4 Place the cover (1) in its place. Insert and tighten the cover screw (2). ENGLISH 3 CAUTION ••Place the door, inside facing up, on a nonscratching surface. Assembling the Right Refrigerator Door Install the right-side door first. 1 Make sure that the plastic sleeve is inserted in the bottom of the door. Lower the door onto the middle hinge pin as shown in the figure.
20 INSTALLATION 2 Rotate the hinge lever clockwise. Lift the top hinge free of the hinge lever latch. Hinge Lever Latch For models with two freezer drawers, remove both drawers in the same way. The Pullout Drawer located above the freezer drawer is not shown for clarity. WARNING Hinge Lever 3 Removing the Freezer Drawers To reduce the risk of electric shock, injury to persons, and death, follow basic precautions, including the following: Connect all the wire harnesses.
INSTALLATION 21 3 Lift the front of the drawer up, then pull it straight out. 6 Hold both rails and push them in simultaneously. ENGLISH 4 Remove the Durabase basket from the rails. Remove the screws from the rails at both ends. 5 Grip both sides of the drawer and pull it up to remove it from the rails. Assembling the Freezer Drawers 1 Pull out both rails simultaneously, until they are fully extended.
22 INSTALLATION 3 Lower the door into its final position and tighten the screws located on both sides. Connecting the Water Line Before Beginning This water line installation is not covered by the refrigerator warranty. Follow these instructions carefully to minimize the risk of expensive water damage. If necessary, call a qualified plumber to correct water hammer before installing the water supply line to the refrigerator.
INSTALLATION 23 If the water pressure from the reverse osmosis system is less than 20 psi or 138 kPa or 1.4 kgf/ cm2 (takes more than 4 seconds to fill a cup of 7 oz or 198 cc capacity): ••Allow the storage tank on the reverse osmosis system to refill after heavy usage. ••If the water pressure remains low, call a licensed, qualified plumber. ••All installations must be in accordance with local plumbing code requirements. NOTE ••A self-piercing saddle type water valve should not be used.
24 INSTALLATION 3 Drill the hole for the valve. ••Drill a ¼ in. hole in the water pipe using a sharp bit. Remove any burrs resulting from drilling the hole in the pipe. Be careful not to allow water to drain into the drill. Failure to drill a ¼ in. hole may result in reduced ice production or smaller cubes. 6 Route the tubing. Route the tubing between the cold water line and the refrigerator.
INSTALLATION 25 9 Connect the tubing to the refrigerator. ••Remove the plastic flexible cap from the water valve. ••Place the compression nut and ferrule (sleeve) onto the end of the tubing as shown. Leveling The refrigerator has two front leveling legs. Adjust the legs to alter the tilt from front-to-back or side-to side.
26 INSTALLATION Turning on the Power ••After installing, plug the refrigerator’s power cord into a 3-prong grounded outlet and push the refrigerator into the final position. CAUTION ••Connect to a rated power outlet. ••If necessary, have a qualified electrician check the wall outlet and wiring for proper grounding. ••Do not damage or cut off the ground terminal of the power plug.