JUN. 2002 PRINTED IN KOREA P/No.
WASHING MACHINE SERVICE MANUAL CAUTION Before servicing the washer, Read the safety precautions in the manual.
SAFETY PRECAUTION! ■ DISASSEMBLE POWER CORD BEFORE SERVING ■ RECONNECT ALL GROUNDING DEVICES IMPORTANT SAFETY NOTICE ! This service information is intended for individuals possessing adequate backgrounds of electrical, electronic and mechanical experience. Any attempt to repair this appliance may result in personal injury or property damage. The manufacturer or seller can not be responsible for the interpretation of this information, nor can it assume any liability in connection with its use. CONTENTS 1.
1.
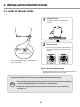
2. INSTALLATION INSTRUCTIONS 2-1. HOW TO ADJUST LEVEL 1 2 Installation area ·Install the washer on flat and firm surface. Checking level ·Open the lid, and check if the washer is correctly leveled by looking down from the top. Adjustable leg Turn the adjustable legs to set the washer horizontal (2 EA). How to use the adjusting plates · Use the adjusting plates to level the washer when the adjustable legs cannot cover the gap. Improper installation of the washer may cause noise and malfunctioning.
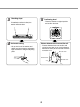
3 Checking slope 5 · If installation surface is tilted, the washer will be shaken. 4 Horizontal setting ·Lift up the front of the washer and adjust level by turning the adjustable legs clockwise or using the adjusting plate. Confirming level · Place the washer to original position and confirm the level. Distance between drain hose and the wall · Distance between drain hose and the wall should be more than 10 cm, and the distance between the other part and the wall should be more than 2 cm.
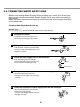
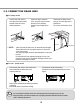
2-2. CONNECTING WATER SUPPLY HOSE Before connecting Water Supply Hose to water tap, check your hose type and choose correct instruction. Water Supply Hose may vary according to the country. Make sure connect blue inlet hose to cold water tab, and orange inlet hose to hot water tab. Connecting Water Supply Hose to water tap Normal Type 1 Normal tab without thread & screw type inlet hose.) Rubber packing Untighten the screw Untighten the screw of the connector so that the tap can be placed in the middle.
One Touch Type 1 (NORMAL TAB WITHOUY THREAD & ONE TOUCH TYPE INLET HOSE.) Separate Middle connector from Water Supply Hose Separate Middle connector from the Water Supply Hose by pulling the Pressing Rod and the Pressing Handle that is attached to the Water Supply Hose while pressing them.
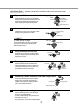
Screw Type 1 Attach the water supply hose to the tap. Push the water supply hose up so that the rubber packing within the hose can adhere completely to the tap. Water tap Rubber Packing Water Supply Hose 2 Connect the water supply hose to the tap. Connect the water supply hose to the tap and then tighten it by screwing it to the right. 3 Check water leakage. After connecting the hose, open the faucet to check for any water leakage.
2-3. CONNECT THE DRAIN HOSE ■ For pump model · Connect the drain hose to the outlet of the drain pump located at the rear of the washing machine. ·Attach the clip to the drain hose. And then push it toward the body of the washing machine as indicated by the arrow. ·Check that the drain hose is hung up over the edge of the laundry tub. ·Do not use an extension hose. Hose Guide Within 50mm 0.9~1.2m Drain Hose · NOTE : · Never lay down the drain hose, as water will be discharged.
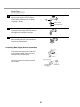
3. OPERATING INSTRUCTIONS 3-1. IDENTIFICATION OF PARTS WATER SUPPLY HOSE • Make sure that water does not leak. • In case of one valve model water supply hose is one. SOFTENER DISPENSER • Softener will automatically flow into the tub. DETERGENT DISPENSER POWER SUPPLY CORD BLEACH INLET FUNCTION SELECTORS DRAIN HOSE For Pump Model • Check out if the drain hose is hung up before operating the washing machine.
3-2. BEFORE STARTING TO WASH Care Labels * Look for a care label on your clothes. This will tell you about the fabric content of your garment and how it should be washed. Sort clothes into loads that can be washed with the same wash cycle, water temperature and spin speed. Sorting To get the best results, different fabrics need to be washed in different ways.
Using Water Amount of Water Level WATER - DETERGENT • This machine detects the quantity of laundry automatically, then sets the water level and EX-LARGE proper amount of detergent. LARGE • When you select a wash program, the water level and amount of detergent (to be used) MEDIUM will be shown on the control panel. SMALL • The following table shows the amount of water.
Using Detergent How much detergent When you select a wash program the water level and the amount of detergent (to be used) will be shown on the control panel. The amount of a cup in the diagram is about 40g for concentrated detergent. The correct amount of detergent will vary depending on the amount of soil in your clothes (Jeans and work cloches may need more detergent, while bath towels usually need less.). For liquid and concentrated detergents, follow the recommendations of the detergent manufacturer.
Using Fabric Softener Available Fabric Softener Type • Do not use concentrated fabric softener. This may cause some problems in automatic dispensing. • For more details refer to the softener products instructions for use. Depositing Fabric Softener • Don't use softener with detergent. Use softener in last rinse water • When using dispenser, dilute softener (30ml) with fresh water (30ml) • When filling dispenser, do not splash or overfill. It may stain clothes.
Special Guide for Stain Removal WARNING ■ Do not use or mix liquid chlorine bleach with other household chemicals such as toilet cleaners, rust removers, acid or products containing ammonia. These mixtures can produce dangerous fumes which can cause serious injury or death. ■ To reduce the risk of fire or serious injury to persons or property, comply with the basic warnings listed below: • Read and comply with all instructions on stain removal products.
3-3. FUNCTION OF EACH BUTTON ▶ Changing various functions is possible only in PAUSE state. Selection button does not work when the washer is in operation (Except for water level, water temp, water power button). How to use delayed washing ■ Use this function for delayed washing. ■ Use it to set the delay time. ■ By pressing the button, it cycles [3→4→5→...→11→12→14→ 16→...→46→48→3] hours. (Up to 48 hours can be delayed).
For manual wash, rinse and spin Displaying abnormal operation ■ In case of abnormal operation, the following indications are displayed. Abnormal water supply : INLET Er. lamp blinks. Abnormal drainage : DRAIN Er. lamp blinks. Abnormal spin : SPIN Er. lamp blinks. Abnormal water level sensing : displayed. Abnormal lid open : DOOR Er. lamp blinks. Abnormal over flooding sensing : SOAK WASH SHOWER RINCE SPIN (SPRAY) M T WASH RINSE M SPIN INLET Er. DRAIN Er. DOOR Er. SPIN Er.
3-4. WASHING PROGRAMS Washing Programs AUTO OFF Add the laundry 1 Fuzzy Washing (Normal Wash) Used for normal loads, this mode automatically selects the most appropriate conditions and completes the sequence in one operation. The built-in sensor detects the size of the load and the ideal wash power and wash, rinse and spin times are set accordingly PRO GRAM Add the deterg 2 ·Add the appropriate detergent as indicat water level next to W DETERGENT.
t START PAUSE Close the lid 3 antity of ·The pulsator rotates for 8 seconds to by the detect the laundry load. TER·Then the water level and the amount of detergent to be used will be shown and water will be supplied. ons 4 Finish Caution & Note ·If water is already in the tub, or putting wet laundry into the tub before starting will increase the water level.
3-5. OTHERS FUNCTIONS 1) Soak Wash Use this mode for washing excessively dirty laundry by soaking in water for some time to remove proteins and fats.‘SOAK’mode can be used with all washing programs simultaneously except for WOOL and HOME DRY program. 1 Press the AUTO OFF (Power) button to turn power on. AUTO OFF 2 Press the PROGRAM button to select the washing program. The SOAK will not work in WOOL and HOME DRY cleaning Program. PRO GRAM 3 Press the WASH button, to select SOAK program.
2) Delay Start (Reservation) Wash Delay start (Reservation) Wash is used to delay the finishing time of the operation. The hours to be delayed can be set by the user accordingly. The time on the display is the finishing time , not the start time. 1 Press the AUTO OFF (Power) button to turn power on. 2 Press the PROGRAM button to select the washing program. AUTO OFF PRO GRAM 3 • Select the program for laundry on the Control panel. This method will not work in Wool Program.
3) Option Washing When you only need the Wash, Wash/Rinse or Rinse cycles, these can be set manually. 1 Press the AUTO OFF (Power) button to turn power on. AUTO OFF 2 Only Wash Only Wash,Rinse Press the WASH button to select the desired timing. Press the WASH button to select the desired timing. WASH Press the RINSE button to select the desired times of rinse.
3) Option Washing 1 Press the AUTO OFF (Power) button to turn power on. AUTO OFF 2 Only Rinse Press the RINSE button to select the desired times of rinse. Only Rinse,Spin Press the RINSE button to select the desired times of rinse. Only Spin/Only drain Press the SPIN button to select the desired times of rinse. RINSE RINSE PRO GRAM Press the SPIN button to select the desired times of rinse. SPIN 3 Press the WATER LEVEL button to control the water level according to the amount of laundry.
4) Child Lock Function If you want to lock all the keys to prevent all the setting from being changed by a child, you can use the child lock option. How to Lock 1 Press the AUTO OFF(Power) button. AUTO OFF 2 Turn Power on. Press the START/PAUSE button to start washing. After all washing conditions are set according to the manual. 3 Press both the WASH button and the RINSE button simultaneously.
3-6. CARE AND MAINTENANCE When there is a fear of freezing • Close the water taps and remove the Water Supply Hose. • Remove the water which remains in the water supply. • Lower the drain hose and drain the water in the bowl and the drain hose by spinning. If frozen • Remove the water supply hose, and immerse it in hot water at approx.. 40˚C. • Pour approx.. 2 liters of hot water at approx.. 40˚C, into the bowl and let it stand for 10 minutes.
4. SERVICE INFORMATION 4-1.
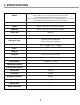
2) WF-T(F/C)1091~3, 1191~3T(C/H/P) / WF-T(F/C)1022,1122,1001T(C/H/P) WF-T1268TH, 2409KTb, 2602kTa, T1491TP, WF-T1491TP, T11292TP, T1292TP,T1291TP, LA-1499ST, WF-T1081TP, T1592TP, T1593TP, T1241TP, T1133TH WF-G15KTB, G13KTC, B15KTB, B13KTC / WF-T1400TH, T1022TPX A 27
4-2.
4-3.
30 Ex-large ExL-L Large L-M Medium M-S Small Ex-large ExL-L Large L-M Medium M-S Small Ex-large ExL-L Large L-M Medium M-S Small Ex-large ExL-L Large L-M Medium M-S Small Speedy Jean Wool Delicate Water Supply Washing 6 6 6 6 6 6 6 3 3 3 3 3 3 3 21 21 15 15 15 9 9 6 6 6 6 6 6 6 21 21 15 15 15 9 9 Drain 4 4 4 3 3 3 3 4 4 4 3 3 3 3 4 4 4 3 3 3 3 - 4 4 4 3 3 3 3 225" 225" 225" 225" 225" 225" 225" 225" 225" 225" 225" 225" 225" 225" 225" 225" 225" 225" 225" 225" 225" - 128" 128" 128" 128
31 Extreme-Large Ex-large ExL-L Large L-M Medium M-S Small Extreme-Large Ex-large ExL-L Large L-M Medium M-S Small Wool Delicate Water Suply 7 7 6 6 5 5 4 3 7 7 6 6 5 5 4 3 7 7 6 6 5 5 4 3 7 7 6 6 5 5 4 3 7 7 6 6 5 5 4 3 Washing 10 10 10 10 10 10 10 10 5 5 5 5 5 5 5 5 15 18 18 18 18 15 10 5 6 6 6 6 6 6 6 6 15 18 18 18 18 15 10 5 Drain 4 4 4 4 3 3 3 3 4 4 4 4 3 3 3 3 4 4 4 4 3 3 3 3 - 4 4 4 4 3 3 3 3 Intermittent Spin 135" 194" 194" 194" 194" 194" 194" 194" 135" 194" 194" 194" 194" 194
4-4. ADJUSTMENT 1) BRAKE LEVER ADJUSTMENT Brake lever Keep the clearance 1.9 0.1mm between the tip of the adjustment screw and brake lever. Lock net Adjustment screw Clutch lever Brake lever bar • Shown as in the figure, untighten the adjustment screw to keep clearance less than 1.9±0.1mm between the tip and the brake lever. And turn on the lock nut then paint it red. ■ CAUTION. CAUTION • Painting part is adjusted in factory, it does not need adjusting.
4-5. DISASSEMBLY INSTRUCTION ▶ Be sure to unplug the power to repair and replace electric parts. CAUTION FOR ELECTROSTATICS Be sure to make earth connection for trouble diagnosis and parts replacement. If impossible, touch earth wire on the body to remove electric deviation between the body and product before work. Screw cap 1) Disassembly of Front Panel & PCB Assembly Remove two screw caps using a sharp tool and two special screws.
2) Disassembly of Back Panel, Power Cord, Inlet Valve & BP Sensor Remove two back panel fixing screws in the back side. Back panel Disassemble the back panel. Disconnect two connectors and disassemble the power cord. Inlet valve ass'y Remove a valve fixing screw & disconnect the leads form the inlet valve. Remove the inlet valve. Disconnect the leads & the pressure tube from the BP sensor. Fuse holder Fuse Remove the BP sensor. Fuse is located in the Fuse holder.
tub cover inner tub pulsator Hub fixing nut 4) Disassembly of Back Cover, Drain Pump, Clutch(Transmission) & Motor Leads Pump fixing screw Remove back cover fixing screws then disassemble the back cover. Disconnect the leads and the drain hose-p from the drain pump. Remove the pump fixing screws then disassemble the drain pump. Fall down the washer for clutch & motor removal. Remove the belt. Disassemble the clutch. Remove two motor fixing screws then disassemble the motor.
4-6. TEST RUNNING WITHOUT WATER 1) METHOD TO USE QC TEST MODE ▶ To use check program (QC test mode), power ON with water temperature and water level. Key pressed in non-load empty water. No. 1 Check points LED and Pressure Check method Start/Pause KEY PUSH Press Load Begining point Buzz once Sensor LEVEL sensor displayed. Frequency display •Pulsator rotates to left four times and right four times.
4-7. TROUBLE SHOOTING AGAINST COMMON WASHING PROBLEMS Many washing problems involve poor soil & stain removal, residues of lint and scum, and fabric damage. For satisfactory washing results, follow these instructions. WASH PROBLEM Problems Solutions & Preventive Measures Possible Causes Poor soil removal • Not enough detergent • Wash water temperature too low.
4-8. TROUBLE SHOOTING METHODS ACCORDING TO ERROR MESSAGE ▶ For more detailed information for trouble shooting refer to page 38 to 49. Error INLET Er lamp blinks. Determination Water supply doesn't reach set level within 60 minutes. Expected cause Remedy 1. Locked or frozen water tap. • Open water tappet for water supply. 2. Obstructed water supply. • Wash at supply condition. 3. Top filter of supply valve is clogged with dregs. • Clean or chunge filter. 4.
Error SPIN Er lamp blinks. Determination Unbalanced water for spin procedure. Expected cause Remedy 1. Water is partially filled in inner tub asm. • Fill water evenly into inner tub asm.(horizontally) 2. Machine is slopped (Check drop position of leveller). • Adjust machine height horizontally. 3. Safety switch is too closer to • Check and replace safety inner tub asm or safety switch. switch contacted wrongly. 4. Is the CONNECTOR of Ball • Check B.P SENSOR Pressure Sensor CONNECTOR or replace B.
4-9. HOW TO DIAGNOSE AND REPAIR BY SYMPTOM 1) Washer is not energized. Where, what & how to check? Result of Check Possible Cause How to repair & settle Household Power supply Change the electrical. 1. Check whether connection between the plug and the electrical is poor Poor Defect of the electrical 2. Measure voltage of the electrical. Around rating No defect 0V Defect of household power supply 1.
2) Defects on displaying function Where, what & how to check? Result of Check Possible Cause How to repair & settle Main voltage 1. Measure mains voltage at the wall outlet Less than 85% Low voltage. of the rating. To explain that it is caused by low voltage in electric supply and recommend using a transfomer if voltage has been continuously low. 2.
3) Reset during operation Where, what & how to check? Result of Check Possible Cause How to repair & settle Drain Motor 1. Operate washer setting spin only, then press the start/pause button when the wash motor starts to work and then press the start/pause button again in order for the drain motor to work intermittently. Reset happens Defect of the drain after the drain motor (A noise motor works. generated when the internal relay works.) Change the drain motor Controller Change the controller. 1.
4) Water doesn’t come into the wash bowl. Where, what & how to check? Ball Pressure Sensor (Pressure Switch) 1. Is there PE error on the display which means Ball Pressure Senosr (Pressure Switch) error 2. Check frequency of the Ball Pressure Sensor(Pressure Switch) without load if wash is proceeding without filling. Result of Check Possible Cause How to repair & settle PE Error displayed. Connector is taken off, or lead or coil is open. Reconnect the connector or change leads.
6) Pulsator doesn’t rotate normally. Where, what & how to check? Result of Check Pulsator rotates at one direction. 1. The Pulsator rotates normally at the beginning of wash cycle, but is it not rotate at clockwise direction (locked) after some wash cycles though there is motor-working sound? Clockwise rotation locked. 2.
6) Pulsator doesn’t rotate normally. Where, what & how to check? Result of Check Possible Cause How to repair & settle 4. Pulsator weakly rotates. 1) Check voltage at the power outlet where the washer is plugged into. Less than 85% Lower voltage. of rating. 2) Check capacitance of the capacitor. Indicating needle rises and immediately indicates ∞. Capacitor is normal. The needle is stopped after it is raised. Lack of capacitance of the capacitor. Change the capacitor. The needle doesn’t move.
7) Water does not drain. Where, what & how to check? 4. Check whether the drain hose is blocked by foreign objects. It may happen in case of the hose is a little kinked. Result of Check Blocked. Possible Cause How to repair & settle Blocked hose. Remove the objects and reinstall so that it can’t be kinked. PV Case (for Non-Pump Model only) 1. Check whether the PV asm is blocked by foreign objects.
8) Water drains though it is not the time of drain. Where, what & how to check? Result of Check Possible Cause How to repair & settle Drain Motor (for Non-Pump Model only) 1. Check whether the drain motor is normally returned after turning power off. (It is considered normal if the lever of the drain motor is fully pulled out by the PV spring) Blocked. Defect of the drain motor. Change the drain motor. PV Case 1.
10) Spin extraction is not proceeded. Where, what & how to check? Result of Check Possible Cause How to repair & settle Motor 1. In the case that the wash motor does not spin during spin extraction; There is motor working sound. Defect of the capacitor or Mechanically locked. ① Check frequency of the Ball Pressure Sensor (Pressure Switch), under no load, or Less than 26.3kHz Defect of the Ball Pressure Sensor (Pressure Switch).
11) Spining is going on even though the lid is open. Where, what & how to check? Safety Switch 1. Check resistance between both terminals of the safety switch with the lid open. Result of Check 0~9Ω Contact points of the safety switch are welded. Change Switch ∞Ω Defect of the controller. Change the controller Yes Reed S/W is short by magnetic on the washer. Keep magnet away from the washer. No Reed Switch. Change the controller. Ball Pressure Sensor 1.
13) Vibration, Noise or Unbalance Error happens during spin. Where, what & how to check? Result of Check Possible Cause How to repair & settle Using conditions such as installation etc. Not leveled. 1. Check whether the washer is leveled. (Check clearance with out tub and out case the left gap is the same as the right and the rear gap is 1.5~2 time bigger than the front gap, between the cabinet and the wash bowl, when it is leveled.) Defect of installation Level the washer. 2.
14) Power is automatically turned off during operation or immediately turning on the power switch. Where, what & how to check? Result of Check Possible Cause How to repair & settle Main voltage 1. It is mostly caused by noise from mains or transfomerient power cut. Defect in main. Explain the cause. (It happens specially when a high frequency equipment is a used around the washer or in the case voltage fluctuation is big) Mechanical defect of the auto off switch. Change the auto off switch.
5.
5-1.
5-2.
5-3.