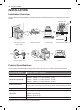
0 INSTALLATION INSTALLATION Installation Overview Please read the following installation instructions first after purchasing this product or transporting it to another location.
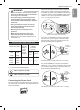
INSTALLATION 11 If you did not receive an anti-tip bracket with your purchase, call 1-800-243-0000 (1-888-542-2623 in CANADA) to receive one at no cost. Warning Warning Tip - Over Hazard •• The information in this manual should be followed exactly. Failure to do so may result in fire, electrical shock, property damage, personal injury, or death. A child or adult can tip the range and be killed. Verify the anti-tip bracket has been installed.
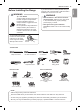
12 INSTALLATION Installing the Range Unpacking and Moving the Range CAUTION •• You should use two or more people to move and install the range. (Excessive Weight Hazard) Failure to do so can result in back or other injury. •• Do not use the door handles to push or pull the range during installation or when moving the range out for cleaning or service. Doing so can result in serious damage to the door of the range. Remove packing material, tape and any temporary labels from your range before using.
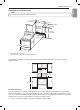
INSTALLATION 13 ENGLISH Dimensions and Clearances NOTE Save for the use of the local electrical inspector. 3" (7.6 cm) 24" (60.9 cm) Acceptable electrical outlet area 3" (7.6 cm) 25" (63.5 cm) Normal counter top depth Counter 36" (91.4 cm) top height Cabinet opening 24" (60.9 cm) 36" (91.4 cm) 29.8" (75.7 cm) A = 30" (76.2 cm) For U.S.A = 30" (76.2 cm) ~ 31" (78.
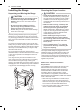
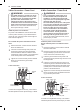
14 INSTALLATION Installing the Anti-tip Device Use a level to check your adjustments. Place the level diagonally on the oven rack, and check each direction for level. Warning Tip - Over Hazard First check direction . A child or adult can tip the range and be killed. Verify the anti-tip bracket has been installed. Ensure the anti-tip bracket is engaged when the range is moved. Do not operate the range without the anti-tip bracket in place.
INSTALLATION 15 •• Allow 2 to 3 ft (61.0 cm to 91.4 cm) of slack in the line so that the range can be moved if servicing is ever necessary. •• The power supply cord and plug should not be modified. If it will not fit the outlet, have a proper outlet Installed by a qualified electrician. Use the cord/conduit connection plate to install the power cord or conduit. Leave the connection plate as installed for power cord installations.
16 INSTALLATION 3-Wire Connection : Power Cord 4-Wire Connection : Power Cord Warning Warning •• The middle (neutral or ground) wire, which is white, of a 3-wire power cord or a 3-wire conduit has to be connected to the middle post of the main terminal block. The remaining two wires of the power cord or conduit have to be connected to the outside posts of the main terminal connection block. Failure to do so can result in electrical shock, severe personal injury or death.
INSTALLATION 17 4-Wire Connection: Conduit Install the conduit as follows: Remove the conduit connection plate from the rear of the oven and rotate it. The conduit hole (11/8") must be used. First, prepare the conduit wires as shown below. 3-Wire Conduit connection plate 4-Wire or Ground wire Second, install the conduit strain relief. For conduit installations, purchase a strain relief and insert it in the 11/8 in. (2.8 cm) conduit hole.
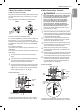
18 INSTALLATION Engaging the Anti-tip Device Test Run •• Move the range close enough to the opening to plug into the receptacle. Check if the range is properly installed and run a test cycle. •• Slide the range into position ensuring that the back leg slides under the anti-tip bracket. The range should sit flush against the back wall when properly installed. 1 Press Clear/Off to start test. 2 Turn on each burner to the Hi setting to check that the surface heating elements are working properly.
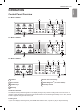
OPERATION 19 ENGLISH OPERATION Control Panel Overview For Model: LRE3061 1 2 3 7 4 6 5 For Model: LRE3083 1 2 3 4 7 5 For Model: LRE3193 1 2 3 7 4 6 5 1 Features 5 Clear Off / Lockout Key 2 Oven Control 6 Smart DiagnosisTM (on some models) 3 Number Keys 7 Cooktop Control 4 Start Key Hot Surface Indicator The HS(hot surface) indicator appears in the display as long as any surface cooking area is too hot to touch.
20 OPERATION Changing Oven Settings Clock The clock must be set to the correct time of day in order for the automatic oven timing functions to work properly. 1 Press Clock. 2 Press the numbers to enter the time. For example, to set the clock for 10:30, press the numbers: 1, 0, 3 and 0. 3 Minimum & Maximum Default Settings All of the features listed have a minimum and a maximum time or temperature setting that may be entered into the control.
OPERATION 21 Settings The Timer On/Off serves as an extra timer in the kitchen that beeps when the set time has run out. It does not start or stop cooking. Press the Settings key repeatedly to toggle through and change oven settings. The Timer On/Off feature can be used during any of the other oven control functions. •• enable/disable convection auto conversion Setting the Timer (for example to set 5 minutes) 1 Press Timer On/Off once. 0:00 appears and Timer flashes in the display. 2 Press 5.
22 OPERATION 1 Press Settings repeatedly until AdJU appears in the display. 2 Use the number keys to enter the number of degrees you want to adjust the oven temperature. 3 Adjust the temperature either up or down by pressing Settings repeatedly to toggle between plus (+) or minus (-). 4 Press Start. NOTE Adjusting the Beeper Volume 1 Press Settings repeatedly until BEEP appears in the display. 2 Press 1 for NORMAL or press 2 for MUTE. 3 Press START to accept the change.
OPERATION 23 Cook Time (Timed Cook) The automatic timer of the Delayed Timed Cook function turns the oven on and off at the time you select. This feature can be used with the Bake, Conv. Bake and Conv. Roast modes. Set the oven to cook for a specific length of time using the Timed Cook feature. This feature can only be used with the Bake, Conv. Bake and Conv. Roast modes.
24 OPERATION Using the Cooktop Using the Cooktop Elements CAUTION Cooking Areas The cooking areas on your range are identified by permanent circles on the glass cooktop surface. For the most efficient cooking, fit the pan size to the element size. Pans should not extend more than 1/2 to 1-inch beyond the cooking area. When a control is turned on, a glow can be seen through the glass cooktop surface. The element cycles on and off to maintain the preset heat setting, even on Hi.
OPERATION 25 Turning on the Warming Zone Adjust the dual element according to the pot/pan size being used. Use the Warming Zone to keep food warm after it has already been cooked. The warming zone is not meant for cooking food. Attempting to cook uncooked or cold food on the warming zone could result in a foodborne illness. Inner element A Outer element B 1 Press the ON/OFF button that controls the desired surface element.
26 OPERATION Using the Proper Cookware Choosing Cookware The size and type of cookware will influence the settings needed for the best cooking results. Be sure to follow the recommendations for using proper cookware. The cookware material determines how evenly and quickly heat is transferred from the surface element to the pan bottom. The most popular materials available are: Cookware should have flat bottoms that make good contact with the entire surface heating element.
OPERATION 27 Replacing Racks Before Using the Oven NOTE •• Because the oven temperature cycles, an oven thermometer placed in the oven cavity may not show the same temperature that is set on the oven. •• It is normal for the convection fan to run while preheating during a regular bake cycle. •• The convection fan motor may run periodically during a regular bake cycle. •• The fan turns off if the door is left open during baking. The fan turns back on automatically once the door is closed.
28 OPERATION Baking Tips Tips for Convection Baking •• Baking time and temperature will vary depending on the characteristics, size, and shape of the baking pan used. •• Use Convection Bake for faster and more even multiple-rack cooking of pastries, cookies, muffins, biscuits, and breads of all kinds. •• Check for food doneness at the minimum recipe time. •• Bake cookies and biscuits on pans with no sides or very low sides to allow heated air to circulate around the food.
OPERATION 29 Baking results will be better if baking pans are centered in the oven as much as possible. If cooking on multiple racks, place the oven racks in the positions shown.
30 OPERATION Broil Smoking The Broil function uses intense heat from the upper heating element to cook food. Broiling works best for tender cuts of meat, fish, and thinly cut vegetables. Some models may feature a hybrid broiler consisting of an inner broiler that utilizes a carbon heating element which provides instantaneous heat, and a traditional outer broiling element. During normal broiler operation, it is normal for either element to cycle off intermittently.
OPERATION 31 The size, weight, thickness, starting temperature, and your preference of doneness will affect broiling times. This guide is based on meats at refrigerator temperature. For best results when broiling, use a pan designed for broiling. Food Ground Beef Quantity and/or Thickness Rack First Side Position (minutes) Second Side (minutes) Comments 1 lb. (4 patties) 1/2 to 3/4" thick 7 4-6 2-4 Beef Steaks Rare Medium Well done 1" thick 1 to 11/2 lbs.
32 OPERATION Tips for Broiling Setting the Warm Function after a Timed Cook Beef 1 Select the cooking function. 2 Enter the oven temperature using the number keys. 3 Press Cook Time and enter the cook time using the number keys. 4 Press Warm. 5 Press Start. 6 When cooking is finished, press Clear/Off to cancel the Warm function. •• Steaks and chops should always be allowed to rest for five minutes before being cut into and eaten.
OPERATION 33 Sabbath mode is typically used on the Jewish Sabbath and Holidays. When the SABBATH mode is activated, the oven does not turn off until the SABBATH mode is deactivated. In SABBATH mode, all function buttons, except for the CLEAR/OFF is inactive. Sb will appear in both the cooktop and oven displays. NOTE •• If the oven light is turned ON and the SABBATH mode is active, the oven light will remain ON until the SABBATH mode is turned OFF.