INSTALLATION 13 ENGLISH INSTALLATION Before Installing the Range Make sure the range is properly installed and grounded by a qualified installer, according to the installation instructions. Any adjustment and service should be performed only by qualified gas range installers or service technicians. In the Commonwealth of Massachusetts •• This product must be installed by a licensed plumber or gas fitter. •• When using ball type gas shut-off valves, they must be the T-handle type.
14 INSTALLATION Installing the Range Unpacking and Moving the Range CAUTION •• You should use two or more people to move and install the range. (Excessive Weight Hazard) Failure to do so can result in back or other injury. •• Do not use the door handles to push or pull the range during installation or when moving the range out for cleaning or service. Doing so can result in serious damage to the door of the range. Remove packing material, tape and any temporary labels from your range before using.
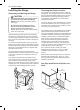
INSTALLATION 15 Provide proper clearance between the range and adjacent combustible surfaces. These dimensions must be met for safe use of your range. The location of the electrical outlet and pipe opening (see Gas Pipe and Electrical Outlet Locations, page 14) may be adjusted to meet specific requirements. The range may be placed with 0" clearance (flush) at the back wall. Installation Clearances Minimum to cabinets on either side of the range 5" 30" (76.2 cm) 30" (76.2 cm) Minimum 18" Minimum (45.
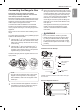
16 INSTALLATION Installing the Anti-tip Device Anti-tip bracket Screw must enter wood or concrete Wall plate Providing Adequate Gas Supply The range is designed to operate at a pressure of 5" of water column on natural gas or 10" of water column on LP. Make sure you are supplying your range with the type of gas for which it is configured. The anti-tip bracket is packaged with an installation template. The instructions include necessary information to complete the installation.
INSTALLATION 17 Shut off the range gas supply valve before removing the old range and leave it off until the new hook-up has been completed. Because hard piping restricts movement of the range, the use of a CSA International-certified flexible metal appliance connector should be used unless local codes require a hard-piped connection. A manual valve shall be installed in an accessible location in the gas piping external to the appliance for the purpose of turning on or shutting off gas to the appliance.
18 INSTALLATION Electrical Connections Electrical Requirements 120 Volt, 60 Hz, properly grounded dedicated circuit protected by a 15 or 20 Amp circuit breaker, or slow blow fuse. If an external electrical source is utilized, the appliance, when installed, must be electrically grounded in accordance with local codes or, in the absence of local codes, with the National Electrical Code, ANSI/NFPA 70. Grounding IMPORTANT: FOR PERSONAL SAFETY, THIS APPLIANCE MUST BE PROPERLY GROUNDED.
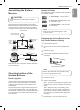
INSTALLATION 19 Quality of Flames The combustion quality of the burner flames needs to be confirmed visually. A Yellow flames - Call for service. CAUTION Do not operate the burners without all parts in place. B Yellow tips on outer cones - This is normal for LP gas. Place the burner caps and heads on the cooktop. Make sure that the caps and heads are placed in the correct locations. There is one small, one medium, one large, and one extra large burner head and cap.
20 INSTALLATION Checking Operation of Bake / Broil Burners To check ignition of the Bake burner, follow the steps below 1 Remove all packing materials from inside the oven cavity. 2 Press the Bake. 350 °F appears in the display. 3 Press the Start. Leveling the Range Level the range by adjusting the leveling legs. Extending the legs slightly may also make it easier to insert the rear leg into the anti-tip bracket.
OPERATION 21 Gas Surface Burners Before Use Read all instructions before using. Make sure that all burners are properly placed. CAUTION WHAT TO DO IF YOU SMELL GAS •• Open windows. •• Do not try to light any appliance. •• Do not touch any electrical switch. •• Do not use any phone in your building. •• Immediately call your gas supplier from a neighbor’s phone. Follow the gas supplier’s instructions. •• If you cannot reach your gas supplier, call the fire department.
22 OPERATION Burner Locations Using the Gas Surface Burners Your gas range cooktop has four or five sealed gas burners, depending on the model. These can be assembled and separated. Follow the guide below. 1 Be sure that all of the surface burners and grates are placed in the correct positions. 2 Place cookware on the grate. 3 Push the control knob and turn to the Lite position. 4 1 1 2 3 The medium and large burners are the primary burners for most cooking.
OPERATION 23 Using a Wok In case of a power failure, you can light the gas surface burners on the range with a match. If using a wok, use a 14-inch or smaller flat-bottomed wok. Make sure that the wok bottom sits flat on the grate. Surface burners in use when an electrical power failure occurs will continue to operate normally. 1 Hold a lit match to the burner, then push in the control knob. 2 Turn the control knob to the Lo position. CAUTION Use extreme caution when lighting burners with a match.
24 OPERATION Using the Griddle Preheat the griddle according to the guide below and adjust for the desired setting. Preheat Conditions Cook Setting - HI Pancakes HI 10 min. HI Hamburgers HI 10 min. HI Fried Eggs HI 5 min. HI Bacon HI 10 min. HI Breakfast Sausage Links HI 10 min. HI Hot Sandwiches HI 10 min.
OPERATION 25 Do not block, touch or place items around the oven vent during cooking. Before Use Read all instructions before using. Make sure the electrical power cord and the gas valve are properly connected. Your oven is vented through ducts at the center above the burner grate. Do not block the oven vent when cooking to allow for proper air flow. Do not touch vent openings or nearby surfaces during any cooking operation. Confirm the correct use of the range for the type of food you will cook.
26 OPERATION Control Panel Overview For Model: LRG3193** 1 2 6 7 1 2 12 7 8 3 4 5 9 10 11 3 4 5 9 6 11 For Model: LRG3193** 1 Bake Press the button to enter the normal bake function. 2 Broil Press the button to select the broil function. 3 Cook Time Press and then use the + and – buttons to set the desired cook time. The oven shuts off when the cooking time runs out. 4 Timer On/Off Press to select the timer feature. 5 START Must be pressed to start any cooking or cleaning function.
OPERATION 27 Clock The clock must be set to the correct time of day in order for the automatic oven timing functions to work properly. 1 Press Clock. 2 Press +/– button to set the time of day. 3 Press Start. NOTE •• The time of day cannot be changed during a timed baking. •• If no other keys are pressed within 25 seconds of pressing Clock, the display reverts to the original setting. •• If the display time is blinking, there may have been a power failure. Reset the time.
28 OPERATION Timer On/Off The Timer On/Off feature serves as an extra timer in the kitchen that beeps when the set time has run out. It does not start or stop cooking. The Timer On/Off feature can be used during any of the other oven control functions. 1 Press Timer On/Off button once to set the time in hours and minutes, or press the button twice to set the time in minutes and seconds. TIMER flashes in the display. 2 Press + or – button until the desired time appears in the display.
OPERATION 29 For Model: LRG3061 1 Press and hold the Clock button for 3 seconds. 1 2 Press Settings repeatedly until PrE appears in the display. Press Clock repeatedly until AdJU appears in the display. 2 Press +/– to turn the light on/off. 3 Using the + button, enter the amount you wish to increase the temperature. 3 Press Start to accept the change. 4 Using the – button, enter the amount you wish to decrease the temperature. Adjusting the Beeper Volume 5 Press Start to accept the change.
30 OPERATION Setting the Convection Auto Conversion Function (For Model: LRG3193) When using convection bake, the convection auto conversion feature will automatically convert entered regular baking temperatures to convection baking temperatures. This feature is activated so that the display will show the actual converted temperature. For example, if you enter a regular recipe temperature of 350°F and press the START button, the display will show the converted temperature of 325˚F.
OPERATION 31 •• Center pans on racks for best baking results. If baking with more than one pan, place the pans so that each one has at least 1" to 11/2" of air space around it. Do not allow pans to touch the walls of the oven. •• If cooking on single rack, place the standard rack in the position suggested in the charts on the following pages. Center the cookware as shown in the single rack baking image. •• If cooking on multiple racks in the oven, place standard racks in positions 3 and 5.
32 OPERATION Convection Bake (For Model: LRG3193) Convection baking allows for even cooking and excellent results when using multiple racks at the same time. It can also shorten the cooking time. Baking Chart This chart is only for reference. Adjust the cook time according to the recipe. Type of Food Frozen pies (on cookie sheet) •• Evenly baked results using multiple racks. •• Faster cooking time. Setting the Convection Bake Function 1 Press the Conv. Bake button. The display will flash 350°F.
OPERATION 33 Setting the Oven to Broil The oven is designed for closed-door broiling. Broil uses an intense heat radiation from the upper gas burner. The Broil function works best when broiling thin, tender cuts of meat (1" or less), poultry or fish. CAUTION •• Do not use a broiler pan without a grid. The oil can cause a grease fire. •• Do not cover the grid and broiler pan with aluminum foil. Doing so will cause a fire. •• Always use a broiler pan and grid for excess fat and grease drainage.
34 OPERATION Recommended Broiling Guide The size, weight, thickness, starting temperature, and preference of doneness will affect broiling times. This guide is based on meats at refrigerator temperature. For best results when broiling, use a pan designed for broiling. Food Ground Beef Quantity and/or Thickness Rack First Side Position (minutes) 1 lb. (4 patties) 1/2 to 3/4" thick 6 4-6 Second Side (minutes) 3-5 Beef Steaks Rare Medium Well Done 1" thick 1 to 11/2 lbs.