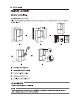
2 INSTALLATION INSTALLATION Before Installing Installation Overview Please read the following installation Instructions first after purchasing this product or transporting it to another location.
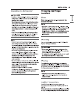
INSTALLATION 13 Unpacking the Refrigerator &b WARNING ° Use two or more people to move and install the refrigerator. Failure to do so can resit in back injury or other injury, « The refrigerator is heavy, Protect the floor when moving the refrigerator for cleaning or service, Always pull the refrigerator straight out when moving it. Do not wiggle or walk the refrigerator when trying to nova it, as floor damage could occur. Keep flammable materials and vapors, such as gasoline, away from the refrigerator.
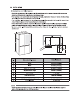
14 INSTALLATION Dimensions and Clearances = Check the dimensions of the appliance and the installation path to ensure there is sufficient roam to move the refrigerator through doors or narrow openings. If an opening is too narrow to fit the refrigerator through, remove the refrigerator doors. See Removing/ Assembling the Doors and Drawers in this manual.
Removing the Door When It is necessary to move the appliance through a narrow opening, removing the roads is the recommended procedure, £, WARNING « Disconnect the power cord, house fuse or circuit breaker before installing or servicing the appliance. Failure to follow these instructions may result in death, fire or electric shock. I your entrance door is too narrow for the appliance to pass through, remove the appliance doors and pass the appliance laterally.
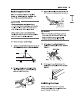
16 INSTALLATION Adjusting the Height of the Door If the door of the appliance is not level, adjust the difference in the height of appliance door using the following method.
INSTALLATION 17 £h caution « To prevent burns and product damage, only connect the refrigerator water line to a cold water supply. « Wear eye protection during installation to prevent injury. Water Pressure You wil need a cold water supply. Water Pressie Modals with out water fitter 20 120 psi (138 827 kPa) Where reverse osmosis water filtration system is concatenated to a cold water supply 40 64 psi minimum o reverse osmosis system (2.8 legwarmer 4.
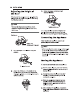
18 INSTALLATION Water Line Installation Instructions Install the shutoff naive on the nearest frequently used drinking water line. ) WARNING « When using any electrical device {such as a power drill) during installation, be sure the device is battery-powered, double-insulated or grounded in a manner that will prevent the hazard of electric shock, 4 astern the shutoff valve. » Fasten the shutoff valve to the cold water pipe with the pipe clamp.
INSTALLATION 19 6 Route the tucking, + Route the tubing between the cold water line and the refrigerator. Route the tubing through 2 hole rifled In the wall or floor {behind the refrigerator or adjacent base cabinet) as close to the wall as possible. NOTE s « Be sure there is sufficient extra tubing (about 8 ft, coiled into three turns of about 10 in, diameter) to allow the refrigerator to move out from the wall after Installation.
20 INSTALLATION Leveling and Door Alignment Leveling The refrigerator has twa front leveling legs. Adjust the legs to alter the #it from front-to back or side to side. If the refrigerator seems unsteady, or the doors do not close sally, adjust the refrigerator’s tilt using the instructions below: 4 Turn the leveling leg teo the left to raise that side of the refrigerator or to the right to lower it. It may take several tums of the leveling leg te adjust the tilt of the refrigerator.