OWNER’S MANUAL Robot Vacuum Cleaner Before using, please carefully read the Safety Precautions pages to allow for safe operation of the product. After reading the operation manual, please keep it in an easily accessible location. LRV5900 www.lg.
FEATURES Images of the ceiling and floor are obtained from the upper and lower cameras. This establishes the location of the HOM-BOT. to accomplish elaborate cleaning of the room. Camera (upper, lower section) The low height of the HOM-BOT (3.54in) allows it to move freely under beds and furniture. Noise levels are very low which allows cleaning to be performed at night. The HOM-BOT has two auto cleaning modes that can be selected by the user.
CONTENTS 1 LG ROBOT VACUUM CLEANER WARRANTY 1 LG ROBOT VACUUM CLEANER WARRANTY 2 BEFORE USE 5 ADDITIONAL INFORMATION 28 Troubleshooting 31 Before You Call for Service 6 REFERENCE ITEMS 2 Safety Precautions 32 Product Specifications 5 Included with Product 33 Open Source Software Notice 6 Parts Descriptions 8 Button Functions 10 Display Status Information 11 Before You Start 12 Overview 3 HOW TO USE 13 How to Install the Home Station 14 How to Turn the Power Supply On and Of
LG ROBOT VACUUM CLEANER WARRANTY LG Electronics Inc. will repair or replace your product, at LG’s option, if it proves to be defective in material or workmanship under personal household use, during the warranty period set forth below, effective from the date of original consumer purchase of the product. This limited warranty is good only to the original purchaser of the product and effective only when used in U.S.A. and Canada.
SAFETY PRECAUTIONS The purpose of the safety precautions described below is for the user to use the product safely and correctly to prevent any unexpected risk of injury or damage. Basic safety precautions After reading this manual, please keep it in an easily accessible location. This is the safety alert symbol. This symbol alerts you to potential hazards that can result in property damage and/or serious bodily harm or death.
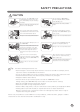
SAFETY PRECAUTIONS WARNING Do not touch the power plug with wet hands. Doing so can cause electric shock. Do not allow children or pets to play with or on the HOM-BOT at any time. Do not use the HOM-BOT while an object is hanging from it. Doing so can cause injury or product damage. Do not spray or place flammable materials, surfactants, or water in the vicinity of the HOM-BOT. Doing so can cause fire or product failure. * flammable materials: gasoline, thinner, etc.
SAFETY PRECAUTIONS CAUTION In rare cases, the HOM-BOT’s brush can damage the carpet. If this happens, immediately stop the cleaning operation. When a carpet has long tassels, the tassels can be damaged. These items can cause product failure. Do not let the main frame and charging terminal of the home station come into contact with metallic objects. Do not put sharp objects into the opening of the HOM-BOT’s supersonic sensor. Doing so can cause product failure. Doing so can cause product failure.
INCLUDED WITH PRODUCT HOM-BOT Remote controller Home station ▶ Figures can be different from actual objects. OWNER’S MANUAL Robot Vacuum Cleaner Before using, please carefully read the Safety Precautions pages to allow for safe operation of the product. After reading the operation manual, please keep it in an easily accessible location. LRV5900 www.lg.com Dust bin filter (spare) Brush for cleaning filter Quick guide Mop plate Ultra microfiber mop (2 pieces) (Sold separately.
PARTS DESCRIPTION - HOM-BOT Top Manipulation button Dust bin cover button Dust bin cover Indicator lamp Upper camera Home station detector & Remote control receiver Front view Ultrasonic sensor Obstacle detecting sensor window Rear view Ventilation port Bottom view Cliff detection sensor Charging terminal Brush Side brush Wheel Lower camera Mop plate attachment hook Battery Power switch ▶ Figures can be different from actual objects.
PART DESCRIPTION – HOME STATION / DUST BIN Home station Power lamp Charging terminal Reset button Power cord groove Dust bin Dust bin handle Dust bin cover Suction port cover Dust bin cover release button ▶ Figures can be different from actual objects.
BUTTON FUNCTIONS – HOM-BOT TIMER • Use the TIMER button to activate the time delay feature. • The timer can be set from 1 to 12 hours. •T he timer button only works when the HOM-BOT is attached to the home station. Always attach HOM-BOT to the home station when setting the timer function START/STOP • Press the START/STOP button to turn the HOM-BOT on/off or start/stop cleaning. • Press the START/STOP button while the HOM-BOT is on and it will automatically start cleaning.
BUTTON FUNCTIONS – REMOTE CONTROL Start HOMING The HOM-BOT will start cleaning The HOM-BOT will move to the home station for charging. Directional button Stop The HOM-BOT will move as desired by the user: to front, rear, left, and right sides for cleaning. Spot Cleaning will concentrate within a space of about 3.28 ft. Zigzag cleaning Cleaning will be performed by the HOM-BOT in the zigzag traveling fashion. Tip 9 It the HOM-BOT is cleaning, all operations will be stopped.
DISPLAY STATUS INFORMATION Spot cleaning • I ndicates when the HOM-BOT is in spot cleaning mode. (page 19) Battery and timer hour indication • When in Stand by without any timer setting, the remaining battery charge will be shown. • While waiting for timer cleaning, the reservation time will be shown. Timer icon • This indicates when timer cleaning has been set up. Tip Spatial expansion cleaning • I ndicates when the HOM-BOT is in spatial expansion cleaning mode.
BEFORE YOU START Check these items before cleaning • • • • • • • Do not use this device in a room where a child is left alone. The child could be injured. Remove any fragile or valuable items from the floor of the room that is to be cleaned. Remove any moisture that might be on the floor. Remove cables, strips, towels, socks, etc. from the floor so they will not get caught by the brush. Confirm whether battery charge is sufficient, and if it is low, recharge it. Empty the dust bin if it is full.
OVERVIEW 1 Install the home station. (page 13) Insert the power cord plug into an outlet and locate the station against a wall. If power is not supplied to the home station, the HOM-BOT will not charge. 2 Turn on the power supply of the HOM-BOT. (page 14) 3 Start cleaning. (page 15) 4 Automatic charge. (page 16-17) 5 Use of cleaning methods and auxiliary functions. (page 18~21) 3ft 3ft 6ft Turn on the power switch located on the bottom of the HOM-BOT to turn on the power supply.
HOW TO INSTALL THE HOME STATION How to Install the Home Station 1. Position the home station against a wall on a hard level surface to prevent sliding during docking. Remove objects within 3ft to the right and left side and within 6ft to the front. 3ft 3ft 6ft 2. Plug the power cord into an outlet. Wrap the power cord around the fixed hanger on the back side of the home station or along the wall surface so that the travel path of the HOM-BOT will not be obstructed. Power cord groove 3.
HOW TO TURN THE HOM-BOT POWER SUPPLY ON & OFF Turning on the main power supply To turn the power supply on, turn the HOM-BOT upside down on a smooth/soft surface and check whether the main power supply switch is turned on. If the main power supply switch is turned off, turn on the switch. ※W hen turning on the power switch, do not press the button located at the upper section of the HOM-BOT. Operation of the button can be delayed.
HOW TO START AND STOP CLEANING Using the buttons on the HOM-BOT After the HOM-BOT is turned on, press the START/STOP button to begin cleaning. A melody will sound and cleaning will begin. Press the START/STOP button during the cleaning cycle to stop cleaning. ※ When the 'START/STOP' button is pressed while the power supply is turned off, the unit will not turn on. Using the remote control After the HOM-BOT is turned on, press the START button on the remote control.
HOW TO CHARGE THE BATTERY Automatic charging The HOM-BOT returns to the home station at the end of a cleaning cycle or when its battery is running low. ※ In the event that the unit returns to the Home Station due to a low battery, cleaning will be started, after the charging, from the nearest place of the area which has not been cleaned before. ※ I f the HOM-BOT is unable to dock to the home station on its first attempt, it will try again until it docks successfully.
HOW TO CHARGE THE BATTERY Remaining Battery Charge Indicator The remaining battery charge can be confirmed from the charge indication lights, which will indicate charge as follows: • During charging, the charge remaining indication lights will flicker. • When charging is completed at the home station, only the battery icon will illuminate to save power. • The battery icon will flicker when battery charging is required.
CLEANING MODES 청소 Zigzag수동 cleaning Use the zigzag cleaning method when rapid cleaning is desired. When the "ZIGZAG" button on the remote control is pressed, zigzag cleaning will begin and the zigzag indicator light will come on. Spatial expansion cleaning With spatial expansion cleaning, the cleaning will be performed by dividing the inside of the house into partial square spaces. If elaborate cleaning is desired, use the spatial expansion cleaning mode.
AUXILIARY CLEANING MODES Manual cleaning This method of cleaning involves manually moving the HOM-BOT by pressing the directional (arrow) buttons on the remote control. Hom-Bot will clean as it is being moved to the front, rear, or rotated to the left and right side according to the input of the directional buttons. 㷡 㩅 㬅 Spiral Spot Cleaning Use this cleaning method when concentrated cleaning of a small interior space is required.
TIMER CLEANING Set the timer to schedule the cleaning and begin in 1-12 hours. 1. B y pressing the TIMER button on the remote control or the HOM-BOT, a cleaning start can be scheduled. 2. A djust the time as much as desired by multiple presses of the TIMER button. Each time you press the button, the time will increase by one hour. - The start time can be set up to a maximum of 12 hours and once set up, the time will be indicated by the status indication lamps. 1 hour 6 hours 9 hours 12 hours 3.
MOP CLEANING (Mop attachment sold separately) By attaching the ultra microfiber mop, you can effectively use the HOM-BOT to remove dust. Ultra microfiber mop Mop plate When the mop plate is attached, the HOM-BOT will not climb on to carpets or over thresholds, in order to prevent transferring dirt from the mop. For mop cleaning, mount the mop and mop plate to the HOM-BOT according to the following instructions: 1. Attach the ultra microfiber mop to the Velcro of the mop plate as shown in the figure.
CLEANING THE DUST BIN If the dust bin is full, suction power can be reduced. Clean the dust bin before and after each cleaning session. Clean the dust bin using the following sequence: 1. Open the dust bin cover by pressing the PUSH button on the HOM-BOT. 2. Grab the handle of the dust bin and pull it upward. 3. S eparate the HEPA filter and the inside sponge filter by removing the HEPA filter ※ To clean the dust bin filter, refer to page 23. 4.
CLEANING THE DUST BIN FILTER The dust bin filters are comprised of the HEPA filter and the sponge filter. Clean the HEPA filter and the sponge filter according to the following sequence: 1. Separate the HEPA filter and the inside sponge filter by removing the HEPA filter (as shown). 2. Carefully clean any fine dust off the HEPA filter and the sponge filter with a vacuum cleaner or water. 3.
CLEANING THE BRUSH The brush, located on the bottom of the HOM-BOT, helps with the suction of foreign objects. Perform the following steps to clean the brush: Lay a smooth cloth on the floor. Turn the HOM-BOT over and put the HOM-BOT on the cloth. Turn off the power supply before cleaning. Separate the cover by pressing the fixing hook and pulling upward. Wearing gloves turn the brush until the separation groove of the brush appears. Separation groove of brush Grab the brush and remove by pulling it up.
CLEANING THE SENSOR/CHARGING TERMINAL There are sensors on the HOM-BOT that can detect obstacles, stairways and the home station for charging the battery. In order to maintain the performance of the HOM-BOT, regularly clean the sensors and charging terminal as follows: 1. L ay a smooth cloth on the floor, overturn the HOM-BOT and put it on the cloth. 2. T urn off the power switch on the bottom of the HOM-BOT. Injury can be caused by the activation of the HOM-BOT if the main power is not turned off. 3.
CLEANING THE SIDE BRUSH Foreign objects/materials such as hair can easily adhere to the side brush. Remove such materials at least once a week. If excessive amounts of foreign materials are stuck to the brush, there is a risk of damage to the brushes. If the floor is rough or wall skirtings are frequently cleaned, the side brush may bend or become damaged. In this case, use the following method to straighten the side brush. 1. The following procedure is helpful in restoring deformed brushes. 2.
CLEANING THE ULTRA MICROFIBER MOP (Mop attachment sold separately) To avoid odors, dirt and dust should be washed off the mop after it is used for cleaning. Follow these directions to wash the ultra microfiber mop: 1. Separate the ultra microfiber mop from the mop plate. 2. Carefully clean it with water. 3. U se the mop only after allowing it to dry completely in a sunny, well-ventilated area. Tip 27 • To avoid product malfunction, only use the ultra microfiber mop provided with the HOM-BOT.
TROUBLESHOOTING When the voice, “Please check the wheels”, is announced. If the unit becomes stuck or suspended and the wheels do not allow the unit move, the voice, “Please check the wheels”, will be announced. • Is a wheel trapped in the front door, balcony, stairway, etc? ▶ Move the HOM-BOT on to the flat floor. • Is any foreign material wound around the wheel? ▶ Lay smooth cloth on the floor, overturn the HOM-BOT, and put it on the cloth. Remove foreign material by confirming the wheel.
TROUBLESHOOTING When the voice, “Please check the dust bin”, is announced When an abnormality is detected with the dust bin, the voice, “Please check the dust bin”, is announced. • Is the dust bin fitted correctly? ▶ Open the dust bin cover, and if check if the dust bin is actually fitted. the unit will not operate without the dust bin. ▶ If the dust bin cover opened, close the cover before operating the unit. When the voice, “Battery is low”, is announced.
TROUBLESHOOTING When you hear “Please check the brush” When the HOM-BOT detects that the brush is not functioning properly, you will hear the message “Please check the brush.” Lay a smooth cloth on the floor, overturn the HOM-BOT, and place it on the cloth. • The side brush is stuck. ▶R emove any foreign materials such as cables, thread or hair caught in the side brush or the brush. ▶ Confirm the correct assembly of the brush by checking the separation groove of the brush.
BEFORE YOU CALL FOR SERVICE Confirm before reporting the failure of HOM-BOT. Problem The HOM-BOT will not activate. ▶ Confirm that the power switch is turned on. (page 14) ▶ Confirm that the battery has been charged. (page 17) Movements or travel path are abnormal. ▶ Carefully wipe the sensor with a smooth cloth. (page 25) ▶ If the ultra microfiber mop is attached, confirm that it is mounted properly. (page 21) ▶T urn on the power switch off and on. Suction power becomes weak.
PRODUCT SPECIFICATIONS Item/model LG HOM-BOT LRV5900 External dimension Φ 14.17 in X 3.54 in Weight 7lb Power consumption 18 W Battery (fully charged) DC 16.8 V Maximum Traveling Velocity 13.8 in/sec Use time (1 time charging) Approx.
REFERENCE ITEMS Open source software notice The following GPL executables and LGPL libraries used in this product are subject to the GPL/LGPL License Agreements: GPL EXECUTABLES: Linux kernel 2.
REFERENCE ITEMS This software is provided by the copyright holders and contributors "as is" and any express or implied warranties, including, but not limited to, the implied warranties of merchantability and fitness for a particular purpose are disclaimed.
MEMO 35
MEMO 36
Disposal of waste batteries/accumulators 1. When this crossed-out wheeled bin symbol is attached to batteries/accumulators of Your product it means they are covered by European Directive 2006/06/EC. 2. This symbol may be combined with chemical symbols for mercury(Hg), cadmium(Cd) or lead(Pb) if the battery Contains more that 0.0005% of mercury, 0.002% of cadmium or 0.004% of lead. 3.