ENGLISH ESPAÑOL OWNER’S MANUAL ELECTRIC RANGE Please read this owner's manual thoroughly before operating and keep it handy for reference at all times. LSE3090ST LSE3092ST LSES302ST www.lg.com (REV.
TABLE OF CONTENTS TABLE OF CONTENTS 3 IMPORTANT SAFETY INSTRUCTIONS 31 LOWER OVEN CONTROLS (ON SOME MODELS) 10 OVERVIEW 31 Using the lower oven 10 Accessories 11 Range overview 32 CARE AND CLEANING 12 Control panel overview 32 Cleaning the glass/ceramic cooktop.
IMPORTANT SAFETY INSTRUCTIONS 3 Read and follow all instructions before using your oven to prevent the risk of fire, electric shock, personal injury, or damage when using the range. This guide does not cover all possible conditions that may occur. Always contact your service agent or manufacturer about problems that you do not understand. Download this owner's manual at: http://www.lg.com. This is the safety alert symbol.
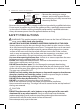
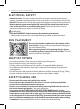
IMPORTANT SAFETY INSTRUCTIONS approximately 0.65”(16.5mm) "OUJ UJQ bracket Screw must enter wood or concrete Wall plate t 3FNPWF UIF XBSNJOH PS TUPSBHF drawers and visually inspect that the rear leveling legs are fully inserted into UIF BOUJ UJQ CSBDLFU t Be certain that your appliance is properly installed and grounded by a qualified technician. t %P OPU SFQBJS PS SFQMBDF BOZ QBSU PG UIF BQQMJBODF VOMFTT TQFDJGJDBMMZ SFDPNNFOEFE in the manual.
IMPORTANT SAFETY INSTRUCTIONS 5 REMOVE FLAMMABLE AND EXPLOSIVE MATERIAL FROM THE APPLIANCE WARNING t #F DFSUBJO UIBU BMM QBDLJOH NBUFSJBMT BSF SFNPWFE GSPN UIF BQQMJBODF CFGPSF PQFSBUJOH Keep plastic, clothes, paper, and other flammable materials away from parts of the appliance that may become hot.
IMPORTANT SAFETY INSTRUCTIONS ELECTRICAL SAFETY t 1SPUFDUJWF -JOFST Do not use aluminum foil or any other material to line the oven bottom. Improper installation of these liners may result in a risk of electric shock or fire. t %P /05 allow aluminum foil or the temperature probe to contact heating elements.
IMPORTANT SAFETY INSTRUCTIONS 7 CHILD SAFETY WARNING • Keep children and pets away from the oven. • Accessible parts may become hot when the grill is in use. • During the normal operation (self-clean cycle, bake, etc.) DO NOT touch the hot surface between the bottom of the oven door and the top of the drawer on the front of the oven. Doing so is a burn hazard and will cause injury. • Never let a child hang on the oven door. • Do not allow children to crawl into the oven.
IMPORTANT SAFETY INSTRUCTIONS • NEVER store items of interest to children in cabinets above the range. Children climbing on the range or on the oven door to reach items could be seriously injured. • Let hot utensils cool in a safe place, out of reach of children. • Children should not be allowed to play with controls or other parts of the appliance. GLASS/CERAMIC COOKING SURFACES Stand to the side of the range when opening the oven door.
IMPORTANT SAFETY INSTRUCTIONS 9 SAFETY WHEN CLEANING CAUTION t 0QFO B XJOEPX PS UVSO PO B WFOUJMBUJPO GBO PS IPPE CFGPSF TFMG DMFBOJOH t %P /PU 6TF 0WFO $MFBOFST No commercial oven cleaner or oven liner protective coating of any kind should be used in or around any part of the oven. t #FGPSF TFMG DMFBOJOH UIF PWFO Remove broiler pan, all oven racks, meat probe and any other utensils from the oven cavity.
OVERVIEW OVERVIEW ACCESSORIES Accessories for cooking Dual Purpose Split Rack (1ea) Roast Rack (1ea) Broiler Pan Insert (1ea) Heavy Rack (1ea) Standard racks (3ea) Broiler Pan (1ea) Drawer Rack (1ea) Gliding rack (1ea) Meat Probe (1ea) For Model : LSE3092ST, LSES302ST Accessories for installation Template (1ea) Screws (6ea) For Model : LSE3090ST Accessories for maintenance Anti-tip bracket (1ea) Anchors (6ea) Cleaner (1ea) 1 Rear filler & 2 Screws Owner’s manual (1ea) Cleaning pad (1e
OVERVIEW ENGLISH RANGE OVERVIEW For model : LSE3092ST, LSES302ST Warming Zone Element Single element Single element Double element Ceramic glass Broiler pan & Broiler Pan Insert Triple element Automatic oven light switch Gasket Heavy racks Gliding rack Split rack Oven door Anti-tip bracket Lower oven drawer Model and serial number plate For model : LSE3090ST Single element Single element Dual element Ceramic glass Single element Automatic oven light switch Gasket Standard racks Oven door Anti-tip
OVERVIEW CONTROL PANEL OVERVIEW For model : LSE3092ST, LSES302ST Cooktop Element gle Sin Oven Controls Features Lower Oven Controls Cooktop Element Du al gle Sin Wa rm 200˚F 450˚F Tr ip le 250˚F 300˚F 400˚F Du al 350˚F Number Buttons Start/Lockout Button Clear Off Button For model : LSE3090ST Hot Surface Indicator Cooktop Element gle Sin Oven Controls Features Cooktop Element Du al Number Buttons Clear Off Button Start/Lockout Button NOTE Cooktop Element Controls are set
FEATURES 13 CLOCK The clock must be set to the correct time of day in order for the automatic oven timing functions to work properly. 1. Press $-0$,. 2. Press the number buttons to enter the time. 'PS FYBNQMF UP TFU UIF DMPDL GPS QSFTT UIF numbers: , , and . Minimum & Maximum default settings All of the features listed have a minimum and a maximum time or temperature setting that may be entered into the control. An entry acceptance beep will sound each time a control button is pressed.
FEATURES TIMER ON/OFF The 5*.&3 0/ 0'' serves as an extra timer in the kitchen that will beep when the set time has run out. It does not start or stop cooking. The 5*.&3 0/ 0'' feature can be used during any of the other oven control functions. To set the Timer (example for 5 minutes): 1. Press 5*.&3 0/ 0'' twice. and )3 inside the 0 will appear and 5*.&3 will flash in the display. 2. Press the 5 button. will appear in the display.
FEATURES 15 :PV NBZ GJOE UIBU ZPVS OFX PWFO DPPLT EJGGFSFOUMZ UIBO the one it replaced. Use your new oven for a few weeks to become more familiar with it before changing the temperature settings. If after familiarizing yourself with the new oven, you still think that it is too hot or too cold, you can adjust the thermostat yourself. Adjusting the oven temperature 1. Press and hold the 1300' or 8"3. 1300' button for 3 seconds. “AUTO” will appear in the display. 2. Press the 1300' or 8"3.
FEATURES LOCKOUT The Lockout feature automatically locks the oven door and prevents most oven and cooktop controls from being turned on. It does not disable the clock, timer or the interior oven light. Activate the Lockout feature: 1. Press and hold the 45"35 button for three seconds. 2. The Lock melody will sound, -0$,*/( will appear in the display and %00, -0$,&% will flash in the display.
FEATURES 17 5IF 5*.&% $00, GFBUVSF BMMPXT ZPV UP TFU UIF PWFO UP cook for a specific length of time. This feature can only be VTFE XJUI UIF #",& $0/7&$5*0/ #",& $0/7&$5*0/ 30"45 BOE '"703*5& NPEFT Setting the TIMED COOK function (example, BAKE at 300°F for 30 minutes): The oven will continue to cook for the set amount of time and then turn off automatically. When the cooking time has elapsed: t &/% and the time of day will show in the display.
USING THE COOKTOP USING THE COOKTOP COOKING AREAS The cooking areas on your range are identified by permanent circles on the glass cooktop surface. For the most efficient cooking, fit the pan size to the element size. Pans should not extend more than 1/2 to 1-inch beyond the cooking area.
USING THE COOKTOP 19 There is one dual element located in the left front position. The dual element can be used as either a dual or a single element. 1. Push in the appropriate knob. " 5 VSO UIF LOPC DPVOUFSDMPDLXJTF UP VTF JU BT B 4*/(-& element. # 5VSO UIF LOPC DMPDLXJTF UP VTF JU BT B %6"- unit. al 2 2 A t )J JT UIF IJHIFTU UFNQFSBUVSF BWBJMBCMF t -P JT UIF MPXFTU UFNQFSBUVSF BWBJMBCMF t 1SFTT BOE IPME UIF + or – buttons to quickly scroll through the temperature settings.
USING THE COOKTOP Recommended surface cooking settings &MFNFOU -FWFM 3FDPNNFOEFE 6TF Dual Triple t -BSHF EJBNFUFS DPPLXBSF t -BSHF RVBOUJUJFT PG GPPE t )PNF DBOOJOH Single Dual Triple HI t #SJOH MJRVJE UP B CPJM t 4UBSU DPPLJOH t )PME B SBQJE CPJM GSZJOH EFFQ GBU GSZ t 2VJDLMZ CSPXO PS TFBS GPPE 5 t .BJOUBJO B TMPX CPJM t 'SZ PS TBVUF GPPET t $PPL TPVQT TBVDFT BOE HSBWJFT 2 t 4UFX PS TUFBN GPPE t 4JNNFS Lo t ,FFQ GPPE XBSN t .FMU DIPDPMBUF PS CVUUFS &MFNFOU -FWFM Warm (On Some .
USING THE OVEN 21 REMOVING AND REPLACING THE OVEN RACKS Rack and Pan Placement (On Some Models) Common use with Roasting rack Split-rack CAUTION • Replace oven racks before turning the oven on to prevent burns. • DO NOT cover the racks with aluminum foil, or any other material, or place anything on the bottom of the oven. Doing so will result in poor baking and may damage the oven bottom. • Only arrange oven racks when the oven is cool. Removing the racks: 1.
USING THE OVEN BAKE BAKE is used to prepare foods such as pastries, breads and casseroles. The oven can be programmed to bake at any temperature from 170°F (77°C) to 550°F (288°C). The default temperature is 350°F (177°C). Setting the BAKE function (example, 375°F): 1. Press BAKE. 2. Set the oven temperature (Press 3, 7 and 5). 3. Press START. PREHEATING and 100˚ will appear in the display. As the oven preheats, the temperature will increase by 5 degrees increments.
USING THE OVEN 23 Dual Convection baking uses two fans to circulate the oven's heat evenly and continuously within the oven. Improved heat distribution allows for even cooking and excellent results using multiple racks at the same time. Foods cooked on a single oven rack will generally cook faster and more evenly with Dual Convection Bake. Multiple oven rack cooking may slightly increase cook times for some foods, but the overall result is time saved.
USING THE OVEN CONVECTION ROAST Roasting Rack Instructions (On Some Models) The Convection Roast feature is designed to give an optimum roasting performance. The Convection Roast feature uses the convection fan while cooking to roast meats and poultry. The heated air circulates around the food from all sides, sealing in juices and flavors. Foods are crispy brown on the outside while staying moist on the inside.
USING THE OVEN 25 The Healthier Roast function is designed to lower the fat content of meat and poultry. Healthier Roast can reduce fat up to 20% compared to regular roasting. The amount of fat reduced from the meat may vary depending on the type and cut of meat. Results are based on beef roasts tested by a certified organization. Preheating is not necessary for meats and poultry.
USING THE OVEN BROIL Smoking The Broil function uses intense heat from the upper heating element to cook food. BROIL works best for tender cuts of meat, fish, and thinly cut vegetables. Due to the intense heat associated with broiling, it is normal to experience smoke during the cooking process. This smoke is a natural byproduct of searing and should not cause you to worry.
USING THE OVEN 27 ENGLISH RECOMMENDED BROILING GUIDE The size, weight, thickness, starting temperature, and your preference of doneness will affect broiling times. This guide is based on meats at refrigerator temperature.
USING THE OVEN Broiling Tips (On Some Models) FAVORITE • Preheat oven 5~7 minutes for best broiling results. • Brush fish and poultry with butter or oil to prevent sticking. • Always use the broiler pan and grid that came with your oven. Do not cover the grid with aluminum foil. The FAVORITE feature is used to record and recall your favorite recipe settings. This feature can store and recall up to three different settings. The Favorite Setting feature can be used with the COOK TIME feature.
USING THE OVEN 29 PROOF The warm function will maintain an oven temperature PG ¡' BOE LFFQ DPPLFE GPPE XBSN GPS TFSWJOH VQ UP hours after cooking has finished. The Warm function may be used without any other cooking operations or can CF VTFE GPMMPXJOH UIF GJOJTI PG 5*.&% #",& PS %&-":&% 5*.&% #",& The Proof feature maintains a warm environment for rising yeast leavened products before baking.
MEAT PROBE (On some models) The meat probe accurately measures the internal temperature of meat, poultry and casseroles. It should not be used during broiling, self clean, warming or proofing. Always unplug and remove the meat probe from the oven when removing food. Before using, insert the probe into the center of the thickest part of the meat or into the inner thigh or breast of poultry, away from fat or bones. Place food in the oven and connect the meat probe to the jack.
LOWER OVEN CONTROLS 31 USING THE LOWER OVEN The purpose of the lower oven is to bake foods using the same cooking times and temperatures you would in a TUBOEBSE PWFO 'PPET JEFBM GPS CBLJOH JO UIF MPXFS PWFO drawer include pizza, frozen foods, casseroles, biscuits, rolls and many desserts. The lower oven uses less energy than a standard oven. It takes more time for preheating than a standard oven. Allow the following approximate times for preheating: -PXFS PWFO 5FNQFSBUVSF 1SFIFBU 5JNF Warm .
CARE AND CLEANING CARE AND CLEANING CLEANING THE GLASS/CERAMIC COOKTOP CAUTION Burned-On Residue 1. While the cooktop is still hot, remove any burnton deposits or spilled food from the glass/ceramic cooking surface with a suitable metal razor scraper (similar to scraping paint off of a windowpane - it will not damage the decorated cooking surface). Hold the scraper at an approximate 30° angle to the cooktop. • DO NOT use scrub pads or abrasive cleaning pads. They may damage your cooktop surface.
CARE AND CLEANING 33 If any sugar or food containing sugar (preserves, ketchup, tomato sauce, jellies, fudge, candy, syrups, chocolate, etc.), plastic or foil melts on the cooktop, remove the molten material IMMEDIATELY with a metal razor scraper (the scraper will not damage the decorated cooking surface) while the cooking surface is still hot to avoid the risk of damage to the glass-ceramic surface. For your safety, use an oven mitt or potholder while cleaning the hot cooking surface.
CARE AND CLEANING During the self clean cycle, the cooktop elements and Lower oven drawer cannot be used. NOTE • Remove oven racks and accessories before starting the self clean cycle. • If oven racks are left in the oven cavity during the self clean cycle, they will discolor and become difficult to slide in and out. • Clean the frame of the oven and door with hot soapy water. Rinse well. • Do not clean the gasket. The fiberglass material of the oven door gasket cannot withstand abrasion.
CARE AND CLEANING 35 After the Self Clean Cycle t 5 IF TFMG DMFBO DZDMF VTFT FYUSFNFMZ IPU UFNQFSBUVSFT to clean the oven cavity. While running the Self Clean cycle, you may notice smoking or an odor. This is normal; especially if the oven is heavily soiled. t "T UIF PWFO IFBUT ZPV NBZ IFBS TPVOET PG NFUBM QBSUT expanding and contracting. This is normal and will not damage the oven. t %P OPU GPSDF UIF PWFO EPPS PQFO XIFO -0$,&% JT displayed.
CARE AND CLEANING CLEANING THE EXTERIOR Broiler Pan and Grid (On Some Models) Painted and Decorative Trim For general cleaning, use a cloth with hot soapy water. For more difficult soils and built-up grease, apply a liquid detergent directly onto the soil. Leave it on for 30 to 60 minutes. Rinse with a damp cloth and dry. Do not use abrasive cleaners. Stainless Steel Surfaces (on some models) To avoid scratches, do not use steel wool pads. 1.
CARE AND CLEANING 37 Replacing the oven door 'JSNMZ HSBTQ CPUI TJEFT PG UIF EPPS BU UIF UPQ CAUTION t #F DBSFGVM XIFO SFNPWJOH BOE MJGUJOH UIF EPPS t %0 /05 MJGU UIF EPPS CZ UIF IBOEMF t %0 /05 IJU UIF HMBTT XJUI QPUT QBOT PS BOZ PUIFS object. t 4 DSBUDIJOH IJUUJOH KBSSJOH PS TUSFTTJOH UIF HMBTT may weaken its structure, causing an increased risk of breakage at a later time.
CARE AND CLEANING Removing the Lower Oven Drawer 1. Pull the bearing glides to the front of the chassis glide. WARNING Disconnect the electrical power to the range at the main fuse or circuit breaker panel before removing UIF ESBXFS 'BJMVSF UP EP TP DBO SFTVMU JO TFWFSF personal injury, death, or electrical shock. .PTU DMFBOJOH DBO CF EPOF XJUI UIF ESBXFS JO QMBDF however, the drawer may be removed if further cleaning is needed. Use warm water to thoroughly clean.
FAQs 39 What types of cookware are recommended for use with my cook top? Can I leave my racks in the oven when running a Self Clean cycle? t 5 IF QBOT NVTU IBWF B GMBU CPUUPN BOE TUSBJHIU TJEFT t 0OMZ VTF IFBWZ HBVHF QBOT t 5IF QBO TJ[F NVTU NBUDI UIF BNPVOU PG GPPE UP CF QSFQBSFE BOE UIF TJ[F PG UIF TVSGBDF FMFNFOU t 6TF UJHIU GJUUJOH MJET t 0OMZ VTF GMBU CPUUPN XPLT No.
TROUBLESHOOTING TROUBLESHOOTING BEFORE REQUESTING SERVICE Review this Troubleshooting section before calling for service. This section contains common occurrences that are not a result of defective workmanship or materials. 1SPCMFN 1PTTJCMF $BVTFT 4PMVUJPOT Range is not level. t 1PPS JOTUBMMBUJPO 1MBDF PWFO SBDL JO DFOUFS PG PWFO 1MBDF B MFWFM PO UIF PWFO SBDL Adjust leveling legs at base of range until the oven rack is level.
TROUBLESHOOTING 41 Possible Causes / Solutions Oven will not work • Plug on range is not completely inserted in the electrical outlet. - Make sure electrical plug is plugged into a live, properly grounded outlet. • A fuse in your home may be blown or the circuit breaker tripped. - Replace the fuse or reset the circuit breaker. • Oven controls improperly set. - See the Using the Oven section. • Oven too hot. - Allow the oven to cool to below locking temperature. Appliance does not operate.
TROUBLESHOOTING Problem Possible Causes / Solutions Food does not broil properly • Oven temperature too hot or too cold • Oven sensor needs to be adjusted. - See Adjusting your Oven Temperature in the Features section. Scratches or abrasions on cooktop surface • Coarse particles such as salt or sand between cooktop and utensils can cause scratches. Be sure cooktop surface and bottoms of utensils are clean before usage. Small scratches do recommended. - See the Using the Oven section, page 26.
TROUBLESHOOTING 43 Possible Causes / Solutions Excessive smoking during a self clean cycle • Excessive soil. - Press the CLEAR/OFF button. Open the windows to rid the room of smoke. Wait until the self clean mode is cancelled. Wipe up the excess soil and reset the Self Clean function. The oven door is not opening after a Self Clean cycle. • Oven is too hot. - Allow the oven to cool. Oven not clean after a self clean cycle • Oven controls not properly set. - See the Self Clean section, page 34.
WARRANTY WARRANTY (USA) -( &MFDUSPOJDT *OD XJMM SFQBJS PS SFQMBDF ZPVS QSPEVDU BU -( T PQUJPO JG JU QSPWFT UP CF EFGFDUJWF JO NBUFSJBM PS XPSLNBOTIJQ under normal use, during the warranty period set forth below, effective from the date of original consumer purchase of the product. This limited warranty is good only to the original purchaser of the product and effective only when used in U.S.A.
ESPAÑOL MANUAL DEL USUARIO COCINA ELÉCTRICA Lea atentamente este manual del usuario antes de poner el electrodoméstico en funcionamiento y téngalo en todo momento a mano para su referencia. LSE3090ST LSE3092ST LSES302ST P/No.: MFL62114704 www.lg.
2 ÍNDICE ÍNDICE 3 IMPORTANTES INSTRUCCIONES DE SEGURIDAD 23 USO DEL HORNO 23 Sacar y volver a colocar los estantes del horno 24 BAKE (Horneado) 12 DESCRIPCIÓN GENERAL 25 12 Accesorios 26 Horneado por convección doble (En algunos modelos) Rostizado por convección 13 Descripción general de la cocina 27 Rostizado más saludable (En algunos modelos) 14 Descripción general del panel de control 28 Asado a la parrilla 29 Guía de asado recomendado 30 El favorito 31 Calentar 31 Leudar
IMPORTANTES INSTRUCCIONES DE SEGURIDAD 3 IMPORTANTES INSTRUCCIONES DE SEGURIDAD Usted puede descargar el manual de usuario en http://www.lg.com. Este es el símbolo de alerta de seguridad. Este símbolo lo alerta sobre los posibles riesgos que pueden causar daños a la propiedad y/o lesiones físicas graves o la muerte. Todos los mensajes de seguridad estarán precedidos por el símbolo de alerta de seguridad y la palabra «ADVERTENCIA» o «PRECAUCIÓN».
4 IMPORTANTES INSTRUCCIONES DE SEGURIDAD Aproximadamente 0,65” (16,5 mm) Soporte Anti-vuelco Debe introducirse el tornillo en la madera o en el hormigón Pared • Retire el cajón calentador o de almacenamiento y controle visualmente que las patas de nivelación traseras estén completamente insertadas en el soporte anti-vuelco. • Asegúrese de que un técnico calificado realice la instalación y puesta a tierra de este electrodoméstico en forma adecuada.
IMPORTANTES INSTRUCCIONES DE SEGURIDAD 5 ADVERTENCIA • No pise ni se siente sobre la puerta del horno. Instale el soporte anti-vuelco que se encuentra embalado junto con la estufa. - La estufa podría tumbarse y el derrame de líquidos o alimentos calientes o la caída de la estufa misma podrían provocar lesiones.
6 IMPORTANTES INSTRUCCIONES DE SEGURIDAD • No almacene o use materiales flamables dentro del horno o cerca de las hornallas. Materiales flamables incluyen papel, plastico, guantes, ropa, revestimientos para paredes, cortinas, gasolina u otros vapores flamables y liquidos como grasas o aceite para cocinar. Estos materiales pueden hacer ignicion cuando el horno y las hornallas estan en uso. • Use prendas adecuadas.
IMPORTANTES INSTRUCCIONES DE SEGURIDAD 7 SEGURIDAD DURANTE SU USO t /P UPRVF MPT FTUBOUFT EFM IPSOP DVBOEP FTUÏO DBMJFOUFT t 4J FM CBTUJEPS EFCF TFS NPWJEP NJFOUSBT FM IPSOP FTUÈ DBMJFOUF OP QFSNJUB RVF MB BHBSSBEFSB FO DPOUBDUP DPO FM FMFNFOUP EF DBMFOUBNJFOUP FO FM IPSOP DBMJFOUF t 4JFNQSF VUJMJDF BHBSSBEFSBT P HVBOUFT EF DPDJOB BM SFUJSBS MB DPNJEB EFM IPSOP P EF MB IPSOBMMB DBMFOUBEPSB DFOUSBM Los recipientes de cocción estarán calientes. t 6UJMJDF DPO QSFDBVDJØO MBT GVODJPOFT 5*.
8 IMPORTANTES INSTRUCCIONES DE SEGURIDAD • Utensilios de cocina vidriados. Sólo ciertos tipos de vidrio, vitrocerámica, cerámica, barro u otros tipos de utensilios vidriados son aptos para utilizar en la parte superior de la estufa sin que se rompan debido al brusco cambio de temperatura. • Las asas de los utensilios deben siempre apuntar hacia adentro y no extenderse sobre las hornallas de superficie adyacentes.
IMPORTANTES INSTRUCCIONES DE SEGURIDAD 9 SUPERFICIES DE COCCIÓN DE VITROCERÁMICA Manténgase a un costado de la estufa al abrir la puerta del horno. El aire caliente y el vapor que escapan pueden causar quemaduras en las manos, el rostro y los ojos. ESPAÑOL ADVERTENCIA • NO TOQUE LAS HORNALLAS DE SUPERFICIE O ÁREAS CERCA DE LAS HORNALLAS. • Las hornallas de superficie podrían estar calientes incluso cuando presenten un color oscuro.
10 IMPORTANTES INSTRUCCIONES DE SEGURIDAD t /0 UPRVF MBT IPSOBMMBT EF TVQFSGJDJF IBTUB RVF TF IBZBO FOGSJBEP t Las hornallas de la superficie podrían todavía estar calientes y podrían producirse quemaduras si se toca la superficie de vidrio antes de que se haya enfriado lo suficiente. t Limpie inmediatamente los derrames sobre el área de cocción para evitar una posterior tarea intensa de limpieza.
IMPORTANTES INSTRUCCIONES DE SEGURIDAD COCINAR BIEN LA CARNE Y LAS AVES Para evitar enfermedades transmitidas por los alimentos, cocine bien la carne y las aves. La USDA ha indicado las siguientes temperaturas internas mínimas como seguras para el consumo. t $BSOF NPMJEB EF WBDB UFSOFSB DFSEP P DPSEFSP ¡ ' t "WFT ¡ ' t $BSOF EF WBDB UFSOFSB DFSEP P DPSEFSP ¡ ' t 1FTDBEP 'SVUPT EFM .
12 DESCRIPCIÓN GENERAL DESCRIPCIÓN GENERAL ACCESORIOS Accesorios para cocinar Objetivo doble Bandeja de rostizado (1 de cada uno) Bandeja dividida (1 de cada uno) Asadera de inserción (1 de cada uno) Bandeja pesada (1 de cada uno) Bandeja estándar (3 de cada uno) Asadera (1 de cada uno) Bandeja del cajón (1 de cada uno) Bandeja deslizante (1 de cada uno) Sonda para carne (1 de cada uno) Para el modelo : LSE3092ST, LSES302ST Accesorios para la instalación Plantilla (1 de cada uno) Tornillos (6 de
DESCRIPCIÓN GENERAL 13 DESCRIPCIÓN GENERAL DE LA ESTUFA Para el modelo : LSE3092ST, LSES302ST Elemento simple Elemento simple Elemento doble Vidrio cerámica Asadera y de inserción Elemento triple Interruptor automático de la luz del horno Empaque Bandejas pesadas Bandeja plegable Bandeja dividida Puerta del horno Soporte anti-volcaduras Cajón del horno inferior Placa de modelo y número de serie Para el modelo : LSE3090ST Elemento simple Elemento simple Elemento doble Vidrio cerámica Elemento simple
14 DESCRIPCIÓN GENERAL DESCRIPCIÓN GENERAL DEL PANEL DE CONTROL Para el modelo : LSE3092ST, LSES302ST Control de la Hornalla de la Estufa gle Sin Controles del Horno Controles del Horno Inferior Características Control de la Hornalla de la Estufa Du al gle Sin Wa rm 200˚F 450˚F Tr ip le 250˚F 300˚F 400˚F Du al 350˚F Botón Clear Off (Borrar) Botones Numéricos Botón Start/Lockout (Inicio/Bloqueo) Para el modelo : LSE3090ST Indicador de superficie caliente Control de la Hornalla de la Est
CARACTERÍSTICAS 15 CARACTERÍSTICAS RELOJ 1. Presione $-0$,. 2. Presione los botones numéricos para ingresar la hora. Por ejemplo, para poner el reloj a las 10:30, presione MPT OÞNFSPT , , y . Todas las características enumeradas tienen una configuración de tiempo o temperatura máxima que puede ingresarse en el control. Un tono de aceptación de la entrada sonará cada vez que presione una tecla del control.
16 CARACTERÍSTICAS TEMPORIZADOR ENCENDIDO/ APAGADO TIMER ON/OFF (temporizador encendido/apagado) funciona como un temporizador extra en la estufa que emite un pitido cuando finaliza el tiempo configurado. No inicia o detiene la cocción. La característica TIMER ON/OFF (temporizador encendido/apagado) puede utilizarse durante cualquiera de las otras funciones de control del horno. Para configurar el temporizador (ejemplo de 5 minutos): 1. Presione TIMER ON/OFF dos veces.
CARACTERÍSTICAS 17 LUZ DE ALARMA DE PRECALENTAMIENTO Podría resultarle que el horno nuevo cocina distinto que el que reemplazó. Utilice su nuevo horno durante unas semanas parta familiarizarse con él antes de cambiar las configuraciones de la temperatura. Si luego de familiarizarse con su nuevo horno, usted todavía cree que la temperatura es demasiado alta o demasiado baja, puede ajustar usted mismo el termostato.
18 CARACTERÍSTICAS BLOQUEO La función de bloqueo, bloquea el horno automáticamente y evita que la mayoría de los controles del horno se activen. No desactiva el reloj, el temporizador ni la luz interior del horno. Cómo activar la función de bloqueo: 1. Presione START (iniciar) durante 3 segundos. 2. Sonará la melodía de bloqueo. Se visualiza LOCKING y DOOR LOCKED (puerta bloqueada) comienza a destellar.
CARACTERÍSTICAS 19 El horno continuará cocinando por la cantidad de tiempo configurada y luego se apagará automáticamente. Cuando haya transcurrido el tiempo de cocción: La función COCCIÓN TEMPORIZADA le permite configurar el horno para que cocine durante un período de tiempo específico. Esta función puede utilizarse únicamente con los modos HORNEAR, HORNEADO POR CONVECCIÓN ASADO POR CONVECCIÓN y FAVORITOS. • END y la hora del día se mostrará en la pantalla.
20 USO DE LA ESTUFA Para el modelo : LSE3092ST, LSES302ST SINGLE TRIPLE DUAL Para el modelo : LSE3092ST, LSES302ST SINGLE WARM ZONE 1. Presione la perilla hacia adentro. 2. Gire la perilla en la dirección de la configuración que desee. La perilla de control hace “clic” cuando se coloca en las posiciones OFF (apagado) y HI (alta). Las áreas de cocción de su cocina están identificadas por círculos permanentes sobre la superficie de vidrio de la estufa.
USO DE LA ESTUFA 21 Encender una hornalla DUAL (hornallas anterior derecha e izquierda): 2 2 C 1 B Tr ip le A Du al Single (única) Dual (doble) Triple (triple) 2-A. Gire la perilla en sentido contrario a las agujas del reloj para alcanzar las configuraciones de unidades de superficie SINGLE (únicas). 2-B. Gire la perilla en sentido de las agujas del reloj para alcanzar las configuraciones de unidades de superficie DUAL (dobles).
22 USO DE LA ESTUFA Configuración de cocción de superficie recomendada Elemento Nv Dual (doble) Triple (triple) Uso recomendado - Single (simple) Dual (doble) Triple (triple) • Recipientes de cocción de diámetro grande • Grandes cantidades de alimentos • Conservas caseras HI • Llevar líquidos al hervor (alto) • Iniciar la cocción 8 • Mantener un hervor rápido, freír, freír con grasa • Dorar o sellar alimentos con rapidez 5 • Mantener un hervor lento • Freír o saltear alimentos • Cocinar sopas, sa
USO DEL HORNO 23 USO DEL HORNO Uso común con la bandeja de rostizado Bandeja dividida PRECAUCIÓN • Volver a colocar los estantes del horno antes de encender el horno para evitar quemaduras. • NO cubra los estantes con papel de aluminio o cualquier otro material, ni coloque nada sobre el fondo del horno. Hacerlo podría causar un horneado deficiente y podría dañar la parte inferior del horno. • Acomode los estantes del horno únicamente cuando el horno este frío. Retirar los estantes: 1.
24 USO DEL HORNO BAKE (HORNEADO) #",& se usa para preparar alimentos tales como pastelería panes, cazuelas. Puede programarse el horno QBSB RVF IPSOFF B DVBMRVJFS UFNQFSBUVSB EFTEF ¡ ' ¡ $ IBTUB ¡' ¡ $ -B UFNQFSBUVSB QSFEFUFSNJOBEB FT EF ¡ ' ¡ $ Configuración de la función BAKE (por ejemplo, 375°F): 1. Presione #",& (hornear). 2. Configure la temperatura del horno. (Presione , 7 y 5). 3. Presione 45"35 (iniciar). Podrá verse la palabra 13&)&"5*/( (precalentando) y ¡.
USO DEL HORNO 25 HORNEADO POR CONVECCIÓN DOBLE (En algunos modelos) Beneficios del horneado por convección doble: • Los alimentos se cocinan más homogéneamente con el horneado por convección comparado con uno de sin convección. • Se puede cocinar en múltiples bandejas. • No se necesitan ollas o artículos especiales para el horneado. • Las reducciones de tiempo varían en base a la cantidad y clase de alimentos que se cocinarán.
26 USO DEL HORNO ROSTIZADO POR CONVECCIÓN La característica CONV Roast (rostizado por convección) se encuentra diseñada para ofrecer un óptimo desempeño de rostizado. La característica de rostizado por convección combina una cocción con el ventilador de convección para rostizar carnes y aves. El aire caliente circula alrededor de los alimentos por todos los lados, sellando los jugos y sabores. Las comidas quedan doradas y crujientes por afuera y jugosas por dentro.
USO DEL HORNO 27 ROSTIZADO MÁS SALUDABLE (En algunos modelos) NOTA 130#& TPOEB BQBSFDFSÈ FO MB QBOUBMMB DVBOEP TF enchufa la sonda del horno en el enchufe. Configuración de la función ROSTIZADO MÁS SALUDABLE (Ejemplo para Carne de Res a temperatura de sonda 140°F): 1. Antes de utilizar esta característica, introduzca la sonda para carne dentro de la carne de res o de ave. 2. Presione )FBMUIJFS 3PBTU (rostizado más saludable).
28 USO DEL HORNO BROIL (ASADO A LA PARRILLA) La función Asado a la parrilla utiliza el calor intenso de la hornalla superior para cocinar la comida. El ASADO A LA PARRILLA funciona mejor con cortes tiernos de carne, pescado y vegetales finamente cortados. NOTA • Su horno está diseñado para asar con la PUERTA CERRADA. • La sonda para carne no puede utilizarse en este modo Antes de asar. 1. Coloque la carne o pescado sobre la rejilla dentro de la asadera. 2.
USO DEL HORNO 29 GUÍA DE ASADO RECOMENDADO ESPAÑOL El tamaño, peso, grosor, temperatura inicial y el punto de cocción preferido afectarán los tiempos de asado. Esta guía está basada en carnes a temperatura de refrigerador. Para mejores resultados durante el asado, utilice un recipiente diseñado para asar (ver Fig. 1) Fig.1 Tabla de asado Alimento Carne picada Bien cocida Cantidad y/o grosor Posición Tiempo del Tiempo del del estante primerlado (min.) segundo lado Comentarios 1 lb.
30 USO DEL HORNO Consejos para el Asado a la Parrilla (En algunos modelos) • Precaliente el horno durante 5~7 minutos para mejores resultados. • Pinte el pescado y aves con manteca o aceite para evitar que se peguen. • Siempre use la asadera y rejilla que vinieron con su horno. No cubra la rejilla con papel de aluminio. EL FAVORITO La característica de FAVORITO se utiliza para registrar y recordar sus configuraciones de recetas favoritas.
USO DEL HORNO 31 LEUDAR Esta función mantendrá el horno a una temperatura de 170ºF. La función CALENTAR mantendrá caliente la comida cocinada para servir hasta 3 horas después de finalizada la cocción. La función Calentar puede utilizarse sin ninguna otra función de cocción o puede utilizarse luego de terminado el tiempo de cocción usando HORNEADO TEMPORIZADO u HORNEADO TEMPORIZADO RETARDADO.
32 USO DEL HORNO SONDA PARA CARNE (En algunos modelos) La sonda para carne mide con precisión la temperatura interna de la carne de res, de ave y de los estofados. No debe utilizarse durante el asado, la autolimpieza y las funciones de calentar y leudado. Siempre desenchufe y quite la sonda para carne del horno cuando quite la comida. Antes de utilizarla, introduzca la sonda en el centro de la parte más gruesa de la carne de res o dentro del muslo o pechuga de la carne de ave, alejada de la grasa o huesos.
CONTROLES DEL HORNO INFERIOR 33 CONTROLES DEL HORNO INFERIOR (En algunos modelos) El objetivo del horno inferior es hornear alimentos utilizando los mismos tiempos de cocción y temperaturas de un horno estándar. Los alimentos ideales para hornear en el cajón del horno inferior son pizza, alimentos congelados, estofados, galletas, bollitos dulces y una variedad de postres.
34 CUIDADO Y LIMPIEZA CUIDADO Y LIMPIEZA LIMPIEZA DE LA ESTUFA DE VITROCERÁMICA PRECAUCIÓN t /0 VUJMJDF FTQPOKBT EF GJCSB P FTQPOKBT EF MJNQJF[B abrasivas. Podrían dañar la superficie de su estufa. t 1BSB TV TFHVSJEBE VUJMJDF VO HVBOUF EF DPDJOB P agarradera para limpiar la superficie caliente de la estufa. Use Limpiador para Estufas Cerámicas sobre la estufa de vidrio. Otras cremas podrían no ser tan efectivas o podrían rayar, dañar o manchar la superficie de la estufa.
CUIDADO Y LIMPIEZA 35 IMPORTANTE: Marcas de Metal y Rayones 1. Tenga cuidado de no deslizar ollas y sartenes por la estufa. Si lo hace, dejará marcas de metal sobre la superficie de la estufa. Para intentar quitar estas marcas, utilice un limpiador para estufas cerámicas con una esponja limpiadora para estufas cerámicas. 2. Si se deja una olla con una delgada capa de revestimiento de aluminio o cobre que hierva hasta secarse, el revestimiento podría dejar una coloración negra sobre la estufa.
36 CUIDADO Y LIMPIEZA Durante un ciclo de auto-limpieza no se podrán utilizar las hornallas de la estufa ni el horno inferior del cajón. NOTA • Retire los estantes del horno y los accesorios antes de iniciar un ciclo de auto-limpieza. • Si se dejan los estantes del horno en la cavidad del horno durante un ciclo de auto-limpieza, se decolorarán y será difícil deslizarlos hacia adentro y hacia afuera. • Limpie el marco de la estufa y la puerta con agua jabonosa caliente. Enjuague bien. • No limpie la junta.
CUIDADO Y LIMPIEZA 37 Luego del Ciclo de Auto-Limpieza t & M DJDMP EF BVUP MJNQJF[B VUJMJ[B UFNQFSBUVSBT extremadamente elevadas para limpiar la cavidad del IPSOP "M FKFDVUBS FM DJDMP EF "VUP -JNQJF[B QVFEF percibir humo u olores. Esto es normal; especialmente si el horno está muy sucio. t " NFEJEB RVF FM IPSOP TF DBMJFOUF QPESÓB PÓS TPOJEPT de partes metálicas que se expanden y contraen. Esto es normal y no dañará el horno.
38 CUIDADO Y LIMPIEZA LIMPIEZA EXTERIOR Asadera y Rejilla (En algunos modelos) Revestimiento Pintado y Decorativo Para la limpieza general, utilice un paño con agua caliente jabonosa. Para suciedades más difíciles y grasa acumulada, aplique detergente líquido directamente sobre la suciedad. Déjelo actuar de 30 a 60 minutos. Enjuague con un paño empapado y seque. No utilice limpiadores abrasivos.
CUIDADO Y LIMPIEZA 39 SACAR Y VOLVER A COLOCAR LA PUERTA DEL HORNO Y EL HORNO INFERIOR DEL CAJÓN Volver a colocar la puerta del horno 1. Sostenga firmemente de la parte superior ambos lados de la puerta. t - B QVFS UB FT NVZ QFTBEB 5FOHB DVJEBEP BM remover y levantar la puerta. t /0 MFWBOUF MB QVFSUB EF MB NBOJKB t /0 HPMQFF FM WJESJP DPO PMMBT TBSUFOFT P DVBMRVJFS otro objeto.
40 CUIDADO Y LIMPIEZA Sacar el horno inferior del cajón ADVERTENCIA Desconecte la energía eléctrica de la estufa desde el fusible principal o el panel interruptor de circuitos antes de retirar el cajón. No hacerlo podría causar lesiones graves, la muerte o descargas eléctricas. La mayor parte de la limpieza se puede realizar con el cajón en su lugar; sin embargo, si es necesario se puede sacar el cajón para realizar una limpieza más a fondo. Use agua tibia para limpiar por completo. 1.
PREGUNTAS FRECUENTES 41 ¿Puedo dejar mis estantes en el horno cuando se está ejecutando un ciclo de Auto-Limpieza? ¿Qué tipo de recipientes de cocción se recomiendan para usar con mi estufa? No. Si bien no dañará los estantes, los decolorará y podría dificultar su deslizamiento hacia afuera y hacia adentro durante su uso. Retire todos los elementos del horno antes de iniciar un ciclo de Auto-Limpieza. • Los recipientes deben tener base plana y lados rectos. • Use únicamente recipientes de gran espesor.
42 IDENTIFICACIÓN Y SOLUCIÓN DE PROBLEMAS IDENTIFICACIÓN Y SOLUCIÓN DE PROBLEMAS ANTES DE LLAMAR AL SERVICIO TÉCNICO Antes de llamar al servicio técnico, examine esta lista. Puede ahorrarle tiempo y dinero. La lista incluye situaciones comunes que no son el resultado de mano de obra o materiales defectuosos del aparato. Problema Causas / Soluciones posibles La estufa está desnivelada. • Una mala instalación. Coloque la bandeja del horno en el centro del horno.
IDENTIFICACIÓN Y SOLUCIÓN DE PROBLEMAS 43 Problema El horno no funciona Causas / Soluciones posibles - Ver la sección “Cómo usar el horno”. • El horno está muy caliente. - Deje que el horno se enfríe por debajo de la temperatura de bloqueo. El aparato no funciona. • interruptores de circuitos. • El cableado de servicio no está completo. Para obtener asistencia, comuníquese con el reparador del aparato. • Corte de energía. Controle las luces de su hogar para asegurarse.
44 IDENTIFICACIÓN Y SOLUCIÓN DE PROBLEMAS Problema Causas / Soluciones posibles Los alimentos no se asan de manera adecuada • El papel de aluminio usado en la asadera y la rejilla no se ha colocado de manera correcta y no se han realizado los cortes recomendados. - Ver la sección “Cómo usar el horno“, página 28. • En algunas regiones el voltaje puede ser bajo. - Precaliente el elemento de asado durante 5-7 minutos. - Ver la Guía de asado, página 29.
IDENTIFICACIÓN Y SOLUCIÓN DE PROBLEMAS 45 Problema Causas / Soluciones posibles • Suciedad excesiva. - Pulse el botón CLEAR/OFF. Abra la ventana para ventilar el humo de la estancia. Espere hasta que el modo de autolimpieza sea cancelado. Limpie el exceso de suciedad y reinicie el proceso de limpieza. La puerta del horno no se abre tras un ciclo de autolimpieza • El horno está excesivamente caliente. - Permita que el horno se enfríe por debajo de la temperatura de bloqueo.
46 GARANTÍA GARANTÍA (EE. UU.) LG Electronics Inc. reparará o reemplazará su producto, a discreción de LG, si se comprueba que los materiales o su confección presentaban defectos con el uso normal, durante el período de garantía establecido a continuación, vigente B QBSUJS EF MB GFDIB EF DPNQSB EFM QSPEVDUP QPS QBSUF EFM DPNQSBEPS PSJHJOBM &TUB HBSBOUÓB FT WÈMJEB ÞOJDBNFOUF QBSB FM DPNQSBEPS PSJHJOBM EFM QSPEVDUP Z UFOESÈ WBMJEF[ ÞOJDBNFOUF DVBOEP TF MB VTF FO MPT && 66 1&3¶0%0 %& ("3"/5¶" $0.0 4² .
NOTAS
LG Customer Information Center 1-800-243-0000 USA, Consumer User 1-888-542-2623 CANADA Register your product Online! www.lg.