
Installation Guide


18 INSTALLATION
2
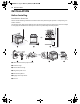
Insert the power cord through the strain relief
and tighten it.
CAUTION
cord without a strain
relief.
3
Remove the lower 3 screws from the terminal
block and retain them.
4
Remove the ground screw and bend the end
of the ground strap up so the slot is over the
hole of the center screw removed in step 3.
5
Insert the ground screw into the power cord
ground wire (green) terminal ring and secure
it to the range frame.
6
Insert the 3 screws through each power cord
terminal ring and into the lower terminals of
the terminal block.
ite center (neutral)
wire is connected to the center lower
position of the terminal block.
7
Tighten the 3 screws securely into the
terminal block.
attaches the bent up
ground strap to the block.
a
Black
b
White
c
Red
d
Terminal block
e
Ground strap
f
Ground screw
g
Cord/Conduit connection plate
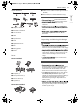
3-Wire Connection: Conduit
WARNING
d securely, it can result
in electrical spark and severe personal injury or
death.
Conduit Installations
CAUTION
t without a strain relief.
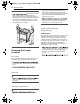
1
Remove the cord/conduit connection plate
from the rear of the oven and rotate it.
2
Prepare the conduit wires as shown below.
a
Cord/Conduit connection plate
3
Install the conduit strain relief.
1) Insert the strain relief in the 1 1/8 in. (2.8
cm) conduit hole.
2) Install the conduit through the body of
the strain relief and fasten the strain relief
with its ring.
NOTE
4
Reinstall the cord/conduit connection plate.
Conduit Connections
If the wire in the conduit is copper it must be 8 or
10 AWG wiring.
If the wire in the conduit is aluminum it must be 6
or 8 AWG wiring.
1
Loosen the lower 3 screws from the terminal
block.