
Installation Guide


17INSTALLATION
ENGLISH
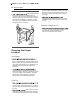
make it easier to insert the rear leg into the anti-tip
bracket.
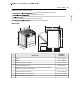
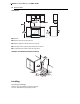
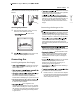
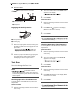
Checking Adjustments
1
Place the level diagonally on the oven rack,
and check each direction for level.
a
. Then check
direction
b
.
2
that the rack is level,
adjust the leveling legs with a wrench.
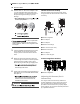
Connecting Gas
Providing Adequate Gas Supply
to operate at a pressure
of 5" of water column on natural gas or 10" of
water column on LP.
type of gas for which it is configured.
gas. When using this range on LP gas,
conversion must be made by a qualified LP
installer before attempting to operate the range.
gas supplied to the regulator must be between
5" and 13" of water column.
ssure supplied to the
regulator must be between 10" and 13" of water
column. When checking for correct operation of
the regulator, the inlet pressure must be at least
1" more than the operating (manifold) pressure
as given above.
cated at the inlet of the
range must remain in the supply line regardless
of which type of gas is being used.
connect the range to the gas supply line should
have an I.D. of 5/8" and a maximum length of 5
feet. In Canada, flexible connectors must be
single wall metal connectors less than 6 feet in
length.
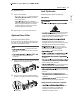
Connecting the Range to Gas
WARNING
the gas supply system by
closing its individual shut-off valve during any
pressure testing of the gas supply system at test
pressures equal to or less than 1/2 psi (3.5 kPa).
must be disconnected from the gas supply
piping system during any pressure testing of
that system at test pressures in excess of 1/2 psi
(3.5 kPa).
removing the old range and leave it off until the
new hook-up has been completed.
stricts movement of the
range, the use of a CSA International-certified
flexible metal appliance connector should be
used unless local codes require a hard-piped
connection.
installed in an accessible
location in the gas piping external to the
appliance for the purpose of turning on or
shutting off gas to the appliance.
ector when installing a
new range.
joint sealant on all external threads.
1
Install a male 1/2" or 3/4" flare union adapter
to the NPT internal thread of the manual shut-
off valve, taking care to back-up the shut-off
valve to keep it from turning.