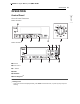
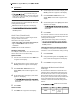
OPERATION 23 OPERATION Control Panel Features Model: LSGL5833* Model: LSGL5831* a Features b Oven Control c +/- buttons d START e CLEAR/OFF f Smart DiagnosisTM NOTE Flashing Clock - If the colon in the clock display flashes, press Clock and reset the time, or press any key to stop the flashing.
4 OPERATION NOTE when activating a button's secondary function. The buttons may not work properly if pressed too far from the center. Changing Oven Settings Clock The clock must be set to the correct time of day in order for the automatic oven timing functions to work properly. Oven Light The interior oven light automatically turns on when the door is opened. Light to manually turn the oven light on. NOTE Model LSGL5833* 1 Set the oven mode knob to the Off position.
OPERATION 25 5 When the set time runs out, End shows in the display. The indicator tones sound every 15 seconds until Timer On/Off is pressed. The Settings key allows you to: NOTE on auto conversion the remaining time by pressing Timer On/Off. Canceling the Timer 1 Press Timer On/Off once. The display returns to the time of day. Wi-Fi The Wi-Fi button is used to connect the appliance to a home Wi-Fi network. Model LSGL5833* 1 Set the mode knob to the OFF position.
26 OPERATION 3 Press plus(+) or minus(-) to enable or disable the feature. oven temperature can be increased (+) or decreased (-) as much as 35 °F or 19 °C. 4 Press START to accept the change. the display shows the adjusted temperature until it readjusts. Adjusting the Oven Thermostat Your new oven may cook differently from the one it replaced. Use your new oven for a few weeks to become more familiar with it before changing the temperature settings.
OPERATION 27 3 Press START to accept the change. Selecting Fahrenheit or Celsius Model LSGL5833* 1 The automatic timer of the Delayed Timed Cook function turns the oven on and off at the time you select. This feature can be used with the Bake, Conv. Bake, Self Clean, and Conv. Roast modes. CAUTION Set the oven mode knob to the Off position. Press and hold Start Time for 3 seconds. Then press Start Time repeatedly until Unit appears in the display.
28 OPERATION 2 as a 12-hour clock, you can delay the cook time for 12 hours. If the oven clock is set as a 24-hour clock, you can delay the cook time for 24 hours. Set the temperature. For this example, press minus(-) until 300 °F appears in the display. 3 Press Cook Time. Timed flashes in the display. Bake, 0:00 and 300 °F appear in the display. The oven will continue to cook for the set amount of time and then turn off automatically.
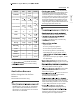
OPERATION 29 Max. CookTime 1 min. 11 hr. 59 min. Conv. Bake 300 / (*275 ) 550 / (*525 ) 350 (*325 ) / 12 Hr. Conv. Roast 300 (*275 ) 550 / (*525 ) 350 (*325 ) / 12 Hr. Broil Lo Hi Hi / 3 Hr. Bake 170 550 350 / 12 Hr. period of time without cookware on the grate. Frozen Meal 300 550 400 / 12 Hr. cookware to absorb the heat. Slow Cook 300 550 Lo Hi 400 / 12 Hr. Hi / 12 Hr. Proof 12 Hr. Warm 3 Hr. Self Clean 3 Hr. 5 Hr. EasyClean® NOTE cook time. 4 Hr. 10 min.
30 OPERATION CAUTION air from the vent may ignite flammable items and will increase pressure in closed containers, which may cause them to burst. pointed metal ends on the electrodes could cause injury. setting. together before heating. meter if possible to prevent overheating fat from heating beyond the smoking point. before using the burner. shallow or deep fat frying. Filling the pan with too much fat can cause spillovers when food is added. the cooktop.
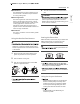
OPERATION 31 b Small burner c Extra large burner The extra large burner is the maximum output burner. Like the other four burners, it can be turned down from Hi to Lo for a wide range of cooking applications. This burner is also designed to quickly bring large amounts of liquid to a boil. It can be used with cookware 10 inches or larger in diameter. 4 Turn the control knob to control the flame size. CAUTION any burner while another burner is on. All the burners spark when any burner is turned to LITE.
32 OPERATION - This metal alone has poor heating properties and is usually combined with copper, aluminum or other metals for improved heat distribution. Combination metal skillets work satisfactorily if they are used with medium heat as the manufacturer recommends. - Under some conditions, the enamel of this cookware may melt. Follow cookware Using Stove-Top Grills Do not place stove-top grills on the burner. CAUTION burners.
OPERATION 33 CAUTION grate when using the period, adjust the griddle temperature settings as the griddle retains heat. iddle plate until the cooktop grates, surfaces and griddle plate have completely cooled. very hot when using the cooktop, oven or broiler systems. Always use oven mitts when placing or removing the griddle plate. In Case of Power Failure In case of a power failure, you can light the gas surface burners on your range with a match.
34 OPERATION CAUTION ns on the cooktop may become hot if left too close to the vent. en door more than necessary during use. This helps the oven maintain temperature, prevents unnecessary heat loss, and saves on energy use. valve are properly connected. type of food you will cook. - Make sure you know how to use the oven (temperature setting, time setting and recipe) for best results. aluminum foil. glass.
OPERATION 35 CAUTION Remove food from the oven. 1 Press Bake. 350F appears in the display. any other material, or place anything on the bottom of the oven. Doing so will result in poor baking and may damage the oven bottom. 2 Set the oven temperature: For example, press plus(+) until 375 °F appears in the display. 3 Press START. The oven starts to preheat. 1 Pull the rack straight out until it stops. 2 Lift up the front of the rack and pull it out.
36 OPERATION Convection Mode (Model LSGL5833*) The convection system uses a fan to circulate the heat evenly within the oven. Improved heat distribution allows for even cooking and excellent results while cooking with single or multiple racks. Setting the Convection Function (example, 375 °F) 1 2 3 Turn the oven mode knob to select Conv. Bake or Conv. Roast. The display flashes 350 °F. Set the oven temperature: press plus(+) until 375 °F appears in the display. Press START. The display shows Conv.
OPERATION 37 Rack and Pan Placement Rack position Food Cheesecake, crème brulée 3 Soufflés Sweet or savory 3 Casserole Frozen lasagna 4 Roasting Rack Guide Standard rack (Position 2) Standard rack (Position 5) Beef Single rack baking Pork Standard rack Poultry Baking Rack Guide Food Rack position Food Multiple rack baking Rack position Cakes Layer cakes Bundt cakes Angel food cake 3 3 3 Cookies Sugar cookies Chocolate chips Brownies 4 4 4 Pizza Fresh Frozen 3 3 Pastry Crust
38 OPERATION CAUTION the oven will be extremely high. Take caution to avoid possible burns by: - Keeping the door closed when broiling - Always wearing oven mitts when inserting or removing food items NOTE for closed-door broiling. Close the door to set the Broil function. If the door is open, the Broil function cannot be set and "door" appears on the display. Close the door and reset the Broil function. Opening the door turns off the broil burner during broiling.
OPERATION 39 Recommended Broiling Guide The size, weight, thickness, starting temperature, and your preference of doneness will affect broiling times. a Grid (sold separately) b Broiler pan (sold separately) * : This feature is for the offset rack use. Food Hamburgers Rack Position First Side (minutes ) Second Side (minutes ) Comments 6 5-7 3-5 Space evenly. Up to 9 patties may be broiled at once.
40 OPERATION Quantity and/or Thickness Food Lamb Chops Rack Position First Side (minutes ) Second Side (minutes ) 2 (1" thick) about 10 to 12 oz. Medium 5 6 4-7 Well Done 5 10 10 2 (1 1/2" thick) about 1lb. Medium 5 10 4-6 Well done 5 17 12-14 Bacon 1/2 lb. (about 8 thin slices) 4 8 3 Lobster Tails 2-4 6 to 8 oz. each 3 13-16 Do not turn over. Comments Slash fat. Arrange in single layer. Cut through back of shell. Spread open.
OPERATION 41 Proof This feature maintains a warm oven for rising yeast leavened products before baking. NOTE Setting the Proof Function Model LSGL5833* 1 or keeping food hot. The proofing oven temperature is not hot enough to keep foods at safe temperatures. Use the Warm feature to keep food warm. Proofing does not operate when the oven is above 125 . Hot shows in the display. Use rack position 2 or 3 for proofing. Proof function. 2 Turn the oven mode knob to select Proof/ Warm.
42 OPERATION NOTE intended to keep food warm. Do not use it to cool food down. 3 Press Cook Time and enter the cook time using the +/- keys. 4 Press Proof/Warm. Warm appears in the display. Keep Warm This function will maintain an oven temperature of 170 °F. The Keep Warm function will keep cooked food warm for serving up to 3 hours after cooking has finished. The Keep Warm function should be used with any other cooking operations except Broil and Proof.
OPERATION 43 NOTE hes, the later batches may take less time to cook. when using the Air Fry mode. reached a safe temperature for consumption. Eating undercooked meats can increase your risk of food-borne illness. wings or tenders in seasoned flour. Use 1/3 cup flour for 2 pounds. Tips for Air Fry - The mesh section of the air fry tray can be cleaned in a dishwasher. Recommendations When Air Frying High-Fat Foods Foods high in fat will smoke when using the Air Fry mode.
44 OPERATION Recommended Air Frying Guide 1 to catch drips. If needed, add parchment paper to absorb oil and reduce smoking. * High-fat items may produce more smoke when cooked using Air Fry. For less smoke, cook using Convection Roast mode. Time Approx.Q uantity(oz ) Temp.
OPERATION 45 Time Approx.Q uantity(oz ) Temp. (°F) Rack Position Scallops on Half Shell Fresh 35 425 4 20-30 Shrimp - Fresh 50 425 4 20-30 Mixed Vegetables 35 425 4 15-25 Brush or lightly spray with 4 tbsp. of olive oil. Add salt and pepper to taste. Thin Sausage* - 2.5 oz each, 3/4" diam. (70 g each, 2 cm diam.) 90 425 4 20-30 *High-fat items may produce more smoke when cooked using Air Fry. For less smoke, cook using Convection Roast mode.
46 OPERATION 4 When cooking is complete, turn the oven mode knob to the OFF position. NOTE Sabbath mode is deactivated. In Sabbath mode, all function buttons are inactive. sb will appear in display. Model LSGL5833* 1 Turn the oven mode knob to select Bake. 2 Set the Bake temperature using the +/- keys. 3 Press START. If the appliance is connected to a home Wi-Fi network, this function starts preheating and then holds the temperature for up to 12 hours (including preheating time).
SMART FUNCTIONS 47 SMART FUNCTIONS This feature is only available on models with Wi-Fi. The LG ThinQ application allows you to communicate with the appliance using a smartphone. Before Using LG ThinQ Application 1 Use a smartphone to check the strength of the wireless router (Wi-Fi network) near the appliance. een the appliance and the wireless router is too far, the signal becomes weak. It may take a long time to register or fail to install the application.
48 SMART FUNCTIONS FCC Notice NOTE problems with the wireless signal transmission, unplug the appliance and wait about a minute before trying again. disable the firewall or add an exception to it. combination of English letters and numbers. (Do not use special characters.) depending on the mobile operating system (OS) and the manufacturer. of the router is set to WEP, network setup may fail. Change the security protocol (WPA2 is recommended), and register the product again.
SMART FUNCTIONS 49 Open Source Software Notice Information 1 Press the START button for three seconds. deactivate the lock and then reactivate it. 2 LG Electronics will also provide open source code to you on CD-ROM for a charge covering the cost of performing such distribution (such as the cost of media, shipping, and handling) upon email request to opensource@lge.com. This offer is valid for a period of three years after our last shipment of this product.
50 MAINTENANCE MAINTENANCE Cleaning the OFF position and pull them straight off the stems. CAUTION the OFF position centered at the top, and slide the knob directly onto the stem. cooled down before touching any of its parts. cleaning the cooktop. NOTE General Cleaning Tips scrape off any chunks or debris before and during oven cleaning. pad may help to take off burnt-on stains better than a soft sponge or towel.
MAINTENANCE 51 Oven Door with a commercial oven cleaner or in the dishwasher. CAUTION oughly clean the oven door. Rinse well. Do not immerse the door in water. ner on the outside glass of the oven door. Do not spray water or glass cleaner on the door vents. harsh abrasive cleaning materials on the outside of the oven door. door gasket is made of a woven material that is essential for a good seal. Care should be taken not to rub, damage, or remove this gasket.
52 MAINTENANCE Grates and burner heads/caps can be removed for care and cleaning. cause injury. Hitting an electrode with a hard object may damage it. in a solution of mild liquid detergent and hot use a toothbrush or wire brush. burner ports or electrodes are clogged or dirty. routinely, especially after excessive spillover. CAUTION properly. They will be stable and rest flat when correctly installed. After Cleaning the Burner Heads/Caps Shake out any excess water and then let them dry thoroughly.
MAINTENANCE 53 Cleaning the Burner Grates NOTE CAUTION ed regularly and after - Rub in the direction of the grain to avoid damaging the surface. with clean water. completely and securely position them over the burners. Cleaning the Cooktop Surface The EasyClean coating makes cleaning the cooktop easier. Even heavy grease stains can be removed using only warm water. CAUTION allow the cooktop to cool. until it has cooled.
54 MAINTENANCE cavity is above 150 °F (65 °C), Hot will appear in the display, and the EasyClean cycle will not be activated until the oven cavity cools down. of the oven, it is better to use the Self Clean cycle. vel to ensure that the bottom surface of the oven cavity is entirely covered by water at the beginning of the EasyClean cycle. Benefits of EasyClean some models) Tap water may leave mineral deposits on the oven bottom.
MAINTENANCE 55 5 NOTE NOTE water to clean each oven. Do not spray water directly on the door. Doing so will result in water dripping to the floor. 6 pads or cleaners as these materials can permanently damage the oven surface. 10 Once the oven cavity is cleaned, wipe any excess water with a clean dry towel. Replace racks and any other accessories. 11 If some light soils remain, repeat the above steps, making sure to thoroughly soak the soiled areas. Close the oven door.
56 MAINTENANCE Self Clean This feature is only available on some models. The Self Clean cycle uses extremely hot temperatures to clean the oven cavity. While running the Self Clean cycle, you may notice smoking or an odor. This is normal; especially if the oven is heavily soiled. During Self Clean, the kitchen should be well ventilated to minimize the odors from cleaning. Before Starting Self Clean oven racks, broiler pan, broiler grid, all cookware, aluminum foil or any other material from the oven.
MAINTENANCE 57 fine lines may appear in the porcelain because it went through heating and cooling. This is normal and will not affect performance. Control Lock feature is active. locks automatically. You will not be able to open the oven door until the oven is cooled. The lock releases automatically. k indicator light stops flashing and remains on. Allow about 15 seconds for the oven door lock to activate. the Delayed Self Clean can never be set to start more than 12 hours in advance.
58 MAINTENANCE 2 Turn the oven mode knob to select Self Clean or press Self Clean. The oven defaults to the recommended four-hour self clean for a moderately soiled oven. Press plus(+) or minus(-) to select a self clean time from 3 to 5 hours. 3 Press Start Time. 4 Set the time of day you would like the Self Clean to start by pressing plus(+) or minus(-). 5 Press START. a Slot b Hinge Lock c Lock d Unlock NOTE Self Clean cycle due to excessive smoke or fire in the oven.
MAINTENANCE 59 further cleaning is needed. Use warm water to thoroughly clean. Fully open the drawer. 2 Unscrew the screw a on the back of the drawer. 3 Locate the glide lever on each side of the drawer. Push down on the left glide lever and pull up on the right glide lever. a Hinge arm b Bottom edge of slot c Indentation 3 Open the door fully. If the door will not open fully, the indentation is not seated correctly in the bottom edge of the slots.
60 MAINTENANCE Periodic Maintenance Changing the Oven Light The oven light is a standard 40-watt appliance halogen. It turns on when the oven door is open. When the oven door is closed, press Light to turn it on or off. WARNING the main fuse or circuit breaker panel. Failure to do so can result in severe personal injury, death, or electrical shock. 1 Unplug the range or disconnect power. 2 Turn the glass lamp cover in the back of the oven counterclockwise to remove.