Operation Starting Adjusting the Temperatures and Functions LED Display Control Panel Dispenser Control Panel Dispenser Lamp (hidden) Water/Ice Output Dispenser Push Switch 12 ENGLISH When the refrigerator is first installed, allow it to stabilize at normal operating temperatures for 2-3 hours prior to filling it with fresh or frozen foods. If operation is interrupted, wait 5 minutes before restarting.
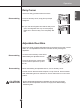
Operation Control Panel LED Display Control Panel 1 2 3 4 5 6 7 8 The Power button turns off all electrical power to the unit. Press and hold the Power button for 3 seconds to turn off the power. When the power is off, the indicator light is off. There is no need to turn off power at the circuit 9 receptacle. 10 Use this 11 function12 breaker or wall for service or extended vacations. 1 Power Press the Ice Plus button once to activate the Ice Plus function.
Operation NOTE • Contact your local service center if the alarm continues to sound after the doors are closed. Press and hold the Water Filter button for approximately 3 seconds to reset the filter indicator after the water filter has been replaced. 6 Water Filter NOTE • It is recommended that you replace the water filter approximately every 6 months, when the water filter indicator light reaches 0 or if the ice or water starts to taste bad. Use during the Smart Diagnosis Feature.
1 2 3 4 5 6 7 8 Operation Dispenser Control Panel 9 10 11 12 13 When Light is pressed the dispenser light turns on and the indicator appears on the LED display. 9 Light Freezer temperature indicator. 10 Freezer Refrigerator temperature indicator. 11 Refrigerator Press and hold the Lock button for three seconds to lock the dispenser and all of the other control panel functions. Press and hold again for 3 seconds to unlock.
Operation Cleaning ENGLISH The water collector has no self-drainage function, so it should be cleaned regularly. Remove the cover by pulling the front of the water collector cover and dry it with a cloth. ON/OFF Switch Automatic Icemaker lcemaker Automatic Shutoff Arm • The automatic icemaker can automatically make 6 cubes at a time, 70~120 pieces per day. This quantity may vary by circumstance, including ambient temperature, door opening, freezer load. etc.
Operation Icemaker Not Working Properly Ice is Lumped Together • When ice is lumped together, take the ice lumps out of the ice storage bin, break them into small pieces, and then place them into the ice storage bin again. • When the icemaker produces too small or lumped together ice, the amount of water supplied to the ice maker may need to be adjusted. Contact the service center. ❈ If ice is not used frequently, it may lump together. Power Failure • Ice may drop into the freezer compartment.
Operation Children should be supervised when using the dispenser. Be careful that frost does not block the ice passage. The ice passage may become blocked with frost if only crushed ice is used. Remove the frost that accumulates by removing the ice bin and clearing the passage with a rubber spatula. Dispensing cubed ice can also help prevent frost buildup. Never store beverage cans or other items in the ice bin for the purpose of rapid cooling. Doing so may damage the icemaker or the containers may burst.
Operation Shelf The shelves in the refrigerator are adjustable to meet individual storage needs. Disassembling 1. Hold the front part of the shelf and lift it up slightly. 2. While holding the shelf, tilt the shelf to pull it out. Reassembling Tilt the front of the shelf up and guide the shelf hooks into the slots at a desired height. Then, lower the front of the shelf so that the hooks drop into the slots. CAUTION Make sure that shelves are level from one side to the other.
Operation Dairy Corner ENGLISH Use to store dairy goods like butter and cheese. Disassembling To remove the dairy corner, simply lift it up and pull straight out. If you close the refrigerator door with the dairy corner open, the refrigerator door may not close properly. Make sure to close the dairy corner completely after use. Adjustable Door Bins Use to store small, packaged refrigerated food or beverages such as milk, canned drinks, etc.
Operation Refrigerator Gallon Bin For storing larger containers, such as gallons of milk. Disassembling Hold the bin with both hands, lift up and pull out. Reassembling Hold the bin with both hands and click it into place, one side at a time. Refrigerator/Freezer Drawers For convenient storage of food such as fruits, vegetables and packaged frozen food. Disassembling 1. Hold the front handle of the drawer and pull it out until it stops. 2.
Operation Upper/Lower Drawer Covers 1. Lift the front of the cover slightly, then lift the back of the cover from below. 2. Pull the cover forward firmly. 3. Tilt the cover up 45° and remove it. The cover is reassembled in the reverse order. 1 CAUTION 2 Never wash the inside accessories of the appliance in the dishwasher. They must be cleaned by hand. Replacing the Water Filter Replace the water filter: - Approximately every six months. - When the water filter indicator turns on.
Operation 2. Replace with a new water filter. - Take the new water filter out of its packing and remove the protective cover from the o-rings. With water filter tabs in the horizontal position, push the new water filter into the manifold hole until it stops. - Rotate the water filter up into position and close the cover. The cover clicks when closed correctly. 3. After the water filter is replaced, dispense 2.