0 INSTALLATION INSTALLATION ENGLISH Installation Overview Please read the following installation instr to another location. 1 Unpacking your refrigerator fter purchasing this product or transporting it 2 Choosing the proper location 3 Disassembling/Assembling WARNING 4 Connecting the water supply and water line Connect to potable water supply only. 5 Leveling and Door Alignment Specifications The appearance and sp constant product improvements.
INSTALLATION Unpacking Your Refrigerator Use two or more people to move and install the refrigerator. Failure to do so can result in back or other injury. Your refrigerator is heavy. When moving the refrigerator for cleaning or service, be sure to protect the r. Always pull the refrigerator straight out when moving it. Do not wiggle or walk the refrigerator when trying to move it, as damage could occur. Keep materials and vapors, such as gasoline, away from the refrigerator.
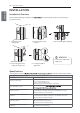
12 INSTALLATION Ambient Temperature ENGLISH Install this appliance in an area where the temperature is between 55°F (13°C) and 110°F (43°C). If the temperature around the appliance is too low or high, cooling ability may be adversely affected. Measuring the Clearances Too small of a distance from adjacent items may result in lowered freezing capability and increased electricity consumption charges. Allow at least 24 inches (61 cm) in front of the refrigerator to open the doors, and at least 2 inches (5.
INSTALLATION 13 Removing/Assembling the Refrigerator Doors Removing the Left (Freezer) Door with Water Line Connection When it is necessary to move the refrigerator through a narrow opening, removing the doors is the recommended procedure. 1. Loosen the hinge cover screws and remove the hinge cover. Disconnect all wire harnesses. hinge cover WARNING Before removing freezer door, disconnect water line connectors (one white tube, one blue tube).
14 INSTALLATION ENGLISH upper hinge hinge lever Reinstalling the Left (Freezer) Door 1. Feed the water tubes through the lower hinge pin and place the door onto the lower hinge pin. Water hoses should be behind the leg to prevent damage. 3. Rotate the hinge lever clockwise (1). Lift the upper hinge free of the hinge lever latch (2). CAUTION When lifting the hinge free of the latch, be careful that the door does not fall forward. 4. Lift the door from the lower hinge pin. 2.
INSTALLATION Connecting the Water Line This water line installation is not covered by the refrigerator warranty. Follow these instructions carefully to minimize the risk of expensive water damage. Water hammer (water banging in the pipes) in house plumbing can cause damage to refrigerator parts and can lead to water leakage or flooding. Call a qualified plumber to correct water hammer before installing the water supply line to the refrigerator.
16 INSTALLATION ENGLISH y If your existing copper water line has a flared fitting at the end, you will need an adapter (available at plumbing supply stores) to connect the water line to the refrigerator OR you can cut off the flared fitting with a tube cutter and then use a compression fitting. y Shutoff valve to connect to the cold water line. The shutoff valve should have a water inlet with a minimum inside diameter of 5/32 in. at the point of connection to the COLD WATER LINE.
INSTALLATION Water Line Installation Instructions FASTEN THE SHUTOFF VALVE Fasten the shutoff valve to the cold water pipe with the pipe clamp. 5 TIGHTEN THE PIPE CLAMP WARNING When using any electrical device (such as a power drill) during installation, be sure the device is battery powered, double insulated or grounded in a manner that will prevent the hazard of electric shock.
18 7 INSTALLATION ENGLISH CONNECT THE TUBING TO THE VALVE Place the compression nut and ferrule (sleeve) for copper tubing onto the end of the tubing and connect it to the shutoff valve. Make sure the tubing is fully inserted into the valve. Tighten the compression nut securely. Saddle-Type Shutoff Valve 10 TURN THE WATER ON AT THE SHUTOFF VALVE Tighten any connections that leak.
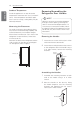
INSTALLATION Leveling Your refrigerator has two front leveling legs— one on the right and one on the left. Adjust the legs to alter the tilt from front-to-back or side-toside. If your refrigerator seems unsteady, or you want the doors to close more easily, adjust the refrigerator’s tilt using the instructions below: NOTE: Tools Required: 11/16” (18mm) wrench ewdriver. 1 Turn the leveling leg counterclockwise to raise that side of the refrigerator or clockwise to lower it.
20 HOW TO USE ENGLISH HOW TO USE Before Use Clean the refrigerator. Clean your refrigerator thoroughly and wipe off all dust that accumulated during shipping. CAUTION Do not scratch the refrigerator with a sharp object or use a detergent that contains alcohol, a flammable liquid or an abrasive when removing any tape or adhesive from the refrigerator. Do not peel off the model or serial number label or the technical information on the rear surface of the refrigerator.
HOW TO USE Control Panel Airflow Cold air circulates from the freezer to the fresh food section and back again through air vents in the wall dividing the two sections. Be sure not to block vents while packing your refrigerator. Doing so will restrict airflow and may cause the refrigerator temperature to become too warm or cause interior moisture buildup. (See air flow diagram below.) IMPORTANT: Because air circulates between both sections, any odors formed in one section will transfer to the other.
22 HOW TO USE Control Panel Features ENGLISH * Depending on the model, some of the following functions may not be available. Vertical Display Ice Type Vertical Display Select Crushed Ice or Cubed Ice by pressing the Ice Type button repeatedly to choose the selection desired. The Crushed Ice or Cubed Ice icon will light up to indicate your selection.V Selecting this icon indicates that cubed ice will be dispensed when the dispenser pad is activated.
HOW TO USE Ice Plus Ice ON/OFF To turn o the automatic icemaker, press and hold the Ice ON/OFF button for three seconds until the Ice O text is illuminated. To turn on the automatic ice maker, press and hold until the Ice On text is illuminated. Lock When power is initially connected to the refrigerator, the Lock function is o . If you want to activate the Lock function to lock other buttons, press and hold the Door Alarm button for three seconds or more.
24 HOW TO USE Automatic Icemaker ENGLISH Ice is made in the automatic icemaker and sent to the dispenser. The icemaker will produce 7 cubes per cycle - approximately 70-120 cubes in a 24-hour period, depending on freezer compartment temperature, room temperature, number of door openings and other operating conditions. It takes about 12 to 24 hours for a newly installed refrigerator to begin making ice. Wait 72 hours for full ice production to occur. Ice making stops when the ice storage bin is full.
HOW TO USE 25 Automatic Icemaker (continued) y The first ice and water dispensed may include particles or odor from the water supply line or the water tank. y Throw away the first few batches of ice (about 24 cubes). This is also necessary if the refrigerator has not been used for a long time. y Never store beverage cans or other items in the ice bin for the purpose of rapid cooling. Doing so may damage the icemaker or the containers may burst.
26 HOW TO USE Ice and Water Dispenser ENGLISH Incorrect Way Correct Way * Depending on the model, some of the following functions may not be available. CAUTION Water Keep children away from the dispenser. Children may play with or damage the controls. Dispenser structure Water Switch Ice & Water Switch Ice CAUTION Ice Switch correct way Using the dispenser To dispense cold water , push on the water switch with a glass. To dispense ice , push on the ice switch with a glass.
HOW TO USE 27 Storing Food Each compartment inside the refrigerator is designed to store different types of food. Store your food in the optimal space to enjoy the freshest taste. Adjustable refrigerator shelf Adjustable shelves to meet your individual storage needs. Ice storage bin If a large amount of ice is needed, transfer the ice in the storage bin to another container.
28 HOW TO USE Storing Food ENGLISH Food Preservation Location Each compartment inside the refrigerator is designed to store di erent types of food. Store your food in the optimal space to enjoy the freshest taste. Adjustable refrigerator shelf Adjustable shelves to meet your individual storage needs. Ice storage bin If a large amount of ice is needed, transfer the ice in the storage bin to another container. Dairy Corner Store dairy products such as butter, cheese, etc.
HOW TO USE Food Storage Tips Wrap or store food in the refrigerator in airtight and moisture-proof material unless otherwise noted. This prevents food odor and taste transfer throughout the refrigerator. For dated products, check date code to ensure freshness. Food How To Butter or Margarine Keep opened butter in a covered dish or closed compartment. When storing an extra supply, wrap in freezer packaging and freeze. Store in the original wrapping until you are ready to use it.
30 HOW TO USE Storing Frozen Food (continued) ENGLISH Packaging Detaching and Assembling the Storage Bins Successful freezing depends on correct packaging. When you close and seal the package, it must not allow air or moisture in or out. If it does, you could have food odor and taste transfer throughout the refrigerator and could also dry out frozen food. Fresh Zone Drawers Packaging recommendations: drawer to full extension 햲, lift the front up 햳, and pull straight out.
HOW TO USE 31 Water Tank Hold the cover with both hands and pull it out. CAUTION: You will see the water tank while removing the Fresh Zone drawer. Do not remove the water tank or water leakage may occur. The water tank is not a removable part. NOTE: Remove the Fresh Zone drawers before removing the Fresh Zone cover. Tank Door Bins The door bins are removable for easy cleaning and adjustment. 1 2 Dairy Corner ( Basic Model ) To remove the bin, simply lift the bin up and pull straight out.
32 HOW TO USE Door-in-Door (Door-in-Door Model) ENGLISH The Door-in-Door compartment allows for easy access to commonly used food items. The outer Door-in-Door door includes three additional door bins. Door-in-Door Door Bins The Door-in-Door inner and outer door bins are removable for easy cleaning. Door-in-Door Compartment 1 To remove the door bins, lift up and pull out.
HOW TO USE Suggested Placement of Shelves ENGLISH Adjusting the Refrigerator Shelves 33 The shelves in your refrigerator are adjustable to meet your individual storage needs. erent Adjusting the shelv exact item you heights will mak want easier. Doing so will also reduce the amount of time the refrigerator door is open which will save energy. Detaching the Shelf 1 Remove all items from the shelf. Lift the back of the shelf slightly to disengage the rail stops.