ENGLISH OWNER'S MANUAL SIDE BY SIDE REFRIGERATOR Read this owner's manual thoroughly before operating the appliance and keep it handy for reference at all times. LSXS26396S LSXC22396S MFL67653459 Rev.02_030817 www.lg.com Copyright © 2017 LG Electronics Inc. All Rights Reserved.
TABLE OF CONTENTS 3 PRODUCT FEATURES 37 MAINTENANCE 37 38 Cleaning Replacing the Water Filter 4 SAFETY INSTRUCTIONS 4 IMPORTANT SAFETY INSTRUCTIONS 43 TROUBLESHOOTING 8 PRODUCT SPECIFICATIONS 43 44 9 PRODUCT OVERVIEW 53 WARRANTY (USA) 9 10 Exterior Interior 11 INSTALLATION 11 12 12 14 14 17 20 21 Installation Overview Unpacking the Refrigerator Choosing the Proper Location Removing/Assembling Handles Removing/Assembling the Doors Connecting the Water Line Leveling and Door Alignment
PRODUCT FEATURES 3 PRODUCT FEATURES Depending on the model, some of the following functions may not be available. The water dispenser dispenses fresh, chilled water. The ice dispenser dispenses cubed and crushed ice. DOOR ALARM The Door Alarm function is designed to prevent refrigerator malfunctioning that could occur if a refrigerator door or freezer door remains open. If a refrigerator door or freezer door is left open for more than 60 seconds, a warning alarm sounds at 30-second intervals.
SAFETY INSTRUCTIONS SAFETY INSTRUCTIONS READ ALL INSTRUCTIONS BEFORE USE Your safety and the safety of others are very important. We have provided many important safety messages in this manual and on your appliance. Always read and follow all safety messages. These words mean: CAUTION You may be injured or cause damage to the product if you do not follow instructions.
SAFETY INSTRUCTIONS 5 ••Keep packing materials out of the reach of children. Packaging material can be dangerous for children. There is a risk of suffocation. ••Do not install the refrigerator in a damp or dusty place where insulation on electrical parts may deteriorate. ••Do not bend or pinch the power cord excessively or place heavy objects on it. OPERATION ••This product is not to be used for special purposes such as the storage of medicine or test materials or for use on ships, etc.
SAFETY INSTRUCTIONS ••If connected to a circuit protected by fuses, use time delay fuse. ••Do not store explosive substances such as aerosol cans with a flammable propellant in this appliance. MAINTENANCE ••Do not use a hair dryer to dry the inside of the refrigerator. ••Do not light a candle to remove odors in the refrigerator. ••In the event of a refrigerant leak, move flammable objects away from the refrigerator. Ensure the area is adequately ventilated and contact an authorized service center.
SAFETY INSTRUCTIONS 7 CAUTION ••Do not hang on to or place heavy objects on the refrigerator’s dispenser. INSTALLATION ••Do not install the refrigerator where there may be a danger of the unit falling. ••The refrigerator must be properly installed in accordance with the Installation Instructions. OPERATION ••Do not use aerosols near the refrigerator. ••This appliance is intended to be used only in domestic and similar applications. ••Do not strike or apply excessive force to any glass surface.
PRODUCT SPECIFICATIONS PRODUCT SPECIFICATIONS The appearance and specifications listed in this manual may vary due to constant product improvements. Electrical requirements: 115 V, 60 Hz Min. / Max. water pressure: 20 - 120 psi (138 - 827 kPa) on models without water filter. 40 – 120 psi (276 – 827 kPa) on models with filter. Model LSXS26396S Description Standard-depth, Side by Side refrigerator Net weight 306.5 lb.
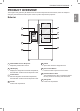
PRODUCT SPECIFICATIONS 9 PRODUCT OVERVIEW Exterior 5 1 6 2 7 3 8 4 1 Filtered Water and Ice Dispenser 8 5 Dispenses purified water and ice. 2 LED Display Opens and closes the refrigerator door. 6 Displays the refrigerator and freezer temperature, the water filter condition and the dispenser mode. 3 Control Panel Freezer Frozen food compartment Door-in-Door Button Press this button to open the Door-in-Door.
PRODUCT SPECIFICATIONS Interior LSXS26396S/LSXC22396S 9 1 3 3 6 4 5 7 8 2 10 1 Automatic Icemaker 7 Automatically produce and store ice. 2 3 Freezer Shelf Adjust the freezer shelves to fit large or tall items. 5 Freezer Drawer Store long-term frozen items. The number of drawers may vary by model. 6 8 LED interior lamps Light up the inside of the refrigerator. 4 Shelves are adjustable to suit individual storage needs.
INSTALLATION 11 INSTALLATION Please read the following installation instructions first after purchasing this product or transporting it to another location. Unpacking the Refrigerator Connecting the Water Line CAUTION ••Connect to a potable water supply only.
INSTALLATION Unpacking the Refrigerator WARNING Choosing the Proper Location Water ••Use two or more people to move and install the refrigerator. Failure to do so can result in back injury or other injury. Water supply must be easily connected for the automatic icemaker. ••The refrigerator is heavy. Protect the floor when moving the refrigerator for cleaning or service. Always pull the refrigerator straight out when moving it.
INSTALLATION 13 Dimensions and Clearances ••Check the dimensions of the appliance and the installation path to ensure there is sufficient room to move the refrigerator through doors or narrow openings. ••The installation location chosen for the refrigerator should allow space behind the unit for connections and airflow and space in front to open the doors and drawers. ••Too small of a distance from adjacent items may result in lowered freezing capability and increased electricity consumption charges.
INSTALLATION Removing/Assembling Handles ••When moving the refrigerator through a narrow opening, removing the doors is preferred. ••The appearance of the handles may vary from what is shown. WARNING Assembling the Refrigerator Handles 1 Assemble the mounting fasteners (1) at both ends of the handle with a 1/4 in. Allen rench. 2 Place the handle on the door by fitting the handle footprints over the mounting fasteners and tightening the set screws (2) with a 3/32 in. Allen wrench.
INSTALLATION 15 Removing the Freezer Door (with Water Line Connection) Before removing freezer door, disconnect water line connectors (one white tube, one blue tube). ••Do not remove freezer door if either the white or blue tube is still connected. ••Use the support block shipped on the upper shelf in the refrigerator to keep the front of the refrigerator tilted up while removing the connectors. Lift the door to remove it from the lower hinge pin.
INSTALLATION 4 Lift the door from the lower hinge pin. Disassembling/Assembling the Water Lines Collet Tube Insert line Clip Lower Hinge 2 CAUTION (Correct) Gently press the collet and insert the tube until only one line shows on the tube. ••When lifting the hinge free of the latch, be careful that the door does not fall forward. ••Place the door, inside facing up, on a nonscratching surface.Be careful not to damage the water lines.
INSTALLATION 17 Assembling the Refrigerator Door Connecting the Water Line 1 Before Beginning Place the door onto the lower hinge pin. Lower Hinge 2 Fit the upper hinge over the hinge lever latch and into place. Rotate the lever counterclockwise to secure the hinge. If necessary, call a qualified plumber to correct water hammer before installing the water supply line to the refrigerator.
INSTALLATION If the water pressure from the reverse osmosis system is less than 20 psi or 138 kPa or 1.4 kgf/ cm2 (takes more than 4 seconds to fill a cup of 7 oz or 198 cc capacity): ••Check to see if the sediment filter in the reverse osmosis system is blocked. Replace the filter if necessary. ••Shutoff valve to connect to the cold water line. The shutoff valve should have a water inlet with a minimum inside diameter of 5/32 in. at the point of connection to the COLD WATER LINE.
INSTALLATION 19 3 6 Route the tubing. Route the tubing between the cold water line and the refrigerator. Route the tubing through a hole drilled in the wall or floor (behind the refrigerator or adjacent base cabinet) as close to the wall as possible. NOTE ••Be sure there is sufficient extra tubing (about 8 ft. coiled into three turns of about 10 in. diameter) to allow the refrigerator to move out from the wall after installation. NOTE ••The hookup line cannot be white, plastic tubing.
INSTALLATION 9 Connect the tubing to the refrigerator. NOTE ••Before making the connection to the refrigerator, be sure that the refrigerator power cord is not plugged into the wall outlet. ••Remove the plastic flexible cap from the water valve. ••Place the compression nut and ferrule (sleeve) onto the end of the tubing as shown. Leveling and Door Alignment Leveling The refrigerator has two front leveling legs. Adjust the legs to alter the tilt from front-to-back or side-to side.
INSTALLATION 21 Door Alignment If the space between the doors is uneven, follow the instructions below to align the doors evenly: Turning on the Power ••After installing, plug the refrigerator’s power cord into a 3-prong grounded outlet and push the refrigerator into the final position. Use the wrench (included with the owner's manual) to turn the nut in the door hinge to adjust the height. Turn the nut to the right to raise the door or to the left to lower it.
OPERATION OPERATION Before Use Clean the refrigerator. Clean the refrigerator thoroughly and wipe off all dust that accumulated during shipping. CAUTION ••Do not scratch the refrigerator with a sharp object or use a detergent that contains alcohol, a flammable liquid or an abrasive when removing any tape or adhesive from the refrigerator. Remove adhesive residue by wiping it off with your thumb or dish detergent.
OPERATION 23 Control Panel Depending on the model, some of the following functions may not be available. 1 Ice Type Press the Ice Type button to choose either cubed or crushed ice. The Cubed or Crushed Ice icon illuminates. 2 * Water Filter Replace the water filter when the Replace Filter icon turns on. After replacing the water filter, press and hold the Water Filter button for three seconds to turn the icon light off. Replace the water filter approximately every six months.
OPERATION 5 Smart Grid Press the Smart Grid button to turn the Smart Grid function On/Off. When the function is on, the icon illuminates. The Smart Grid function automatically turns on when the refrigerator is connected to the Wi-Fi network. When the refrigerator is responding to a Demand Response (DR) message from the electric company, the Grid text illuminates.
OPERATION 25 ••To prevent odor transfer and dried out food, wrap or cover foods tightly. (See the Food Storage Guide section for details.) ••If you close the refrigerator door, you may see the freezer door open and close again due to pressure from internal airflow. Ice and Water Dispenser CAUTION ••Keep children away from the dispenser. Children may play with or damage the controls. ••Throw away the first few batches of ice (about 140 - 160 cubes) after installation.
OPERATION Cleaning the Dispenser Drip Tray 1 Grip the drip tray with both hands and pull it out. CAUTION ••When handling the ice bin, keep hands away from the icemaker tray area to avoid personal injury. ••Storing cans or other items in the ice bin will damage the icemaker. ••Never use thin crystal glasses or containers to collect ice. Such containers may chip or break resulting in glass fragments in the ice. 2 Wipe out dirty areas with a clean cloth.
OPERATION 27 Automatic Icemaker Turning the Automatic Icemaker On Normal Sounds You May Hear Auto shutoff (feeler arm) NOTE ••Ice is made in the automatic icemaker and sent to the dispenser. The icemaker produces 70 - 182 cubes in a 24-hour period, depending on freezer compartment temperature, room temperature, number of door openings and other operating conditions. ••It takes about 12 to 24 hours for a newly installed refrigerator to begin making ice.
OPERATION Storing Food Where to Store Food Each compartment inside the refrigerator is designed to store different types of food. Store food in the optimal space to enjoy the freshest taste. 6 1 2 3 4 5 7 1 In-Door Ice Bin 5 If a large amount of ice is needed, transfer the ice in the in-door ice bin to an ice storage bin in the freezer. 2 Freezer Shelves Store fruit and vegetables in the crisper drawers to keep them fresh.
OPERATION 29 CAUTION ••Do not store glass containers in the freezer. Contents may expand when frozen, break the container and cause injury. NOTE ••If you are leaving home for a short period, like a short vacation, the refrigerator should be left on. Refrigerated foods that are able to be frozen will stay preserved longer if stored in the freezer. Wrap or store food in the refrigerator in airtight and moisture-proof material unless otherwise noted.
OPERATION Storing Frozen Food Check a freezer guide or a reliable cookbook for further information about preparing food for freezing or food storage times. Freezing Your freezer will not quick-freeze a large quantity of food. Do not put more unfrozen food into the freezer than will freeze within 24 hours (no more than 2 to 3 pounds of food per cubic foot of freezer space). Leave enough space in the freezer for air to circulate around packages.
OPERATION 31 Removing the Fresh Zone Cover Hold the cover with both hands and pull it out. InstaView Function NOTE ••Remove the Fresh Zone drawers before removing the Fresh Zone cover. Door Bins 1 Knock twice on the glass to turn the LED light inside the Door-in-Door on or off. Some bins may vary in appearance and will only fit in one location. 2 The LED light turns off automatically after 10 seconds.
OPERATION Door-in-Door Case Detaching the Shelf To open the Door-in-Door case, pull evenly on the marked area. The Door-in-Door Case is removable for easy cleaning and adjustment. 1 Remove all items from the shelf. Lift the back of the shelf slightly to disengage the rail stops. 2 Holding the shelf with both hands, tilt the shelf and pull it out. CAUTION ••Remove contents from Door-in-Door case before disassembly. 1 To remove the Door-in-Door case, lift up and pull out.
SMART FUNCTIONS 33 SMART FUNCTIONS The Smart ThinQ application allows you to communicate with the appliance using a smartphone. Installing Smart ThinQ Application Search for the LG Smart ThinQ application from the Google Play Store or Apple App Store on a smart phone. Follow instructions to download and install the application.
SMART FUNCTIONS FCC Notice ••For transmitter module contained in this product Industry Canada Statement (For transmitter module contained in this product) This equipment has been tested and found to comply with the limits for a Class B digital device, pursuant to Part 15 of the FCC Rules. These limits are designed to provide reasonable protection against harmful interference in a residential installation.
SMART FUNCTIONS 35 Smart Grid Function ••You can override the Smart Grid function any time (using the Smart Grid button or application). ••To use the Smart Grid function, you need to register your appliance with your electric utility company. Smart Grid Application Features Smart Saving_Demand Response You can lower energy usage based on Demand Response (DR) signals from the utility company. If the refrigerator is operating in Smart Saving mode according to the DR signal, you can see a pop up.
SMART FUNCTIONS NOTE ••Smart Diagnosis™ cannot be activated unless the appliance can be turned on using the Power button. If the appliance cannot be turned on, troubleshooting must be done without using Smart Diagnosis™. 4 Hold the mouthpiece of your phone in front of the speaker that is located on the right hinge of the refrigerator door, when instructed to do so by the call center. 5 Press and hold the Freezer button for three seconds while continuing to hold your phone to the speaker.
MAINTENANCE 37 MAINTENANCE WARNING ••Use non-flammable cleaner. Failure to do so can result in fire, explosion, or death. CAUTION ••Do not use an abrasive cloth or sponge when cleaning the interior and exterior of the refrigerator. ••Do not place your hand on the bottom surface of the refrigerator when opening and closing the doors. ••When lifting the hinge free of the latch, be careful that the door does not fall forward.
MAINTENANCE Replacing the Water Filter Replace the Water Filter : 2 Make sure to rotate the filter down completely before pulling it out of the filter head. Pull the water filter downward and turn to counterclockwise. 3 Replace with a new water filter. Take the new water filter out of its packing and remove the protective cover from the o-rings. With the water filter tabs in the horizontal position, push the new water filter into the filter head and turn to clockwise.
MAINTENANCE 39 6 After changing the filter, press and hold the Water Filter button for three seconds to reset the indicator light. ENGLISH NOTE To purchase a replacement water filter: ••Visit your local dealer or distributor ••Search using "water filter" on lg.
MAINTENANCE Performance Data Sheet Model: LT1000P Use Replacement Cartridge: MDJ64844601(LT1000P) The concentration of the indicated substances in water entering the system was reduced to a concentration less than or equal to the permissible limit for water leaving the system as specified in NSF/ANSI Standard 42, Standard 53 and Standard 401. System tested and certified by NSF International against NSF/ANSI Standard 42, Standard 53 and Standard 401 for the reduction of substances listed below.
MAINTENANCE 41 substance Reduction Average Influent Challenge Avg % Reduction Average Product Water Concentration Max Permissible Product Water Concentration NSF Reduction Requirements Atenolol 240 ng/L 200 ± 40% ng/L > 95.50% 10.80 ng/L 30 ng/L NA Carbamazepine 1600 ng/L 1400 ± 40% ng/L 98.40% 25.60 ng/L 200 ng/L NA DEET 1600 ng/L 1400 ± 40% ng/L 97.10% 46.40 ng/L 200 ng/L NA Trimethoprim 170 ng/L 140 ± 40% ng/L >96.80% 5.
MAINTENANCE Application Guidelines/Water Supply Parameters CAUTION Service Flow 0.5 gpm (1.9 lpm) Water Supply Community or Private Well Potable Water Water Pressure 20 – 120 psi (138 – 827 kPa) ••Read and follow Use Instructions before installation and use of this system. Water Temperature 33 °F – 100 °F (0.6 °C – 37.8 °C) ••Installation and use MUST comply with all state and local plumbing codes.
TROUBLESHOOTING 43 TROUBLESHOOTING Q: What are the best temperature settings for my refrigerator and freezer? A: The default setting for the refrigerator is 37° Fahrenheit (3° Celsius). The default setting for the freezer is 0° Fahrenheit (-18° Celsius). Adjust these settings as necessary to keep food at desired temperatures. Milk should be cold when stored on the inner shelf of the refrigerator. Ice cream should be firm and ice cubes should not melt in the freezer.
TROUBLESHOOTING Before Calling for Service Review this section before calling for service; doing so will save you both time and money. Cooling Problem Refrigerator and Freezer section are not cooling. Cooling system runs too much. Possible Cause Solutions The refrigerator control is set to OFF (some models). Turn the control ON. Refer to the Setting the Controls section for proper temperature settings. Refrigerator is set to Demo Mode.
TROUBLESHOOTING 45 Cooling Problem Food is freezing in the refrigerator compartment. Refrigerator or Freezer section is too warm. Solutions Doors are opened often or for long periods of time. When the doors are opened often or for long periods of time, warm, humid air enters the compartment. This raises the temperature and moisture level within the compartment. To lessen the effect, reduce the frequency and duration of door openings. Doors are not closed correctly.
TROUBLESHOOTING Cooling/Ice & Water Problem Refrigerator or Freezer section is too warm. Refrigerator or Freezer section is too cold. Frost or ice crystals form on frozen food (inside of sealed package). Frost or ice crystals form on frozen food (outside of package). Possible Cause Solutions Doors are opened often or for long periods of time. When the doors are opened often or for long periods of time, warm, humid air enters the compartment.
TROUBLESHOOTING 47 Ice & Water Problem Possible Cause Solutions The icemaker will produce approximately 70-184 cubes in a 24 hour period. House water supply is not connected, valve is not turned on fully, or valve is clogged. Connect the refrigerator to a cold water supply with adequate pressure and turn the water shutoff valve fully open. If the problem persists, it may be necessary to contact a plumber. Replacing the water filter is recommended: Approximately every six months.
TROUBLESHOOTING Ice & Water Problem Icemaker is not making ice Ice has bad taste or odor. Icemaker is making too much ice. Ice is not dispensing. Possible Cause Solutions The ice detecting sensor is obstructed. Foreign substances or frost on the ice-detecting sensor can interrupt ice production. Make sure that the sensor area is clean at all times for proper operation. The refrigerator is not connected to a water supply or the supply shutoff valve is not turned on.
TROUBLESHOOTING 49 Ice & Water Problem Solutions Infrequent use of the dispenser. Infrequent use of the ice dispenser will cause the cubes to stick together over time, which will prevent them from properly dispensing. Check the ice bin for ice cubes clumping/sticking together. If they are, break up the ice cubes to allow for proper operation. The delivery chute is clogged with frost or ice fragments.
TROUBLESHOOTING Ice & Water Problem Possible Cause Water will not dispense if any of the refrigerator doors are left open. Water filter has been recently removed or replaced. After the water filter is replaced, dispense 2.5 gallons of water (flush for approximately five minutes) to remove trapped air and contaminants from the system. Do not dispense the entire 2.5 gallon amount continuously. Depress and release the dispenser pad for cycles of 30 seconds ON and 60 seconds OFF.
TROUBLESHOOTING 51 Parts & Features Problem Solutions Rearrange food containers to clear the door and door shelves. Ice bin, crisper cover, pans, shelves, door bins, or baskets are out of position. Push bins all the way in and put crisper cover, pans, shelves and baskets into their correct positions. See the Operation section for more information.
TROUBLESHOOTING Noises Problem Possible Cause Solutions The defrost control will click when the automatic defrost cycle begins and ends. The thermostat control (or refrigerator control on some models) will also click when cycling on and off. Normal Operation Rattling noises may come from the flow of refrigerant, the water line on the back of the unit, or items stored on top of or around the refrigerator. Normal Operation Refrigerator is not resting solidly on the floor.
WARRANTY (USA) 53 WARRANTY (USA) WARRANTY PERIOD Refrigerator One (1) year from the date of original retail purchase Parts and Labor (internal/ functional parts only) Sealed System (Condenser, Dryer, Connecting Tube and Evaporator) One (1) year from the date of original retail purchase Parts and Labor Seven (7) years from the date of original retail purchase Parts only (Consumer will be charged for labor) Linear Compressor Ten (10) years from the date of original retail purchase Part only (Consumer wil
WARRANTY (USA) ••Damage or failure caused by incorrect electrical current, voltage, or plumbing codes, commercial or industrial use, or use of accessories, components, or consumable cleaning products that are not approved by LG. ••Damage caused by transportation and handling, including scratches, dents, chips, and/or other damage to the finish of your product, unless such damage results from defects in materials or workmanship and is reported within one (1) week of delivery.
WARRANTY (CANADA) 55 WARRANTY (CANADA) WARRANTY PERIOD: (Note: If the original date of purchase cannot be verified, the warranty will begin sixty (60) days from the date of manufacture) Refrigerator/Freezer One (1) year from the date of original retail purchase Parts and Labor (internal/ functional parts only) Sealed System (Condenser, Dryer, Connecting Tube and Evaporator) One (1) year from the date of original retail purchase Parts and Labor Seven (7) years from the date of original retail purchase Pa
WARRANTY (CANADA) ••Damage caused by leaky or broken water pipes, frozen water pipes, restricted drain lines, inadequate or interrupted water supply or inadequate supply of air. ••Damage resulting from operating the product in a corrosive atmosphere or contrary to the instructions outlined in the product’s owner’s manual. ••Damage to the product caused by accidents, pests and vermin, lightning, wind, fire, floods, or acts of God.
MEMO 57
LG Customer Information Center For inquiries or comments, visit www.lg.com or call: 1-800-243-0000 1-888-542-2623 U.S.A. CANADA Register your product Online! www.lg.