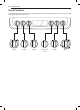
OPERATION 19 ENGLISH OPERATION Control Panel Overview 1 8S S HU /RZH U P FR Q PR /RZHU 5HPRWH 6WDUW HU /RZ 2 3 4 5 6 7 1 Smart DiagnosisTM Use during the Smart Diagnosis feature. 2 Cook Time / Clock •• Press the button to set the desired amount of time for food to cook. The oven shuts off when the set cooking time runs out. •• Press and hold button for three seconds to set the time of day. 3 Start Time / Setting •• Press the button to set the delayed timed cook.
0 OPERATION Knob Positions After cleaning the oven knobs, make sure to replace each knob in the correct position. Failure to do so can result in improper operation of the burners.
OPERATION 21 Clock The clock must be set to the correct time of day in order for the automatic oven timing functions to work properly. 1 Press and hold Cook Time for three seconds. CLO shows in the display. 2 Press plus(+) or minus(-) to select the desired time. Plus(+) to increase the time and minus(-) to decrease the time. Minimum & Maximum Default Settings All of the features listed have a minimum and a maximum time or temperature setting that may be entered into the control.
22 OPERATION Timer On/Off Settings The Timer On/Off feature serves as an extra timer in the kitchen that beeps when the set time has run out. It does not start or stop cooking. Press and hold Start Time for three seconds. Then press the Start Time key repeatedly to toggle through and change oven settings. The Timer On/Off feature can be used during any of the oven control function.
OPERATION 23 Adjusting the Beeper Volume Your new oven may cook differently from the one it replaced. Use your new oven for a few weeks to become more familiar with it before changing the temperature settings. If after familiarizing yourself with the new oven, you still think that it is too hot or too cold, you can adjust the oven thermostat yourself. 1 Press and hold Start Time for three seconds. Then press Start Time repeatedly until BEEP appears in the display.
24 OPERATION Start Time (Delayed Timed Cook) Cook Time (Timed Cook) The automatic timer of the Delayed Timed Cook function turns the oven on and off at the time you select. This feature can be used with the Bake, Conv. Bake and Conv. Roast modes. Set the oven to cook for a specific length of time using the Timed Cook feature. This feature can only be used with the Bake, Conv. Bake and Conv. Roast modes.
OPERATION 25 CAUTION Cooking Areas The cooking areas on your range are identified by permanent circles on the glass cooktop surface. For the most efficient cooking, fit the pan size to the element size. Pans should not extend more than 1/2 to 1-inch beyond the cooking area. When a control is turned on, a glow can be seen through the glass cooktop surface. The element cycles on and off to maintain the preset heat setting, even on Hi.
26 OPERATION Turning on the Dual element CAUTION There is one dual element located in the left front position. Use the dual element as a dual or single element. FOOD POISON HAZARD: Bacteria may grow in food at temperatures below 140 °F. 1 2-A Push in the appropriate knob. •• Always start with hot food. Do not use the warm setting to heat cold food. Turn the knob counterclockwise to use it as a Single element. •• Do not use the warm setting for more than 2 hours.
OPERATION 27 Choosing Cookware The size and type of cookware will influence the settings needed for the best cooking results. Be sure to follow the recommendations for using proper cookware. The cookware material determines how evenly and quickly heat is transferred from the surface element to the pan bottom. The most popular materials available are: Cookware should have flat bottoms that make good contact with the entire surface heating element.
28 OPERATION Using the Oven Replacing Racks Before Using the Oven 1 Place the end of the rack on the support. 2 Tilt the front end up and push the rack in. NOTE •• Because the oven temperature cycles, an oven thermometer placed in the oven cavity may not show the same temperature that is set on the oven. •• It is normal for the convection fan to run while preheating during a regular bake cycle. •• The convection fan motor may run periodically during a regular bake cycle.
OPERATION 29 Tips for Convection Baking •• Baking time and temperature will vary depending on the characteristics, size, and shape of the baking pan used. •• Use Convection Bake for faster and more even multiple-rack cooking of pastries, cookies, muffins, biscuits, and breads of all kinds. •• Check for food doneness at the minimum recipe time. •• Bake cookies and biscuits on pans with no sides or very low sides to allow heated air to circulate around the food.
30 OPERATION Recommended Baking and Roasting Guide Baking Rack Guide Baking results will be better if baking pans are centered in the oven as much as possible. If cooking on multiple racks, place the oven racks in the positions shown.
OPERATION 31 Smoking The Broil function uses intense heat from the upper heating element to cook food. Broiling works best for tender cuts of meat, fish, and thinly cut vegetables. Some models may feature a hybrid broiler consisting of an inner broiler that utilizes a carbon heating element which provides instantaneous heat, and a traditional outer broiling element. During normal broiler operation, it is normal for either element to cycle off intermittently.
32 OPERATION Recommended Broiling Guide The size, weight, thickness, starting temperature, and your preference of doneness will affect broiling times. This guide is based on meats at refrigerator temperature. For best results when broiling, use a pan designed for broiling. Upper oven Food Quantity and/or Thickness Ground Beef Well done 1 lb.
OPERATION 33 Beef •• Steaks and chops should always be allowed to rest for five minutes before being cut into and eaten. This allows the heat to distribute evenly through the food and creates a more tender and juicy result. Proof This feature maintains a warm oven for rising yeast leavened products before baking. Setting the Proof Function •• Pieces of meat that are thicker than two inches should be removed from the refrigerator 30 minutes prior to cooking.
34 OPERATION Setting the Meat Probe Function (example: Conv. Roast at 350°F with probe temp at 160°F) 1 Select cook mode. Turn the oven mode knob to select Conv. Roast. 2 Set the oven temperature: press plus(+) or minus(-) until 375 °F appears in the display. 3 4 Press Start. 5 Press Start. Set the probe temperature: press plus(+) or minus(-) until 160 °F appears in the display.
SMART FUNCTIONS 35 LG SmartThinQ Application The LG SmartThinQ application allows you to communicate with the appliance using a smartphone. Before Using LG SmartThinQ •• For appliances with the 1 or logo Use a smartphone to check the strength of the wireless router (Wi-Fi network) near the appliance. •• If the distance between the appliance and the wireless router is too far, the signal strength becomes weak. It may take a long time to register or installation may fail.
36 SMART FUNCTIONS Smart Diagnosis™ This function provides useful information for diagnosing and solving issues with the appliance based on the pattern of use. Smart Diagnosis™ through the Customer Information Center •• For appliances with the or logo Allows you to set various options on the oven and in the Application. This method allows you to speak directly to our trained specialists.
SMART FUNCTIONS 37 Select Smart Diagnosis, then press the Start Smart Diagnosis button. NOTE •• If the diagnosis fails several times, use the following instructions. 4 5 6 Select the Audible Diagnosis. Follow the instructions on the smart phone. Keep the phone in place until the tone transmission has finished. View the diagnosis on the phone. NOTE •• Smart Diagnosis™ cannot be activated unless the appliance can be turned on using the Power button.
38 MAINTENANCE MAINTENANCE Cleaning the Glass-Ceramic Cooktop Burned-On Residue 1 CAUTION While the cooktop is still hot, remove any burnt on deposits or spilled food from the glass-ceramic cooking surface with a suitable metal razor scraper. (Similar to scraping paint off of a windowpane, it will not damage the decorated cooking surface.) Hold the scraper at an approximate 30° angle to the cooktop. •• Do not use scrub pads or abrasive cleaning pads. They may damage your cooktop surface.
MAINTENANCE 39 1 Be careful not to slide pots and pans across the cooktop. Doing so will leave metal markings on the cooktop surface. To help remove these marks, use a ceramic cooktop cleaner with a cleaning pad for ceramic cooktops. 2 If pots with a thin overlay of aluminum or copper are allowed to boil dry, the overlay may leave black discoloration on the cooktop. This should be removed immediately before heating again or the discoloration may be permanent.
40 MAINTENANCE When to Use EasyClean® Suggested Cleaning Method Example of Oven Soiling Soil Pattern Types of Soils Common Food Items That Can Soil Your Oven Small drops or spots Cheese or other ingredients Pizza Steaks, broiled EasyClean® Fish, broiled Light splatter Fat/grease Medium to heavy splatter Fat/grease Meat roasted at high temperatures Filling or sugar based soils Pies Cream or tomato sauce Casseroles Self Clean* Drops or spots Meat roasted at low temperatures * The Self Cl
MAINTENANCE 41 Spray or pour the remaining water (8 oz or 240 ml) onto the bottom center of the oven cavity. The indentation on the oven bottom should be fully covered to submerge all soils. Add water if necessary. NOTE If cleaning multiple ovens, use an entire bottle of water to clean each oven. Do not spray water directly on the door. Doing so will result in water dripping to the floor. 6 Close the oven door. Turn the oven mode knob to select EasyClean®. Press Start.
42 MAINTENANCE Self Clean The Self Clean cycle uses extremely hot temperatures to clean the oven cavity. While running the Self Clean cycle, you may notice smoking or an odor. This is normal; especially if the oven is heavily soiled. During Self Clean, the kitchen should be well ventilated to minimize the odors from cleaning. NOTE •• Remove oven racks and accessories before starting the Self Clean cycle.
MAINTENANCE 43 1 Remove all racks and accessories from the oven. 2 Turn the oven mode knob to select Self Clean. The oven defaults to the recommended four-hour self clean for a moderately soiled oven. Press plus(+) or minus(-) repeatedly to cycle through self-clean times in the upper or lower oven. Both ovens cannot use the self-clean function at the same time. 3 Press Start Time. 4 Press plus(+) or minus(-) to enter the time of day you would like the Self Clean to start. 5 Press Start.
44 MAINTENANCE Changing the Oven Light Cleaning the Exterior The oven light is a standard 40-watt appliance bulb. It turns on when the oven door is open. When the oven door is closed, touch Start to turn it on or off. Painted and Decorative Trim 1 Unplug the range or disconnect power and make sure that the oven and bulb are cool first. 2 Turn the glass bulb cover in the back of the oven counterclockwise to remove. 3 Turn the bulb counterclockwise to remove it from the socket.
MAINTENANCE 45 Oven Door It is best to clean the manifold panel after each use of the range. For cleaning, use a damp cloth and mild soapy water or a 50/50 solution of vinegar and water. For rinsing, use clean water and polish dry with a soft cloth. •• Use soapy water to thoroughly clean the oven door. Rinse well. Do not immerse the door in water. CAUTION •• Do not use abrasive cleansers, strong liquid cleaners, plastic scouring pads or oven cleaners on the manifold panel.
46 MAINTENANCE Broiler Pan and Grid Removing and Replacing the Lift-Off Oven Doors CAUTION •• Do not store a soiled broiler pan or grid anywhere in the range. •• Do not clean the broiler pan or grid in a selfcleaning mode. •• Remove the grid from the pan. Carefully pour out the grease from the pan into a proper container. •• Wash and rinse the broiler pan and grid in hot water with a soap-filled or plastic scouring pad.
MAINTENANCE 47 1 Be sure both hinges are in a 30 degree position. 2 Slide the door back onto the hinges until you hear a solid click and the release buttons have engaged. Lower Oven ENGLISH Replacing the Door Removing the Door 1 Fully open the door. 2 Unlock the hinge locks, rotating them as far toward the open door frame as they will go. Lock Slot Unlock Hinge lock 3 Fully open the door. 4 Push the hinge locks down onto the door frame. 3 Firmly grasp both sides of the door at the top.
48 MAINTENANCE Replacing the Door 1 Firmly grasp both sides of the door at the top. 2 With the door at the same angle as the removal position, seat the indentation of the hinge arms into the bottom edge of the hinge slots. The notch in the hinge arms must be fully seated into the bottom edge of the slots. Door Care Instructions Most oven doors contain glass that can break. CAUTION •• Do not close the oven door until all the oven racks are fully in place.