ENGLISH ESPAÑOL FRANÇAIS OWNER’S MANUAL TOP FREEZER REFRIGERATOR Please read this manual carefully before operating your appliance and retain it for future reference. Model Name*=color number LTCS20220* LTCS24223* LTNS20220* LTCS20120* GT66BP* GT58BP* GT57BP*K LTWS24223* AFN75754512 P/No. MFL67527912-5 www.lg.com Copyright © 2019 LG Electronics Inc.All Rights Reserved. Copyright © 2019 LG Electronics Inc. Todos los Derechos Reservados. Copyright © 2019 LG Electronics Inc. Tous droits réservés.
TABLE TABLE OF CONTENTS Important Safety Instructions Requirements for Ground Connection Parts and Features Refrigerator Installation Unpacking Installation How to remove and Install the Refrigerator Doors How to reverse and Install the Refrigerator Doors Closing and Aligning the Doors Using your Refrigerator Ensuring Proper Air Circulation Adjusting the Controls Adjusting Control Settings Food Storage Guide Refrigerator Shelves Pantry Drawer Ice Tray Humidity Controlled Crispers Door Bins Dairy Bin Wat
IMPORTANT SAFETY INSTRUCTIONS SAFETY MESSAGES This manual contains several important safety notices. Always read and obey all of the following safety messages. This is the safety alert symbol. This symbol is a warning to potential dangers that could cause death, injury or damage to you, others or the product. All safety messages will follow after this warning symbol and the word “DANGER”, “CAUTION” or “WARNING”.
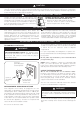
CAUTION This appliance is not intended for use by children, persons with physical or mental disabilities, persons with reduced sensory or mental capacity, or persons that lack experience or know-how, unless they have supervision or instruction in relation to the use of the appliance by the person responsible for their safety. Children should be supervised to assure that they do not play with the appliance.
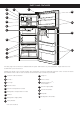
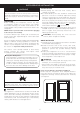
PARTS AND FEATURES A K L M B C D N E F O G H P I J Use this page to become more familiar with the parts and features of your refrigerator. Page references are included for your convenience. NOTE: This guide covers several models. The refrigerator you have purchased may have some or all of the items listed below. The locations of the features shown below may not match your model.
REFRIGERATOR INSTALLATION INSTALLATION WARNING 1. Avoid placing the unit near heat sources, direct sunlight, or humidity. 2. To avoid vibration, the unit should be leveled and placed on even floor. If needed, adjust the leveling screws to compensate for an unleveled floor. The front should be slightly taller than the rear to ensure that the doors close properly.
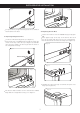
REFRIGERATOR INSTALLATION HOW TO REMOVE AND INSTALL THE REFRIGERATOR DOORS (For additional support on this topic, including helpful videos, please visit us at: www.lg.com). If entrance is lees than 35 inches wide, the refrigerator’s door will need to be removed. IMPORTANT: Before starting, turn off and unplug the refrigerator. Remove all food and the racks from the doors. TOOLS YOU MIGHT NEED OR USE 1/4 in 3/8 in 10 mm Hex Socket Wrench Phillips Screwdriver No.
REFRIGERATOR INSTALLATION REFRIGERATOR INSTALLATION Fig. 9 Fig. 6 To replace doors, begin with refrigerator door and then follow with freezer door. 4. Replacing Freezer Door Set the freezer door onto the Middle Hinge pin (Figure 10). Place upper hinge in the top of the freezer door and line up the hinge with the holes in top of refrigerator. Use the three bolts to fasten the hinge (See Figure 11). 3. Replacing Refrigerator Door Set door on Bottom Hinge Pin (See Figure 7).
REFRIGERATOR INSTALLATION HOW TO REVERSE AND INSTALL THE REFRIGERATOR DOORS (on some models) You may find it more convenient to have the doors converted from the left opening type (factory installed) to the right opening type. Directions refer to the right side as the side on your right as you face the unit. TOOLS YOU MIGHT NEED OR USE 1/4 in 3/8 in 10 mm Hex Socket Wrench Phillips Screwdriver No.
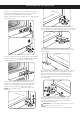
REFRIGERATOR INSTALLATION 2. Reversing and Reinst alling Refrigerator Door Using a ¼” socket wr ench, loosen and remove Hinge Pin fr om the Middle Hinge Bracket. Remove washer undernea th the middle hinge and set aside. NOTE: At this point the door will be loose. Slightly lift the door and remove it. Using a 3/8’’ socket wrench with a 2-Inch extension and screwdriver, loosen the two bolts and one screw, and remove the Bottom Hinge from right side of the housing.
REFRIGERATOR INSTALLATION Flip the Middle Hinge Bracket, (flange will now be on top) position it on left side of the refrigerator and reattach with two bolts and a Phillips screwdriver. Place the refrigerator door down over the pin on the bottom hinge. Place the washer between the refrigerator door and middle hinge and re-attach Hinge Pin to Hinge Bracket with a ¼” socket wrench. NOTE: Bracket has been flipped, but Hinge Pin stays in the same orientation with its hexagonal end facing upward.
REFRIGERATOR INSTALLATION CLOSING AND ALIGNING THE DOORS To avoid vibration, the unit must be leveled. If necessary, adjust the Leveling Legs to compensate for unevenness of the floor. The front should be slightly higher than the rear to aid in door closing. Corners Your refrigerator has three front leveling screws, one on the right and one on the left.
USING USING USING YOUR YOUR REFRIGERATOR REFRIGERATOR ADJUSTING THE CONTROLS ENSURING PROPER AIR CIRCULATION In order to obtain stable temperature, the air must flow between the freezer and refrigerator sections. As shown in the illustration below, the cold air enters through the bottom part and circulates upward. This air returns below the freezer floor and the rest of the air enters the refrigerator section through the top vent.
USING YOUR REFRIGERATOR FOOD STORAGE GUIDE ADJUSTING CONTROL SETTINGS Give the refrigerator time to cool down completely before adding food. It is best to wait 24 hours before adding food to the refrigerator. The mid-settings indicated in the previous section should be correct for normal household refrigerator usage. The controls are set correctly when milk or juice is cold to your liking and ice cream is firm. ITEMS The refrigerator control functions as the thermostat for the entire appliance.
USING YOUR REFRIGERATOR Packaging Recommendations: Us se s containers. Us s containers Package f o Wr yered Use wat roo stic. Us rec s REFRIGERATOR SHELVES The glass shelves in your refrigerator are adjustable to meet your individual storage needs. Adjusting the shelves to fit different heights of items will make finding the exact item you want easier. Doing so will also reduce the amount of time the refrigerator door is open which will save energy.
USING YOUR REFRIGERATOR Grasp the drawer handle and pull it forward to the drawer stop. Lift up and pull out. To remove the crisper glass: 1. Remove the crisper drawers (as described above). 2. Reach in under the glass and lift up. 3. Gently push the glass up and out. To replace the Pantry Drawer: Slide the drawer back all the way past the drawer stop. To remove the crisper cover: Ice Tray (On some models) 1. Remove both crisper drawers. 2. Remove the crisper glass. 3.
USING YOUR REFRIGERATOR WATER DISPENSER (On some models) To dispense cold water, push on the dispenser switch with a glass. Icemaker Dispenser Switch Ice detecting sensor Power Switch WHEN YOU SHOULD SET THE ICEMAKER POWER SWITCH TO OFF (O) • • Some dripping may occur after dispensing. Hold your cup beneath the dispenser for a few seconds after dispensing to catch all of the drops. • NOTE: The ice bin should be emptied when the icemaker ON/OFF switch is turned to the OFF position.
WATER FILTER WATER FILTER (On some models) It is recommended that you replace the water filter. • • • • 3. Push the water filter up into the filter receptacle and rotate it clockwise to lock it into place. Once installed correctly, the lock symbol should be facing you and you should not be able to rotate the filter clockwise any more. Approximately every 6 months. When the Filter Exchange indicator turns on. When the water dispenser output decreases. When the ice cubes are smaller than normal.
REFRIGERATOR REFRIGERATOR CARE CARE ANDAND CLEANING CLEANING WARNING NOTE: Back Cover should only be removed by a qualified technician. EXPLOSION HAZARD In order to get an efficient performance of your refrigerator, clean the back cover of it at least twice a year. BACK COVER REPLACING REFRIGERATOR LIGHTS The refrigerator and freezer compartment lights are LED interior lighting, and service should be performed by a qualified technician. Do not use flammable cleaners.
REFRIGERATOR REFRIGERATOR CARE CARE ANDAND CLEANING CLEANING WHEN MOVING If you decide to take your refrigerator with you when moving, consider the following: 7. Keep the doors closed with the cable glued to the refrigerator cabinet with an adhesive tape. 1. Remove all of the food from it, and place the frozen food in an ice chest with dry ice. 2. Unplug your refrigerator. 3. Empty the water from its tray. 4. Clean and dry it with a rag. 5.
CONNECTING THE WATER LINE NOTE: It is necessary to have a water source when both water and/or ice dispensers are available in your product. BEFORE START The water source is not guaranteed by the refrigerator manufacturer. Follow instructions carefully in order to reduce damage. behind the refrigerator and the source of water and add to that 8 feet (2,4 m). Make sure there is sufficient pipe material to allow the free movement of the refrigerator from the wall A cold water source.
CONNECTING THE WATER LINE 3. DRILL A HOLE FOR THE VALVE Drill a 1/4” (6,35 mm) diameter hole in the water pipeline. Remove jagged edges produces after perforation. Make sure water does not reach the drill. Not performing the 1/4” (6,35 mm) perforation can lead to a low or smaller ice production. Saddle Type Shutoff Valve Compression Nut Packing Nut Outlet Valve 4. TIGHTEN THE VALVE Ferule (sleeve) Tight the valve into the cold water pipeline with a tube trap. 8.
CONNECTING THE WATER LINE ce c os es se o f c T a of ve as f /4 6 T 10. OPEN THE BYPASS VALVE T c cov m) es /4 F o w w F Ref a ce acces esso . es fi s o s P ae aw ef ef a a a doe s 12. TURN ICE MAKER ON eve f om ef ao, o Af e wa ds, se o ze. c 11. CONNECT TO REFRIGERATOR 6 o eaks. c T ce mak s o s af e of 15 °F (-9 ° ) ess.
TROUBLESHOOTING GUIDE Problem Possible Causes The power supply cord is unplugged. Solutions Firmly plug the cord into a live outlet with proper voltage (see Electrical & Grounding Requirements). A household fuse has blown or a circuit breaker has tripped. Replace the fuse or reset the circuit breaker. If the problem persists, contact an electrician. The refrigerator control is set to the Refer to the Setting the Controls section. Refrigerator is not OFF position. cooling.
TROUBLESHOOTING GUIDE Problem Doors will not close completely. Possible Causes The refrigerator is not level. Solutions See the Leveling and Door Alignment section. Food packages are blocking the door open. Rearrange food containers to clear door and door shelves. The ice bin, crisper cover, pans, shelves, door bins or baskets are out of position. Push bins all the way in and put crisper cover, pans, shelves and baskets into their correct positions.
TROUBLESHOOTING GUIDE Problem The refrigerator seems to make too much noise. Possible Causes Solutions The sounds may be normal for your refrigerator. Refer to the Understanding Sounds You May Hear section for more information. New installation. Wait 12 to 24 hours after icemaker installation for ice production to begin. Wait 72 hours for full ice production.
TROUBLESHOOTING GUIDE Problem Possible Causes Solutions The air vents are blocked. Cold air circulates from the freezer to the fresh food section and back again through air vents in the wall dividing the two sections. Locate air vents by using your hand to senseairflow and move all packages that blockvents and restrict airflow. (See air flowdiagram below.) The doors are opened often.
SMART DIAGNOSISTM Smart DiagnosisTM (on some models) Should you experience any problems with your refrigerator, it has the capability of transmitting data via your telephone to the Smart DiagnosisTM team. This gives you the capability of speaking directly to our trained specialists. The specialist records the data transmitted from the machine and uses it to analyze the issue, providing a fast, effective diagnosis. If you experience problems with your refrigerator, call to the LG service center.
LIMITED WARRANTY LG ELECTRONICS U.S.A., INC. LG REFRIGERATOR LIMITED WARRANTY - U.S. A. ARBITRATION NOTICE: THIS LIMITED WARRANTY CONTAINS AN ARBITRATION PROVISION THAT REQUIRES YOU AND LG TO RESOLVE DISPUTES BY BINDING ARBITRATION INSTEAD OF IN COURT, UNLESS YOU CHOOSE TO OPT OUT. IN ARBITRATION, CLASS ACTIONS AND JURY TRIALS ARE NOT PERMITTED. PLEASE SEE THE SECTION TITLED “PROCEDURE FOR RESOLVING DISPUTES” BELOW.
LIMITED WARRANTY PROCEDURE FOR RESOLVING DISPUTES: ALL DISPUTES BETWEEN YOU AND LG ARISING OUT OF OR RELATING IN ANY WAY TO THIS LIMITED WARRANTY OR THE PRODUCT SHALL BE RESOLVED EXCLUSIVELY THROUGH BINDING ARBITRATION, AND NOT IN A COURT OF GENERAL JURISDICTION. BINDING ARBITRATION MEANS THAT YOU AND LG ARE EACH WAIVING THE RIGHT TO A JURY TRIAL AND TO BRING OR PARTICIPATE IN A CLASS ACTION. Definitions. For the purposes of this section, references to “LG” mean LG Electronics U.S.A., Inc.
LIMITED WARRANTY LG ELECTRONICS CANADA, INC. LG REFRIGERATOR LIMITED WARRANTY - Canada ARBITRATION NOTICE: THIS LIMITED WARRANTY CONTAINS AN ARBITRATION PROVISION THAT REQUIRES YOU AND LG TO RESOLVE DISPUTES BY BINDING ARBITRATION INSTEAD OF IN COURT, UNLESS THE LAWS OF YOUR PROVINCE OR TERRITORY DO NOT PERMIT THAT, OR, IN OTHER JURISDICTIONS, IF YOU CHOOSE TO OPT OUT. IN ARBITRATION, CLASS ACTIONS AND JURY TRIALS ARE NOT PERMITTED. PLEASE SEE THE SECTION TITLED “PROCEDURE FOR RESOLVING DISPUTES” BELOW.
LIMITED WARRANTY •Any noises associated with normal operation of the Product; •Replacement of light bulbs, filters, fuses or any other consumable parts; •Replacement of any part that was not originally included with the Product; •Costs associated with removal and/or reinstallation of the Product for repairs; and •Shelves, door bins, drawers, handle and accessories to the Product, except for internal/functional parts covered under this Limited Warranty.
LIMITED WARRANTY by the applicable arbitration rules. If your claim exceeds $25,000, the right to a hearing will be determined by the applicable arbitration rules. Any in-person arbitration hearings will be held at the nearest, most mutually-convenient arbitration location available within the province or territory in which you reside unless you and LG both agree to another location or agree to a telephonic arbitration. Severability and Waiver.
NOTES 33
ESPAÑOL MANUAL DE USUARIO REFRIGERADOR CON CONGELADOR SUPERIOR Lea detenidamente este manual antes de empezar a utilizar el refrigerador y guárdelo como referencia para el futuro. www.lg.
TABLA TABLA DE DE CONTENIDO CONTENIDO Versión Inglés Instrucciones Importantes de Seguridad Requerimientos de Conexión a Tierra Partes y Características 1 36-37 37 38 Instalación del Refrigerador Desempaque Instalación Removiendo y reemplazando puertas Como cambiar el sentido de apertura a las puertas del Refrigerador Cierre y Alineación de Puertas 39-45 39 39 Uso del Refrigerador Circulación Apropiada del Aire Ajuste de los Controles Cómo regular los Ajustes de los Controles Guía para Almacenar Alim
INSTRUCCIONES INSTRUCCIONES IMPORTANTES IMPORTANTES DE SEGURIDAD DE SEGURIDAD MENSAJES DE SEGURIDAD Hemos incluido muchos mensajes importantes de seguridad en este manual. Lea y obedezca siempre todos los mensajes de seguridad. Este es el símbolo de advertencia de seguridad. Este símbolo le advierte sobre peligros potenciales que pueden ocasionar la muerte o una lesión a usted y a los demás, así como daños al producto.
PRECAUCIÓN Este aparato no está destinado para su uso por las personas (incluidos niños) con capacidad física, sensorial o mental reducida, falta de experiencia y conocimientos, a menos que se les haya dado la supervisión o instrucción en relación con el uso del aparato por la persona responsable de su seguridad. Los niños deben ser supervisados para asegurar que no jueguen con el aparato.
PARTES Y CARACTERÍSTICAS A K L M B C D N E F O G H P I J Use esta sección para que Ud. se familiarice con las partes y características de su nuevo refrigerador. NOTA: Esta guía cubre distintos modelos. Su refrigerador puede tener algunas o todas las características y partes que se muestran en la siguiente lista. Algunas de las localizaciones de las partes tal vez no concuerden con su modelo.
INSTALACIÓN DEL REFRIGERADOR ADVERTENCIA PELIGRO DE PESO EXCESIVO Use la ayuda de dos o más personas para mover e instalar el refrigerador, no seguir estas instrucciones puede ocasionar lesiones en la espalda u otras partes del cuerpo. DESEMPAQUE Antes de instalar su refrigerador, despegue y remueva las cintas y etiquetas temporales. No retire aquellas etiquetas que muestren advertencias, el modelo y número de serie o la ficha técnica del producto que se encuentra en la parte posterior del refrigerador.
INSTALACIÓN REFRIGERADOR INSTALACIÓN DELDEL REFRIGERADOR REMOVIENDO Y REEMPLAZANDO PUERTAS (Para obtener asistencia adicional sobre este tema incluyendo videos útiles, por favor visítenos en: www.lg.com) Si la entrada tiene menos de 35 pulgadas de ancho, se necesitará quitar las puertas del refrigerador. IMPORTANTE: Antes de empezar, apague el refrigerador y desconéctelo. Quite la comida y los anaqueles de las puertas.
INSTALACIÓN DEL REFRIGERADOR Fig. 9 Fig. 6 Para volver a colocar las puertas, comience con la puerta del refrigerador y continúe con la puerta del congelador. 4. Para Instalar la puerta del Congelador Coloque la puerta del congelador dentro del soporte de la Bisagra Central (Figura 10). 3. Para Instalar la puerta del Refrigerador Coloque la puerta en el pivote de la Bisagra Inferior (Figura 7).
INSTALACIÓN DELDEL REFRIGERADOR INSTALACIÓN REFRIGERADOR CÓMO CAMBIAR EL SENTIDO DE APERTURA A LAS PUERTAS DEL REFRIGERADOR (en algunos modelos) Puede que encuentre más conveniente convertir las puertas del estilo de abrir del lado izquierdo (instalado de fabrica) para abrir del lado derecho. Las direcciones hacen referencia al lado derecho como su lado derecho al mirar la unidad.
INSTALACIÓN DEL REFRIGERADOR 2. INVERTIR Y VOLVER A PONER LA PUERTA DEL REFRIGERADOR Utilizando una llave tubular de ¼ pulgadas, afloje y quite el Pivote de Bisagra del Soporte del Pivote de Inserción de la Bisagra Central. Quite las arandelas debajo de la bisagra central y colóquelas a un lado. NOTA: A este punto la puerta estará floja, levántela un poco y sáquela.
INSTALACIÓN DEL REFRIGERADOR Siguiendo la ilustración, gire el Soporte de la Bisagra Central (la Pestaña quedará hacia arriba) y posiciónela en el lado izquierdo del refrigerador y vuelva a unirla con dos tornillos y el destornillador Phillips. Coloque la puerta del refrigerador sobre el pivote de la bisagra inferior. Coloque la arandela entre la puerta del refrigerador y la bisagra central y vuelva a unir el Pivote de Bisagra al Soporte de Bisagra con una llave tubular de ¼ pulgadas.
INSTALACIÓN USO DEL REFRIGERADOR DEL REFRIGERADOR CIERRE Y ALINEACIÓN DE PUERTAS Su refrigerador cuenta con tres tornillos niveladores: uno en el lado izquierdo y otro en el lado derecho. Si su refrigerador se encuentra inestable o si Ud. desea que las puertas cierren más fácil, ajuste la inclinación del refrigerador realizando lo siguiente: Corners Nota: El tercer tornillo nivelador es usado para proteger la bisagra de la parte de abajo de la puerta. Ajuste los tornillos.
USOUSO DELDEL REFRIGERADOR REFRIGERADOR CIRCULACIÓN APROPIADA DEL AIRE Para obtener temperaturas estables, el aire debe fluir entre las secciones del congelador y refrigerador. Como se muestra en la ilustración de abajo, el aire frío entra a través de la parte inferior y circula hacia arriba, este aire regresa por debajo del piso del congelador y el resto del aire entra a la sección del refrigerador a través de la ventila superior.
USO DEL REFRIGERADOR CÓMO REGULAR LOS AJUSTES DEL CONTROL Antes de introducir alimentos a su refrigerador, deje que éste se enfríe primero, dejando pasar 24 horas desde el momento en que usted conecta el refrigerador. El ajuste medio indicado en la sección anterior corresponde a un enfriamiento normal de un refrigerador. Los controles han sido ajustados de manera correcta, de tal forma que la leche y jugo se encuentren tan fríos como usted lo desea y los helados (mantecados) tienen una consistencia firme.
USO DEL REFRIGERADOR ESTANTES DEL REFRIGERADOR Los estantes en su refrigerador son ajustables para cumplir con sus necesidades de almacenamiento. Todos los estantes en esta unidad son de cristal.
USOUSO DELDEL REFRIGERADOR REFRIGERADOR Para sacar el cristal del compartimiento de verduras: 1. Saque las gavetas del compartimiento de verduras. 2. Para sacar el cristal encima del compartimiento de verduras, alcance llegar por debajo del cristal y levante. 3. Saque el cristal hacia arriba. Aguante la gaveta por la manija, jale hacia al frente hasta que pare la gaveta, levante y saque. Para colocar el cajon de carnes frías: Deslice el cajon hacia atras hasta que tope.
USO DEL REFRIGERADOR DISPENSADOR DE AGUA (En algunos modelos) Para dispensar agua fría, empuje el interruptor del dispensador con un vaso. ADVERTENCIA Peligro de lesiones personales NO coloque sus dedos o manos en el mecanismo automático de hacer hielo mientras el refrigerador está enchufado. Botón activador de dispensador Máquina de hielo Es posible que tras la dispensación se produzca un goteo.
FILTRO DE AGUA FILTRO DE AGUA (En algunos modelos) Se recomienda reemplazar el filtro de agua: • • • • 3. Empuje hacia adentro el filtro de agua, mientras enrosca la punta del filtro rotándolo a favor de las manecillas del reloj. El símbolo de Bloqueado del filtro de agua estará colocado viendo hacia usted. Aproximadamente cada 6 meses. Cuando el indicador del filtro del agua se encienda. Cuando disminuya el caudal del dispensador de agua. Cuando los cubitos de hielo sean más pequeños de lo normal.
CUIDADO CUIDADO DE SU DE REFRIGERADOR SU REFRIGERADOR NOTA: La cubierta trasera solo debe ser removida por un técnico calificado. Para un funcionamiento eficiente de su refrigerador, limpie la cubierta por lo menos 2 veces al año. ADVERTENCIA PELIGRO DE EXPLOSIÓN CÓMO CAMBIAR LAS LUCES (LED) Utilice limpiadores no inflamables. No seguir ésta instrucción puede ocasionar la muerte, explosión o incendio.
CUIDADO DE SU REFRIGERADOR 6. Según el modelo, levante la parte delantera del refrigerador para que ruede con facilidad o atornille las patas niveladoras para no rayar el piso. Consulte la sección “Cierre y Alineación de Puertas”. CUIDADOS CUANDO USTED SE MUDA Si Ud. muda su refrigerador a una casa nueva, siga los siguientes pasos para prepararse para la mudanza. 1. Saque toda la comida del refrigerador y empaque los alimentos congelados con hielo seco. 2. Desconecte su refrigerador. 3.
CÓMO CONECTAR LA TUBERÍA DE AGUA CÓMO CONECTAR LA TUBERÍA DE AGUA NOTA: La línea de agua es necesaria instalarla cuando las características de los dispensadores de agua y/o hielo están disponibles en su producto. ANTES DE COMENZAR La instalación de la tubería de agua no está garantizada por el fabricante del refrigerador o de la fábrica de hielos. Siga las instrucciones cuidadosamente para minimizar el riesgo de daños al producto.
CÓMO CONECTAR LA TUBERÍA DE AGUA NOTA: Asegúrese de que exista suficiente tubería extra (unos 8 pies [244 mm] enrollados en 3 vueltas de 10” [25 cm] de diámetro) para permitir al refrigerador moverse fuera de la pared después de la instalación. 2. SELECCIONE LA LOCALIZACIÓN DE LA VÁLVULA Seleccione la localización para la válvula que mejor se le facilite el acceso. Es mejor conectar en una tubería vertical.
CÓMO CÓMO CONECTAR CONECTAR LA TUBERÍA LA TUBERÍA DE AGUA DE AGUA Retire el tapón protector (1) de la rosca de la c rt ost éste. Apriete el de conexión (casa) al sujetador de parte trasera del refrigerador. Primero afloje el t que sostiene el sujetador. Después, inserte el conexión de casa en el orificio. Finalmente, vuelva apre tornillo. 1 10. ABRA LA VÁLVULA DE PASO Apriete todas las conexione que tengan fugas. Vuelva poner la rta de acceso compresor.
GUÍA DE SOLUCIÓN DE PROBLEMAS Ruido de vibración: Si el lateral o la parte posterior del refrigerador está en contacto con un mueble o una pared, algunas de las vibraciones normales pueden producir un sonido audible. Para eliminar el ruido, asegúrese de que los laterales y la parte posterior no puedan vibrar contra las paredes o los muebles. Goteo: El agua cayendo en la bandeja de drenaje durante el ciclo de descongelación.
GUÍA DE SOLUCIÓN DE PROBLEMAS Problema Ruido de vibración o traqueteo. El compresor parece que funciona demasiado. CUIDPosibles Causas Soluciones El refrigerador no está sólidamente apoyado en el suelo. El suelo es poco sólido o irregular, o es necesario ajustar los pies de nivelación. Consulte la sección Instalación para obtener instrucciones sobre la nivelación. El refrigerador sustituido era un modelo antiguo.
GUÍA GUÍA DE SOLUCIÓN DE SOLUCIÓN DE PROBLEMAS DE PROBLEMAS Problema Escarcha o cristales de hielo sobre los alimentos congelados. El hielo huele o sabe mal. Hay agua en la bandeja de drenaje de descongelación. Posibles Causas Soluciones La puerta no se cierra correctamente. Consulte el apartado “Las puertas no se cierran completamente” en la sección Guía para la solución de problemas. La puerta se abre a menudo.
GUÍA DE SOLUCIÓN DE PROBLEMAS Problema La máquina de hielo no está fabricando hielo o no en la cantidad suficiente. Posibles Causas Soluciones La instalación es nueva. Espere de 12 a 24 horas tras la instalación de la máquina de hielo para que comience la fabricación de hielo. Espere 72 horas para que la fabricación de hielo esté a pleno rendimiento. El refrigerador no está conectado a un suministro de agua o la válvula de corte del suministro no está abierta.
GUÍA DE SOLUCIÓN DE PROBLEMAS Problema La temperatura es demasiado cálida o hay una acumulación de humedad en el interior. Posibles Causas Soluciones Los conductos de ventilación del aire están bloqueados. El aire frío circula desde el congelador hacia la sección de alimentos frescos y vuelta atrás de nuevo a través de los conductos de ventilación del aire que hay en la pared que divide las dos secciones.
SMART DIAGNOSISMR Smart DiagnosisMR (en algunos modelos) Si tiene algún problema con su refrigerador, puede transmitir datos a través de su teléfono al centro de servicios. Esto le otorga la capacidad de hablar directamente con nuestros especialistas capacitados. El especialista registra los datos transmitidos desde su máquina y los utiliza para analizar el problema, brindándole un diagnóstico rápido y efectivo. Si experimenta problema con su refrigerador, llame al centro de servicio LG.
GARANTÍA LIMITADA LG ELECTRONICS U.S.A., INC. FRIGORÍFICO LG GARANTÍA LIMITADA - U.S.A. AVISO DE ARBITRAJE: ESTA GARANTÍA LIMITADA CONTIENE UNA CLÁUSULA DE ARBITRAJE QUE LE DEMANDA A USTED Y A LG RESOLVER CONFLICTOS A TRAVÉS DE UN ARBITRAJE VINCULANTE EN LUGAR DE HACERLO EN LA CORTE, A MENOS QUE USTED DECIDA NO PARTICIPAR. EN EL ARBITRAJE NO ESTÁN PERMITIDAS LAS ACCIONES COLECTIVAS NI LOS JUICIOS CON JURADO. POR FAVOR, VEA A CONTINUACIÓN LA SECCIÓN TITULADA “PROCEDIMIENTO PARA RESOLVER CONFLICTOS”.
GARANTÍA LIMITADA PROCEDIMIENTO PARA RESOLVER CONFLICTOS: TODOS LOS CONFLICTOS ENTRE USTED Y LG QUE SURJAN FUERA DE O RELACIONADOS DE ALGUNA MANERA CON ESTA GARANTÍA LIMITADA O CON EL PRODUCTO, SE RESOLVERÁN EXCLUSIVAMENTE A TRAVÉS DE UN ARBITRAJE VINCULANTE Y NO EN UNA CORTE DE JURISDICCIÓN GENERAL. ARBITRAJE VINCULANTE SIGNIFICA QUE USTED Y LG RENUNCIAN AL DERECHO DE UN JUICIO CON JURADO Y A REALIZAR O PARTICIPAR EN UNA DEMANDA COLECTIVA. Definiciones.
NOTAS 65
FRANÇAIS MANUEL D’UTILISATEUR RÉFRIGÉRATEUR A CONGÉLATEUR AU HAUT Veuillez lire ce manuel en entier avant de mettreen marche l’unité et conservez-le à portée de la main pour le consulter à tout moment. www.lg.
TABLA DE MATIERES Version Anglaise 1 Version Espagnole 34 Consignes de sécurité Spécifiations techniques Pièces et caractéristiques Installation du réfrigérateur Déballage du réfrigérateur Installation Comment retirer et installer les portes du réfrigérateur Comment inverser et installer les portes du réfrigérateur Fermeture et alignement des portes Utilisation du réfrigérateur Circulation de l’air adéquate Réglage des contrôles Configuration du panneau de contrôle Guide de conservation des aliments É
CONSIGNES DE SÉCURITÉ MESSAGES DE SÉCURITÉ Veuillez lire et respecter les messages de sécurités inclus dans ce guide. Symbole d’alerte. Il indique un message de sécurité concernant les risques relatifs à l’endommagemen du produit, aux blessures ou à la mort. Tous les messages de sécurité sont dotés de ce symbole et d’un mot (DANGER, AVERTISSEMENT, ATTENTION). DANGER Risque de blessures graves ou de mort si les instructions ne sont pas suivies correctement.
AVERTISSEMENT L’usage de cet appareil n’est pas destiné aux personnes avec un handicape locomoteur, ou des capacités sensorielles ou mentales réduites, en manque d’expérience ou de connaissance, à moins qu’elles aient reçu les instructions nécessaires de la part d’une personne responsable de leur sécurité. Surveiller les enfants afin d’éviter le contact direct avec l’appareil. DANGER: RISQUE DE PRISE AU PIÉGE AVANT DE JETER UN VIEUX REFRIGERATEUR OU CONGELATEUR: • Enlever les portes.
PIÈCES ET CARACTÉRISTIQUES A P L K B C D M E F N G H O I J Utilisez cette page pour vous familiariser avec les pièces et fonctionnalités de votre réfrigérateur. Les références des pages sont indiquées pour votre confort. REMARQUE: Ce guide couvre plusieurs modèles. Le réfrigérateur que vous avez acheté peut posséder certains ou l’ensemble des éléments indiqués ci-dessous. L’emplacement des fonctionnalités indiquées ci-dessous peut ne pas correspondre à votre modèle.
INSTALLATION DU RÉFRIGÉRATEUR INSTALLATION AVERTISSEMENT 1. Éviter de placer l’appareil près des sources de chaleur, au soleil ou à l’humidité. 2. Pour éviter les vibrations, l’appareil doit être de niveau. Au besoin, régler les vis niveleuses pour compenser. Le devant doit être légèrement plus haut que l’arrière pour faciliter la fermeture de la porte. Ces vis peuvent être tournées facilement en inclinant légèrement l’appareil.
INSTALLATION DU RÉFRIGÉRATEUR COMMENT RETIRER OU INSTALLER LES PORTES DU RÉFRIGÉRATEUR Si l’entrée de votre cuisine mesure moins de 35 pouces de large, les portes du réfrigérateur devront être retirées. IMPORTANT: Avant de commencer, éteignez et débranchez le réfrigérateur. Retirez les aliments et les bacs des portes. OUTILS DONT VOUS POUVEZ AVOIR BESOIN 10 mm 3/8 po 1/4 po Clé Tubulaire de tête hexagonale Tournevis Phillips AVERTISSEMENT Tournevis à tête plate Fig.
INSTALLATION DU RÉFRIGÉRATEUR Fig. 9 Fig. 6 • Pour replacer les portes, commencez par celle du réfrigérateur puis placez la porte du congélateur. 3. Replacement de la porte du réfrigérateur • Posez la porte sur la broche de charnière du bas (Voir Figure 7). • Placez la broche de charnière du support du milieu à l’intérieur du trou de broche de charnière inséré dans la partie supérieure de la porte (Voir Figure 8).
INSTALLATION DU RÉFRIGÉRATEUR COMMENT INVERSER ET INSTALLER LES PORTES DU RÉFRIGÉRATEUR (Sur certains modèles) Vous pourrez trouver cela plus pratique d’avoir les portes converties d’une poignée gauche (installation par défaut en usine) pour le bon mouvement d’ouverture. Les consignent se réfèrent au côté droit comme au côté sur votre droite lorsque vous faites face à l’unité.
INSTALLATION DU RÉFRIGÉRATEUR 2. Inversement et réinstallation de la porte de réfrigérateur À l’aide d’une Clé Tubulaire d’ 1/4 pouces desserrez et retirez la broche de charnière du support. Otez le joint situé sous la charnière du milieu et mettez-le de côté. REMARQUE : À ce stade, la porte est détachée. Soulevez-la légèrement et retirez-la.
INSTALLATION DU RÉFRIGÉRATEUR Retournez le support de milieu de charnière, (Le joint sera maintenant au-dessus) placez-le à gauche du réfrigérateur et rattachez-le avec deux écrous et un tournevis Phillips. Placez la porte du réfrigérateur sur la broche du bas de la charnière. Placez le joint entre la porte du réfrigérateur et le milieu de la charnière et rattachez la broche au support avec une Clé Tubulaire d’ 1/4 pouces.
INSTALLATION DU RÉFRIGÉRATEUR FERMETURE ET ALIGNEMENT DES PORTES Pour éviter les vibrations, l’unité doit être mise à niveau. Si besoin, ajustez les pieds pour compenser un plancher inégal. L’avant doit être légèrement surélevé par rapport à l’arrière pour faciliter la fermeture de la porte. Votre réfrigérateur possède trois vis de réglage à l’avant, l’une à droite, et l’autre à gauche.
UTILISATION DU RÉFRIGÉRATEUR CIRCULATION DE L’AIR ADÉQUATE Afin d’obtenir une température stable, l’air doit circuler entre le congélateur et le réfrigérateur. Comme indiqué dans les illustrations ci-dessous, l’air froid pénètre à travers la partie basse et circule vers le haut. Cet air retourne sous le plancher du congélateur et le reste de l’air entre dans la section du réfrigérateur à travers la grille d’aération supérieure. Ne pas bloquer ces aérations avec des emballages de produits alimentaires.
UTILISATION DU RÉFRIGÉRATEUR RÉGLAGE DU PANNEAU DE CONTRÔLE Laisser du temps au réfrigérateur pour refroidir complètement avant d’y ajouter des aliments. Il est préférable d’attendre 24 heures. Les réglages du milieu indiqués dans la section précédente devraient être corrects pour une utilisation normale. Les contrôles sont réglés adéquatement lorsque le lait ou le jus sont aussi froids que désirés et que la crème glacée est ferme.
UTILISATION DU RÉFRIGÉRATEUR ÉTAGÈRES DU RÉFRIGÉRATEUR Les étagères en verre de votre réfrigérateur sont réglables pour répondre à vos besoins de stockage. Le réglage des étagères pour correspondre à des hauteurs différentes vous permettra de trouver facilement l’aliment exact que vous cherchez. Cela vous permet aussi de réduire le temps d’ouverture de la porte du réfrigérateur, ce qui économise l’énergie Emballage Une bonne congélation dépend d’un emballage approprié.
UTILISATION DU RÉFRIGÉRATEUR Tenez la poignée du tiroir et tirez-le à fond. Soulevez, puis tirez de nouveau pour le retirer. Pour retirer le bac en verre: 1. Retirez les tiroirs du bac à légumes (comme décrit ci-dessus). 2. Passez la main sous le verre et soulevez. 3. Poussez gentiment le verre vers le haut et vers l’extérieur Pour remplacer le tiroir garde-manger: Réinsérez le tiroir jusqu’au bout. Bac à glaçons (Sur certains modèles) • Versez de l’eau potable jusqu’au niveau indiqué sur l’image.
UTILISATION DU RÉFRIGÉRATEUR FILTRE À EAU (Sur certains modèles) Pour distribuer de l'eau froide, appuyez sur l'interrupteur du distributeur avec un verre. AVERTISSEMENT Danger de blessures corporelles NE PAS placer les doigts ou les mains sur le mécanisme automatique de fabrication de glaçons lorsque le réfrigérateur est branché. Interrupteur de distributeur Machine à glaçons Quelques gouttes peuvent s'égoutter après la distribution.
FILTRE À EAU WATFILTRE À EAU (Sur certains modèles) Il est recommandé de remplacer le filtre à eau. • • • • Environ tous les 6 mois. Lorsque le voyant Filter Exchange s'allume. Lorsque le débit du distributeur d'eau diminue. Quand les glaçons sont plus petits que la normale. 3. Poussez le filtre à eau vers le haut dans le réceptacle du filtre et tournez-le dans le sens horaire pour le verrouiller dans sa position.
ENTRETIEN ET NETTOYAGE REMARQUE: La couverture en arrière devrait seulement être enlevée par un technicien qualifié. Nettoyez les passages sur couverture en arrière. COUVERTURE Employez un vide décapant avec la brosse attachement, au moins EN ARRIÈRE deux fois a année à maintenir votre fonctionnement de réfrigérateur efficacement. AVERTISSEMENT RISQUE D´EXPLOSION Utiliser un nettoyant ininflammable. Sinon, il peut en résulter une explosion, un incendie ou la mort.
ENTRETIEN ET NETTOYAGE CONSEILS DE DÉMÉNAGEMENT CONSEILS DE VACANCES Lorsque l’on déménage le réfrigérateur dans une nouvelle résidence, suivre les étapes ci-dessous. 1. Retirer tout aliment et emballer tout aliment congelé avec de la glace sèche. 2. Débrancher le réfrigérateur. 3. Vider l’eau du plateau à dégivrage. 4. Nettoyer, essuyer et assécher complètement. 5. Retirer toute pièce amovible, envelopper ensemble afin que les pièces ne bougent pas pendant le transport. 6.
BRANCHEMENT DE LA LIGNE D’EAU REMARQUE: Lil est nécessaire d’installer la ligne d’eau quand les caractéristiques des dispensateurs d’eau et/ ou de glace sont disponibles sur le produit. AVANT DE COMMENCER L’installation de la canalisation d’eau n’est pas garantie par le fabriquant du réfrigérateur ou de la machine à glaçons. Suivre ces instructions afin de minimiser le risque de dommages causés par l’eau.
BRANCHEMENT DE LA LIGNE D’EAU 3. PERCER UN TROU POUR LA SOUPAPE Percer un trou de 1/4 po dans le tuyau d’eau (même si l’on utilise une soupape à auto perçage) à l’aide d’une mèche bien affûtée. Enlever toute bavure résultant du perçage. Faire attention pour que l’eau n’entre pas en contact avec la perceuse. Si ceci n’est pas fait, la fabrication de glaçons peut être réduite ou produire des glaçons plus petits. 4.
BRANCHEMENT DE LA LIGNE D’EAU 10. OUVRIR L’EAU À LA SOUPAPE D’ARRÊT Placer l’écrou à compression et la bague (manchon) sur l’extrémité du tuyau. Insérer l’extrémité du tuyau sur la connexion de soupape d’eau le plus loin possible. Tout en maintenant le tuyau, serrer le raccord. Serrer toute connexion présentant des fuites priete. Remettre le couvercle d’accès au compartiment du compresseur. L’écrou à compression 1/4” 11.
GUIDE DE DÉPANNAGE Problème Cause possible CUIDADO DE SU REFRIGERADOR La lumière OFF est allumée. Le réfrigérateur ne refroidit pas. niveau de température souhaité. Lorsque le mode démo est désactivé, le message OFF disparaît. Le câble d’alimentation est débranché. Branchez le câble dans une prise active avec une tension adaptée (consulter les spécifications électriques et de mise à la masse).
GUIDE DE DÉPANNAGE Problème Les portes ne se ferment pas complètement Givre ou cristaux de glace sur les aliments congelés. Causes possibles Solutions Le réfrigérateur n’est pas droit. Consulter la section (Ajustement et alignement des portes). Les emballages alimentaires empêchent la fermeture de la porte. Réarrangez les récipients alimentaires pour dégager la porte et les étagères. Le bac à glace, le couvercle du bac à légumes, les étagères, les bacs ou les paniers sont mal positionnés.
GUIDE DE DÉPANNAGE Problème Causes possibles Solutions Ce bruit est peut-être normal pour votre Le réfrigérateur semble faire trop réfrigérateur. de bruit. Reportez-vous à la section « Comprendre les sons que vous entendez » pour plus d’informations. Nouvelle installation. Attendez 12 à 24 heures après l’installation de la machine à glace, pour que la production de glaçons commence. Attendez 72 heures pour le fonctionnement normal.
GUIDE DE DÉPANNAGE Problème La température est trop chaude ou il y a de la moisissure à l’intérieur Causes possibles Solutions Les entrées d’air sont bloquées. L’air froid circule du congélateur vers la section des aliments frais et revient à travers les trous d’aération divisant les deux sectionses. Localisez les aérations avec votre main pour sentir le flux d’air et déplacez tous les emballages qui bloquent les grilles et empêchent l’air de passer. (Voir schéma du flux d’air ci-dessous.).
SMART DIAGNOSISTM Smart DiagnosisTM (sur certains modèles) Si vous rencontrez des difficultés techniques avec votre réfrigérateur, celui-ci à la capacité de transmettre des données à travers votre téléphone Centre de dépannage LG. Cela vous donne la possibilité de parler directement à l'un de nos techniciens spécialisés. Le technicien enregistre les données transmises depuis votre machine et s'en servira pour analyser le problème et fournir un diagnostic rapide et efficace.
GARANTIE LIMITÉE LG ELECTRONICS CANADA, INC. GARANTIE LIMITÉE DES RÉFRIGÉRATEURS LG - Canada AVIS D’ARBITRAGE : LA PRÉSENTE GARANTIE LIMITÉE CONTIENT UNE DISPOSITION SUR L’ARBITRAGE QUI EXIGE QUE LE RÈGLEMENT DES DIFFÉRENDS ENTRE VOUS ET LG S’EFFECTUE PAR ARBITRAGE EXÉCUTOIRE PLUTÔT QUE DEVANT UN TRIBUNAL, À MOINS QUE LES LOIS DE VOTRE PROVINCE OU TERRITOIRE L’INTERDISENT OU QUE, DANS UN AUTRE TERRITOIRE DE COMPÉTENCE, VOUS VOUS PRÉVALIEZ D’UNE OPTION DE RETRAIT.
GARANTIE LIMITÉE ment à la finition du Produit, à moins que tel dommage ait résulté de fabrication ou matériaux défectueux et rapporter à LGECI dans la (1) semaine suivant livraison du Produit; •Dommage or articles absents de tout Produit démonstrateur, boîte ouverte, réusiné ou escompté; •Produit réusiné ou tout Produit vendu “Tel quel”, “Où est”, “Avec tous défauts”, ou toute mise en garde similaire; •Produit dont le numéro de série original ait été retiré, altéré ou ne peut être facilement déterminé à la
GARANTIE LIMITÉE Frais et coûts. Aucuns frais ne sont exigibles pour entamer une procédure d’arbitrage. À la réception de votre demande d’arbitrage écrite, LG réglera rapidement la totalité des frais de dépôt de la demande d’arbitrage, sauf si vous réclamez des dommages-intérêts supérieurs à 25 000 $. Dans ce cas, le paiement de ces frais sera régi par les règles d’arbitrage applicables.
NOTES 97
NOTES 98
LG Customer Information Center 1-800-243-0000 1-888-865-3026 1-888-542-2623 USA, Consumer User USA, Commercial User CANADA Register your Product Online! www.lg.