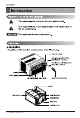
NORSK SUOMI OWNER’S MANUAL DANSK AIR CONDITIONER Please read this manual carefully before operating your set and retain it for future reference. TYPE : WINDOW MODELS LW1017ERSM LW1217ERSM P/NO : MFL69365407 www.lg.
Safety Precautions Before Operation 7 Introduction Safety Installation Operating Instructions 16 Maintenance and Service 20
Do not store flammables like gasoline benzene thinner etc. near the air conditioner.
No correlation between fan usage and oxygen depletion. Unplug the unit when not using it for a long time.
Hold the plug by the head (not the cable)when taking it out. When gas leaks, open the window for ventilation before operating the unit. Never touch the metal parts of the unit when removing the filter. For inner cleaning, contact an Authorized Service Center or a dealer. Do not use harsh detergent that causes corrosion or damage on the unit. Harsh detergent may also cause failure of product, fire, or electric shock. Install the product so the exhaust and noise are not aimed directly at the neighbors.
Do not use this appliance for special purposes such as cooling pets,foods,precision machinery,or objects of art Instead of running air conditioning constantly,open a window for fresh air occasionally. You will feel better. If the liquid from the battery gets onto your skin or clothers,wash it well with clean water. Do not use the remote if the battery has leaked. y If you eat the liquid from the battery,brush your teeth and see doctor.Do not use the remote if the battery has leaked.
2. No correlation between fan usage and oxygen depletion. 3.
RESET TEST be should USE OF EXTENSION CORDS RISK OF FIRE could cause serious injury or death DO NOT use an extension cord with this window air conditioner DO NOT use surge protectors or multi-outlet adapters with this window air conditioner Avoid shock hazard. This unit cannot be user-serviced. Do NOT open the tamper-resistant sealed portion. All warranties and performance will be voided. This unit is not intended to be used as an ON/OFF switch.
WARNING 1.Do not use means to accelerate the defrosting process or to clean, other than those recommended by the manufacturer 2.The appliance shall be stored in a room without continuously operating ignition sources (for example: open flames, an operating gas appliance or an operating electric heater) 3.Do not pierce or burn. Be aware that refrigerants may not contain an odor This unit contains flammable refrigerant and has special safety precautions not normally associated with older units.
14 EA 3 EA 2 EA 2 EA 2 EA Left Guide Panel (Not adhesive backed) 1 EA 2 EA 5 EA Right Guide Panel 1 EA Curtain 2 EA 1 EA ( Adhesive backed) FOAM-HEATPROOF EA Phillips head screwdriver Scissors or knife Adjustable Wrench 11
slightly tilted between 27 16 Preparation Of Chassis Remove 4 screws which fasten the cabinet at both sides and at the back.(Keep the screws for later use.
the base pan (Adhesive backed) and bottom of window frame. ) (Adhesive backed Upper guide Right Guide Panel Left Guide panel 8 Screws (Type A) Frame guide hole upper guide Center hole frame curtain sill support.
frame guides sill support sill support frame curtain frame curtain (removed from the cabinet) at See page 12.
12 13 Before installing the front grille, pull out the vent control lever located above the unit control knobs, as shown. 14 Cut the adhesive-backed Foam-Heatproofs to the Guide Panel size. Foam-Heatproof Remove the backing from the FoamHeatproofs and attach he Foam-Heatproofs to Guide Panel. Foam-Heatproof improves the cooling capability of the unit. 15 Connect the housing. 16 Attach the front grille to the cabinet by insertingthe tabs the grille into the slots on the front the cabinet.
8 7
8 WiFI Enables connection of the air conditioner to the home WiFi.
The horizontal direction is adjusted by moving the lever to the left or right. Adjusting horizontal air flow direction Touch the horizontal louvers to adjust the air airflow up or down. Adjusting vertical air flow direction NOTICE When the unit operates in extremely hot weather, it turns off automatically to protect compressor.
base pan drain base pan Slinger Fan 19
1. Remove the air filter from the front grille by pulling forward the air filter and then up slightly. 2. Wash the filter using lukewarm water below 40 3.Gently shake the excess water from the filter and replace.
call 1-800-243-0000. voltage and amperage. an outlet of the proper Water drip from the rear of the unit Normal Sound High pitched Chatter Sound of Rushing Air Today’s high efficiency compressors may have a high pitched chatter during the cooling cycle. At the front of the unit, you may hear the sound of rushing air being moved by the fan. Pinging or Swishing Droplets of water hitting condenser during normal operation may cause “pinging or swishing” sounds.
Air conditioner does not start The air conditioner is unplugged. The fuse is blown/circuit breaker is tripped. Power failure. The current interrupter device is tripped. Air conditioner Airflow is restricted. does not cool as it should The temp control may not be set correctly. The air filter is dirty. The room may have been hot. Cold air is escaping. Cooling coil have iced up. Air conditioner The cooling coils are iced over. freezing up Water drips outside Water drips indoors Hot, humid weather.
Precauciones de Seguridad.............26 Antes de poner el equipo en funcionamiento............................30 Introduccion .....................................31 Seguridad.........................................32 Instalacion........................................34 Instrucciones de Funcionamiento ...............................39 Mantenimiento y Servicio ................
No opere ni detenga la unidad insertando o estirando de enchufe. No dane ni use un enchufe de alimentaci on no especificado. No toque el producto con las manos mojadas o en un ambiente h umedo. Sostenga el enchufe por el cuerpo(no del cable) cuando lo saque. Para una limpieza interior, póngase en contacto con un Centro de Servicios Autorizado o un revendedor. No utilice detergentes abrasivos que causan corrosión o dañan la unidad.
Contiene elementos de contención y hacer que se enferme Si entra l lquido de las pilas en contacto con la piel o la ropa,lavela inmediatamente con agua.No utilice el control remoto si las pilas tienen fugas. Si el l quido de las pilas alcanzara su boca, cepille sus dientes y consulte a un medico。No utilice el mando a distancia si las pilas han experimentado fugas.
El funcionamiento del ventilador no afectará a la reducción de oxígeno.
Seguraida Seguraida Datos Electricos El cable de alimentación puede incluir un dispositivo interruptor de corriente. La carcasa del enchufe cuenta con un botón de prueba y otro de reinicio. El dispositivo debe comprobarse periódicamente presionando primero el botón TEST y después RESET. Si el botón TEST no se desconecta o si el botón RESET no permanece activo, suspenda el uso del aire acondicionado y póngase en contacto con un técnico de servicio cualificado.
Seguraida Seguraida IMPORTANTE (FAVORLEA CON ATENCIÓN) POR LA SEGURIDAD PERSONAL DEL USUARIO, ESTE APARATO DEBE SER DEBÍDAMENTE NEUTRALIZADO. El cordón de energía de éste aparato esta equipado con tres patas(cable a tierra). Utilice éste con un enchufe de pared de tres salidas(a tierr a) para minimizar el peligro de choque eléctrico. El cliente debe revisar el receptor de pared y el circuito por un electricista calificado para asegurarse que la recepción esta debidamente neutralizada.
TORNILLO (TIPO A) 14 EA PERNO 2 EA TORNILLO (TIPO B) 3 EA TORNILLO (TIPO C) DINTEL DE SOPORTE 2 EA 5 EA TUERCA MARCO DE LA CORTINA 2 EA 2 EA Grupo Guía de la izquierda BURLETE DE ESPUMA (No adhesivo respaldado) 1 EA Grupo Guía de derecho CANO DE DRENAJE 1 EA Cortina GUIA DEL MARCO 2 EA 1 EA BURLETE DE ESPUMA-PE AISLAMIENTO DE ESPUMA (Adhesivo respaldado) ( Adhesivo respaldado) 2EA Un destornillador de estrella Una regla o cinta metrica Tijeras o cuchilla Nivel Lapiz 34 ABRAZA
27 39 16 Preparcion del chasis Quite los tornillos que unen el gabinete a ambos lados y a la parte posterior. (Mantener los tornillos para su uso posterior.
(Adhesivo respaldado) BURLETE DE ESPUMA-PE (con adhesivo en la parte trasera) Grupo Guía de la izquierda 8 Guia superior Tornillos (Tipo A) Guia del marco 36 Grupo Guía de derecho
Tipo C Tipo C Tipo C Tipo C Tornillo Tornillo (No adhesivo respaldado) BURLETE DE ESPUMA (No adhesivo respaldado) 37
12 13 Antes de instalar la parrilla frontal tire hacia afuera de la control de ventilacion localizada encima de los botones de control de la unidad, como se muestra. 14 Corte el aislamiento de espuma con adhesivo en la parte trasera del tamaño del panel guía. Retire la protección del adhesivo del aislamiento de espuma y pegue el aislamiento en el panel guía. TSugerencia El aislamiento de espuma mejora la capacidad de enfriamiento de la unidad 15 Conectar la vivienda.
8 7
8 WiFI WiFi Connect le permite la conexión delacondicionador de aire al WiFi del hogar.
El control de ventilacion esta localizado encima de los paneles de control. Cuando esta ajustado en CLOSE(CERRADO),solamente el aire en el interior de la habitacion circulara y se acondicionara Cuando esta ajustado en open (ABIERTO),un poco del aire interno es expelido hacia afuera. FERMER AERER OUVRIR Direccion del aire El flujo de aire puede ser ajustado cambiando la direccion de las rejillas de ventilacion del acondicionador deaire.
Ventilador de extracción 42
1.Quite el filtro de aire de la rejilla frontal tirando de él hacia delante y hacia arriba ligeramente. 2. 3.
1-800-243-0000. Sonidos normales Traqueteo agudo Sonido de ráfagas de aire Los compresores modernos de alto rendimiento pueden presentar un traqueteo agudo durante el ciclo de enfriado. Delante de la unidad, puede oír el sonido de ráfagas de aire que son movidas por el ventilador. Goteo o chapoteo Las gotas de agua que caen sobre el condensador durante la normal operación del producto pueden producir sonidos de "goteo o chapoteo".( Borboteo/Siseo 42.
El aire acondiciona do no enciende El aire acondicionado esta desconectado. Asegurese que ei aire acondicionado esta conectado completamente a la fuente de energia. El fusible esta quemado/el interruptor de energia se habloqueado. Cheque los fusibles/interruptor de la casa y reemplace los fuslbles o reestablezca el interruptor de energia. Falta de energia. espere 3 minutos Cuando la energia se reestablezca , para encender de nuevo el aire acondicionado.
WARRANTY LG ROOM AIR CONDITIONER LIMITED WARRANTY - USA WHAT THIS WARRANTY COVERS: LG Electronics U.S.A., Inc. (“LG”) warrants your LG Room Air Conditioner ("product") against defect in materials or workmanship under normal household use, during the warranty period set forth below, LG will, at its option, repair or replace the product.
Garantía GARANTÍA LIMITADA DEL AIRE ACONDICIONADO LG - EE.UU. COBERTURA DE LA GARANTÍA: LG Electronics Inc. (“LG”) garantiza que reparará o sustituirá, gratuitamente, su producto si resulta defectuoso en materiales o mano de obra bajo condiciones normales de uso durante el periodo de garantía mencionado más abajo, efectivo a partir de la fecha de compra del producto original por parte del consumidor.
LG Customer Information Center 1-800-243-0000 LG ELECTRONICS,INC. 1000 Sylvan Ave.,Englewood Cliffs,NJ 07632 Register your product Online! www.lg.