ENGLISH ESPAÑOL OWNER’S MANUAL ELECTRIC CONVECTION BUILT-IN OVEN Please read this guide thoroughly before operating and keep it handy for reference at all times. LWD3063ST LWD3063BD www.lg.com MFL51224513_03 Copyright © 2016 - 2017 LG Electronics Inc. All Rights Reserved.
TABLE OF CONTENTS TABLE OF CONTENTS 3 IMPORTANT SAFETY INFORMATION 28 SMART FEATURES 30 MAINTENANCE 30 Self-Clean 8 PRODUCT OVERVIEW 8 Accessories 33 EasyClean® 9 Oven Overview 33 Cleaning Tips 10 Control Panel Overview 34 EasyClean® Instruction Guide 35 Changing the Oven Light 35 Cleaning the Exterior 37 Removing and Replacing the Lift-Off Oven 12 FEATURES 12 Clock 13 Timer On/Off 14 Special Oven Control Settings Door 37 Door Care Instructions 38 TROUBLESHOOTING
IMPORTANT SAFETY INFORMATION 3 Read and follow all instructions before using your oven to prevent the risk of fire, electric shock, personal injury, or damage when using the oven. This guide does not cover all possible conditions that may occur. Always contact your service agent or manufacturer about problems that you do not understand. Download this owner’s manual at http://www.lg.com. This is the safety alert symbol. This symbol alerts you to potential hazards that can kill or hurt you and others.
IMPORTANT SAFETY INFORMATION SAFETY PRECAUTIONS (CONT.) ••Keep Oven Vent Ducts Unobstructed. The oven vent could become hot during oven use. Never block this vent and never place plastic or heat-sensitive items on or near the vent. Metal bottom trim (Vent) NOTE: For proper operation vent trim must be installed. WARNING ••NEVER use your appliance for warming or heating the room. ••DO NOT use water on grease fires. Should an oven fire occur, leave the oven door closed and turn the oven off.
IMPORTANT SAFETY INFORMATION 5 •• Protective Liners. Do not use aluminum foil or any other material to line the oven bottom. Improper installation of these liners may result in a risk of electric shock or fire. ••Do Not allow aluminum foil or the meat probe to contact heating elements. WARNING No aluminum foil ••DO NOT place aluminum foil directly on the oven bottom. ••DO NOT line the oven walls, racks, bottom, or any other part of the oven with aluminum foil or any other material.
IMPORTANT SAFETY INFORMATION CHILD SAFETY WARNING ••Children should be kept away from the oven. ••Accessory parts will become hot when the broiler is in use. CAUTION ••Children should not be left alone or unattended in the area where the appliance is in use. Children should never be allowed to sit or stand on any part of the appliance. • • DO NOT leave small children unattended near the appliance. During the selfcleaning cycle, the outside of the oven can become very hot to the touch.
IMPORTANT SAFETY INFORMATION WARNING This product contains chemicals known to the State of California to cause cancer and birth defects or other reproductive harm. Wash hands after handling.
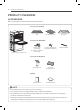
PRODUCT OVERVIEW PRODUCT OVERVIEW ACCESSORIES Make sure that all parts are included after purchasing this product.
PRODUCT OVERVIEW 9 ENGLISH OVEN OVERVIEW Make sure to understand the name and function of each part. * Throughout this manual, the features and appearance may vary depending on your model. Door switch (2 ea) - One on upper oven and one on lower oven. Control panel Door latch (2 ea) - One on upper oven and one on lower oven. Model & serial number plate Spacer (2 ea) - One on each side Broiler pan & Grid Standard racks (4 ea) Gasket (2 ea) - One on upper oven and one on lower oven.
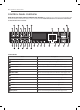
PRODUCT OVERVIEW CONTROL PANEL OVERVIEW READ THE INSTRUCTIONS CAREFULLY BEFORE USING THE OVEN. For satisfactory use of the oven, become familiar with the various features and functions of the oven as described below. Detailed instructions for each feature and function are listed in this owner's manual.
PRODUCT OVERVIEW Name Description 14 LOWER TIMER ON/OFF Use to set or cancel the timer of the lower oven. 15 LOWER LIGHT Use to turn the oven lights of the lower oven on and off. 16 LOWER CLEAR/OFF Use to stop cooking, cancel settings of the lower oven. 17 CONV. BAKE Use to select the Convection Bake function of the lower oven. 18 CONV. ROAST Use to select the Convection Roast function of the lower oven. 19 CRISP CONV. Use to select the Crisp Convection function of the lower oven.
FEATURES FEATURES CLOCK The clock must be set to the correct time of day for the automatic oven timing functions to work properly. The time of day cannot be changed during a timed baking or Self Clean cycle. Setting the Clock Power Outage If the colon in the time is flashing in the display, you have experienced a power failure. Resetting the Clock 1. Press CLOCK. 2. Press the numbers to enter the correct time of day. 3. Press START. 1. Press CLOCK once. Minimum & Maximum Default Settings 2.
FEATURES 13 The UPPER or LOWER TIMER ON/OFF serves as an extra timer in the kitchen that will beep when the set time has run out. It does not start or stop cooking. The UPPER or LOWER TIMER ON/OFF feature can be used during any of the other oven control functions. The UPPER and LOWER TIMER can be operated independently of each other. Setting the Timer (example to set 5 minutes): 4. When the set time has run out, End shows in the display.
FEATURES SPECIAL OVEN CONTROL SETTINGS Adjusting the Oven Temperature The oven has additional settings which can be accessed and adjusted using the Setting button. These additional settings can only be activated while the display is showing the time of day. They remain in the control’s memory until changed. The settings also remain in memory after a power failure.
FEATURES 15 1. Press SETTING four times or until U-AJ appears in the display. Adjusting the Beeper Volume The beeper volume can be adjusted to four possible volume levels, loud, normal, low, and mute. 1. Press SETTING seven times or until BEEP appears in the display. 2. Enter the desired temperature adjustment. Example: to adjust the oven temperature UP 15 degrees, enter 15. 3. Press START to accept the change. 4.
USING THE OVEN USING THE OVEN BAKE The oven can be programmed to bake at any temperature from 170°F (80°C) to 550°F (288°C). The default temperature is 350°F (177°C). Setting the Oven to Bake at 375°F 1. Press UPPER or LOWER BAKE. 2. Set the oven temperature. (Press 3, 7, and 5.) 3. Press START. The word PREHEATING and 100°F appear in the display. As the oven preheats the temperature is displayed in 5 degree increments. Once the oven reaches the desired temperature, a tone sounds.
USING THE OVEN 17 NOTE •• Preheating is necessary for good results when baking cakes, cookies, pastries and breads. After the oven has reached the desired temperature, the preheat melody sounds once. •• The heating elements turn off immediately when the door is opened. They will turn on again approximately 5 seconds after the door is closed. If the oven door is left open for more than 30 minutes, all settings are canceled. •• Press UPPER CLEAR/OFF or LOWER CLEAR/OFF to cancel BAKE at any time.
USING THE OVEN TIMED COOK (for either upper or lower oven) The oven turns on immediately and cooks for a selected length of time. At the end of the cooking time, the oven turns off automatically. Setting Immediate Cook and Automatic Shutoff (example to set bake at 300°F for 30 minutes.) 1. Set the clock for the correct time of day. Changing the Cook Time During Cooking (example to change the cook time from 30 minutes to 1 hour 30 minutes.) 1. Press COOK TIME. 2. Set the new baking time.
USING THE OVEN 19 The automatic timer of the Delayed Timed Cook function turns the oven ON and OFF at the time selected. Setting the Oven for Delayed Start (for example, to Bake at 300°F for 30 minutes starting at 4:30 p.m.) 1. Set the clock for the correct time of day. 2. Arrange interior oven rack(s) and place the food in the oven. 3. Press BAKE. 350°F appears in the display. 4. Set the oven temperature. (Press 3, 0 and 0.) 5. Press COOK TIME. 6. Set the desired baking time. (Press 3 and 0.
USING THE OVEN BROIL RECOMMENDED BROILING GUIDE Broiling uses an intense, radiant heat to cook food. Both the inner and outer broil elements heat during full broiling. Only the inner broil element heats during center broiling. The element(s) cycle on and off at intervals to maintain the oven temperature. The meat probe cannot be used with this mode. The size, weight, thickness, starting temperature, and your preference of doneness will affect broiling times.
USING THE OVEN 21 Shelf Position First Side Time (min.) Second Side Time (min.) 1 lb. (4 patties) 1/2 to 3/4” thick E 4-6 3-4 1” thick 1 to 1-1/2 lbs. D D D 6 7 8 2–3 2–3 3–4 Rare Medium Well Done 1-1/2” thick 2 to 2-1/2 lbs. D D D 10 12 14 4–6 6–8 8–10 Chicken 1 whole cut up 2 to 2-1/2 lbs., split lengthwise 2 Breasts C 20 6–8 C 20 6–10 Lobster Tails 2–4 10 to 12 oz. each C 12-14 Do not turn over.
USING THE OVEN ROAST CONVECTION BAKE Use the Roast feature to cook large cuts of meat. Benefits of Convection Bake Setting the Oven to Roast (for example, to cook meat at 375°F) 1. Press UPPER or LOWER ROAST. •• Some foods cook up to 25 to 30% faster, saving time and energy. •• Multiple rack baking. •• No special pans or bakeware needed. 2. Set the oven temperature. (Press 3, 7 and 5.) 3. Press START.
USING THE OVEN 23 1. Press CONV. BAKE. The display flashes 350 °F. 2. Set the oven temperature. (Press 3, 7 and 5.) 3. Press START. The display shows CONV BAKE and the converted temperature starting at 100°F. As the oven preheats, the display shows increasing temperatures in 5 degree increments. Once the oven reaches the desired adjusted temperature, a tone sounds.The display shows the auto converted oven temperature 350 °F, CONV BAKE and the fan icon. 4.
USING THE OVEN Setting the Oven to Crisp Convection Setting the Oven to Convection Roast 1. Press CRISP CONV. The display flashes 350 °F. 1. Arrange oven racks and place food in oven. 2. Set the oven temperature. (Press 3, 7 and 5.) 2. Press CONV. ROAST. The display flashes 350 °F. 3. Press START. The display shows CONV and the converted temperature starting at 100°F. As the oven preheats, the display shows increasing temperatures in 5 degree increments.
USING THE OVEN 25 The WARM function maintains an oven temperature of less than 200°F(93.3°C). This function should not be used to reheat cold food. The Warm function keeps cooked food warm for serving up to 3 hours after cooking has finished. After 3 hours the WARM function shuts the oven OFF automatically. The Warm feature can be used alone or after the Timed Cook or Delayed Timed Cook modes. Setting the Oven to Warm 1. Press WARM/PROOF once. 2.
USING THE OVEN PROOF The Proof feature maintains a warm environment for rising yeast leavened products before baking. To avoid lowering the oven temperature and lengthening proofing time, do not open the oven door unnecessarily. Check bread products early to avoid over-proofing. NOTE For best results, cover the dough with a cloth or with plastic wrap (the plastic may need to be anchored underneath the container so the oven fan does not blow it off ).
USING THE OVEN 27 The FAVORITE feature is used to record and recall favorite recipe settings. This feature can store and recall up to 3 different settings. The Favorite feature can be used with the Cook Time mode. It will not work with any other function including the Start Time (delayed cook) mode. 1. Place the food in the oven. 2. Press FAVORITE once for Bread, twice for Meat, and 3 times for Chicken. The default temperature appears and COOK flashes. Category How to Select Default Temp.
SMART FEATURES SMART FEATURES BEFORE USING TAG ON The Tag On function allows you to conveniently use the LG Smart ThinQ application to communicate with your appliance right from your own smart phone. To use the Tag On function: 1. Download the LG Smart ThinQ application to your smart phone. 2. Turn on the NFC (Near Field Communication) function in your smart phone.- The Tag On function can only be used with smart phones equipped with the NFC function and based on the Android operating system (OS).
SMART FEATURES 29 THE NFC ANTENNA POSITION Because of the characteristics of NFC, if the transmission distance is too far, or if there is a metal sticker or a thick case on the phone, transmission will not be good. Press [ ] in the LG Smart ThinQ app for a more detailed guide on how to use the Tag On function. When you use the Tag On function, position your smart phone so that the NFC antenna inside the back of your smart phone matches the position of the Tag On icon on the appliance.
MAINTENANCE MAINTENANCE SELF-CLEAN The self-clean cycle uses above normal cooking temperatures to clean the oven’s interior automatically. It is normal for smoking to occur during cleaning if the oven is heavily soiled. It is better to clean the oven regularly rather than to wait until there is a heavy buildup of soil in the oven. Before a Self-Clean Cycle Open a window or use a fan or ventilation hood to keep the kitchen ventilated during the first self-clean cycle.
MAINTENANCE 31 Starting a Self Clean Cycle NOTE Before running a self-clean cycle be sure to remove all racks and accessories. 1. Set the clock to the correct time of day, remove everything from both ovens, and close both oven doors. Setting a Delayed Self-Clean 1. Press UPPER or LOWER SELF CLEAN. Select the desired self clean time by pressing UPPER or LOWER SELF CLEAN. 2. Press START TIME. DELAY is flashing 3. Set the desired start time. 4. Press START. DELAY and CLEAN remain on. 5.
MAINTENANCE If it becomes necessary to stop or interrupt a selfcleaning cycle due to excessive smoke or fire in the oven: 1. Press UPPER or LOWER CLEAR/OFF. 2. After the oven has cooled down, the DOOR LOCK will automatically release allowing you to open the oven door. NOTE When using the self-clean feature: •• A self-clean cycle cannot be started if Control Lock feature is active. •• Once the SELF CLEAN is set, the oven door will lock automatically.
MAINTENANCE 33 LG’s new oven with EasyClean® enamel technology provides two cleaning options for the oven interior. The EasyClean® feature takes advantage of LG’s new enamel to help lift soils without harsh chemicals, and it runs using ONLY WATER for just 10 minutes in low temperatures to help loosen LIGHT soils before hand-cleaning. While EasyClean® is quick and effective for small and LIGHT soils, the Self Clean feature can be used to remove HEAVY built up soils.
MAINTENANCE EasyClean® INSTRUCTION GUIDE 1. Remove oven racks and accessories from the oven. 2. Scrape off and remove any burnt-on debris with a plastic scraper. Suggested plastic scrapers: •• Hard plastic spatula •• Plastic pan scraper •• Plastic paint scraper •• Old credit card 3. Fill a spray bottle with 1¼ cups (10 oz or 300 ml) of water and use the spray bottle to thoroughly spray the inside surfaces of the oven. 7. A tone will sound at the end of the 10-minute cycle.
MAINTENANCE 35 The oven light is a standard 10-watt halogen bulb for ovens. Replacing Lamp on Side Wall • Make sure oven and bulb are cool. 8. Plug in oven or reconnect power. Glass Light Cover Clip Flat Blade Screwdriver 1. Unplug oven or disconnect power. 2. Remove oven racks. 3. Slide a flat blade screwdriver between the housing and the glass light cover. Flat Blade screwdriver 4. Support the glass light cover with two fingers to prevent the cover from falling to the bottom of the oven. 5.
MAINTENANCE 3. Dry and buff with a clean, dry paper towel or soft cloth. 4. Repeat as necessary. NOTE If a mineral oil-based stainless steel appliance cleaner has been used before to clean the appliance, wash the surface with a mild soap and water prior to using the Stainless Steel Appliance Cleaner or polish. Oven Cavity DO NOT use oven cleaners. NEVER wipe a warm or hot porcelain surface with a damp sponge; it may cause chipping or crazing (tiny hairlike cracks).
MAINTENANCE 37 CAUTION •• Be careful when removing and lifting the door. •• DO NOT lift the door by the handle. −− The door is very heavy. Replacing the Door 1. Firmly grasp both sides of the door at the top. 2. With the door at the same angle as the removal position, seat the indentation of the hinge arm into the bottom edge of the hinge slot. The notch in the hinge arm must be fully seated into the bottom of the slot. Removing the Door 1. Open the door fully. Hinge arm 2.
TROUBLESHOOTING TROUBLESHOOTING FAQs My new oven doesn’t cook like my old one. Is there something wrong with the temperature settings? No, Your oven has been factory tested and calibrated. For the first few uses, follow your recipe times and temperatures carefully. If you still think your new oven is too hot or too cold, you can adjust the oven temperature yourself to meet your specific cooking needs. See Adjusting the Oven Temperature, for easy instructions on how to adjust your thermostat.
TROUBLESHOOTING 39 Soils on the side and rear walls of your oven may be more difficult to fully soak with water. Try repeating the EasyClean® process with more than the ¼ cup (2 oz or 50 ml) spray recommended. Will EasyClean® get all of the soils and stains out completely? It depends on the soil type. Sugar-based and certain grease stains are especially hard to clean. Also, if stains are not sufficiently soaked in water, this can negatively affect cleaning performance.
TROUBLESHOOTING BEFORE CALLING FOR SERVICE Before you call for service, review this list. It may save you time and expense. The list includes common occurrences that are not the result of defective workmanship or materials in this appliance. Problem Oven control beeps and displays any F code error. Oven will not work Possible Causes / Solutions •• Electronic control has detected a fault condition. Press UPPER CLEAR/OFF or LOWER CLEAR/OFF to clear the display and stop beeping. Reprogram oven.
TROUBLESHOOTING 41 Food does not broil properly Possible Causes / Solutions •• Oven controls improperly set. −− Make sure you press the BROIL pad. •• Improper rack position being used. −− See the Broiling Guide, page 20. •• Cookware not suited for broiling. −− Use the broiling pan and grid that came with your oven. •• Aluminum foil used on the broiling pan and grid has not been fitted properly and slit as recommended. −− See the Using the Oven section. •• In some areas the power (voltage) may be low.
SMART DIAGNOSIS™ SMART DIAGNOSIS™ Should you experience any problems with your oven, it has the capability of transmitting data to your smart phone using the LG Smart ThinQ Application or via your telephone to the LG call center. Smart Diagnosis™ cannot be activated unless your oven is turned on by pressing the Power button. If your oven is unable to turn on, then troubleshooting must be done without using Smart Diagnosis™.
WARRANTY 43 LG Electronics Inc. will repair or replace your product, at LG’s option, if it proves to be defective in material or workmanship under normal use, during the warranty period set forth below, effective from the date of original consumer purchase of the product. This limited warranty is good only to the original purchaser of the product and effective only when used in U.S.A.
NOTE NOTE
ESPAÑOL MANUAL DE PROPIETARIO HORNO ELÉCTRICO DE CONVECCIÓN EMPOTRADO Lea detenidamente estas instrucciones antes utilizar y guárdelas como referencia para el futuro. LWD3063ST LWD3063BD www.lg.com P/No.: MFL51224513 Copyright © 2016 - 2017 LG Electronics Inc. Todos los Derechos Reservados.
2 ÍNDICE ÍNDICE 3 8 INFORMACIÓN IMPORTANTE DE SEGURIDAD DESCRIPCIÓN GENERAL DE LOS PRODUCTOS 25 Warm (calentar) 26 Proof (leudar) 26 Para encender o apagar la luz del horno 26 Configuración de la función de bloqueo de controles 27 Favorito 28 SMART FEATURES (CARACTERÍSTICAS INTELIGENTES) 8 Accesorios 9 Descripción general de la cocina 10 Descripción general del panel de control 12 CARACTERÍSTICAS 12 Reloj 30 MANTENIMIENTO 13 Temporizador encendido/apagado 14 Características es
INFORMACIÓN IMPORTANTE DE SEGURIDAD 3 INFORMACIÓN IMPORTANTE DE SEGURIDAD Este es el símbolo de alerta de seguridad. Este símbolo lo alerta sobre peligros potenciales que pueden matarlo a lastimarlo a usted o a otros. Todos los mensajes de seguridad se encontrarán después de los símbolos de alerta de seguridad y de las palabras ADVERTENCIA O PRECAUCIÓN.
4 INFORMACIÓN IMPORTANTE DE SEGURIDAD PRECAUCIONES DE SEGURIDAD (CONT.) ••Mantenga despejados los conductos de ventilación del horno. La ventilación del horno puede calentarse durante el uso del horno. Nunca obstruya esta ventilación y nunca coloque elementos de plástico o sensibles al calor sobre o cerca de la ventilación. Reborde inferior de metal (ventilación) NOTA: Para una operación adecuada, debe instalarse un reborde de ventilación.
INFORMACIÓN IMPORTANTE DE SEGURIDAD 5 SEGURIDAD ELÉCTRICA ADVERTENCIA Papel de aluminio ••NO coloque papel de aluminio directamente sobre el fondo del horno. ••NO recubra las paredes, bandejas, fondo o cualquier otra pieza del horno con papel de aluminio o cualquier otro material. Hacerlo afectará la distribución de calor, producirá un horneado pobre y provocará un daño permanente al interior del horno (el papel de aluminio se derretirá hacia la superficie interna del horno).
6 INFORMACIÓN IMPORTANTE DE SEGURIDAD SEGURIDAD PARA NIÑOS ADVERTENCIA ••Los niños siempre deben estar alejados del horno. ••Los accesorios se calientan cuando la bandeja está en uso. PRECAUCIÓN ••No hay que dejar a los niños solos o desatendidos en el área donde se está utilizando el aparato. Nunca debe permitirse que los niños se sienten o se paren en cualquier parte de este electrodoméstico. • • NO deje niños pequeños desatendidos cerca del aparato.
INFORMACIÓN IMPORTANTE DE SEGURIDAD 7 ACTO DE REFORZAMIENTO DE LA INGESTA SEGURA DE AGUA LIBRE DE TOXICOS ESPAÑOL ADVERTENCIA Este producto contiene químicos conocidos por el estado de California por causar cáncer, malformaciones de nacimiento u otros daños reproductivos. Lávese bien las manos después de su manipulación.
8 DESCRIPCIÓN GENERAL DE LOS PRODUCTOS DESCRIPCIÓN GENERAL DE LOS PRODUCTOS ACCESORIOS Asegúrese de que todas las piezas estén incluidas antes de comprar el producto.
DESCRIPCIÓN GENERAL DE LOS PRODUCTOS 9 DESCRIPCIÓN GENERAL DE LA COCINA Asegúrese de entender los nombres y función de cada pieza. * A lo largo de este manual, las características y apariencia del producto pueden variar dependiendo de su modelo. Panel de control Placa de modelo y número de serie Espaciador (2 cada uno) - Uno en cada lado Traba de la puerta (2 cada uno) - U no en el horno superior y otro en el horno inferior.
10 DESCRIPCIÓN GENERAL DE LOS PRODUCTOS DESCRIPCIÓN GENERAL DEL PANEL DE CONTROL LEA LAS INSTRUCCIONES CON CUIDADO ANTES DE UTILIZAR EL HORNO. Para un uso satisfactorio de su horno, familiarícese con las diferentes características y funciones del horno descriptas a continuación. Las instrucciones detalladas de cada característica y función se encuentran listadas en este Manual del Propietario.
DESCRIPCIÓN GENERAL DE LOS PRODUCTOS 11 HORNO INFERIOR Descripción 14 LOWER TIMER ON/OFF (Temporizador encendido / apagado) Se utiliza para seleccionar o cancelar el temporizador del horno inferior. 15 LOWER LIGHT (Luz inferior) Se utiliza para encender y apagar las luces del horno inferior. 16 LOWER CLEAR/OFF (Borrar apagado inferior) Se utiliza para detener la cocción, cancelar los ajustes del horno inferior. 17 CONV.
12 CARACTERÍSTICAS CARACTERÍSTICAS RELOJ El reloj debe estar configurado en la hora correcta para que las funciones con temporizador del horno funcionen correctamente. La hora no puede modificarse durante los ciclos de horneado con temporizador o de auto-limpieza. Cómo configurar el reloj 1. Presione el botón CLOCK (reloj) una vez para configurar. 2. Presione el botón numérico para ingresar la hora. Presione los botones numéricos con la hora correcta.
CARACTERÍSTICAS 13 TEMPORIZADOR ENCENDIDO/ APAGADO Para configurar el temporizador (ejemplo para seleccionar 5 minutos): NOTA Si no se muestra el tiempo restante en la pantalla, recupérelo pulsando TIMER ON/OFF INFERIOR o SUPERIOR. •• Si pulsa TIMER ON/OFF SUPERIOR o INFERIOR dos veces, podrá introducir el tiempo en segundos. (Por ejemplo: Si presiona 50, significa 50 segundos) 1. Pulse TIMER ON/OFF SUPERIOR o INFERIOR una vez.
14 CARACTERÍSTICAS CARACTERÍSTICAS ESPECIALES DE LOS CONTROLES DEL HORNO Los nuevos controles con botones de toque cuentan con características adicionales. siguientes páginas describen esas características y la manera en que usted puede activarlas. Los modos de características especiales sólo pueden activarse mientras la pantalla muestra la hora. Se conservan en la memoria de los controles hasta que se repitan los pasos.
CARACTERÍSTICAS 15 (Sólo para el horno superior) 1. Pulse SETTING 4 veces para el horno superior y se mostrará "U-AJ" en la pantalla. 3. Pulse START para aceptar el cambio. 4. Para bajar la temperatura del horno, introduzca 15 y pulse SETTING para bajar la temperatura, (para valor -). 5. Pulse START para aceptar el cambio. Cómo seleccionar el idioma El control del horno se encuentra configurado para verse en inglés, pero usted puedo cambiarlo para visualizarlo en español o francés. 1.
16 USO DEL HORNO USO DEL HORNO HORNEAR El horno puede programarse para hornear a cualquier temperatura desde 170°F (80°C) hasta 550°F (288°C). La temperatura predeterminada es de 350°F (177°C). Para poner el horno en HORNEADO y la temperatura en 375°F 1. Pulse BAKE SUPERIOR o INFERIOR. 2. Configure la temperatura del horno. (Presione 3, 7 y 5) 3. Presione START. Aparecerá PREHEATING en la pantalla y se mostrará 100˚F.
USO DEL HORNO 17 HORNEADO DE PASTELES DE CAPAS NOTA •• Los elementos calentadores se apagan inmediatamente cuando se abre la puerta. Se volverán a encender aproximadamente 5 segundos después de que se cierre la puerta. Si se deja la puerta abierta por más de 30 minutos, se cancelarán todas las configuraciones. •• El horno tiene 5 posiciones de bandejas. Los resultados de horneado serán mejores si los moldes para hornear se centran en el horno.
18 USO DEL HORNO COCCIÓN TEMPORIZADA (Para los hornos inferior y superior) El horno se enciende inmediatamente y cocina los alimentos durante un período de tiempo seleccionado. Al finalizar el tiempo de cocción, el horno se apaga automáticamente. Para que el horno comience a cocinar inmediatamente y se apague automáticamente: (ejemplo para horneado a 300°F durante 30 minutos.) 1. Asegúrese de que el reloj esté configurado con la hora correcta. 2. Pulse UPPER o LOWER BAKE, aparecerá 350°F en la pantalla.
USO DEL HORNO 19 COCCIÓN TEMPORIZADA DIFERIDA (Para los hornos inferior y superior) Para configurar el horno para un inicio diferido. (ejemplo para ajustar el horneado a 300 °F durante 30 minutos y poner el horno en funcionamiento en el modo de horneado a las 4:30). 1. Asegúrese de que el reloj muestre la hora correcta. 2. Arregle las parrillas internas del horno y coloque los alimentos en el horno. 3. Presione BAKE (hornear). 350°F aparecerá en la pantalla. 4. Configure la temperatura del horno.
20 USO DEL HORNO ASAR GUÍA DE ASADO RECOMENDADO El asado utiliza un calor intenso y radiante para cocinar los alimentos. Los elementos de asado tanto internos como externos se calientan durante el asado completo. Sólo el elemento de asado interno se calienta durante el asado de centro. Los elementos se encienden y apagan a intervalos para mantener la temperatura del horno. La sonda de carne no puede utilizarse en este modo.
USO DEL HORNO 21 Cuadro de Asado a la Parrilla Alimento Filetes de carne de res Jugoso Medio Bien cocido 1 lb. (4 hamburguesas) Grosor de 1/2 a 3/4” Posición de la bandeja Segundo Primer lado lado Tiempo Tiempo (min.) (min.) E 4-6 3-4 Comentarios Espaciar uniformemente. Pueden asarse hasta 8 hamburguesas al mismo tiempo. Los filetes de menos de 1” de grosor se cocinan antes de dorarse. Se recomienda freír en sartén. Retire la grasa. Grosor de 1" 1 a 1-1/2 lbs.
22 USO DEL HORNO ROSTIZAR CONVECCIÓN PARA HORNEAR El horno puede programarse para rostizar. Beneficios del horneado por convección Para configurar la característica de rostizado (ejemplo carnes que se cocinan a 375°F) 1. Pulse ROAST SUPERIOR o INFERIOR. •• Algunos alimentos se cocinan hasta un 25-30% más rápido, lo que ahorra tiempo y energía. •• Horneado en bandejas múltiples. •• No se necesitan recipientes de horneado especiales. 2. Configure la temperatura del horno. (Presione 3, 7 y 5). 3.
USO DEL HORNO 23 Para configurar el horno para convección para hornear y temperatura a 375°F 1. Presione CONV. BAKE (convección para hornear). En la pantalla destellará 350 °F. 3. Presione START (iniciar). En la pantalla podrá verse CONV BAKE (Convección para hornear) y la temperatura convertida comenzando a 100°F. A medida que se precalienta el horno, la pantalla mostrará la temperatura en aumentos de 5 grados. Una vez que el horno alcance la temperatura deseada, sonará una alarma.
24 USO DEL HORNO Para configurar el horno para convección tostar y temperatura a 375°F 1. Presione CRISP CONV. (convección tostar). En la pantalla destellará 350 °F. 2. Configure la temperatura del horno (Presione 3, 7 y 5). 3. Presione START (iniciar). En la pantalla podrá verse CONV. y la temperatura convertida comenzando a 100°F. A medida que se precalienta el horno, la pantalla mostrará la temperatura en aumentos de 5 grados. Una vez que el horno alcance la temperatura deseada, sonará una alarma.
USO DEL HORNO 25 WARM (calentar) Para ajustar la función de calor: 1. Pulse WARM/ PROOF una vez. 2. Presione el botón #1 para ALTA, el #2 para Mediana, el #3 para BAJA. 3. Pulse START. 1. Seleccione la función que desea utilizar: PROGRAMADA (HORNEAR, HORNEADO POR CONVECCIÓN, ROSTIZADO POR CONVECCIÓN, CONVECCIÓN TOSTAR, ROSTIZADO), DIFERIDA (HORNEADO, HORNEADO POR CONVECCIÓN, ROSTIZADO POR CONVECCIÓN, CONVECCIÓN TOSTAR, ROSTIZADO) consulte la página anterior correspondiente. 2. Pulse START. 3.
26 USO DEL HORNO PROOF (leudar) La característica de leudado mantiene un medio tibio que resulta útil para leudar productos con levadura antes de hornear. Para evitar bajar la temperatura del horno y prolongar el tiempo de leudado, no abra la puerta del horno innecesariamente. Verifique que los productos panificados no leuden de más.
USO DEL HORNO 27 FAVORITO NOTA •• Sólo se almacenará la temperatura seleccionada, no el tiempo de cocción. 1. Coloque los alimentos en el horno. 2. Presione FAVORITE (favorito) una vez para pan, dos veces para carne y tres veces para pollo. La temperatura predeterminada aparecerá y destellará COOK (cocción). Categoría 4. Presione START (iniciar). Los tonos indicadores de precalentamiento sonarán 3 veces cuando el horno alcance la temperatura programada. Temp.
28 SMART FEATURES (CARACTERÍSTICAS INTELIGENTES) SMART FEATURES (CARACTERÍSTICAS INTELIGENTES) ANTES DE USAR TAG ON La función Tag On le permite utilizar convenientemente la aplicación LG Smart ThinQ para comunicarse con su aparato directamente desde su propio teléfono inteligente. Para utilizar la función Tag On: 1. Baje la aplicación LG Smart ThinQ en su telefóno inteligente. 2. Active la función NFC, Comunicación de Campo Cercano por sus siglas en Inglés en su dispositivo inteligente.
SMART FEATURES (CARACTERÍSTICAS INTELIGENTES) 29 POSICIÓN DE LA ANTENA NFC Por las características del NFC, si la distancia de transmisión es muy larga, si existe una calcomanía metálica o una carcasa gruesas para el teléfono, la transmisión no será buena. Presione [ ] en la aplicación LG Smart ThinQ para información detallada de cómo usar la función Tag On.
30 MANTENIMIENTO MANTENIMIENTO AUTO-LIMPIEZA El ciclo de auto-limpieza utiliza temperaturas de cocción superiores a lo normal para limpiar automáticamente la parte interior del horno. Antes de un ciclo de auto-limpieza Recomendamos ventilar su cocina con una ventana abierta o utilizando un ventilador o campana durante el primer ciclo de auto-limpieza. Quite las bandejas del horno, la asadera, la rejilla, todos los recipientes de cocción y el papel de aluminio o cualquier otro material del horno.
MANTENIMIENTO 31 Para iniciar un ciclo de AUTO-LIMPIEZA SUPERIOR o INFERIOR inmediato y pararlo automáticamente. NOTA Antes de realizar un ciclo de auto-limpieza, asegúrese de que retirar todas las bandejas y accesorios. 1. Asegúrese de que el reloj esté en hora, los hornos vacíos y las puertas cerradas. Para ajustar un período de inicio retardado 1. Pulse UPPER o LOWER SELF CLEAN. Seleccione el tiempo de auto-limpieza deseado con UPPER o LOWER SELF CLEAN. 2. Pulse START TIME. DELAY está parpadeando. 3.
32 MANTENIMIENTO Si es necesario detener o interrumpir un ciclo de autolimpieza debido a la existencia de humo o fuego excesivo en el horno: 1. Pulse UPPER o LOWER CLEAR/OFF. 2. Una vez que el horno se ha enfriado, el BLOQUEO DE LA PUERTA se liberará automáticamente permitiéndole abrir la puerta del horno. NOTA Cuando utilice la característica de auto-limpieza: •• No puede iniciarse un ciclo de auto-limpieza si la característica de bloqueo de control se encuentra activada.
MANTENIMIENTO 33 EasyClean® Mientras que EasyClean® es rápido y efectivo para pequeñas y LIJERAS suciedades, la función de auto-limpieza (Self Clean) puede ser usada para remover suciedades PESADAS acumuladas. La intensidad y alto calor del ciclo de autolimpieza (Self Clean) puede tener como resultado humo que hará que se requiera abrir ventanas para proveer ventilación.
34 MANTENIMIENTO GUÍA DE INSTRUCCIÓN EasyClean® 1. Retire bandejas y accesorios del horno. 2. Talle y remueva cualquier resto quemado con la espátula de plástico. Espátulas de Plástico Sugeridas: •• Paleta de plástico duro •• Espátula de plástico de cocina •• Espátula de plástico para pintura •• Tarjeta de crédito antigua 3. Llene el rociador con 1¼ de taza (10 oz o 300 ml) de agua y úselo para rociar completamente las superficies internas del horno. 7.
MANTENIMIENTO 35 REEMPLAZO DE LA LUZ DEL HORNO 8. Enchufe el horno o vuelva a conectar la energía. Tapa de vidrio de la luz Gancho Destornillador plano 1. Desenchufe el horno o desconecte la energía. ESPAÑOL La luz del horno es una bombilla halógena estándar de 10 vatios para hornos. Para reemplazar las lámparas ubicadas en la pared lateral: •• Asegúrese de que el horno y la bombilla no estén calientes. Flat Blade screwdriver 2. Quite las bandejas del horno. 3.
36 MANTENIMIENTO 3. Seque y pula con una toalla de papel limpia y seca o con un paño suave. 4. Repita según sea necesario. NOTA Si un limpiador de artefactos de acero inoxidable mineral a base de aceite se ha utilizado antes de limpiar el aparato, limpie la superficie con líquido lavaplatos y agua antes de utilizar el limpiador o lustrador de artefactos de acero inoxidable. Asadera y rejilla de la asadera No limpie la asadera o la rejilla en el modo autolimpiante.
MANTENIMIENTO 37 CÓMO QUITAR Y REEMPLAZAR LA PUERTA DEL HORNO DESMONTABLE PRECAUCIÓN •• Tenga cuidado al quitar y levantar la puerta. •• NO levante la puerta de la manija. −− La puerta es muy pesada. Brazo de la bisagra Para quitar la puerta: Extremo inferior de la ranura Muesca 1. Abra la puerta por completo. 2. Tire de las trabas de la bisagra hacia abajo en dirección del marco de la puerta hasta destrabarlas. Bloqueo Ranura Desbloqueo 3. Abra la puerta por completo.
38 DETECCIÓN DE PROBLEMAS DETECCIÓN DE PROBLEMAS PREGUNTAS FRECUENTES Mi nuevo horno no cocina como el viejo. ¿Hay algún problema con la configuración de la temperatura? ¿Puedo dejar mis estantes en el horno cuando se está ejecutando un ciclo de Auto-Limpieza? No, Su horno está previamente probado y calibrado de fabrica. Para los primeros usos, siga los tiempos y temperaturas de sus recetas cuidadosamente.
DETECCIÓN DE PROBLEMAS 39 ¿Es seguro que mi ventilador de convección, asador o elemento de calentamiento se moje durante EasyClean®? La función EasyClean® trabaja de la mejor manera cuando la suciedades están completamente saturadas o sumergidas en agua antes de comenzar el ciclo de limpieza y durante la limpieza a mano. Si las suciedades no están completamente saturadas en agua, el desempeño de limpieza puede verse afectado negativamente. Repita el proceso EasyClean® usando suficiente agua.
40 DETECCIÓN DE PROBLEMAS ANTES DE LLAMAR AL SERVICIO TÉCNICO Antes de llamar al servicio técnico, examine esta lista. Puede ahorrarle tiempo y dinero. La lista incluye situaciones comunes que no son el resultado de mano de obra o materiales defectuosos del aparato. Problema El control del horno emite un pitido y muestra un error de código F. El aparato no funciona. Causas / Soluciones posibles •• El control eléctrico ha detectado una condición de falla.
DETECCIÓN DE PROBLEMAS 41 Problema Los alimentos no se hornean o rostizan correctamente Causas / Soluciones posibles •• Los controles del horno están mal configurados. −− Ver la sección Cómo usar el horno. •• Se están utilizando recipientes de cocción incorrectos o de tamaño inapropiado. −− Ver la sección Cómo usar el horno. •• El sensor del horno debe ajustarse. −− Ver Cómo ajustar la temperatura de su horno en la sección de opciones.
42 DETECCIÓN DE PROBLEMAS Problema Causas / Soluciones posibles El ícono DOOR LOCKED (puerta bloqueada) se enciende cuando desea cocinar •• La puerta del horno está bloqueada porque la temperatura interior del horno se encuentra por debajo de la temperatura de bloqueo tras la autolimpieza del horno. Un olor a quemado o a aceite sale de la ventilación •• Esto es normal en un horno nuevo y desaparece con el tiempo.
SMART DIAGNOSIS™(DIAGNÓSTICO INTELIGENTE) 43 ESPAÑOL SMART DIAGNOSIS™ (DIAGNÓSTICO INTELIGENTE) Si su horno llegará a fallar, ésta tiene al capacidad de transmitir información a su teléfono usando la Aplicación de LG Smart ThinQ. Puede hacer también una llamada al centro de servicio telefónico LG. El diagnostico inteligente no puede ser activado si la horno no está encendida. Encienda presionando el botón START.
44 GARANTÍA GARANTÍA (EE.UU.) LG Electronics Inc. reparará o reemplazará su producto, a criterio de LG, si llegara a tener defectos en los materiales o mano de obra bajo un uso normal, durante el período de garantía establecido a continuación, vigente desde la fecha original de compra del producto por parte del consumidor. Esta garantía limitada solamente cubre al comprador original del producto y tiene vigencia sólo cuando se utiliza en los EE.UU.
NOTA 45 NOTA ESPAÑOL
46 NOTA
NOTA 47 ESPAÑOL
LG Customer Information Center 1-800-243-0000 USA, Consumer User 1-888-542-2623 CANADA Register your product Online! www.lg.