ENGLISH OWNER’S MANUAL DIGITAL SIGNAGE CONTENTS PLAYER (Hardware) Please read this manual carefully before operating the product and retain it for future reference. DIGITAL SIGNAGE CONTENTS PLAYER MP700 www.lgsupersign.com www.lg.
CONTENTS Specifications..............................................................................3 General Specifications................................................................................................... 3 Multi I/O Port.................................................................................................................. 3 Operational Specifications............................................................................................. 3 Included in the Box............
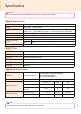
Specifications Attention ●P roduct specifications may change without prior notice to improve performance. General Specifications Dimensions Weight CPU GPU Chip Set Main Memory Secondary Storage Device O/S 260mm(W) x 40.1mm(H) x 275.9mm(D)(only Set) SSD 2.3Kg / 1TB HDD 2.4Kg Intel® Core™ i7-3610QE (Qaud Core, 2.3 GHz Clock Speed, 6M Cache) Intel® Core™ i5-3610ME (Dual Core, 2.
Included in the Box Basic Components The MP700 comes with the following components. Please check that these components have been included prior to installation. MP700 User Manual / Cards Power Cable M 3.0 mm x Pitch 0.5 mm x Length 6.0 mm X 4ea Attention ● These illustrations may differ from your product and are subject to change. ● In some countries, a Y-type cable may be provided instead of the power cord. ● Always use genuine components to ensure safety and product life.
Connections Front Panel I Back Panel A B Number F D B C E E Connection G H H J K Description A Power Cable In For the power cable. B USB 2.0 Connector For USB-type devices, including memory, hard disk, CD-ROM, keyboard, and mouse. C LAN Connector For a LAN cable. D RS-232C Out For the RS-232C cable. E DisplayPort with HBR2 (Out) Connects the cable to a monitor that supports DP (Display Port) (resolution: up-to 3840x2160) F Power Button Turns MP700 ON/OFF.
Monitor Integration **WS50 Model We recommend you to use the items provided with your MP700 and follow our instructions for integrating the product with your monitor in order to ensure the correct results. Attention The illustrations shown are to guide your integration and may differ from your product. 1 Place a soft cloth on the table and put the product on the table with the screen facing downward. Push the MP700 into the compartment to mount it.
**WX50MF Model For proper use, it is recommended to use the basic components provided with the MP700 to attach it to a monitor. Attention The illustrations shown are to guide your integration and may differ from your product. 1 Place a soft cloth on the table and put the product on the table with the screen facing downward. Remove the opening cover by unfastening two screws as shown in the picture. 3 Secure the MP700 to the product using the two screws provided.
4WS70MS Model For proper use, it is recommended to use the basic components provided with the MP700 to attach it to a monitor. Attention The illustrations shown are to guide your integration and may differ from your product. 1 Place a soft cloth on the table and put the product on the table with the screen facing downward.Remove the handle at the bottom of the section where the Contents Player is mounted from the set. 2 Push the Contetns Player into the compartment at the back of the set to mount it.
In/Out Cable Connection To view images on the monitor that is not connected to the monitor docking port of MP700, you need to connect the MP700 to the monitor via an RGB or DP Cable. Attention ● RGB, DP(Display Port), LINE-OUT(Audio Port), and LAN cables are not included. You need to purchase these separately, if needed. ● After cabling is complete, assign the SET ID of the monitor to be connected to MP700. ● To configure the SET ID, please refer to the owner’s manual for your monitor.
Connecting a Monitor with an RGB Cable RGB connections does not allow analog video and audio signals to be transferred with one cable. RGB cable connections require an additional audio in cable. Attention ● The monitor to connect with MP700 should have the RGB-In Connector in for the RGB connection. ● In case of the connection to RGB, 'Line-out' of MP700 should be connected with any speakers for audio system. 10 1 Connect the appropriate power cables to a monitor and MP700 respectively.
3 Connect the MP700 to the monitor with a LINE-OUT(Audio Out) cable. AUDIO IN AUDI IN AUDIO IN 4 Connect MP700 (OUT) to the monitor (IN) with an RS-232C cable. 5 Connect a LAN cable to MP700.
Connecting a Monitor with DP(Display Port) Cable Attention To enable DP connection, the monitor that will be connected to MP700 must support the DP input port. 12 1 Connect the appropriate power cables to a monitor and MP700 respectively. 2 Connect MP700 to the monitor via a DP cable.
3 Connect MP700 to the monitor (IN) with an RS-232C cable.
Attention ● If you connect multiple cables simultaneously and turn the product on, video output is prioritized accordingly. ● For DP output, the screen is displayed only when the power is turned on after connecting the cables or when the cables are connected after the OS is booted.
Connecting/Disconnecting DP(Display Port) Audio Device in Windows Embedded Standard 7P 1 Select Start > Control Panel > Hardware and Sound > Sound. 2 Click the Play tap first. Right-click on the DP device or speakers you want and select Set as Default Device then click OK to connect the audio device or select Disable to disconnect it. ※ In order to change the audio devices, you may restart the computer.
Connection to Multiple Monitors Multiple monitors can be connected to a single MP700. (The maximum number of monitors connected varies depending on the monitor type.) You can set the tile mode by connecting multiple monitors. 1 Connect the RS-232C Out port of the MP700 to the RS-232C In port of the first monitor (SET ID 1). 2 Connect rest of the monitors using a RS-232C cable. (Be careful about input and output ports.
Frequently Asked Questions (FAQs) Question Answer Where can I download the driver file? You can obtain the file from the SuperSign Support website (http://www.lgsupersign.com). Where can I get a vaccine program? This media player comes packaged with the Windows program only. Please purchase a vaccine program separately for use. The screen resolution is not adequate. Check whether the screen resolution of Windows is set properly.
Attention ●S hut down the system properly using the Windows Start menu. Otherwise, this may cause errors such as data loss, which will lead damage to the product. ●K eep the air inlet/outlet at the top of the product from getting clogged by dust or foreign matter and prevent debris from attaching to the fan. Otherwise, this may cause malfunction. ●A void using the product in a closed environment which could prevent the flow of the air.
Attention ● Certain USB devices may not be recognized when they are connected to the MP700. ● For display output connection of the MP700, from the third monitor on, connect monitors via DP. ● When disconnecting port cables, disconnect the RGB or RS232 port cables before disconnecting the LAN or DP port cables. ● When using Eyefinity, we recommend that the same monitors are used. ● Because this version of OS does not include hotfixes and service packs, we recommend that you install these separately.
Unified Codecs You need to install codecs required to play videos. Video files may require different codecs for playing. Websites to download unified codecs are listed below: ·http://www.codecguide.com · ·http://shark007.net · ·http://www.free-codecs.com · Note ● The websites above are not related to LG Electronics, and are subject to change. ● Visit their websites for details about the codec license.
● Right-click the Local Area Connection icon to open a pop-up menu and go to the "Properties" menu. ● In the Properties pop-up, select "Internet Protocol Version 4 (TCP/IPv4)" and double-click it. ● Check that the IP is set to "Fixed IP" in the IP settings window. ● If IP is set to "Fixed IP", change it to the DHCP setting (Automatic) and re-check the network connection.
Make sure to read the Important Precautions before using the product. Keep the User’s Guide(CD) in an accessible place for furture reference. The model and serial number of the SET is located on the back and one side of the SET. Record it below should you ever need service. MODEL SERIAL WARNING - This is a class A product. In a domestic environment this product may cause radio interference in which case the user may be required to take adequate measures.