PLASMA MONITOR OWNER’S MANUAL MODELS : MU-50PZ44/44M/44V MU-50PZ44A/44MA/44VA MU-50PZ44B/44MB/44VB MU-50PZ44K/44MK/44VK MU-50PZ44R/44MR/44VR MU-50PZ44S/44MS/44VS MU-50PZ90/90M/90V MU-50PZ90A/90MA/90VA MU-50PZ90B/90MB/90VB MU-50PZ90K/90MK/90VK MU-50PZ90R/90MR/90VR MU-50PZ90S/90MS/90VS Please read this owner’s manual thoroughly before operating the Monitor. Retain it for future reference. Record model number and serial number of the Monitor.
Warning Warning WARNING RISK OF ELECTRIC SHOCK DO NOT OPEN WARNING: TO REDUCE THE RISK OF ELECTRIC SHOCK DO NOT REMOVE COVER (OR BACK). NO USER SERVICEABLE PARTS INSIDE. REFER TO QUALIFIED SERVICE PERSONNEL. The lightning flash with arrowhead symbol, within an equilateral triangle, is intended to alert the user to the presence of uninsulated “dangerous voltage” within the product’s enclosure that may be of sufficient magnitude to constitute a risk of electric shock to persons.
Safety Instructions Safety Instructions Important safeguards for you and your new product Your product has been manufactured and tested with your safety in mind. However, improper use can result in potential electrical shock or fire hazards. To avoid defeating the safeguards that have been built into your new product, please read and observe the following safety points when installing and using your new product, and save them for future reference.
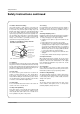
Safety Instructions Safety Instructions continued 14. Outdoor Antenna Grounding If an outside antenna or cable system is connected to the product, be sure the antenna or cable system is grounded so as to provide some protection against voltage surges and built-up static charges. Article 810 of the National Electrical Code (U.S.A.
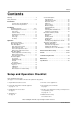
Contents Contents Warnings . . . . . . . . . . . . . . . . . . . . . . . . . . . . . . . . . . . . .2 Safety Instructions . . . . . . . . . . . . . . . . . . . . . . . . . . . . .3~4 Screen Menu Options Auto Adjustment . . . . . . . . . . . . . . . . . . . . . . . .20 Setting Picture Format . . . . . . . . . . . . . . . . . . .20 Picture Size Zoom . . . . . . . . . . . . . . . . . . . . . .20 Split Zoom . . . . . . . . . . . . . . . . . . . . . . . . . . . .21 Screen Position . . . . . . . . . . . . . . .
Introduction Introduction What is a Plasma Display Panel (PDP)? If voltage is applied to gas within glass panels, ultraviolet rays are produced and fused with a fluorescent substance. At that instant, light is emitted. A Plasma Display is a next generation flat Display using this phenomenon. 160° - Wide angle range of vision Your flat panel plasma screen offers an exceptionally broad viewing angle -- over 160 degrees. This means that the display is clear and visible to viewers anywhere in the room.
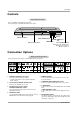
Introduction Controls Front Panel Controls - This is a simplified representation of front panel. Here shown may be somewhat different from your monitor. ON/OFF INPUT SELECT MENU VOL. E, D Main Power Button INPUT SELECT Button Buttons VOLUME (F,G) Buttons MENU Button Remote Control Sensor Power Standby Indicator Illuminates red in standby mode, Illuminates green when the Monitor is turned on.
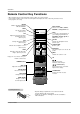
Introduction Remote Control Key Functions - When using the remote control, aim it at the remote control sensor on the monitor. - Under certain conditions such as if the remote IR signal is interrupted, the remote control may not function. Press the key again as necessary. POWER Switches the Monitor between ON and STANDBY. SLEEP Sets the Sleep Timer. (Refer to p.18) APC Adjusts the factory preset picture according to the room. (Refer to p.16) ARC Changes the picture format. (Refer to p.
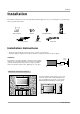
Installation Installation Ensure that the following accessories are included with your plasma display. If an accessory is missing, please contact the dealer where you purchased the product. POWER SLEEP INPUT SELECT APC DASP ARC PIP ARC PIP TWIN PICTURE SUB INPUT SWAP MENU MUTE VOL OK 1 2 4 5 7 8 VOL 3 6 9 0 1.5V 1.5V Owner’s Manual D-sub 15 pin Cable POWER STOP P/STILL REW PLAY FF REC WIN.SIZE WIN.
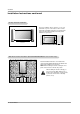
Installation Installation Instructions continued Desktop Pedestal Installation For proper ventilation, allow a clearance of 4” on each side and the top, 2.36” on the bottom, and 2” from the wall. Detailed installation instructions are included in the optional Desktop Stand Installation and Setup Guide available from your dealer. 4 inches 4 inches 2 inches 4 inches 2.
Installation External Equipment Connections NOTE: Not all cables shown are included with the plasma display. VCR Setup - To avoid picture noise (interference), leave an adequate distance between the VCR and Monitor - Use the ISM Method feature to avoid having a fixed image remain on the screen for a long period of time. Typically a frozen still picture from a VCR. If the 4:3 picture format is used; the fixed image may remain visible on the screen. How to connect 1.
Installation External A/V Source Setup How to connect 1. Connect the provided BNC-RCA adapter to the monitor’s VIDEO INPUT. 2. Connect the audio and video cables from the external equipment's output jacks to the monitor input jacks, as shown in the figure. When connecting the monitor to external equipment, match the jack colors (Video = yellow, Audio Left = white, and Audio Right = red).
Installation PC Setup - This monitor provides Plug and Play capability, meaning that the PC adjusts automatically to its settings. The monitor sends configuration information (EDID) to the PC using the Video Electronics Standard Association (VESA) Display Data Channel (DDC) protocol. - The monitor perceives 640x480, 60Hz as DTV 480p based on the PC graphic card. In this case, change the screen scanning rate for the graphic card. How to connect 1.
Installation Monitor Display Specifications (RGB-PC / DVI-PC Mode) Resolution 640x350 720x400 640x480 800x600 832x624 848x480 14 Plasma Monitor Vertical Horizontal Frequency(KHz) Frequency(Hz) 31.468 70.09 Resolution Horizontal Vertical Frequency(KHz) Frequency(Hz) 31.500 60.00 37.861 85.08 35.000 70.00 31.469 70.08 37.500 75.00 37.927 85.03 48.363 60.00 31.469 59.94 56.476 70.06 35.000 66.66 60.023 75.02 37.861 72.80 54.348 60.05 37.500 75.00 63.995 70.01 43.269 85.
Operation Operation Turning on the Monitor Turning on the Monitor just after installation 1. Connect power cord correctly. 2. Press the ON/OFF button on the Monitor. At this moment, the Monitor is switched to standby mode. Press the INPUT SELECT button on the Monitor or press the POWER, INPUT SELECT button on the remote control and then the Monitor will switch on. Turning on the Monitor (power cord is still connected) 1.
Operation V ideo Menu Options - Video menu adjustment are unique to each input source. Readjust Video menu settings for each following input source as preferred. • RGB (PC) / DVI (PC), • RGB (DTV) / DVI (DTV) / Component (480p, 720p, 1080i) • Video / S-Video / Component (480i) APC (Auto Picture Control) - APC adjusts the Monitor for the best picture appearance. - When adjusting Video menu options (contrast, brightness, color, sharpness, and tint) manually, APC automatically changes to User. 1.
Operation Audio Menu Options DASP (Digital Auto Sound Processing) - DASP lets you enjoy the best sound without any special adjustment because the Monitor has the appropriate sound options based on the program content. - When adjusting sound options (treble, bass, and balance) manually, DASP automatically changes to User. 1. Press the DASP button repeatedly to select the appropriate sound setup as shown below. Flat Music Cinema Sports User • You can also adjust DASP in the AUDIO menu.
Operation T ime Menu Options Clock Setup - If current time setting is wrong, reset the clock. 1. Press the MENU button and then use D /E button to select the TIME menu. 2. Press the G button and then use D /E button to select Clock. 3. Press the G button and then use D /E button to set the hour. 4. Press the G button and then use D /E VIDEO AUDIO TIME G Clock -- : -- Off timer On timer Auto off SPECIAL button to set the minutes. SCREEN 5. Press the OK button to save.
Operation Special Menu Options Key Lock - The monitor can be set up so that it can only be used with the remote control. - This feature can be used to prevent unauthorized viewing by disabling the front panel controls. - This Monitor is programmed to remember which option it was last set to even if you turn the monitor off. 1. Press the MENU button and then use 2. Press the G button and then use 3. Press the G button and then use D /E button to select the SPECIAL menu.
Operation Screen Menu Options Auto Adjustment - RGB (PC) mode only; This function doesn’t work for RGB-DTV. Automatically adjusts picture position and minimizes image shaking. After adjustment, if the image is still not correct, your Monitor is functioning properly but needs further adjustment. The Auto config. and Manual config. are not active in DVI mode. 1. Press the MENU button and then use 2. Press the G button and then use D /E D /E button to select the SCREEN menu.
Operation Split Zoom - Enlarges the picture in correct proportions. Split Zoom can be used for all input sources. In 2-Split Zoom mode, you can only move the image up or down. If a screen is enlarged, a screen can move without selecting section of screen Split Zoom. It’s not available to use this function if OSD Rotate is set to the Rotate option. 1. Press the SPLIT ZOOM button repeatedly to select either 2, 4 , or 9 Split Zoom.
Operation Screen Menu Options continued Screen Adjustments (Video, (Video, S-Video S-Video and Component 480i mode only) - Use this function to correct jittering or picture instability while viewing a video tape. 1. Press the MENU button and then use D /E 2. Press the G button and then use D /E button to select Screen adj.. 3. Press the G button and then use D /E button to to select TV or VCR. button to select the SCREEN menu. • Select the VCR option if watching a VCR.
Operation PIP (Picture-In-Picture) Feature - PIP lets you view 2 different inputs (sources) on your monitor screen at the same time. One source will be large, and the other source will show a smaller inset image. PIP Size Watching PIP Press the PIP button repeatedly to turn PIP on or off. Press the WIN.SIZE button and then use change the sub picture size. F / G button to Component Video 10 : 30 Win.size F PIP Aspect Ratio G Swapping the PIP Press the PIP ARC button.
Operation Twin Picture Setup Option - As the name suggests, this mode splits the screen into 2, allowing 2 picture sources to be shown on the monitor screen at the same time. Each source is given half the screen. Watching Twin Picture Press the TWIN PICTURE button repeatedly to select one of the Twin Picture options. DW 1 DW 2 Sub Picture Size Adjustment Press the WIN.SIZE button and then use F /G button to change the sub picture size. • Using the WIN.
External Control Device Setup External Control Device Setup - Connect the RS-232C input jack to an external control device (such as a computer or an A/V control system) and control the Monitor’s functions externally. - Connect the serial port of the control device to the RS-232C jack on the Monitor back panel. - RS-232C connection cables are not supplied with the Monitor.
External Control Device Setup Set ID - Use this function to specify a monitor ID number. - Refer to ‘Real Data Mapping 1’. See page 27. 1. Press the MENU button and then use the 2. Press the G button and then use D /E 3. Press the G button and then use monitor ID number. F /G D /E button to select the SPECIAL menu. button to select Set ID.. VIDEO AUDIO button to adjust Set ID. to choose the desired TIME SPECIAL Language Key lock ISM Method Low power Set ID.
External Control Device Setup 01. Power (Command2:a) 04. Screen Mute (Command2:d) G To control Power On/Off of the Monitor. G To select screen mute on/off. Transmission Transmission [k][a][ ][Set ID][ ][Data][Cr] Data 0 : Power Off [k][d][ ][Set ID][ ][Data][Cr] 1 : Power On Acknowledgement Data 0 : Screen mute off (Picture on) 1 : Screen mute on (Picture off) [a][ ][Set ID][ ][OK][Data][x] Acknowledgement [d][ ][Set ID][ ][OK][Data][x] G To show Power On/Off. 05.
External Control Device Setup 08. Brightness (Command2:h) 13. Remote Control Lock Mode (Command2:m) G To adjust screen brightness. You can also adjust brightness in the Video menu. G To lock the remote control and front panel controls on the monitor Transmission Transmission [k][h][ ][Set ID][ ][Data][Cr] [k][m][ ][Set ID][ ][Data][Cr] Data Min : 0 ~ Max : 64 • Refer to ‘Real data mapping 1’. See page 27.
External Control Device Setup 17. PIP Position (Command2:q) 21. Color Temperature (Command2:u) G To select sub picture position for PIP. You can also adjust the sub picture position using Win.position on the remote control or in the Twin menu. G To adjust color temperature. You can also adjust ACC in the Video menu.
External Control Device Setup 25. PIP Input Select (Command2:y) 29. Orbiter Time Setting (Command2:r) G To select input source for sub picture in PIP mode. G To adjust orbiter operation time term. Transmission Transmission [k][y][ ][Set ID][ ][Data][Cr] [j][r][ ][Set ID][ ][Data][Cr] Data 0: RGB 2: Video 1: Component 3: S-video Data Min: 1 ~ Max: FE 4: DVI Acknowledgement Acknowledgement [r][ ][Set ID][ ][OK][Data][x] [y][ ][Set ID][ ][OK][Data][x] 26. Abnormal State (Command2:z) 30.
IR Code IR Code How to Connect G Connect your wired remote control to the Remote Control port on the Monitor. Remote Control IR Code G Output waveform Single pulse, modulated with 37.
IR Code Code (Hexa) 00H 01H 02H 03H 08H C4H C5H 09H 10H 11H 12H 13H 14H 15H 16H 17H 18H 19H 0BH D5H C6H 5AH D8H BFH 0EH 44H 43H 52H 4DH 60H 61H 63H 64H 6BH 40H 41H 69H 6AH 7BH 79H 76H 77H AFH 99H 32 Plasma Monitor Function UP (D) DOWN (E) VOL+ (G) VOL- (F) POWER On/Off POWER ON POWER OFF MUTE Number Key 0 Number Key 1 Number Key 2 Number Key 3 Number Key 4 Number Key 5 Number Key 6 Number Key 7 Number Key 8 Number Key 9 AII INPUT SELECT RGB DVI VIDEO S-VIDEO COMPONENT SLEEP OK (Á) MENU DASP APC PIP SUB I
Troubleshooting Checklist Troubleshooting Checklist • Check whether the Monitor is turned on. No picture & No sound • Power cord inserted into wall outlet? • Test the wall power outlet, plug other product’s power cord into the wall outlet where the Monitor’s power cord was plugged in. Picture OK & No sound • Press the VOLUME (G) button. • Sound muted? Press MUTE button. • Check to see if there is any object between the Plasma Display and the remote control causing obstruction.
Maintenance Maintenance - Early malfunctions can be prevented. Careful and regular cleaning can extend the amount of time you will have your new Monitor. Be sure to turn the power off and unplug the power cord before you begin any cleaning. Cleaning the Screen 1. Here’s a great way to keep the dust off your screen for a while. Wet a soft cloth in a mixture of lukewarm water and a little fabric softener or dish washing detergent. Wring the cloth until it’s almost dry, and then use it to wipe the screen. 2.
Specification Product Specifications MODELS MU-50PZ44/44A/44B/44K/44R/44S MU-50PZ44M/44MA/44MB/44MK/44MR/44MS MU-50PZ44V/44VA/44VB/44VK/44VR/44VS MU-50PZ90/90A/90B/90K/90R/90S MU-50PZ90M/90MA/90MB/90MK/90MR/90MS MU-50PZ90V/90VA/90VB/90VK/90VR/90VS Width (inches / mm) 48.2 / 1223 Height (inches / mm) 28.9 / 734 Depth (inches / mm) 4.1 / 105 Weight (pounds / kg) 95.2 / 43.
PLASMA MONITOR OWNER’S MANUAL MODELS : MU-50PZ44/44M/44V MU-50PZ44A/44MA/44VA MU-50PZ44B/44MB/44VB MU-50PZ44K/44MK/44VK MU-50PZ44R/44MR/44VR MU-50PZ44S/44MS/44VS MU-50PZ90/90M/90V MU-50PZ90A/90MA/90VA MU-50PZ90B/90MB/90VB MU-50PZ90K/90MK/90VK MU-50PZ90R/90MR/90VR MU-50PZ90S/90MS/90VS Please read this owner’s manual thoroughly before operating the Monitor. Retain it for future reference. Record model number and serial number of the Monitor.