
Installation Guide


10 INSTALLATION
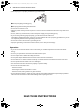
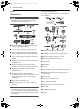
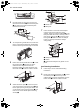
3 Use side cutters or tin snips to cut out and
remove the knockouts b from the back plate
a. Be careful not to distort the back plate.
Discard the knockouts.
4 To avoid pinching the blower wire, make sure
that it is channeled underneath and between
the two exhaust ports when they are rotated.
5 Rotate and reinstall the blower unit a so that
the exhaust ports b face the rear of the
cabinet and are aligned with the rear
knockouts. When you insert the blower unit,
the blower wire
c must be routed as shown.
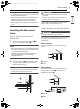
6 Attach the blower plate d to the microwave
oven so the blower unit exhaust ports c and
blower plate opening are aligned. Attach one
or two blower unit mounting screw(s)
f and
then one or several blower plate mounting
screw(s) a.
b Blower unit
e Back plate
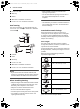
7 Insert the tabs on each side of the damper
into the holes at the inside rear of the
adapter. Attach the exhaust adapter
a to the
back plate wall side. Push in securely until it is
past the top locking tabs
c and in the lower
locking tabs c. Make sure that the damper
hinge is at the top and that the damper
swings freely.
b Damper (hinge side up)
c Guides
e Slide exhaust adapter into guides on rear
panel.
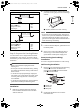
Roof-Venting Installation
1 Follow steps 1 and 2 under Wall-Venting
Installation.
2 Rotate and reinstall the blower unit a so that
the exhaust ports
b face the top of the
cabinet. When you insert the blower unit, the
blower wire c must be routed as shown.
us_main.book.book Page 10 Wednesday, May 4, 2022 1:09 PM