Model number : Serial number : P/NO : 3828VA0484E (RF04FA) PLASMA MONITOR Please read this manual carefully before operating your set. Retain it for future reference. Record model number and serial number of the set. See the label attached on the back of the set and quote this information to your dealer when you require service.
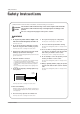
Safety Instructions Safety Instructions * Safety instructions have two kinds of information, and each meaning of it is as below. WARNING The violation of this instruction may cause serious injuries and even death. NOTES The violation of this instruction may cause light injuries or damage of the product. Take care of danger that may happen under specific condition. WARNING W 1. Do not place the product in direct sunlight or near heat sources such as heat registers, stove and so on. 8.
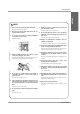
Safety Instructions ENGLISH NOTE 1. Never touch the power plug with a wet hand. This may cause an electric shock. 8. Ensure the power cord doesn’t trail across any hot objects like a heater. This may cause a fire or an electric shock. 2. Disconnect from the mains and remove all connections before moving. 3. Do not place the product in a built-in installation such as a bookcase or rack. 9. Do not plug when the power cord or the plug is damaged or the connecting part of the power outlet is loose.
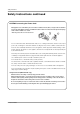
Safety Instructions Safety Instructions continued CAUTION concerning the Power Cord : Most appliances recommend they be connected to a dedicated circuit; that is, a single outlet circuit which powers only that appliance and has no additional outlets or branch circuits. Check the specification page of this owner's manual to be certain. - This may cause a fire or an electric shock. Do not overload wall outlets.
Contents Contents Introduction Controls and Connection Options . . . . . . . . . .7~8 Remote Control Key Functions . . . . . . . . . . . . . .9 Installation Installation . . . . . . . . . . . . . . . . . . . . . . . . . . . . . .10 Installation Instruction . . . . . . . . . . . . . . . . . . . . . .11 External Equipment Connections . . . . . . . . . .12~17 VCR Setup . . . . . . . . . . . . . . . . . . . . . . . . . . . .12 Cable TV Setup . . . . . . . . . . . . . . . . . . . . . . . .
Introduction Introduction What is a Plasma Display Panel (PDP)? If voltage is applied to gas within glass panels, ultraviolet rays are produced and fused with a fluorescent substance. At that instant, light is emitted. A Plasma Display is a next generation flat Display using this phenomenon. 160° - Wide angle range of vision Your flat panel plasma screen offers an exceptionally broad viewing angle -- over 160 degrees. This means that the display is clear and visible to viewers anywhere in the room.
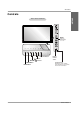
Introduction Controls ENGLISH Front Panel Controls INDEX Switches LED Display on or off. INPUT VOL MENU Sub power Button E, D Buttons VOLUME (F,G) Buttons MENU Button INPUT Button Remote Control Sensor Power Indicator Illuminates red in standby mode, Illuminates green when the monitor is turned on.
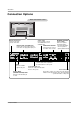
Introduction Connection Options Back Connection Panel S-Video Input Connect S-Video out from an S-VIDEO device to the S-VIDEO input. EXTERNAL SPEAKER (8 ohm output) Connect to optional external speaker(s). EURO SCART SOCKET * For further information, refer to ‘Speaker & Connect the euro scart of Speaker Stand’ manual. the VCR to these sockets. Remote Control Port Connect your wired remote control here.
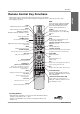
Introduction Remote Control Key Functions MODE Selects the remote operating mode: MNT, VCR, DVD, CABLE, HDSTB or AUDIO. Select other operating modes, for the remote to operate external devices. LIGHT Illuminates the remote control buttons. INPUT Selects: Video1-2-3-4, Component 1-2, RGB-DTV (or RGB-PC), DVI-DTV (or DVI-PC), HDMI input sources. PIP Selects the PIP mode. LIGHT MODE POWER INPUT PIP DW NUMBER buttons Dosen’t work for monitor mode.
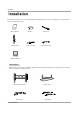
Installation Installation Ensure that the following accessories are included with your plasma display. If an accessory is missing, please contact the dealer where you purchased the product. 1.5V 1.5V Owner’s Manual MODE LIGHT Power Cord POWER PIP INPUT Batteries DW DASP APC MUTE SLEEP VOL CH WIN. POSITION SPLIT ZOOM WIN.
Installation Installation Instructions ENGLISH • Install this monitor only in a location where adequate ventilation is available. GROUNDING Power Supply Ensure that you connect the grounding / earth wire to prevent possible electric shock. If grounding methods are not possible, have a qualified electrician install a separate circuit breaker. Do not try to ground the unit by connecting it to telephone wires, lightening rods, or gas pipes.
Installation External Equipment Connections NOTE: Not all cables shown are included with the plasma display. VCR Setup - To avoid picture noise (interference), leave an adequate distance between the VCR and Monitor. - Use the ISM Method feature to avoid having a fixed image remain on the screen for a long period of time. Typically a frozen still picture from a VCR. If the 4:3 picture format is used; the fixed image may remain visible on the screen. How to connect 1.
Installation External Equipment Connections - After subscribing to a cable monitor service from a local provider and installing a converter, you can watch cable TV programming. The monitor cannot display monitor programming unless a TV tuner device or cable TV converter box is connected to the Monitor. - For further information regarding cable monitor service, contact your local cable TV service provider(s). How to connect 1.
Installation DVD Setup How to connect VIDEO INPUT 2 COMPONENT INPUT 2 PUT VICE) HDMI DVI INPUT AUDIO INPUT COMPONENT INPUT 1 RGB INPUT 1. Connect the DVD video outputs to the COMPONENT (Y, PB, PR) or HDMI INPUT jacks and connect the DVD audio outputs to the AUDIO INPUT jacks on the monitor, as shown in the figure. 2.
Installation External Equipment Connections - This monitor provides Plug and Play capability, meaning that the PC adjusts automatically to its settings. The monitor sends configuration information (EDID) to the PC using the Video Electronics Standard Association (VESA) Display Data Channel (DDC) protocol. - The monitor perceives 640x480, 60Hz as DTV 480p based on the PC graphic card. In this case, change the screen scanning rate for the graphic card. How to connect 1.
Installation Monitor Display Specifications (RGB-PC / DVI-PC Mode) Resolution 720x400 640x480 800x600 832x624 848x480 852x480 1024x768 1152x864 1280x960 1280x1024 16 Plasma Monitor Horizontal Vertical Frequency(KHz) Frequency(Hz) 31.469 70.08 37.927 85.03 31.469 59.94 35.000 66.66 37.861 72.80 37.500 75.00 43.269 85.00 35.156 56.25 37.879 60.31 46.875 75.00 53.674 85.06 49.725 74.55 31.500 60.00 35.000 70.00 37.500 75.00 31.500 60.00 35.000 70.00 37.500 75.
Installation HDMI How to connect When Source Devices(DVD Player or Set Top Box) support HDMI. - If Source Devices have HDMI Output Connector, Source Devices connect to DTV with HDMI Cable .(not supplied with the product). - If Source Devices support Auto HDMI, automatically, Source Devices divert output resolution in 1920 x 1080i. But if not, resolution divert Manually Setting for reference Manual of Source Devices.
Operation Operation Turning on the Monitor Turning on the Monitor just after installation 1. Connect power cord correctly. At this moment, the Monitor is switched to standby mode. 2. Press the INPUT or button on the Monitor or press the POWER, INPUT button on the remote control and then the Monitor will switch on. Menu Language Selection - The menus can be shown on the screen in the selected language. First select your language. 1. Press the MENU button and then use 2.
Operation Picture Menu Options ENGLISH - Readjust Picture menu settings for each following input source as preferred. APC (Auto Picture Control) - APC adjusts the Monitor for the best picture appearance. - When adjusting Picture menu options (contrast, brightness, color, sharpness, and tint) manually, APC automatically changes to Off. 1. Press the APC button repeatedly to select the picture appearance setup option as shown below.
Operation Picture Menu Options continued Fleshtone (Video1-2-3-4, (Video1-2-3-4, Component 1-2, RGB-DTV, RGB-DTV, DVI-DTV and HDMI-DTV Mode only) - Use Fleshtone to select the desired skin color option. PICTURE 1. Press the MENU button and then use D /E button to select the PICTURE menu. 2. Press the G button and then use D /E button to select Fleshtone. 3. Press the G button and then use F / G button to make appropriate adjustments. • The adjustment range is 0 ~ 3.
Operation Sound Menu Options ENGLISH DASP (Digital Auto Sound Processing) - DASP lets you enjoy the best sound without any special adjustment because the Monitor has the appropriate sound options based on the program content. - When adjusting sound options (treble, bass) manually, DASP automatically changes to Off. 1. Press the DASP button repeatedly to select the appropriate sound setup as shown below. SRS TSXT Flat Music Movie Off Sports • You can also adjust DASP in the SOUND menu.
Operation T imer Menu Options Clock Setup - If current time setting is wrong, correct the clock setting. 1. Press the MENU button and then use D /E button to select the TIMER menu. 2. Press the G button and then use D /E button to select Clock. 3. Press the G button and then use D /E button to set the hour. 4. Press the G button and then use D /E button to set the minutes. PICTURE SOUND Clock Off timer On timer Auto off G -- : -- AM TIMER SPECIAL 5.
Operation Special Menu Options ENGLISH Key Lock - The monitor can be set up so that it can only be used with the remote control. - This feature can be used to prevent unauthorized viewing by disabling the front panel controls. - This Monitor is programmed to remember which option it was last set to even if you turn the monitor off. 1. Press the MENU button and then use D 2. Press the G button and then use D /E button to select the SPECIAL menu. /E PICTURE button to select Key lock. SOUND 3.
Operation Special Menu Options continued XD Demo - Use it to see the difference between XD Demo on and XD Demo off. 1. Press the MENU button and then use D /E 2. Press the G button and then use 3. Press the G button to begin XD Demo. D button to select the SPECIAL menu. / E button to select Demo. PICTURE SOUND TIMER SPECIAL 4. Press the EXIT button to stop XD Demo. Language Key lock ISM Method Low power Set ID Demo Index G To start G On Off SCREEN PIP/DW Menu Prev.
Operation Screen Menu Options - RGB (PC) mode only; This function doesn’t work for RGB-DTV. Automatically adjusts picture position and minimizes image shaking. After adjustment, if the image is still not correct, your Monitor is functioning properly but needs further adjustment. The Auto config., Position and Manual config. are not active in DVI mode. 1. Press the MENU button and then use 2. Press the G button and then use D /E D /E button to select the SCREEN menu. button to select Auto config..
Operation Split Zoom - Enlarges the picture in correct proportions. Split Zoom can be used for all input sources. In 2-Split Zoom mode, you can only move the image up or down. If a screen is enlarged, a screen can move without selecting section of screen Split Zoom. 1. Press the SPLIT ZOOM button repeatedly to select either 2, 4 , or 9 Split Zoom. 9-Split zoom 4-Split zoom 2-Split zoom 1 ▲ ▼ 1 2 ▲ ▼ 1 4 4 ◀▶ 4 5 ◀▶ 7 2 5 8 3 6 9 ▲ ▼ ◀▶ 2.
Operation Screen Menu Options continued ENGLISH Initializing (Reset to original factory value) - This function operates in every mode. - To initialize the adjusted value. 1. Press the MENU button and then use menu. D /E 2. Press the G button and then use button to select Reset. D /E button to select the SCREEN PICTURE SOUND 3. Press the G button. TIMER Auto config. ARC Position Manual config. Reset VGA Mode G To start SPECIAL • You can initialize Manual config.
Operation Screen Menu Options continued Screen Adjustments (Video1-2 (Video1-2 and Component 480i mode only) - Use this function to correct jittering or picture instability while viewing a video tape. 1. Press the MENU button and then use D /E button to select the SCREEN menu. PICTURE 2. Press the G button and then use D /E button to select Screen adj.. 3. Press the G button and then use D /E button to select TV or VCR. TIMER • Select the VCR option if watching a VCR.
Operation PIP (Picture-In-Picture) Feature PIP Size Watching PIP Press the PIP button repeatedly to turn PIP on or off. Press the WIN.SIZE button and then use change the sub picture size. F / G button to Component Video 10 : 30 Win.size F PIP Transparency (PIP Mode only) Moving the PIP - To make the PIP clear or opaque. 1. Press the MENU button and then use select the PIP/DW menu. D /E 2. Press the G button and then use D Transparency . button to select PIP /E 3.
Operation DW Setup Option - As the name suggests, this mode splits the screen into 2, allowing 2 picture sources to be shown on the monitor screen at the same time. Each source is given half the screen. - This function doesn’t work for RGB-DTV(1080p). Watching DW Press the DW button repeatedly to select one of the DW options. DW 1 DW 2 Sub Picture Size Adjustment Press the WIN.SIZE button. • Use the F / G button to change the sub picture size. • Using the WIN.
External Control Device Setup External Control Device Setup ENGLISH - Connect the RS-232C input jack to an external control device (such as a computer or an A/V control system) and control the Monitor’s functions externally. - Connect the serial port of the control device to the RS-232C jack on the Monitor back panel. - RS-232C connection cables are not supplied with the Monitor.
External Control Device Setup Set ID - Use this function to specify a monitor ID number. - Refer to ‘Real Data Mapping 1’. See page 34. 1. Press the MENU button and then use the menu. 2. Press the G button and then use D /E 3. Press the G button and then use desired monitor ID number. F /G D /E button to select the SPECIAL PICTURE SOUND button to select Set ID.
External Control Device Setup 04. Screen Mute (Command 2:d) G To control Power On/Off of the Monitor. G To select screen mute on/off. Transmission Transmission [k][a][ ][Set ID][ ][Data][Cr] Data 0 : Power Off ENGLISH 01. Power (Command 2:a) [k][d][ ][Set ID][ ][Data][Cr] 1 : Power On Acknowledgement Data 0 : Screen mute off (Picture on) 1 : Screen mute on (Picture off) [a][ ][Set ID][ ][OK][Data][x] Acknowledgement [d][ ][Set ID][ ][OK][Data][x] G To show Power On/Off.
External Control Device Setup 07. Contrast (Command 2:g) 10. Tint (Command2:j) G To adjust screen contrast. You can also adjust contrast in the picture menu. G To adjust the screen tint. You can also adjust tint in the Picture menu. Transmission Transmission [k][g][ ][Set ID][ ][Data][Cr] [k][j][ ][Set ID][ ][Data][Cr] Data Min : 0 ~ Max : 64 • Refer to ‘Real data mapping1’ as shown below. Data Red : 0 ~ Green : 64 • Refer to ‘Real data mapping 1’.
External Control Device Setup 17. Treble (Command2:r) G To control the PIP (Picture-in-Picture) or DW. You can also control the PIP/DW using the PIP or DW button on the remote control or in the PIP/DW menu. G To adjust treble. You can also adjust treble in the Sound menu. Transmission Transmission [k][r][ ][Set ID][ ][Data][Cr] [k][n][ ][Set ID][ ][Data][Cr] 2: DW1 3: DW2 Data Min: 0 ~ Max: 64 • Refer to ‘Real data mapping 1’. See page 34.
External Control Device Setup 21. PIP Input Select (Command2:y) 24. Low Power (Command2:q) G To select input source for sub picture in PIP mode.
IR Code IR Code ENGLISH How to Connect G Connect your wired remote control to the Remote Control port on the Monitor. Remote Control IR Code G Output waveform Single pulse, modulated with 37.
IR Code Code (Hexa) 10 11 12 13 14 15 16 17 18 19 0E 09 08 02 03 00 01 4D 52 44 0B 43 79 7B 62 64 07 06 40 41 5B 60 92 61 6B CD CE 3E 75 99 5A D0 BF D4 D5 C6 38 Plasma Monitor Function Number Key 0 Number Key 1 Number Key 2 Number Key 3 Number Key 4 Number Key 5 Number Key 6 Number Key 7 Number Key 8 Number Key 9 SLEEP MUTE POWER VOL+ VOLCH+ CHAPC DASP ENTER (Á) AII INPUT SELECT MENU ARC Split Zoom Window Position Window Size F G D E EXIT PIP XD PIP Input DW Video HDMI Key lock Index Auto config.
Programming the Remote Programming the Remote Programming a code into a remote mode 1. Test your remote control. To find out whether your remote control can operate the component without programming, turn on the component such as a VCR and press the corresponding MODE button (VCR) on the remote control, while pointing at the component. 2. Turn on the component to be programmed, then press the corresponding MODE button on the remote control. 3.
Programming the Remote Programming Codes VCRs Brand Codes Brand Codes Brand Codes Brand Codes AIWA AKAI 034 016 125 072 031 012 035 028 108 003 031 005 065 112 108 012 034 059 006 029 036 129 003 034 031 107 132 012 004 043 031 031 012 040 043 012 048 130 KENWOOD 014 047 001 101 034 003 017 040 031 067 012 069 101 027 031 003 033 101 045 013 013 049 151 034 024 012 048 043 053 066 133 013 063 031 031 067 101 013 PORTLAND PULSAR QUARTZ QUASAR RCA 108 072 011 033 013 040 107 145 003 031 053 058
Programming the Remote ENGLISH HDSTB Brand Codes Brand ALPHASTAR DSR AMPLICA BIRDVIEW BSR CAPETRONICS CHANNEL MASTER 123 050 051 053 053 013 036 008 054 050 005 011 141 024 038 093 097 122 089 EUROPLUS FUJITSU CHAPARRAL CITOH CURTIS MATHES DRAKE DX ANTENNA ECHOSTAR ELECTRO HOME 126 129 014 015 018 055 009 012 077 145 006 007 010 052 112 116 046 040 094 098 056 057 095 099 076 058 096 100 Codes 114 017 133 GENERAL INSTRUMENT 003 031 HITACHI 139 HOUSTON TRACKER 033 057 HUGHES 068 HYTEK 053 JAN
Troubleshooting Checklist Troubleshooting Checklist • Check whether the Monitor is turned on. No picture & No sound • Power cord inserted into wall outlet? • Test the wall power outlet, plug other product’s power cord into the wall outlet where the Monitor’s power cord was plugged in. Picture OK & No sound • Press the VOLUME (+) button. • Sound muted? Press MUTE button. • Check to see if there is any object between the Plasma Display and the remote control causing obstruction.
Specifications Product Specifications MW-71PY10/71PY10G Width (inches / mm) 68.9 / 1750 Height (inches / mm) 38.7 / 982 Depth (inches / mm) 3.9 / 98 Weight (pounds / kg) 190.6 / 86.5 Power requirement AC110-240V ~ 50/60Hz Resolution 1920 x 1080 (Dot) Viewing Size (mm) 1512.26 Operating Temperature Range 41 ~ 104°F (5 ~ 40°C) Operating Humidity Range Less than 80% ENGLISH MODELS • The specifications shown above may change without notice for quality improvement.
Notes 44 Plasma Monitor
Notes ENGLISH Owner’s Manual 45
Model number : Serial number : P/NO : 3828VA0484E (RF04FA) PLASMA MONITOR Please read this manual carefully before operating your set. Retain it for future reference. Record model number and serial number of the set. See the label attached on the back of the set and quote this information to your dealer when you require service.