us_main.book.book Page 1 Friday, September 3, 2021 3:24 PM INSTALLATION MANUAL SPEED OVEN Read this installation manual thoroughly before installing the appliance and keep it handy for reference at all times. ENGLISH MFL71846701 Rev.00_090321 www.lg.com Copyright © 2021 LG Electronics Inc. All Rights Reserved.
us_main.book.
us_main.book.book Page 3 Friday, September 3, 2021 3:24 PM IMPORTANT SAFETY INSTRUCTIONS 3 IMPORTANT SAFETY INSTRUCTIONS Safety Messages Your safety and the safety of others are very important. We have provided many important safety messages in this manual and on your appliance. Always read and follow all safety messages. This is the safety alert symbol. This symbol alerts you to potential hazards that can kill or injure you and others.
us_main.book.book Page 4 Friday, September 3, 2021 3:24 PM 4 IMPORTANT SAFETY INSTRUCTIONS • Place the plug into a properly installed and grounded outlet a Three-pronged (grounding) plug b Properly polarized and grounded outlet • Do not use an extension cord. • Keep the power cord dry and do not pinch or crush it. Failure to follow this instruction may cause a fire hazard. • Do not, under any circumstances, remove the power supply cord grounding prong.
us_main.book.book Page 5 Friday, September 3, 2021 3:24 PM INSTALLATION 5 INSTALLATION Before You Start Be sure to read the following safety instructions Read the entire manual before you begin. The model name, serial number, and cooking guide a are located on the oven front. and front trim until the marks or opening are covered. • If the cabinet does not have a front frame and the sides are less than 3/4” (1.9 cm) thick, shim both sides equally to establish the cutout width.
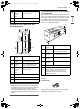
us_main.book.book Page 6 Friday, September 3, 2021 3:24 PM 6 INSTALLATION Single Speed Oven Installation: Order a 30” wide single oven cabinet or cut the opening in a wall to the dimensions shown. b Cutout Width 28 1/2” Min (723.9 mm) 28 5/8” Max (727.0 mm) c Cutout Height 19 11/16” Min (500.1 mm) 19 3/4” Max (501.7 mm) d Cutout location from floor 36 3/4” Min (933.
us_main.book.book Page 7 Friday, September 3, 2021 3:24 PM INSTALLATION d 45 1/4” Min (1149.4 mm) Recommended e 2” Min (3” Recommended) f Per oven requirement Installation under a 30″ or 36″ Cooktop or Countertop: Gas or electric cooktops may be installed over this oven. See cooktop installation instructions for the cutout size. This oven requires a separate, properly grounded 16-Amp, 120-Volt, 60Hz power supply. The cooktop requires a separate power supply. Use a 36″ or wider base cabinet.
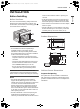
us_main.book.book Page 8 Friday, September 3, 2021 3:24 PM 8 INSTALLATION Tools and Materials • Remove the oven from the carton. Do not lift unit by handle or conduit. Two people are required to lift this oven. You will need the following tools and materials for the installation: • Open the door and remove any packaging in the oven. 2 a Phillips Screwdriver b Drill Installing the Oven Slide the oven into the cutout. CAUTION • Two people are required to lift the oven into the opening.
us_main.book.book Page 9 Friday, September 3, 2021 3:24 PM INSTALLATION 9 ENGLISH 4 Finalize installation. • Turn power on at the source. The interior light should come on when the door is opened. • Refer to the Owner’s Manual for operating instructions.
us_main.book.book Page 10 Friday, September 3, 2021 3:24 PM 10 APPENDIX APPENDIX Checking Operation Before Using the Oven 1 Plug in the power supply cord. 2 Read your Owner’s Manual, then check the operation of your oven.
us_main.book.
us_main.book.